Shop-Express belongs to the category of website builders where most things work “out of the box.” A store can be created quickly, it doesn’t take weeks to design, and maintenance is as simple as possible. That is why the platform is often chosen to test a new niche, a specific product, or even a different market.
For example, you decide to check if engraved thermal mugs will sell. You can launch a store in an evening, add a dozen items, and the very next day you are driving traffic. This can be Google Shopping (Google product ads) or other Google formats, targeted Meta Ads on Facebook and Instagram, or TikTok Ads. In its operating logic, Shop-Express is similar to Shopify: everything is designed so that you can launch ads and get your first orders as quickly as possible.
Steps to Launch Google Shopping and Performance Max
The entire process comes down to three steps. Each one is important, and you shouldn’t skip any.
- Creating a Merchant Center account. This is a separate Google service through which the system reviews the store and checks if the products and website comply with its policies.
- Setting up goals in Google Analytics 4. It sounds scary, but in practice, it is one of the easiest steps. It is necessary for Performance Max: this is an AI-based campaign, and without goals, it simply won’t know what to aim for.
- Launching the campaigns themselves. Here you create a Performance Max or classic Google Shopping campaign. I will break down both options separately, and you can choose the one that better suits your business.
If you plan to launch Performance Max, do not skip setting up goals. A campaign without conversion data essentially works blindly, and the budget is wasted on traffic that doesn’t buy anything.
Creating and Setting Up Merchant Center
We start with Merchant Center. Let me remind you: information about the products and partially about the store itself is uploaded here. This is exactly where Google starts verifying your website.
Only one Merchant Center account can be linked to one domain. This is how Google understands who exactly is advertising the products or showing them in free product listings. If a contractor has ever created an account for your domain before, first find out where it is and who has access to it.
This is the longest stage. And not because it’s difficult. It’s just that the review by Google can take up to 72 hours, so factor these days into your launch plan.
The process itself consists of several steps:
- registering the Merchant Center;
- filling in the mandatory store information;
- verifying website ownership;
- uploading the product feed.
Next, we will go through each step so that you don’t get confused anywhere.
Registering the Merchant Center
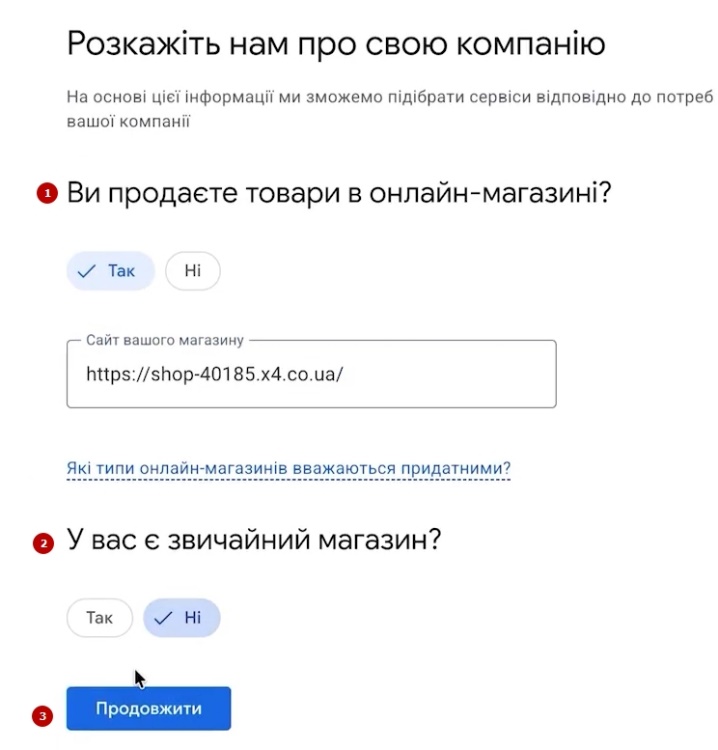
Go to business.google.com and click “Get started”. The initial settings are very simple. Google asks if you sell products online—we answer “Yes” and paste the website address. The next question is about a physical (brick-and-mortar) store. If you don’t have an offline location, select “No” and click “Continue”.
Specifics of Selling Abroad
A separate note for those using Shop-Express to enter other markets. Choosing a currency, like dollars, is not a problem. The difficulty lies elsewhere.
It is highly recommended that the country you are selling to via Merchant Center matches the geolocation of the device and IP address from which you are creating the account. Google is very sensitive to such discrepancies and may consider them a sign of suspicious activity.
So, if you are in Kyiv setting up a store for the US, keep this risk in mind in advance.
Entering Business Information
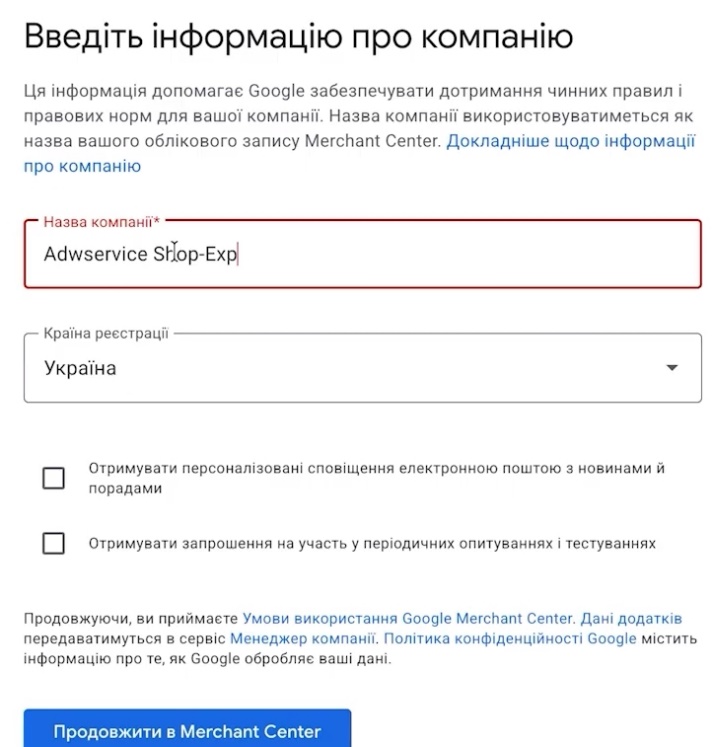
Now we enter the store name. Ideally, it should match the domain. For this example, I named it “Adwservice Shop-Exp”. The logo and other optional fields can be skipped at this stage. The country of registration is Ukraine.
Next, we specify the address. It is best if it exactly matches the one on the website: in the footer or in the “Contacts” section. Google checks whether the address is real and if it corresponds to the store’s data, so no improvising here.
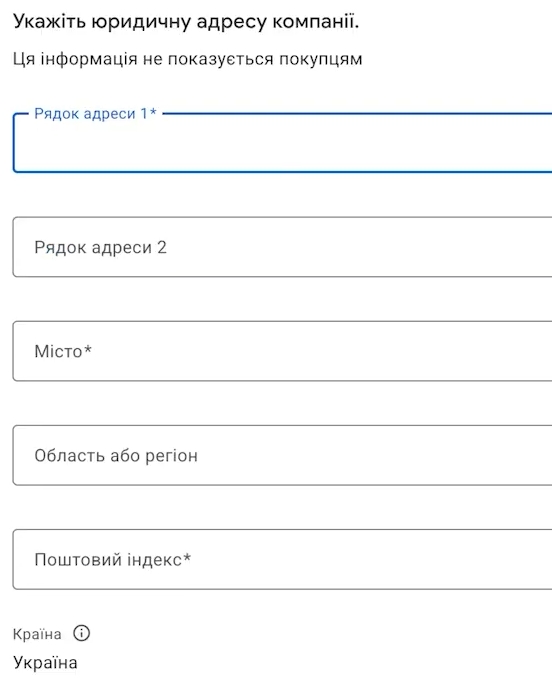
A minor detail people often stumble on: Kyiv is selected as a separate region in the form, not as a part of the Kyiv region. The zip code is, for example, 02070. Once filled out—click “Continue”.
Verifying Website Ownership
The next step is email and other verification methods. Do not be surprised if the system immediately redirects you to a page with code: that’s how it’s supposed to be. Google wants to make sure that the website belongs to you, and not to a dozen other sellers.
By the way, the Merchant Center interface may look slightly different for different users. Google constantly tests new design layouts, so if the buttons are not located exactly as they are in the screenshots, it’s nothing to worry about.
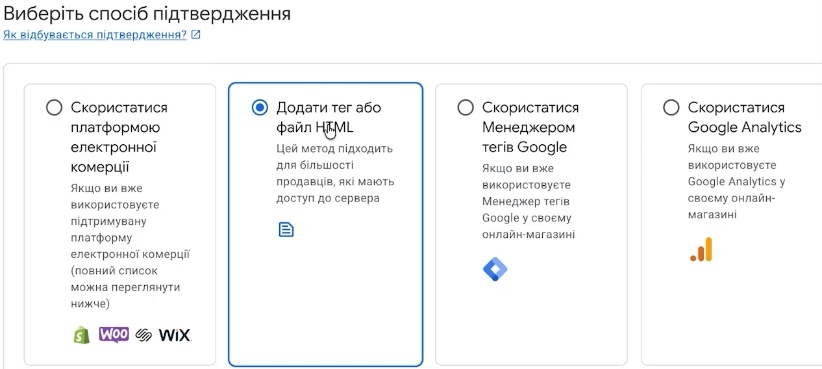
There are several verification methods:
- integration with hosted platforms (WooCommerce, Wix, Shopify)—doesn’t apply to Shop-Express;
- HTML tag or HTML file;
- Google Tag Manager;
- Google Analytics.
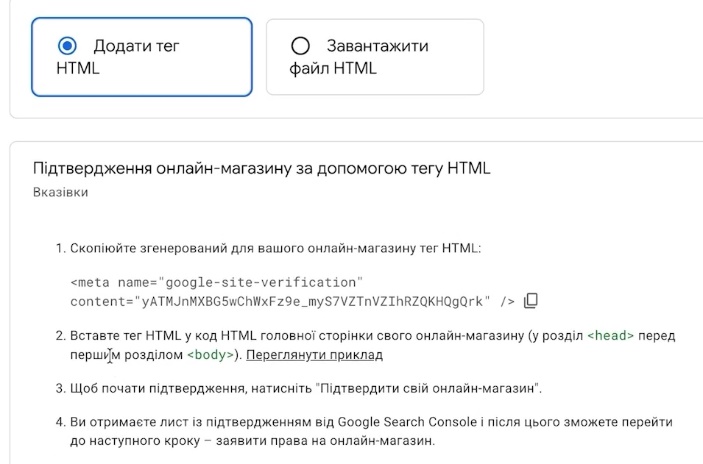
For Shop-Express, the most convenient option is “Add an HTML tag or file”. On the platform itself, this is done by inserting a script:
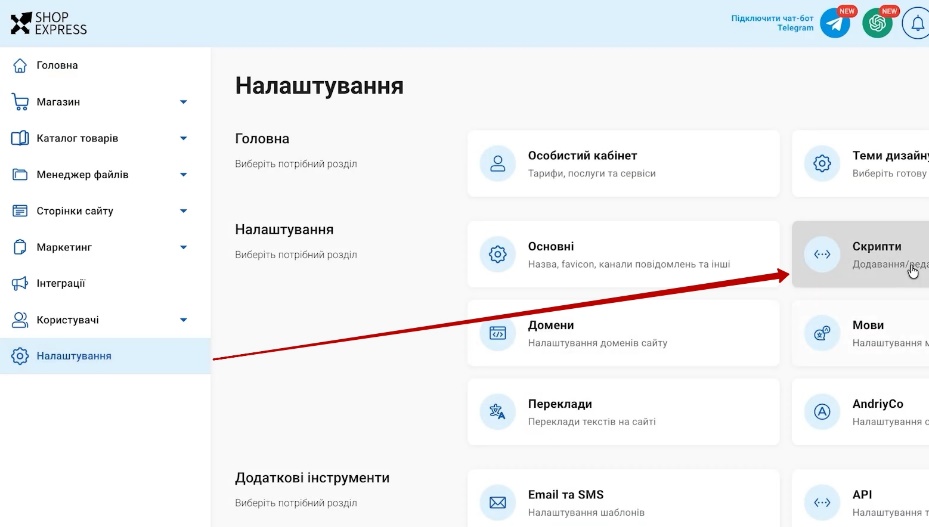
- Copy the tag code from Merchant Center.
- In the Shop-Express admin panel, go to “Settings” → “Scripts” → “Create”.
- Give the script a clear name, for example, “Merchant Center”, and paste the code.
- Choose the placement as required by Google: in the <head> section of the homepage, before the first <body> tag. In Shop-Express, this is the “Head — first line” option.
- Set the status to “Published” and save.
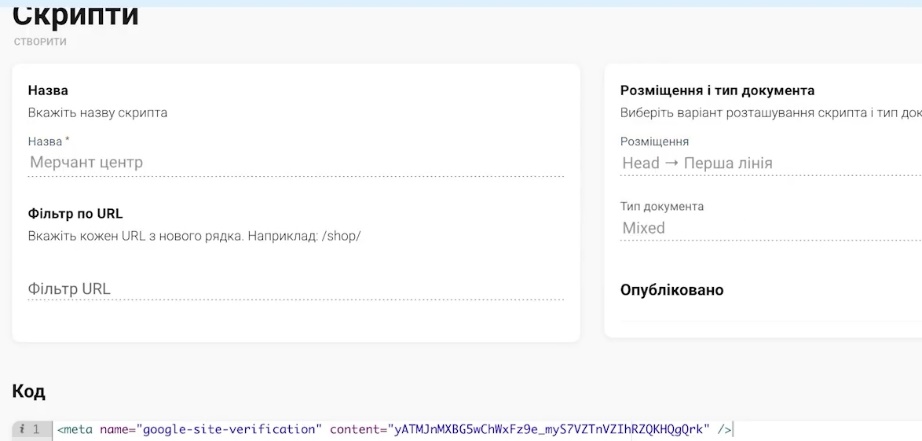
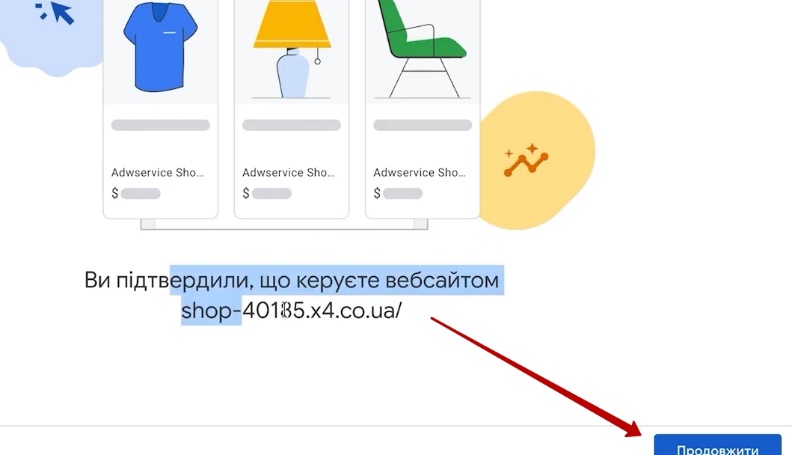
Return to Merchant Center, select this method, and click “Verify”. If everything is done correctly, a message will appear stating that the website ownership is verified. Click “Continue”, select the country of sale again (in our case, only Ukraine)—and this stage is behind us.
Ways to Add Products in Merchant Center
After verifying the website, Google offers to go through a few more steps. You can do everything at once, or postpone some of it using the “Not right now” button. I advise doing it all in one go: the interface is quite logical, and this way nothing gets lost. Although you can add the shipping or return policy later anyway, they are moderated separately over the same 72 hours.
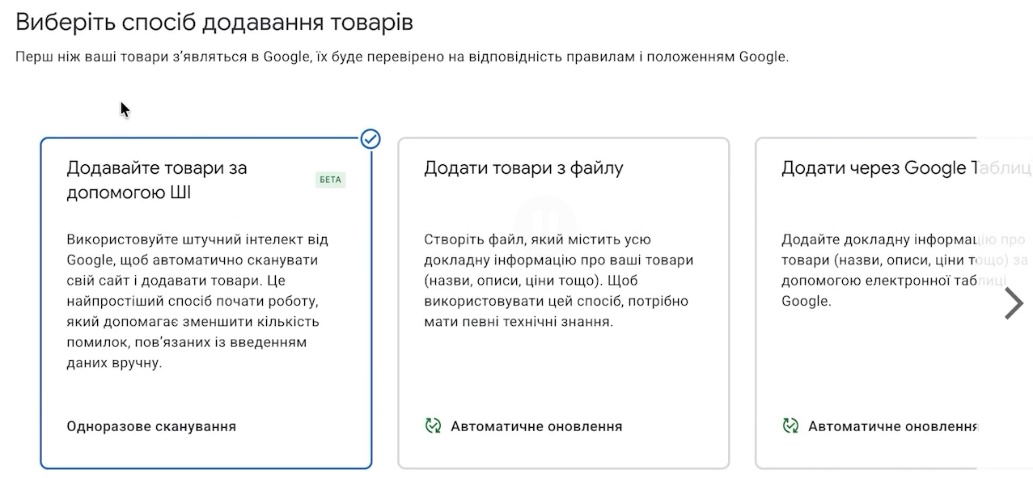
Now the most interesting part: exactly how to transfer products from Shop-Express to Merchant Center. There are five options:
- using AI. Google will scan the site itself and pull products from structured data (usually schema.org markup);
- from a file;
- via Google Sheets;
- manually, one product at a time;
- via API. Shop-Express doesn’t have this feature, so we immediately discard this option.
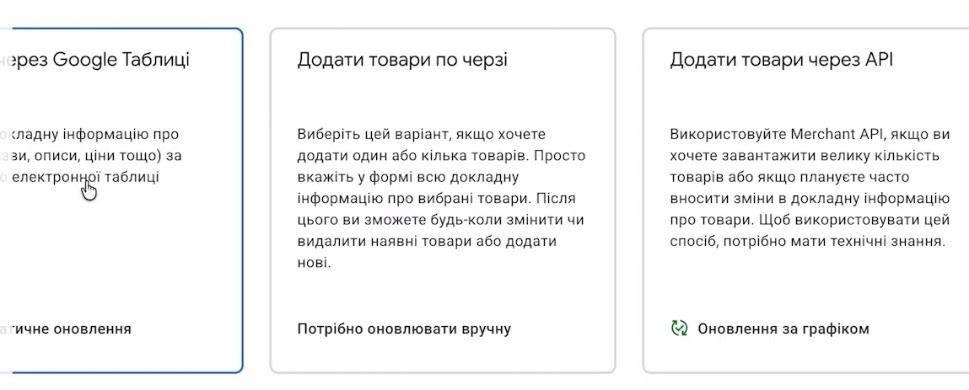
The AI option looks convenient, but I would leave it as a last resort. The result depends entirely on whether the products are open for indexing and whether Google has had time to crawl them. If the store was launched yesterday, a part of the inventory simply won’t make it into the selection. You can experiment, but you shouldn’t rely on this method.
Adding Products from a File
We will go the file route. And here there’s also a fork in the road: upload a file from your computer or add a link to it. I don’t recommend the first option. A link, however, is exactly what we need, because Shop-Express generates a feed that updates automatically.
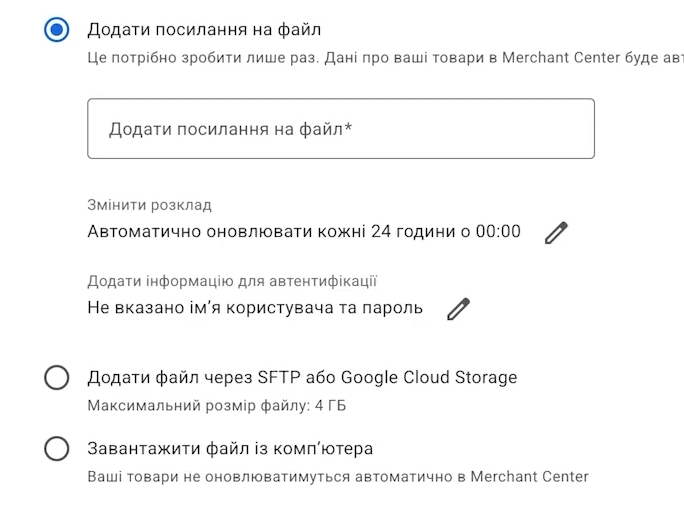
How does this work in practice? Let’s say you raised the price of a coffee grinder from 2,400 to 2,650 UAH, and removed two items from sale. You don’t need to manually change anything in Merchant Center; the data will update itself. In general, it’s better to automate all routine operations so you don’t have to keep track of them in your head.
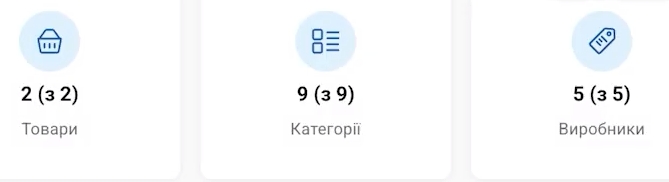
So, we return to the Shop-Express admin panel, go to “Integrations” → “Google Shopping”, and click “Connect”. The system will immediately show how many products, categories, and manufacturers you have, that is, everything you added in the previous stages.

Next, we set up the feed link generation. There are several useful parameters here:
- “Availability”. Decide whether to export only in-stock products or the entire catalog.

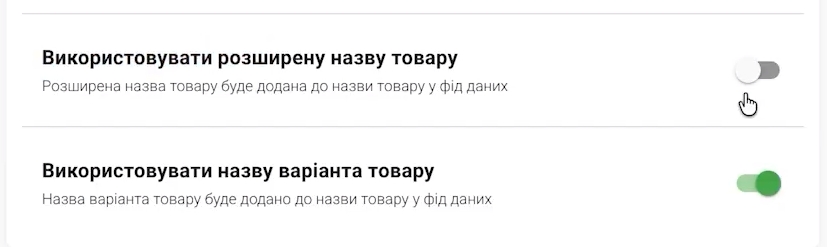
- “Use extended name”. In the Shop-Express catalog, you can set a short basic name or an extended one. If your extended titles are well-written (with brand, model, color), it makes sense to enable this option. I left it as is.

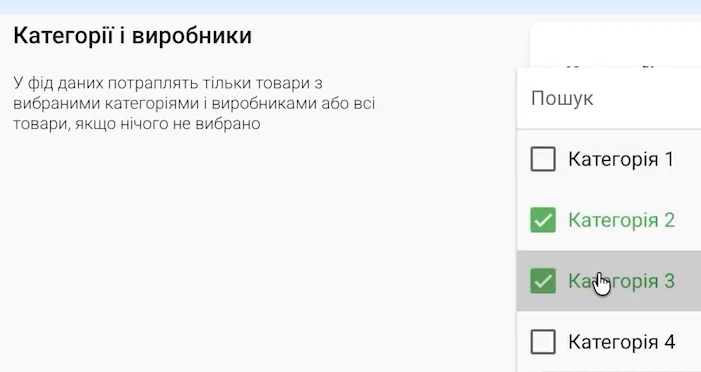
- “Categories and manufacturers”. Useful if, say, you have 1,000 products, but you only want to advertise a few categories or specific brands.

- “Category”. There is a checkbox for “Adult content”—this includes alcohol, intimate goods, etc. If you sell something similar, make sure to check this.

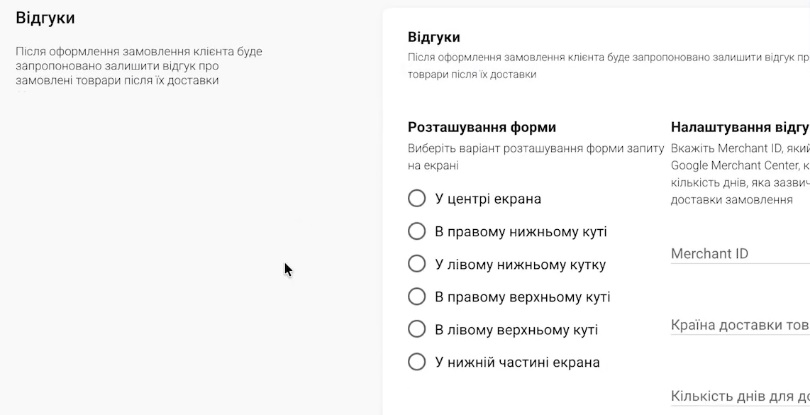
- “Reviews”. Can be set up later.

- “Description”, “Characteristics”, “Labels”. Labels are a separate attribute for Merchant Center, which makes it easy to segment products in campaigns later. But this is a topic for a separate discussion, so I’ll skip it for now.

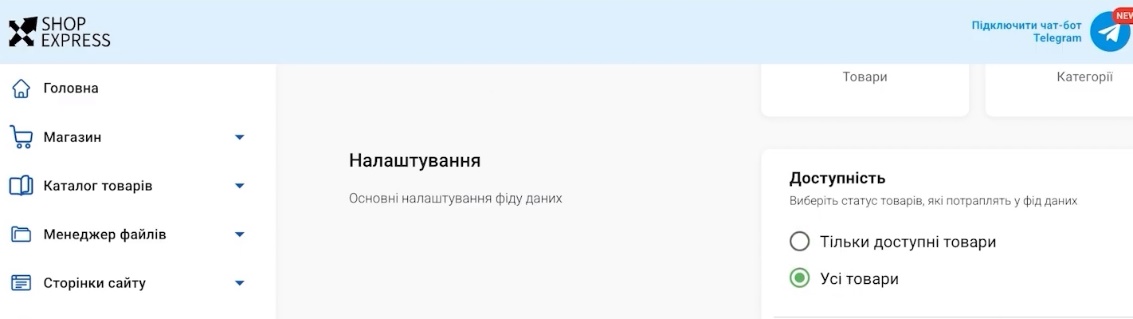
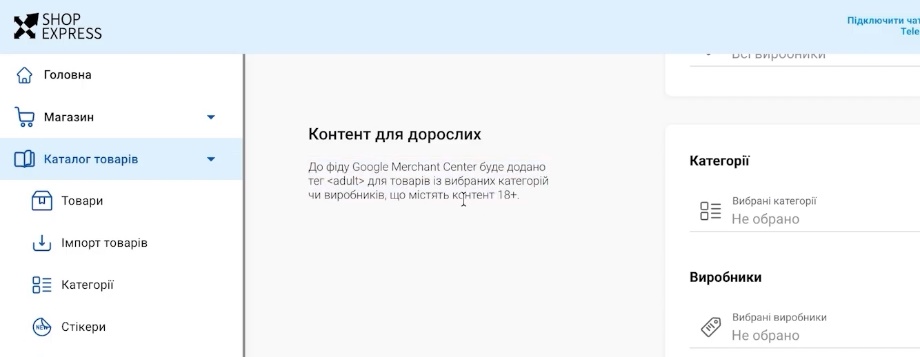
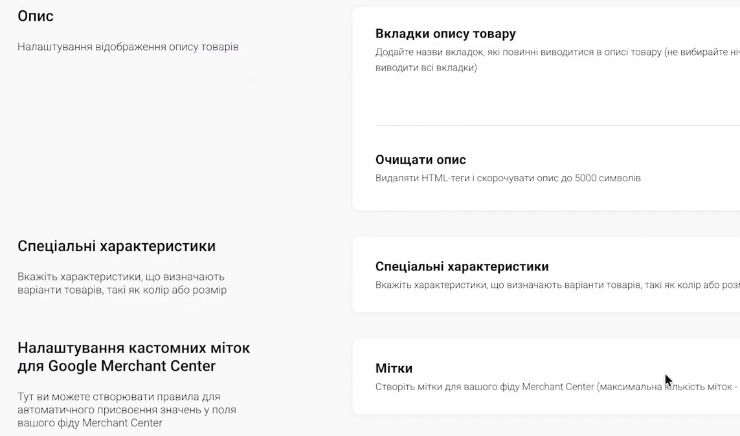
Alcohol and adult products have significant impression restrictions, and some of these items cannot be uploaded to Merchant Center at all. Consider this before allocating your advertising budget.
We click “Save”—and we get the ready-to-use feed link. My website has one language, Ukrainian, so there is only one link.
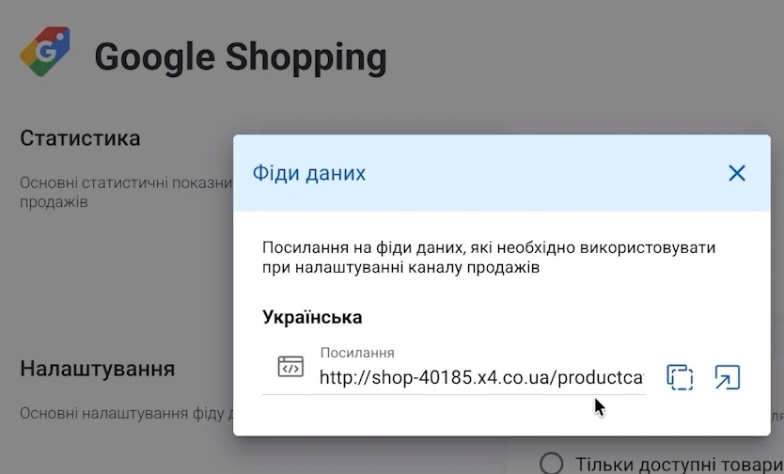
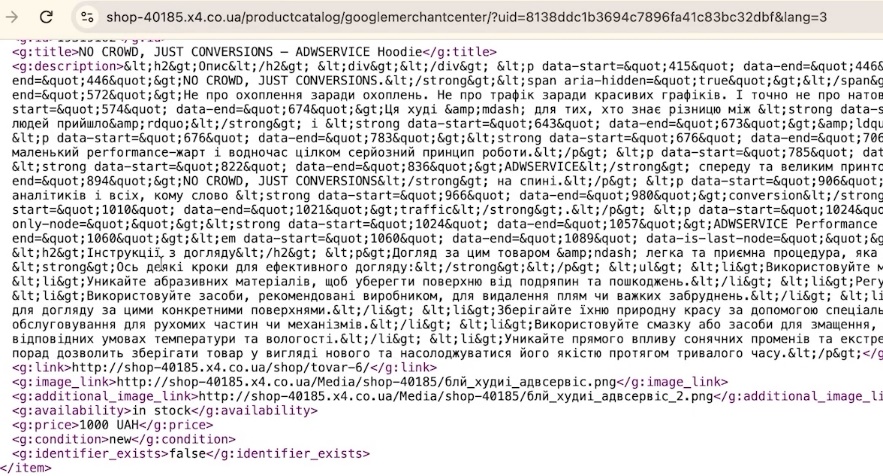
Be sure to open this link in your browser before adding it to Merchant Center. You should see a “wall” of code containing your products. This way, you can ensure that the feed was generated, works, and generally looks correct. Server glitches happen more often than we’d like, so this one-minute check can save you days.
Copy the link, return to Merchant Center, and paste it. The update frequency can be left at the standard setting. We choose Ukraine as the country; this is important. The feed language is Ukrainian (if the site has multiple languages, check which one you are exporting). After this, we specify the “Marketing methods”.
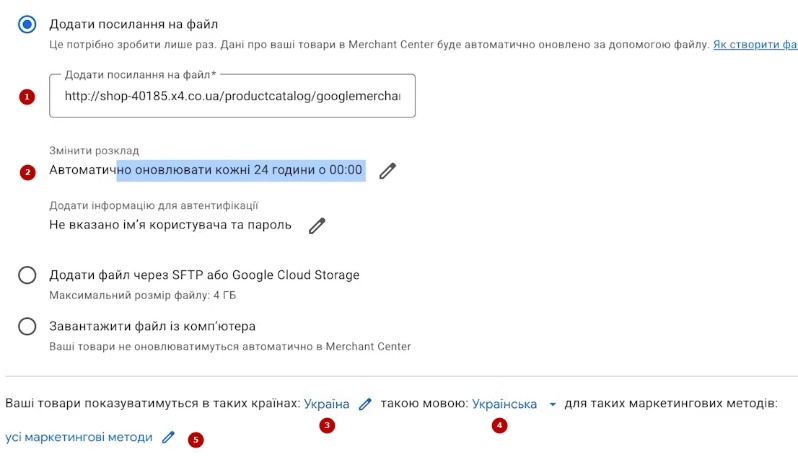
For now, products will only show up in free listings. To launch paid Google Shopping ads, we will enable another program in the settings a bit later. Click “Continue”. Honestly, it takes longer to explain than to actually do it: a few clicks and it’s done.
Entering Shipping Information
Without shipping setup, no Merchant Center account will pass review. This is a mandatory step, and you cannot skip it.
There is no automatic shipping integration with Shop-Express, so we fill everything out manually, making sure it matches what is written on the website. One caveat: you must specify the cheapest option for door-to-door delivery. Not courier delivery in a broad sense, but specifically to a physical address. Delivery to a branch or parcel locker is unfortunately not available for Ukraine in this format.
What needs to be filled out:
- order cutoff time. If you work 24/7, state it as such. If until 6:00 PM or 7:00 PM—set your time;

- time zone. For Ukraine, it is Kyiv;

- handling time in days;

- operating days (Monday–Friday, no days off—whatever applies to you);
- transit time.
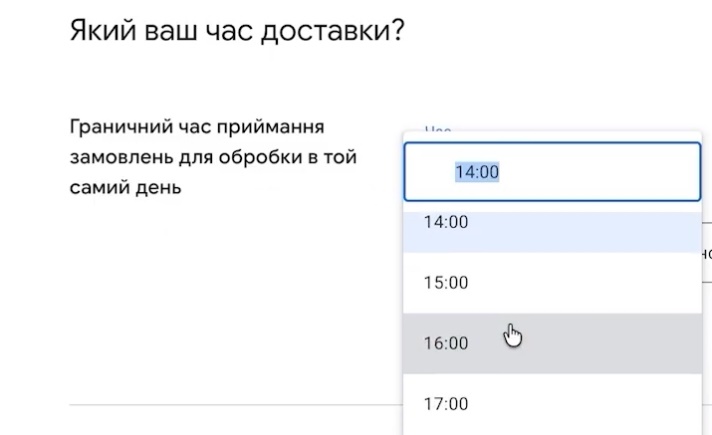
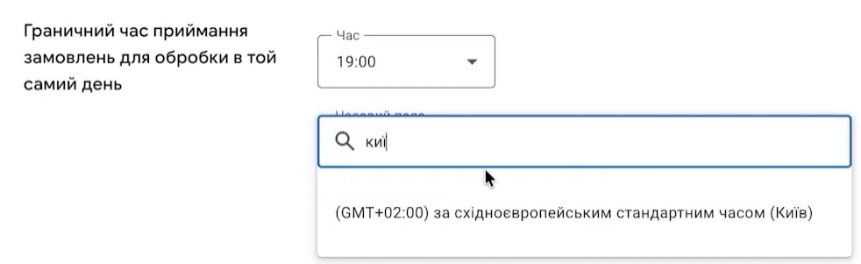

People often get confused with handling time, so I will explain it separately. A zero in Google means the first 24 hours. If you process orders around the clock, specify 0–0. I accept orders until 7:00 PM, and anything that comes in later is processed the next day. Therefore, I set 0–1, meaning from 24 to 48 hours.

Transit time is how long the package travels to the customer via Nova Poshta, Ukrposhta, or your courier. If you deliver on the day of the order, put zero. If it’s usually 1–3 days, write just that. The main thing is that these numbers match what is stated on your “Shipping” page in the section about door-to-door delivery. A single, cheapest option is more than enough.


The currency must match the feed currency. My prices are in hryvnias (in the feed it looks like `price 1000 UAH`), so I don’t change anything here.

Next are the “Order value conditions”. There are quite a few options:
- Free shipping over a certain amount.
- No delivery for orders below a certain amount.
- Fixed rate.
- Cost depending on the product price.
- Cost depending on weight—but then each product card must have a “weight” attribute, and Shop-Express doesn’t have it.
- Cost depending on the number of items or an advanced pricing table.
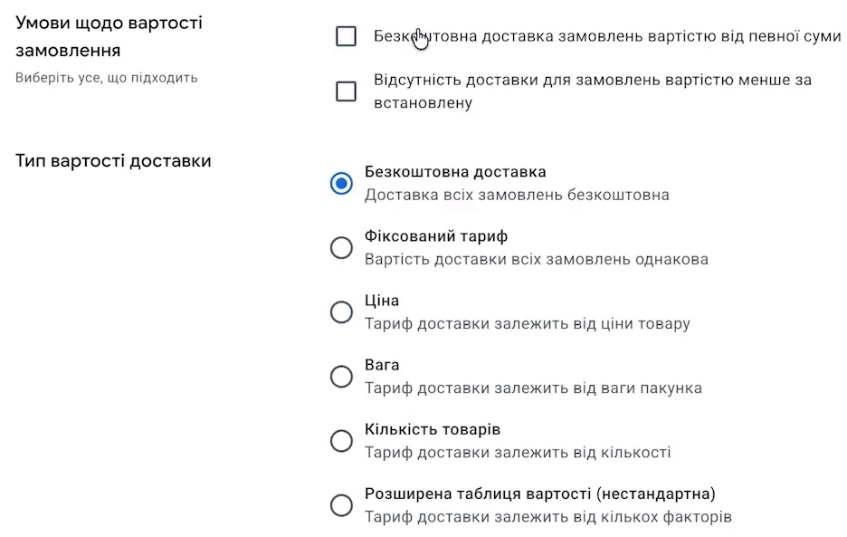
For Ukraine, the simplest is a fixed rate: 70, 90, or 100 UAH, approximately what the carrier charges. This is enough for the review process. The ideal option, of course, is free shipping, but not every business can afford that.
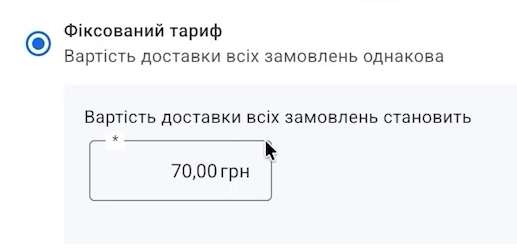
Why does Google even need this information? It’s simple: according to advertising policies, the buyer must see all costs even before ordering. You yourself probably don’t like surprises at the checkout stage. Imagine selling water heaters or air conditioners. Shipping a bulky item across the country can cost a lot of money, and some people, upon seeing the price, simply won’t order. Yes, in some regions, the conversion rate will drop slightly. But you won’t get cancellations over the phone or returned packages when the customer suddenly discovers the real cost. A person sees the delivery price right in the ad and makes an informed decision. Therefore, my advice: either free shipping or a fixed rate. Click “Continue”.
Return Policy Settings
The next step is the return policy. It is reviewed separately from the rest of Merchant Center, so pay close attention when filling it out. Ideally, provide a link to your “Returns and Exchanges” page. My demo site doesn’t have such a page, so I’ll show you the underlying logic.
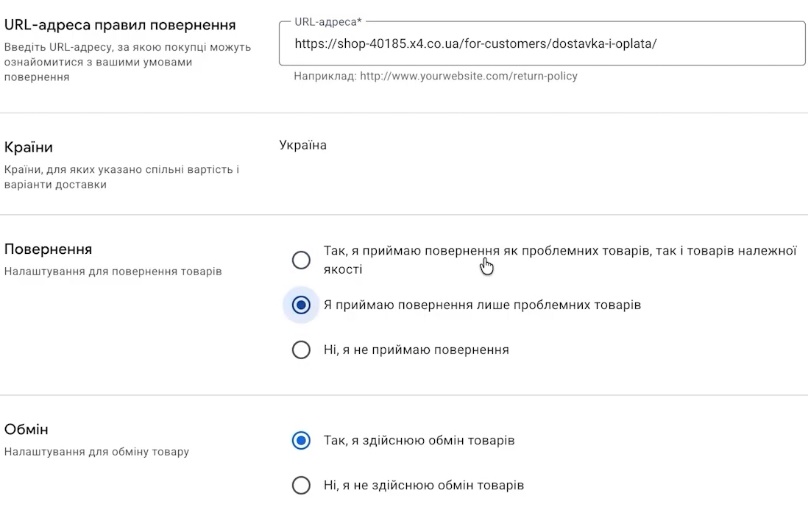
Everything you enter must match the text on the website. First, you choose which products you accept back: only defective ones, any products of acceptable quality, or none. For example, underwear, swimwear, and pajamas cannot be returned according to Ukrainian law. If you sell exactly these, confidently select “No, I do not accept returns”. The same applies to exchanges.
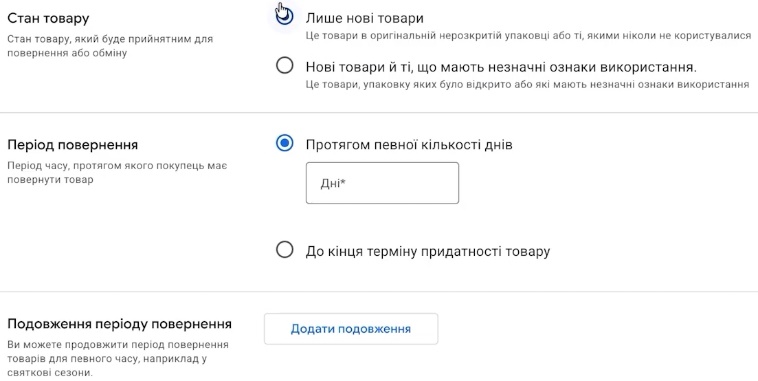
Next, you specify:
- item condition: “New only” or “Slight signs of use”;
- number of days for return and if there is a window extension;
- return method (e.g., by mail) and whether you provide a label;
- restocking fee (if there is none—”Free”);
- refund processing time, i.e., in how many days the buyer will get their money.
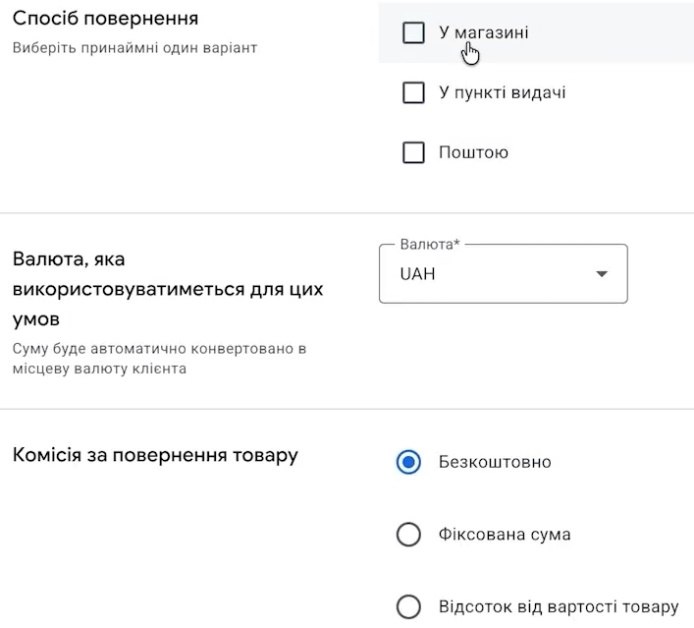
Confirm and save.
The return policy does not affect the Merchant Center review process, but it does affect your “Store quality” score. Stores with high ratings get bonuses from Google: they are shown more often in search results, and generally, it’s easier for them to advertise. So it is better not to leave this section empty.
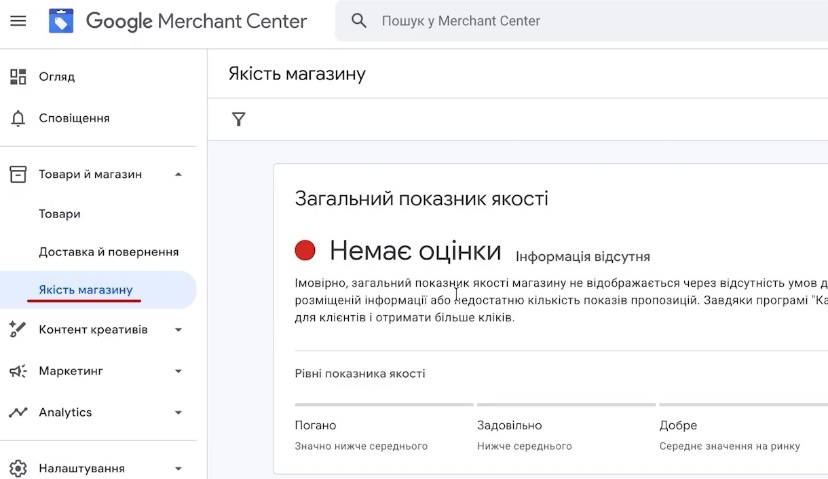
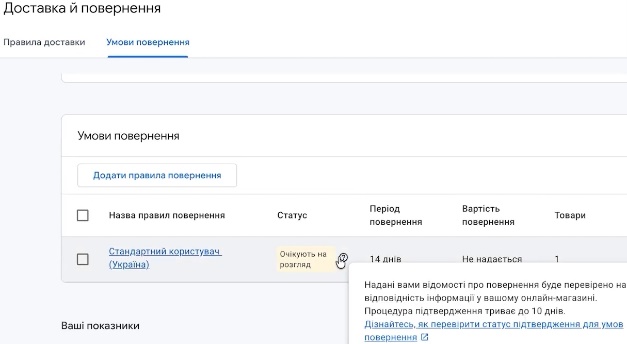
If you made a mistake (entered the wrong page or an incorrect number of days), don’t worry. Next to each section is a pencil icon, through which everything can be edited. My shipping settings, by the way, are already approved, while the return conditions are still “pending review”. This process can take up to 10 days, so check back in a week or two to see the status. If the policy was rejected, it can be deleted and created anew, this time correctly.

Checking Product Uploads and Fixing Errors
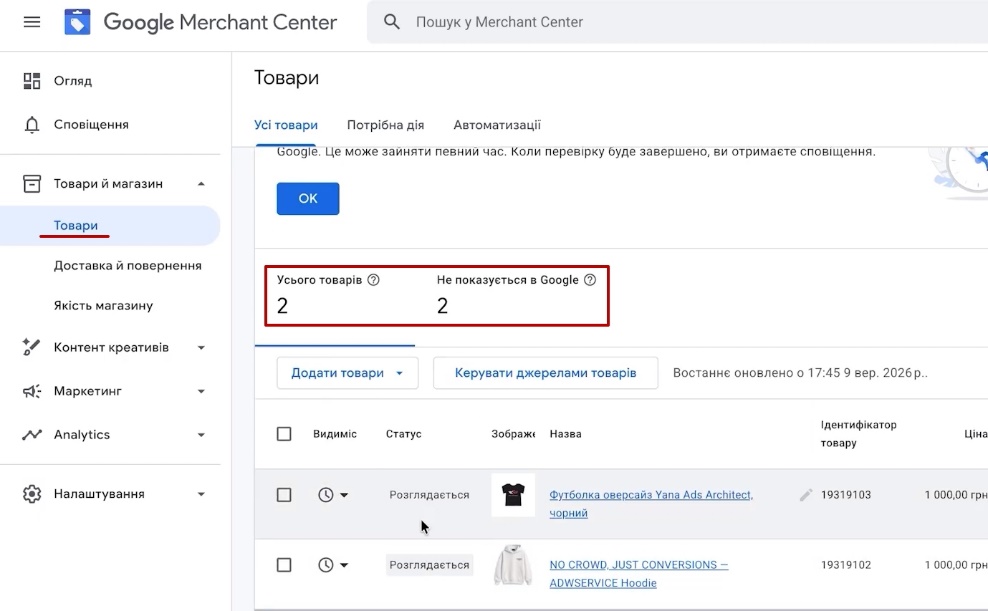
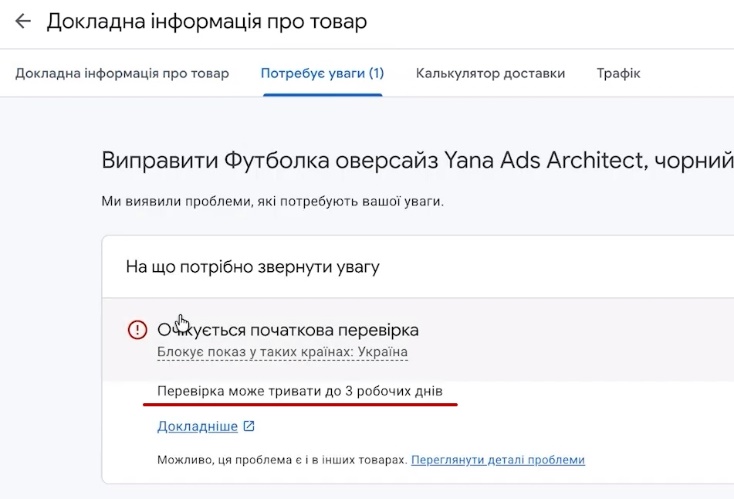
Now we check if the products have uploaded. Mine are all in place, the status is “under review”. The standard review takes up to 72 hours, and the status even says “Initial review pending, up to 3 business days”.
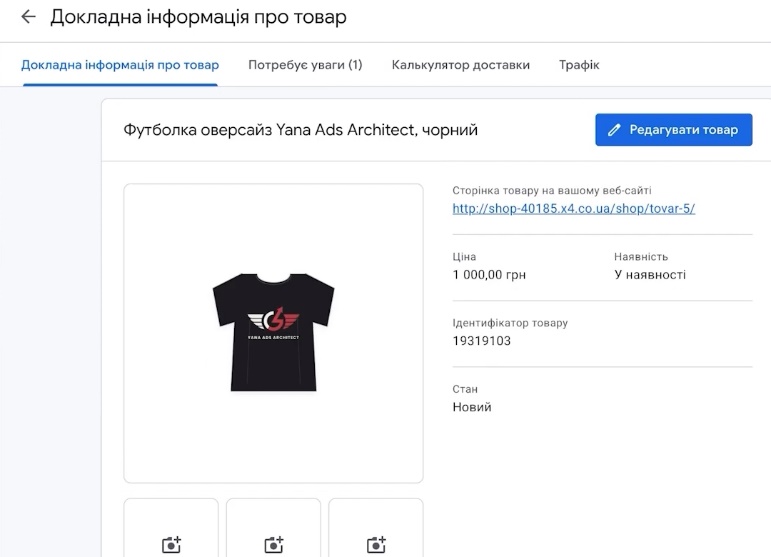
You can open any product card and see what was pulled in: title, description, price. The same information is visible in the “Overview” tab. The account status is displayed in “Notifications”, and issues with individual items are in the “Products” → “Needs attention” section. That’s exactly where you should look if something goes wrong during the review.
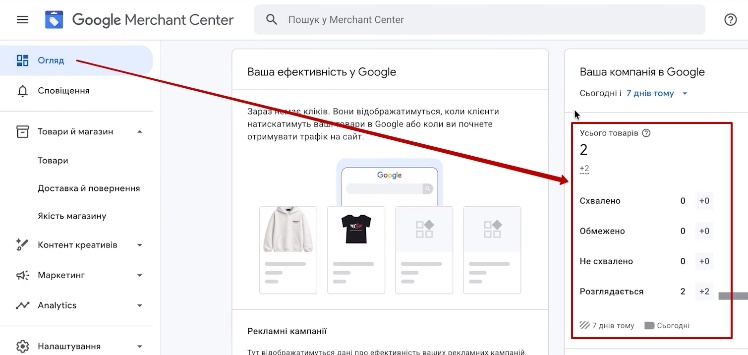
A Brief Summary of What We’ve Done
There were a lot of explanations, but in reality, the account itself is created in literally a minute. Google immediately guided us through all the mandatory settings, and if anything was left unfilled, it will appear in the “Next steps” block. I have no pending tasks there anymore.
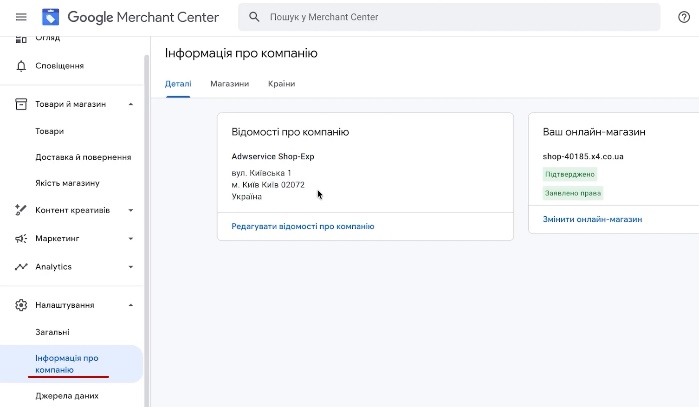
So, we have:
- Created a Merchant Center account.
- Added business information.
- Verified website ownership via the “Scripts” section in Shop-Express.
- Connected an auto-updating feed.
- Set up shipping.
- Filled out the return policy.
Check once more to ensure all data in Merchant Center matches the website, because Google verifies it. And a small note: domains like my demo one rarely pass review on the first try, because Google might be suspicious of an atypical domain. But on a real store with correct data, issues usually do not arise.
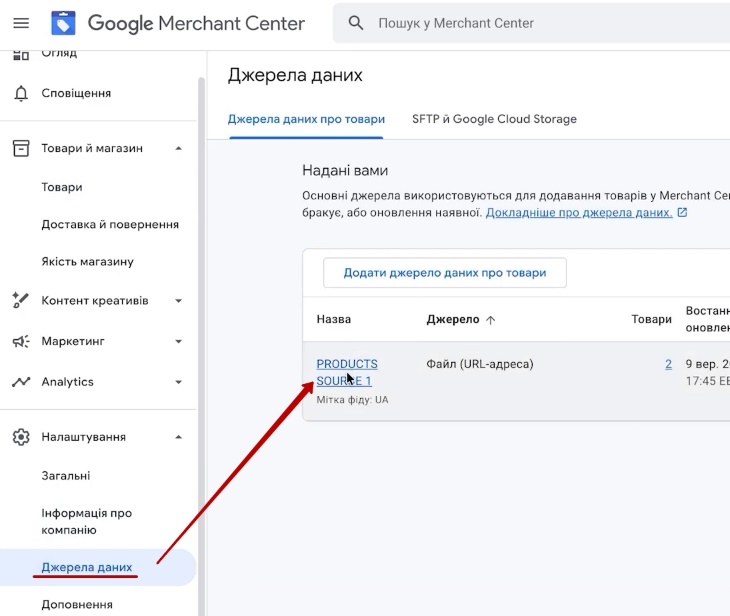
If you later need to replace the feed link or change the set of categories, look for it in the “Settings” → “Data sources” section. There, you open “Data source settings” and you will see the generated URL.
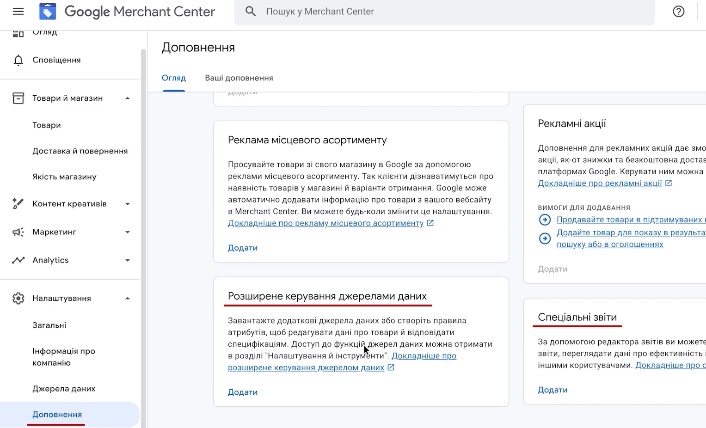
Before you close Merchant Center, go to the “Add-ons” section and enable “Custom reports” and “Advanced data source management”. You will need them later for analysis and more flexible work with the feed.
How and Why to Set Up Goals for Performance Max?
Let’s move on to the second stage. Merchant Center is already under review, and in the meantime, we are preparing goals for future Performance Max campaigns.
It’s important to understand one thing here. Google’s artificial intelligence already knows quite well how people buy your specific type of product online: it has a massive database of behavioral data. But it doesn’t see what happens on your website after the click unless you show it.
So imagine this: a person clicked through from an ad, added a product to the cart, and placed an order. But Google didn’t find out about it because the `purchase` event isn’t being passed. What will it “think”? That’s right: “Wrong audience, I’ll look for others.” Even though it actually hit the right people on the first try. The campaign starts to rebuild itself, the budget goes to untargeted traffic, and you wonder why there are fewer sales than expected.
Without correctly set up goals, primarily the purchase event, there is no point in launching Performance Max. The algorithm simply won’t have anything to work off of.
For the setup, we will need three services: Google Analytics 4, Google Tag Manager, and a Google Ads account. We will create them one by one.
Creating Google Analytics 4
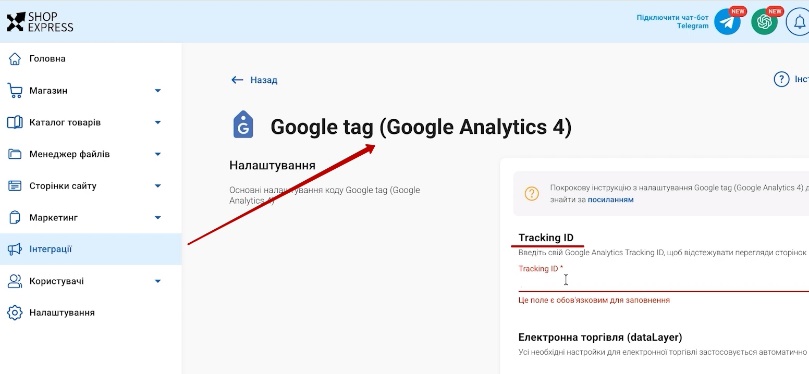
Let’s start with analytics. On Shop-Express, everything here is very simple: it’s enough to paste the measurement ID of the new property and enable ecommerce data tracking. But first, this property needs to be created.
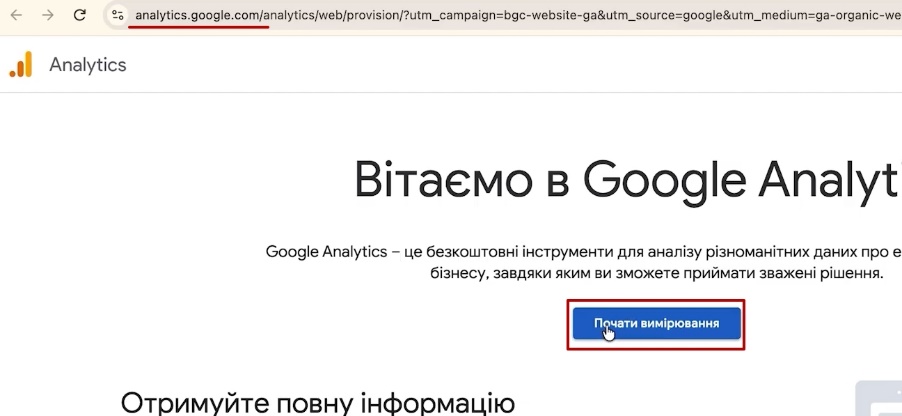
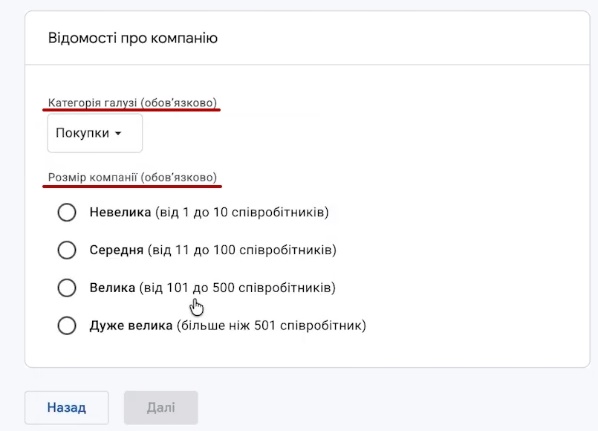
Open Google Analytics and click “Get started” → “Start measuring”. Then, in order:
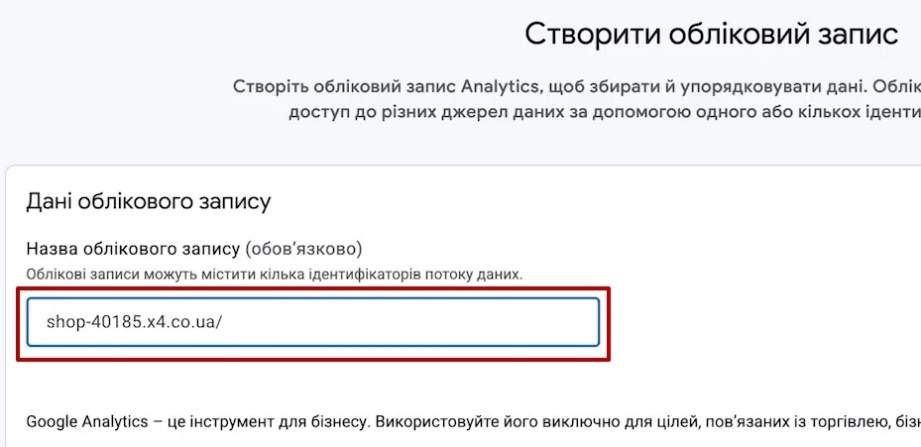
- Account name. I advise using the website domain. It’s unlikely you will have only one project in your lifetime, and navigating analytics by domain names is much easier.


- Country — Ukraine. Google might suggest another one, don’t accept it.
- Currency — hryvnia, or the currency in which prices are listed on the website.

- Industry category. If you’re worried about choosing the “wrong” one, don’t be. It only affects the set of standard reports that will appear immediately after creation.

- Click “Create” and accept the terms.
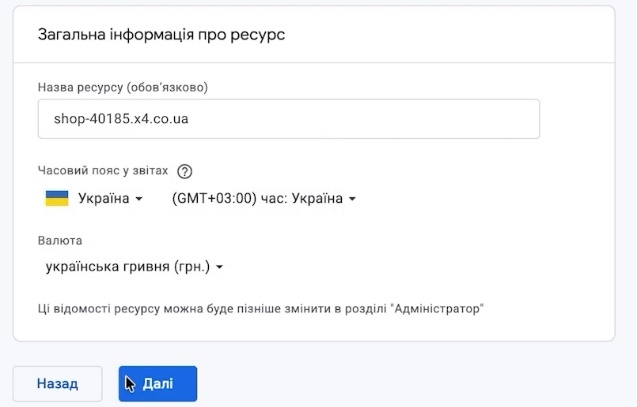
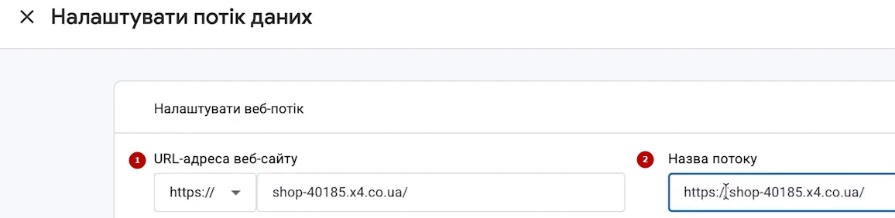
The next step is the data stream. Enter the website URL, and duplicate the domain again in the stream name. Google has already set the rest of the parameters itself, so nothing needs to be changed. “Create and continue”—and the property is ready.
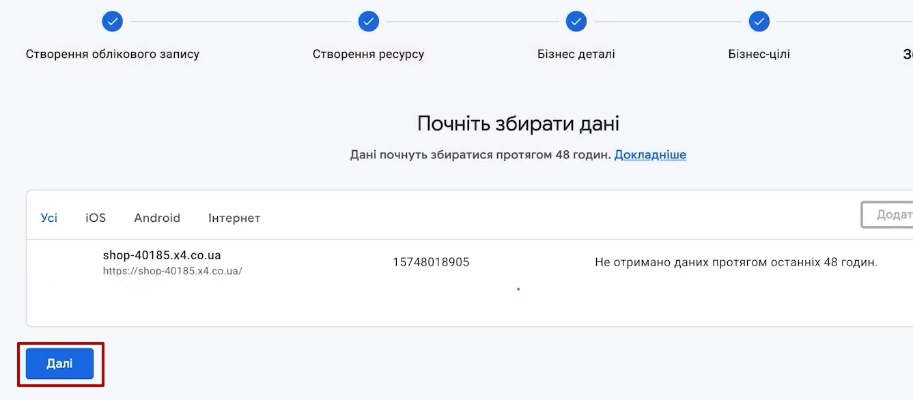
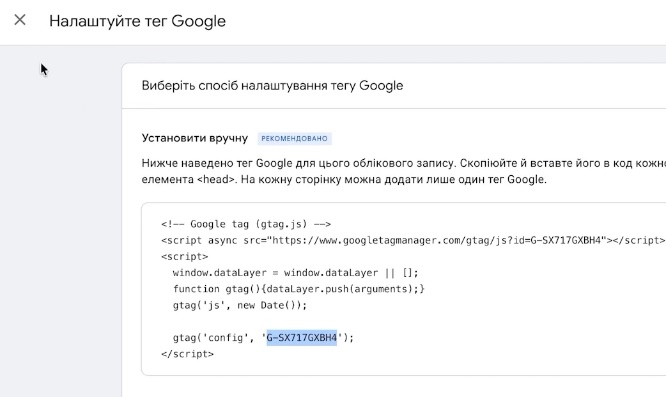
Skip the “Set up your Google tag” screen and the “Test installation” button for now. We only need the Measurement ID—the code that starts with the letter G.

Connecting GA4 to Shop-Express
Copy the Measurement ID, return to the Shop-Express admin panel, and paste it into the Google Analytics integration. Be sure to enable “Ecommerce (dataLayer)”, which is passed via gtag. This specific option ensures that data about product views, add-to-carts, and purchases goes into analytics.
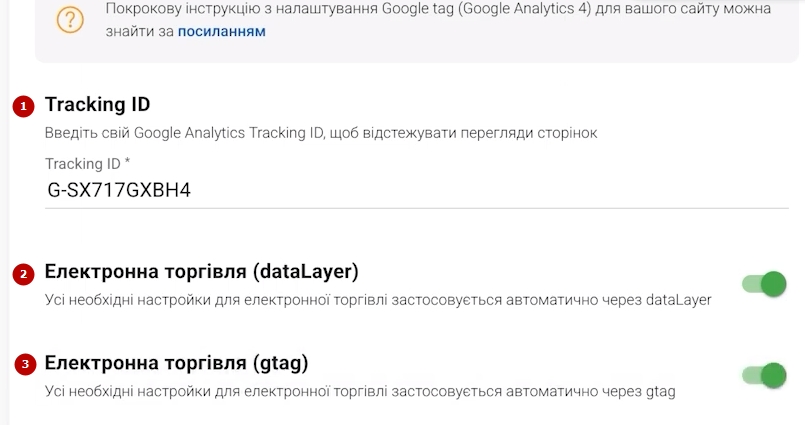
In “Advanced parameters”, you can view the configuration settings, but nothing needs to be changed for starters. Click “Save”.
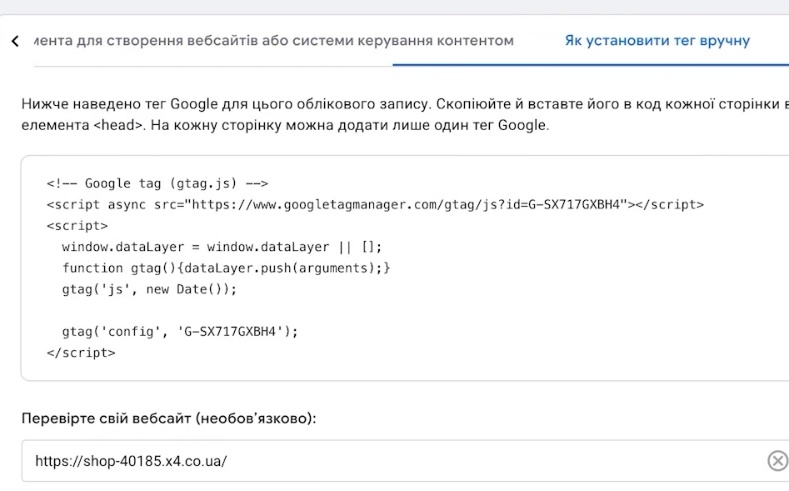
You might not find the test buttons in the Google Analytics interface at this stage. It’s fine: go to the homepage, don’t select anything, and just save. The information that the tag has been installed will appear with a delay.
Verifying the Proper Installation of GA4 on Shop-Express
How can you make sure that analytics is actually working? You can do it via Google Tag Manager (we’ll get to that later), or more simply—via a browser extension.
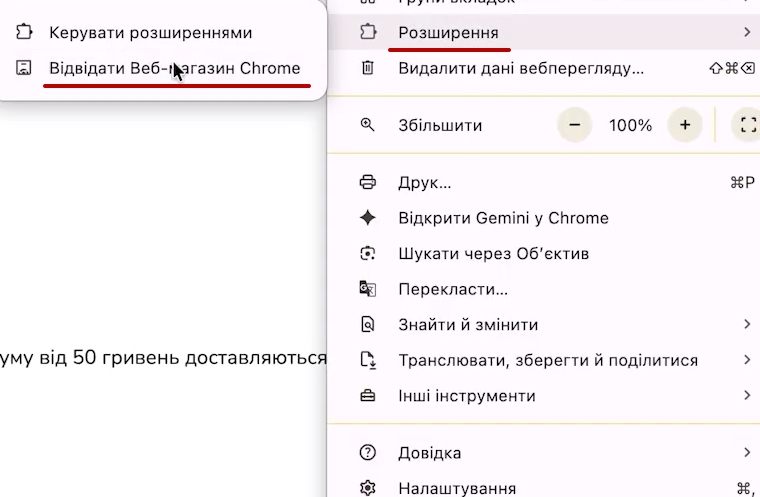
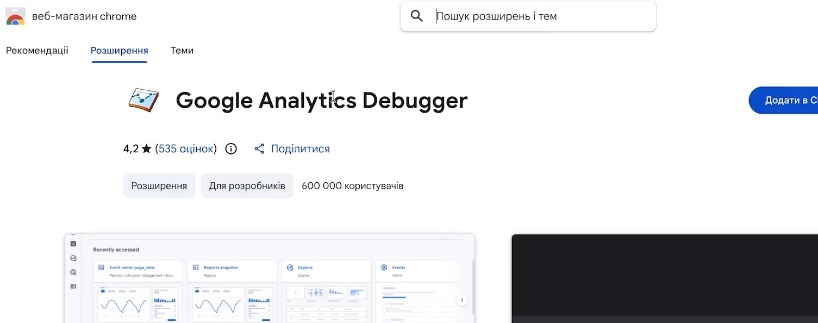
I use Google Analytics Debugger. Find it in the Chrome Web Store, click “Add extension”, pin it to your toolbar, and turn it on. It doesn’t affect the website’s operation in any way; it simply shows what data is being transmitted.
Next:
- open any product card on your website;
- right-click → “Inspect” and go to the “Console” tab;

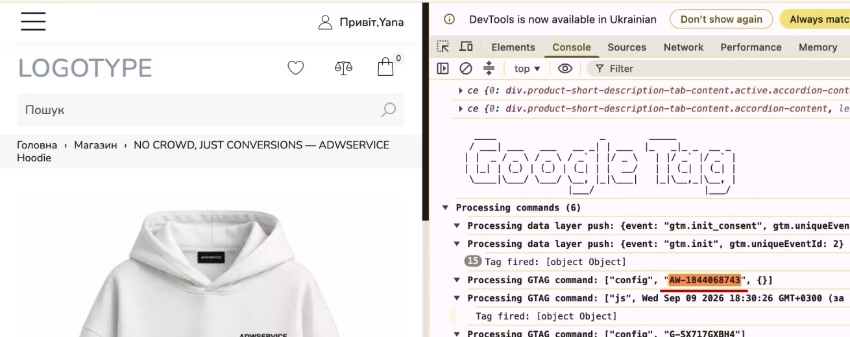
- in Google Analytics, go to “Admin” → “Data streams” and copy that same G- ID;

- in the console, press Ctrl+F and paste it.

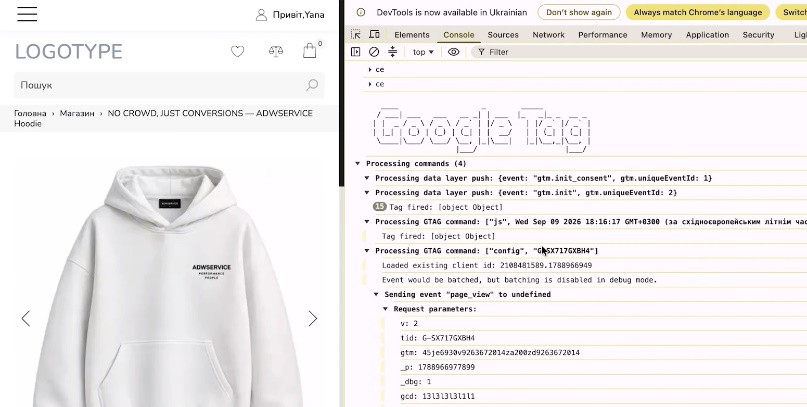
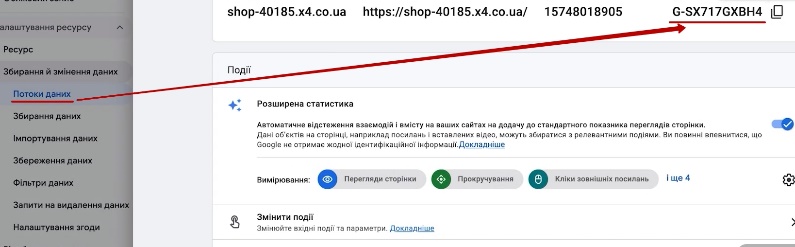
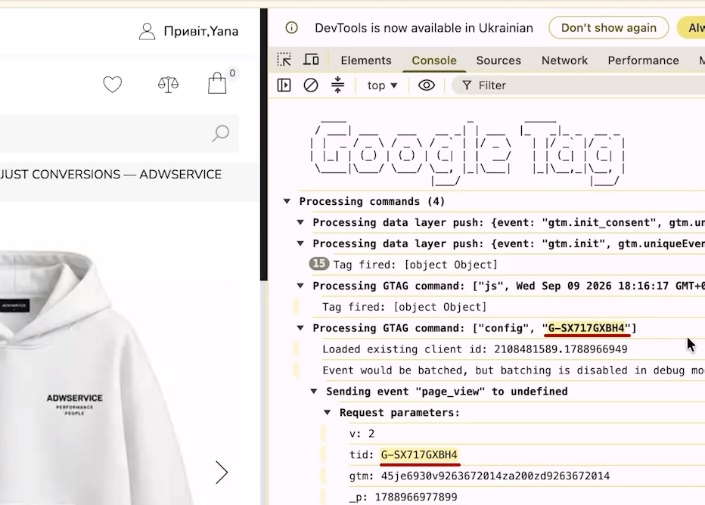
The console looks intimidating, I agree. But you only need one thing: to find your ID there. If you found it, it means analytics is set up and sending data.
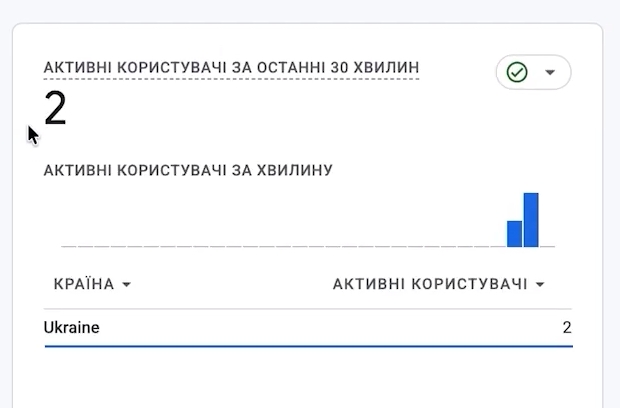
There is an even easier way. Wait 15–20 minutes and open the “Realtime” report. If active users appear there (for example, two for me—that’s me logging in from two devices), everything works. Google Analytics 4 is set up.
Creating Google Tag Manager
Honestly, for basic conversions, just analytics would suffice. But there’s a catch. Providing correct goals for artificial intelligence is, in my experience, 70–80%, and sometimes even 90% of a campaign’s success. Therefore, it’s better to put in the extra effort at the start than to redo everything later. We will additionally create a Google Ads conversion tag so that the advertising account receives data directly.
For this, we will need the Google Ads account itself and Google Tag Manager. It looks more complicated than it actually is, so just follow along with me step by step.
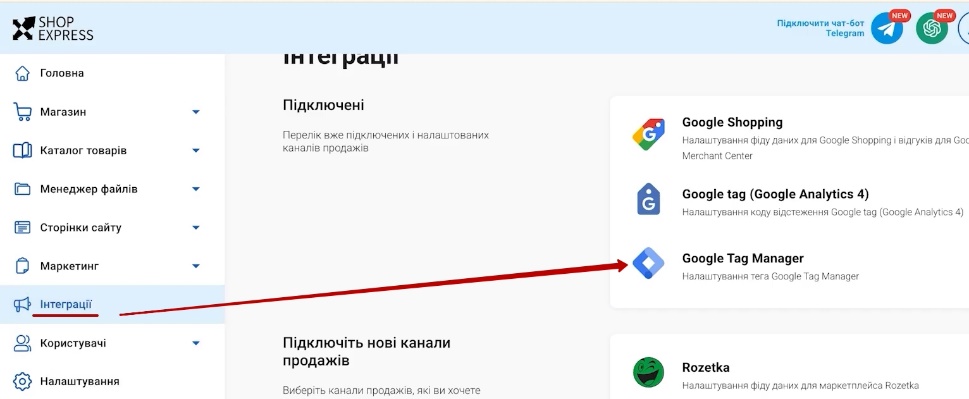
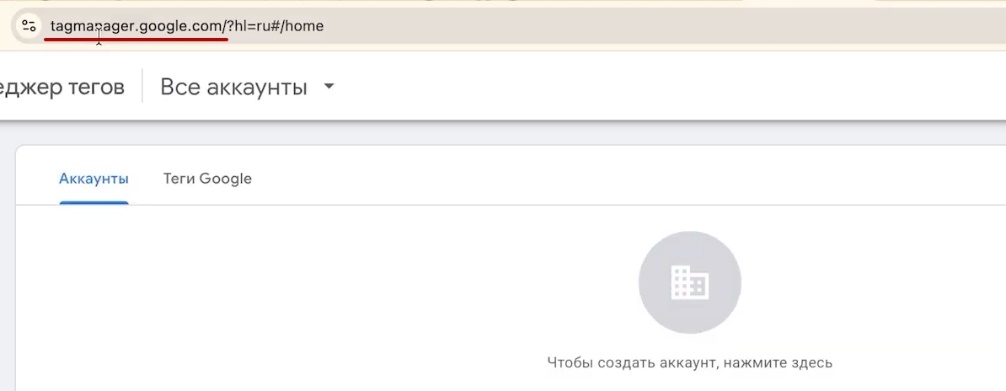
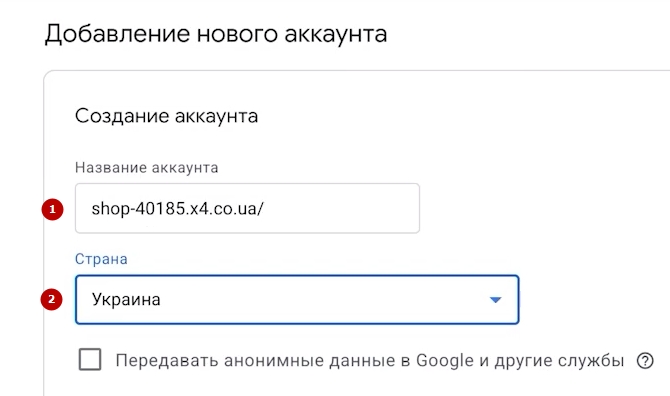
In the Shop-Express admin panel, open “Integrations” → “Google Tag Manager” and follow the link to the service. Click “Create Account”. I again name it after the domain, for the same reason: you might have multiple websites. Specify Ukraine as the country (for some reason, the service loves to default to the US, so double-check). The target platform is “Web”. Click “Create”.
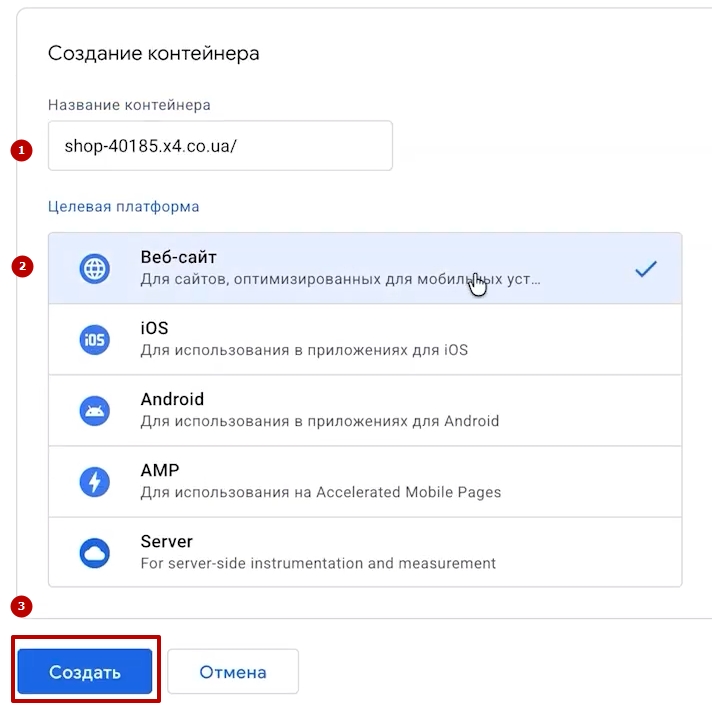
By the way, the Tag Manager interface sometimes displays in a language other than the one set in your Google account. It doesn’t affect functionality, just rely on the button placements.
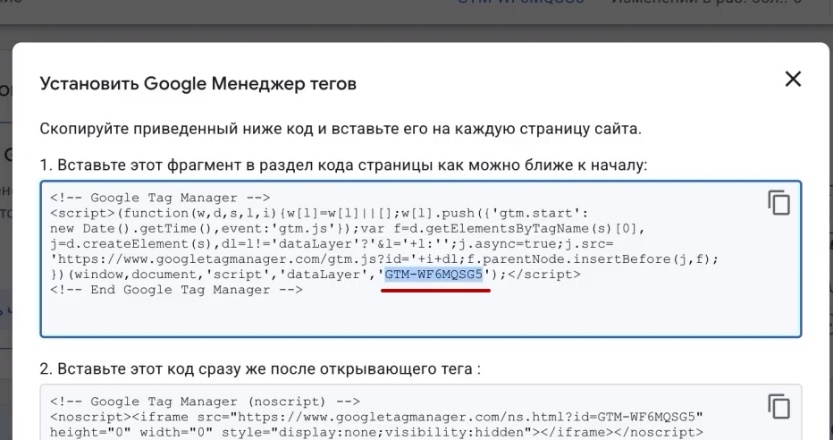
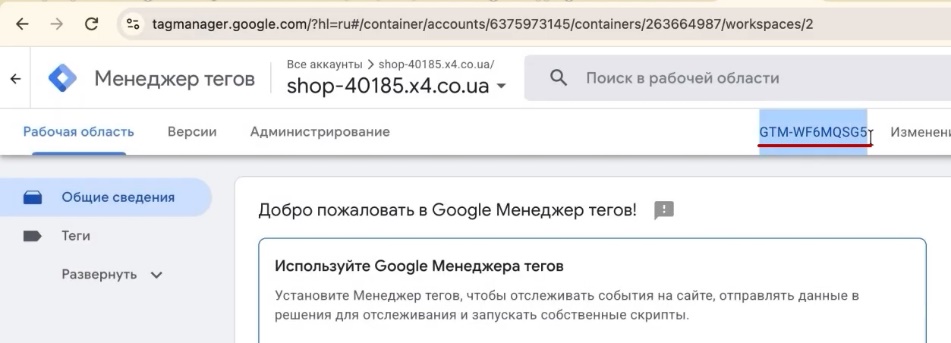
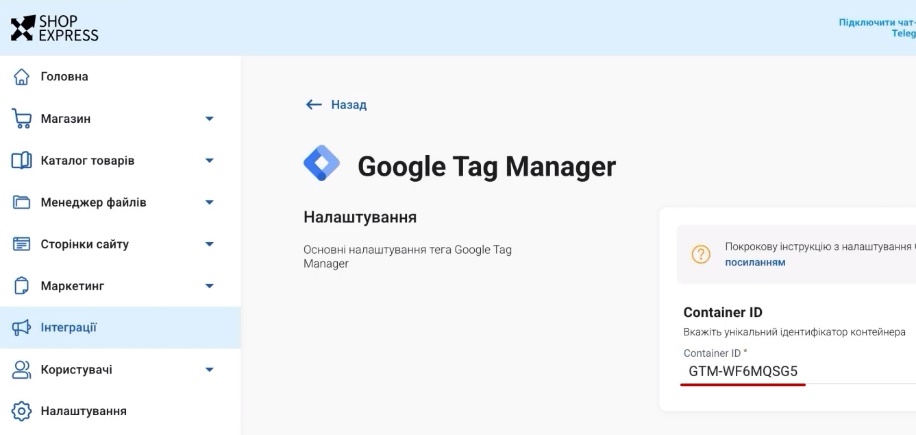
After creation, copy the container ID (in the format GTM-XXXXXXX). It is visible immediately in the installation code window and at the top of the workspace—grab it from wherever is more convenient. Paste it into the Shop-Express integration and save. That’s it, Tag Manager is on the site.
Creating a Google Ads Account
A Google Ads account can be created in two ways. The first is obvious: you search for Google Ads, click “Get started”, and go through registration. The second is straight from Merchant Center. I prefer this method because this way all services are immediately linked to the same email.
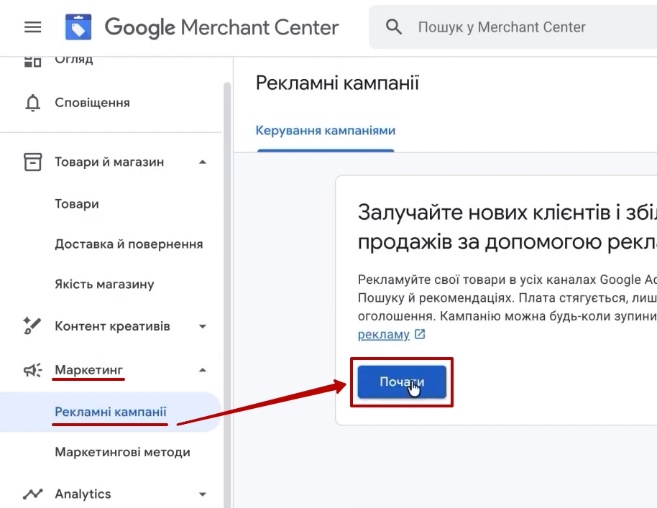
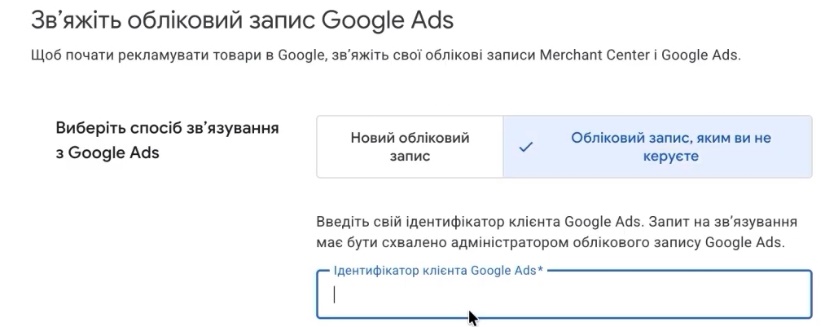
In Merchant Center, open “Marketing” → “Ad campaigns”. There are two options here: create a new account or request access to an existing one. If you already have an account, copy its Customer ID (the ten-digit number in the top right corner of Google Ads), send the request, and approve it inside Google Ads itself. I am creating a new one.
I usually name it after the store’s name, not the domain. It is more convenient when you have several websites, and emails from Google look more accurate.
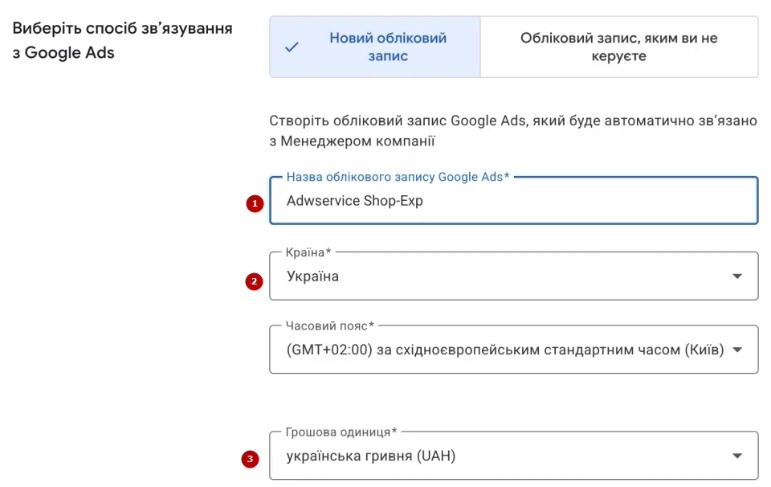
The currency of the advertising account cannot be changed after creation. Choose the one in which you plan to add funds: hryvnia, dollar, or euro. Make a mistake, and you will have to create a new account.
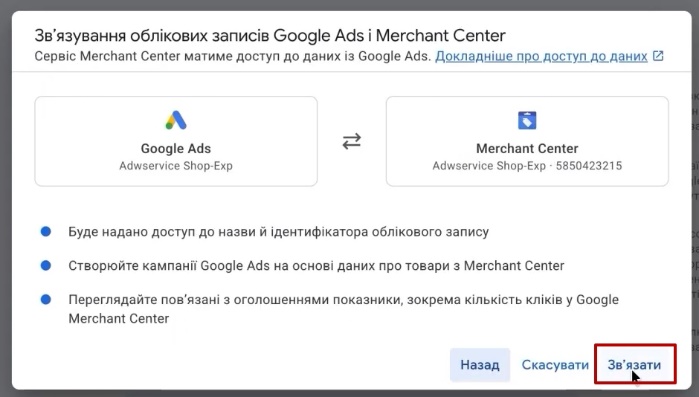
Next, the system will prompt you to link the account with Merchant Center—click “Link”. Google Ads is created. We will launch the basic campaign a bit later; first, we need to add billing data.
For comparison: when creating an account directly, Google often immediately asks you to fill out a bunch of texts, upload images, and set up your first campaign. A beginner easily gets lost in this and can get stuck halfway. Through Merchant Center, everything goes much smoother.
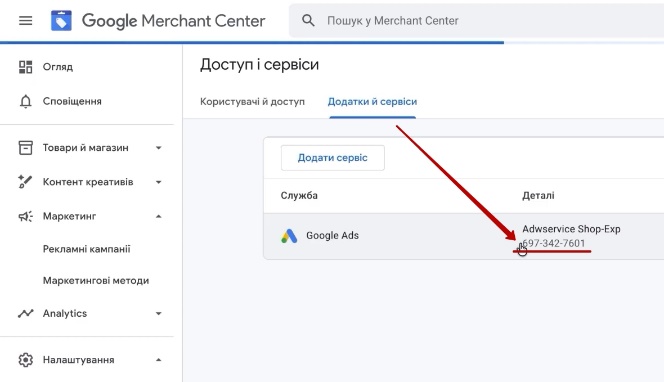
If you closed the tab after creation and don’t know how to get into the account, don’t worry. In Merchant Center, open “Access & security” (or “Settings” → “Linked accounts” / “Apps and services”), find Google Ads there, and follow the link.
Entering Billing Information
Let’s look at payments in more detail, as there are some specifics for Ukraine here. The first thing you need to choose is how you pay: manual payments or automatic payments.
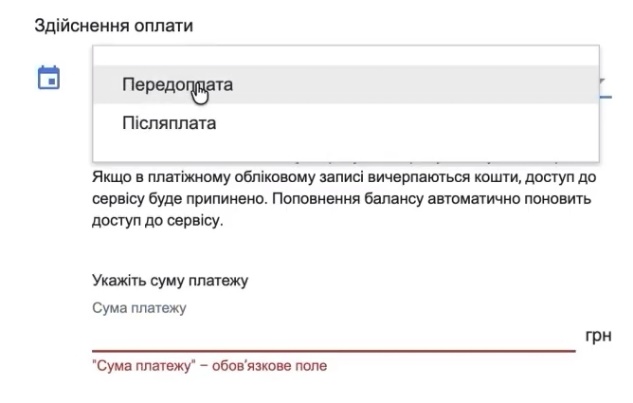
Manual payments are straightforward: first, you top up your balance, then money is deducted for ads. Automatic payments work differently. You link a credit or debit card, the ads run, and Google charges your card afterward.
For automatic payments, get a separate card just for your advertising account and top it up as needed. First, this protects you from overspending if you make a mistake with the budget. Second, scammers regularly hack accounts with linked cards. While you are recovering access, a large sum could be drained from your primary card, often at night when you can’t even react in time.
Which payment setup should you choose? In my opinion, automatic payments are more convenient: the money is withdrawn automatically, the main thing is to top up the card on time. But some people feel more secure working with manual payments; decide for yourself here. The system will suggest the minimum first payment amount during setup.
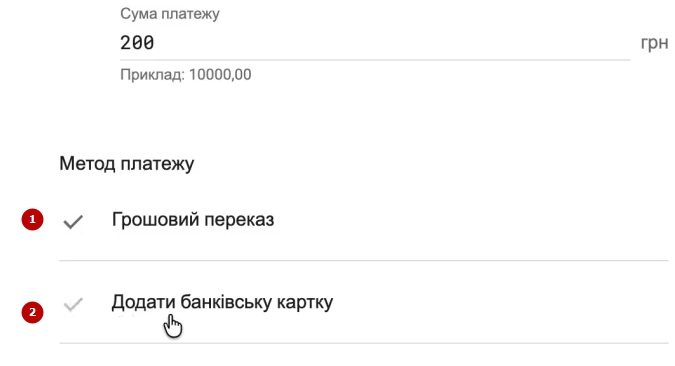
Next is the payment method: credit/debit card or money transfer. Everything is standard with a card, no different from paying for Netflix or an Apple subscription. A money transfer works like this: in the account, you click “Make a payment” and receive a PDF invoice. VAT will be included in it regardless of your status. However, there are no limits that sometimes apply to cards, and you can pay however is convenient: via Monobank, PrivatBank, or even at a bank teller.
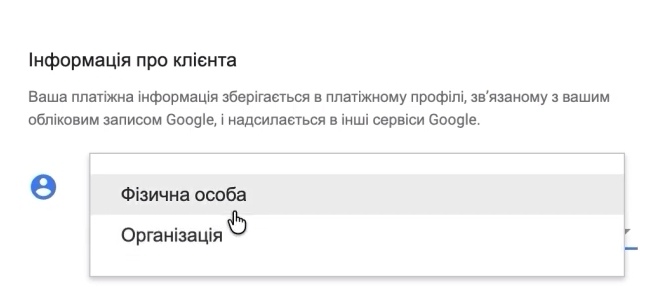
Now, the account type. There are two of them:
- “Organization” — a legal entity (LLC, etc.). Fill in the details strictly according to your corporate documents;
- “Individual”, which splits into two more options: a regular individual and a private entrepreneur.
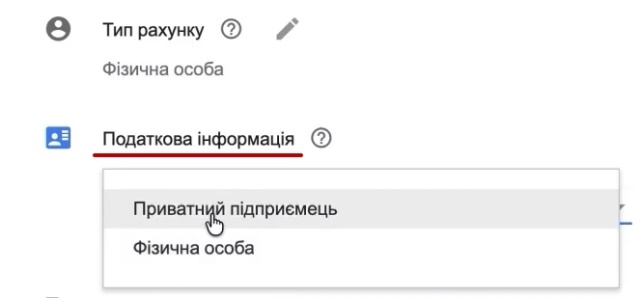
A private entrepreneur corresponds to a Sole Proprietorship. For this, you enter your Tax ID (TIN).
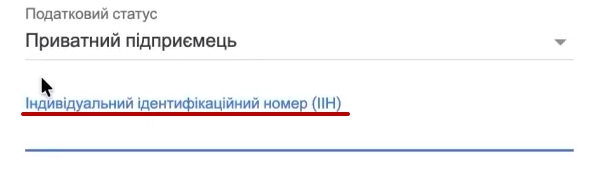
Do not select the standard “Individual” type if you have a commercial project. It’s not just about VAT: according to Google’s support docs, regular individuals (not sole proprietors or businesses) can only advertise non-commercial activities—charities, volunteer initiatives, etc. This is not suitable for an online store.
In which combinations VAT applies and in which it doesn’t is a topic for a separate discussion, so I won’t dwell on it now. And one more minor thing: if the billing settings window suddenly closes or the page reloads, you can always return to them—both from Google Ads and from Merchant Center.
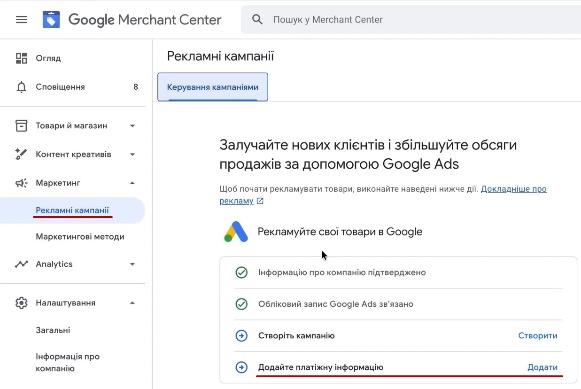
Creating the “Purchase” Conversion
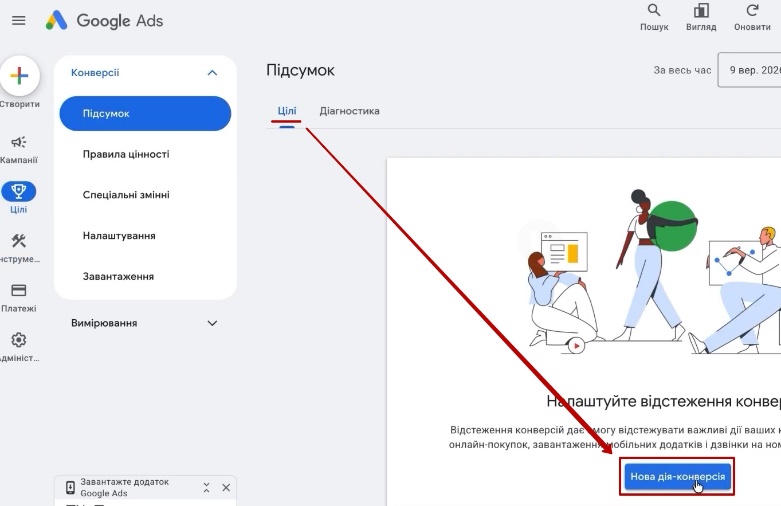
The advertising account is currently empty, and that’s normal. Our task now is to set up a conversion action in it. Open the “Goals” section.
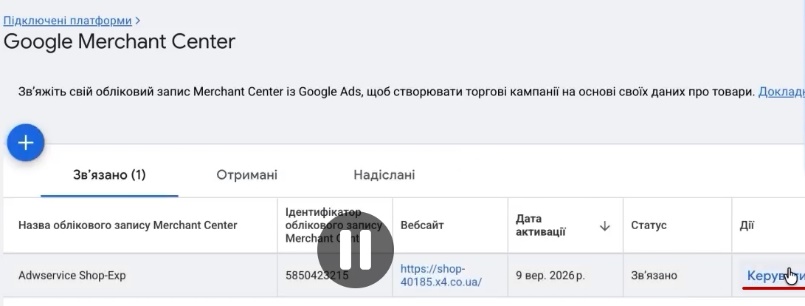
Google might immediately show a message suggesting you review the Merchant Center link. Click “Manage” and verify it. Everything was already approved for me, yet the message was still hanging there for some reason. It happens.
Creating a Conversion Action in Google Ads
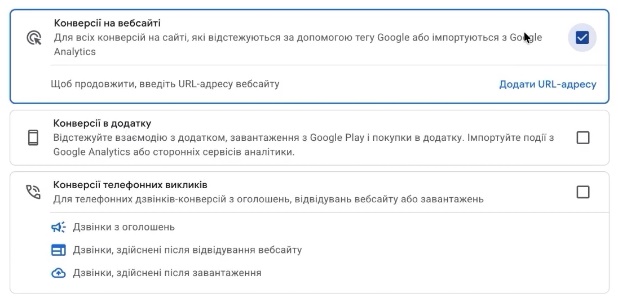
In “Goals”, click “New conversion action”. Pay attention here: we don’t need “Phone calls”, select “Website”. Add your URL and click “Scan”.
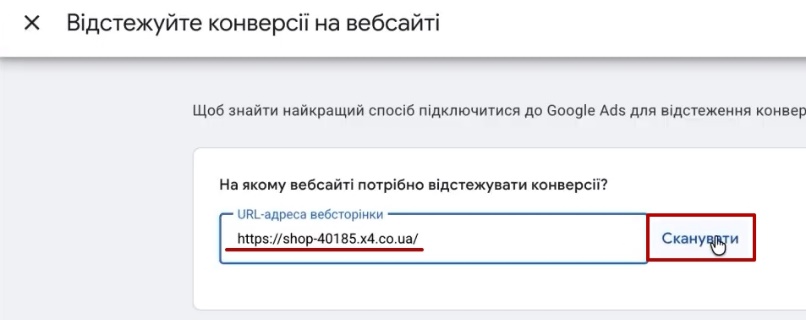
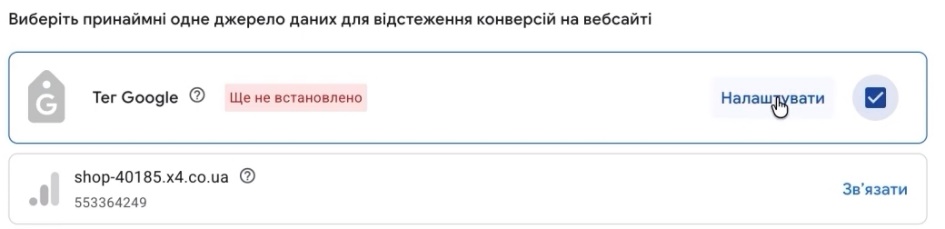
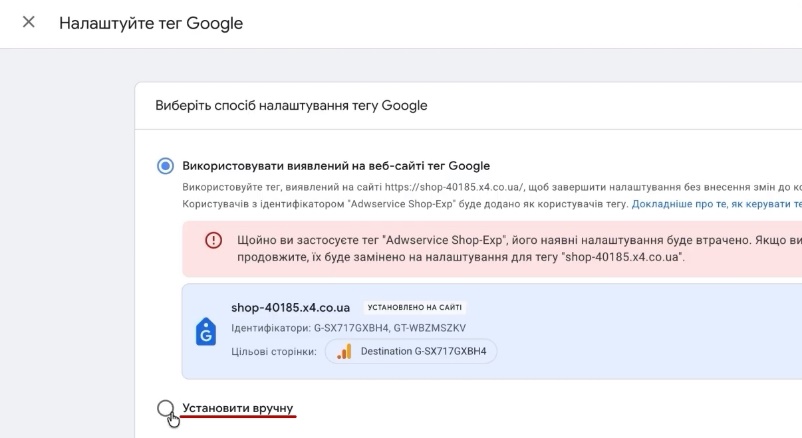
Google will offer two options: import data from Google Analytics 4 or use the Google tag. We choose the Google tag, then “Install manually”. You can set it up right away or come back to this later. I advise doing everything in the exact same sequence as I do; there’s less chance of getting confused. Though any section is easy to find again later.
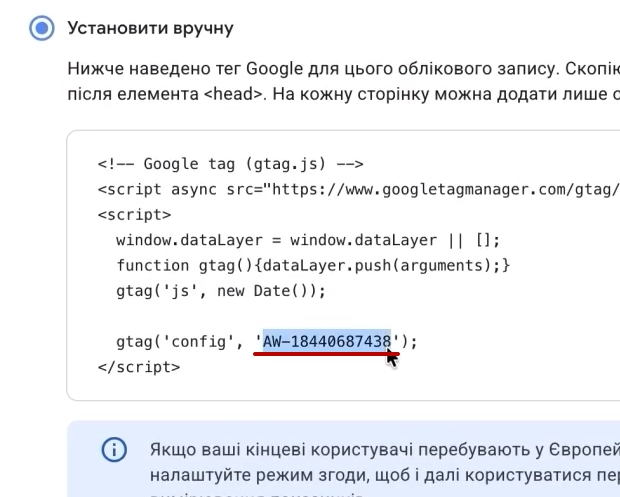
Installing the Google Tag via Tag Manager
Copy the tag ID and go to Google Tag Manager:
- Open “Tags” → “New”.
- In “Tag Configuration”, select Google Ads → “Google tag”.

- Paste the copied ID.


- Save.

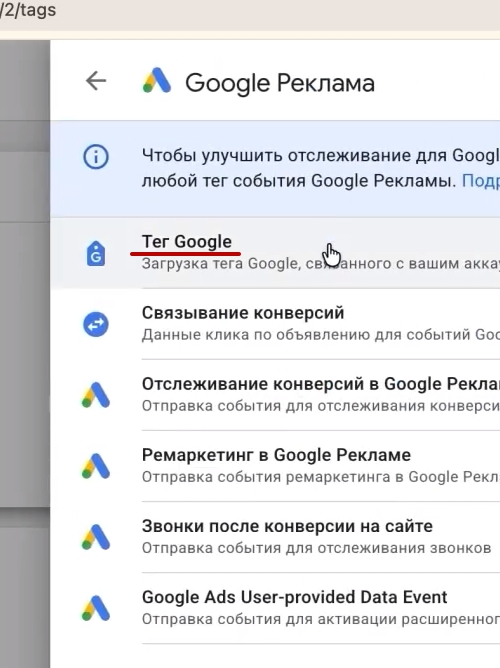
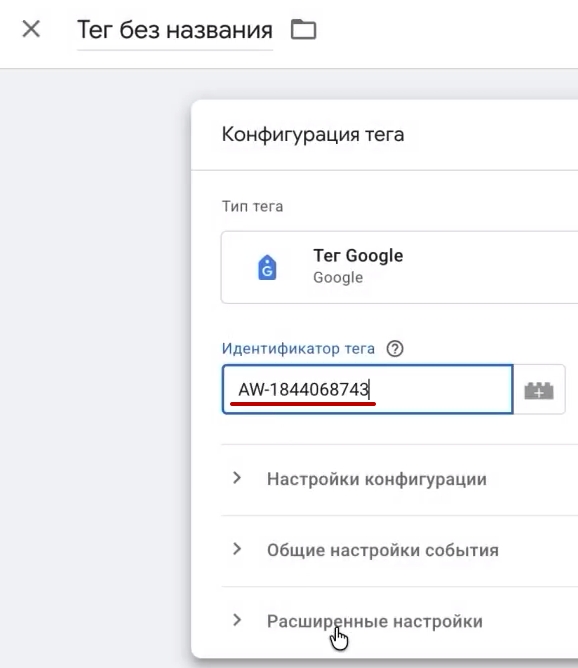
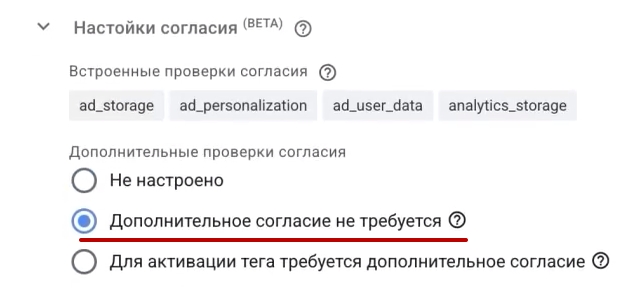
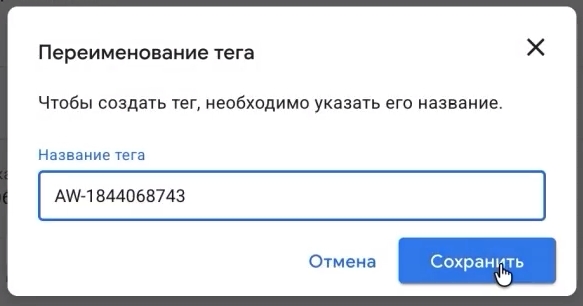
Now you can click “Test installation” in Google Ads. But first, the container needs to be published, otherwise, the test won’t find anything (I briefly forgot about this myself). After publishing, everything connects. Click “Done” → “Save and continue”.
Setting Conversion Parameters
Next, we fill out the settings for the action itself:
- category — “Purchase”;

- setup method — manual, using code;

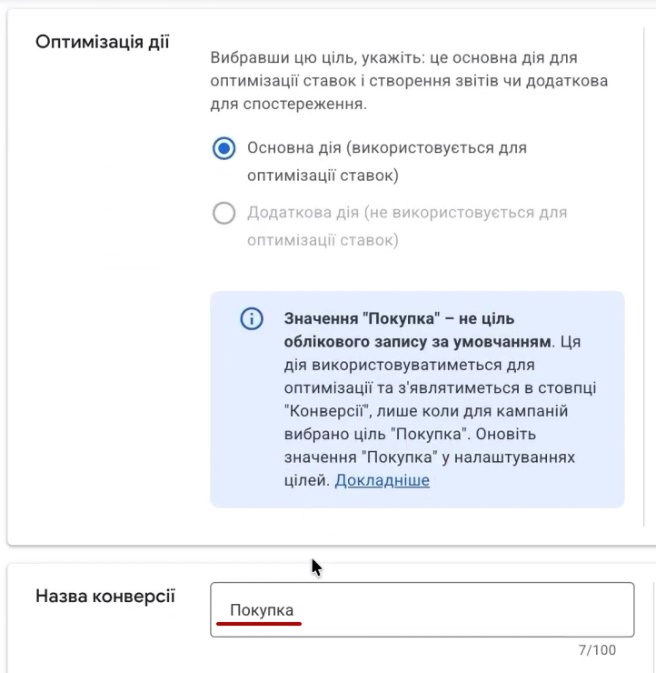
- action optimization — primary action;
- conversion name — whatever is convenient for you, for example, “Purchase”;

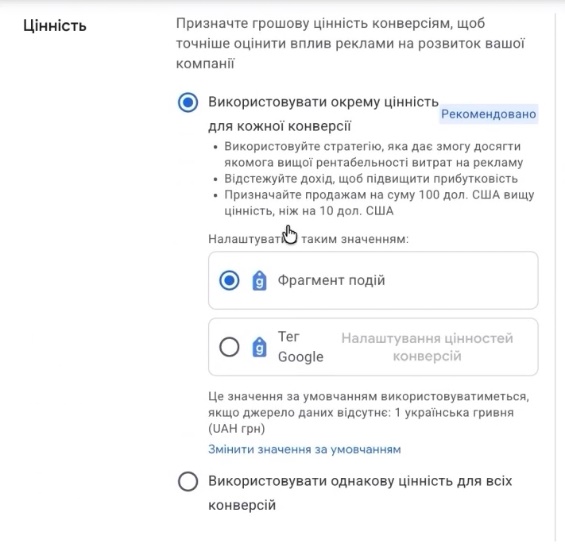
- value — use different values for each conversion (the order amount will vary);

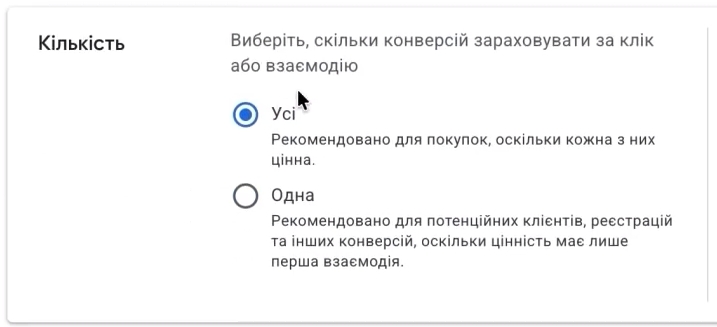
- count — “Every”;

- click-through conversion window — 30 days;

- attribution model — “Last click”.

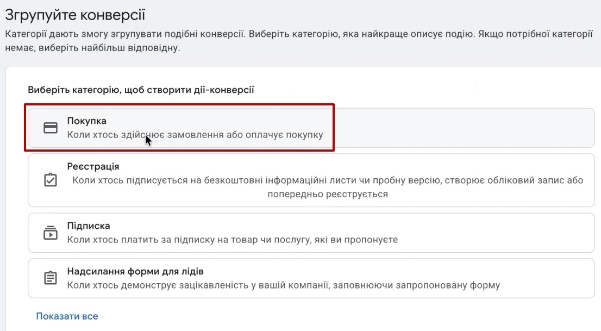
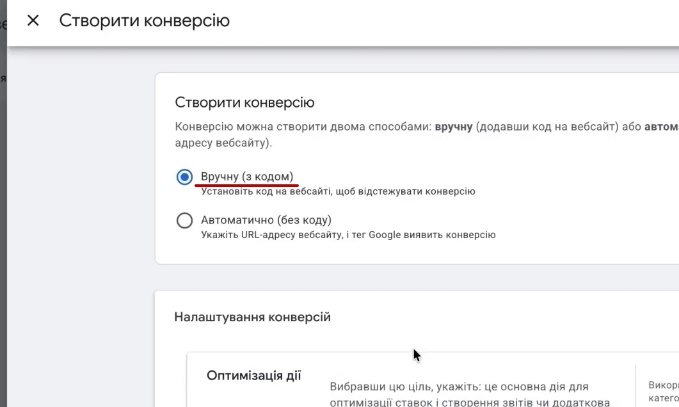
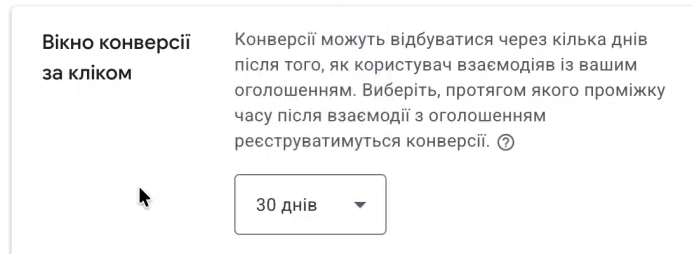
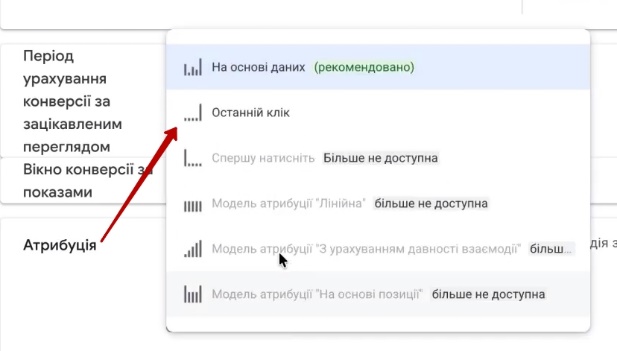
A separate note about the conversion window. 30 days is suitable for most online stores. However, 90 days makes sense for B2B niches with a long deal cycle. Let’s say you sell industrial refrigeration units: a client might spend a month getting budget approval from a director and only place the order after that.
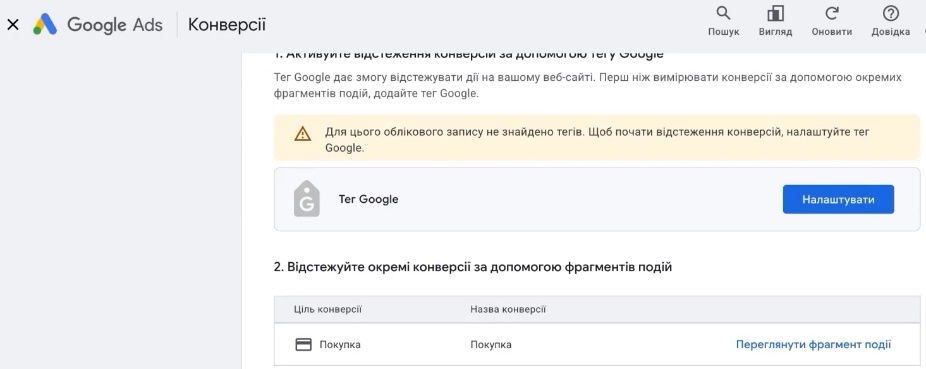
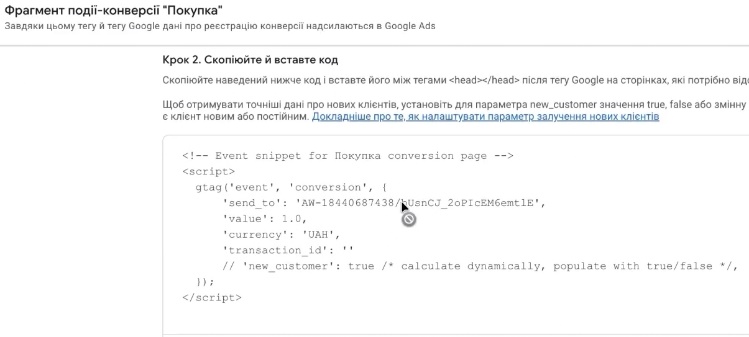
We’ll skip enhanced conversions for now. Click “Save and continue”, then “See event snippet”. This is the exact data we will need right now.
Setting Up the Conversion Tag in Tag Manager
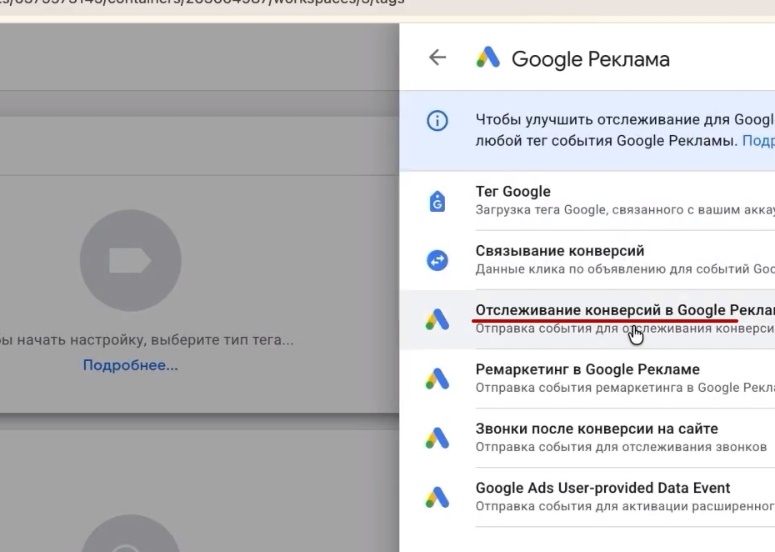
Return to Tag Manager: “Tags” → “New” → Google Ads → “Google Ads Conversion Tracking”. Fill in the two fields from the event snippet:
- conversion ID — the numeric code;
- conversion label — the string of characters that follows it.
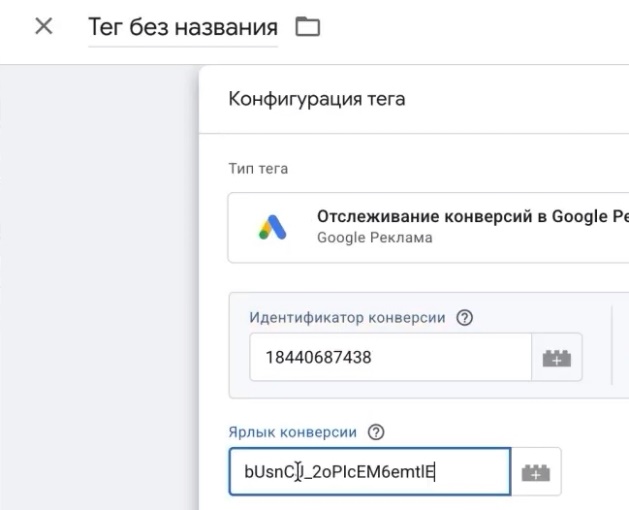
But this is not enough. For Google to receive the order amount and transaction ID, we need to pass a few more parameters. We take them from the dataLayer, that is, from the data that Shop-Express sends during a purchase.
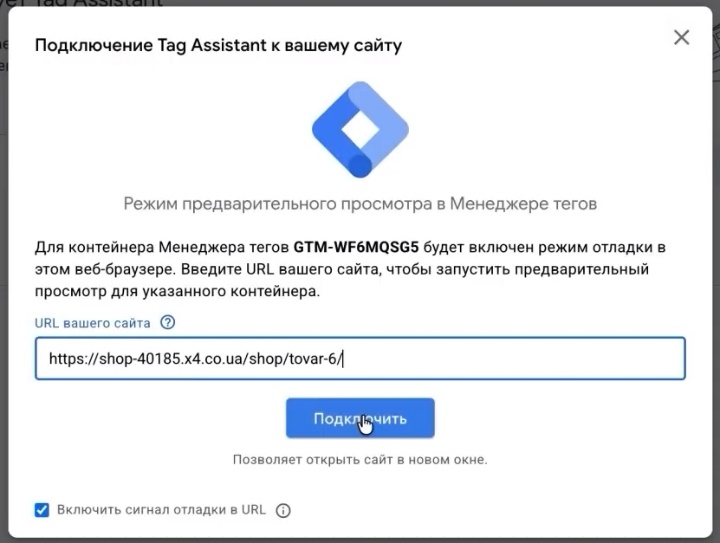
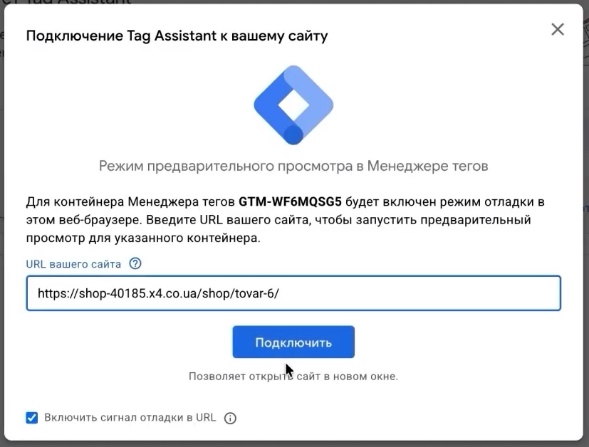
To see this data, enable “Preview” mode in Tag Manager, paste your website URL, and click “Connect”. The website opens, and we go through the path of a regular buyer: add a product to the cart, select the delivery country, city (I use Kyiv), and place an order.
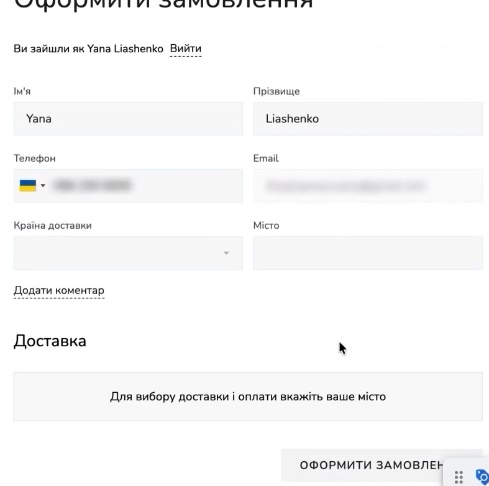
Now return to the preview window. Two `purchase` events will appear there. Open either of them and go to the “Data Layer” tab. You will see an `ecommerce` block with all the order information—it is the same in both events.
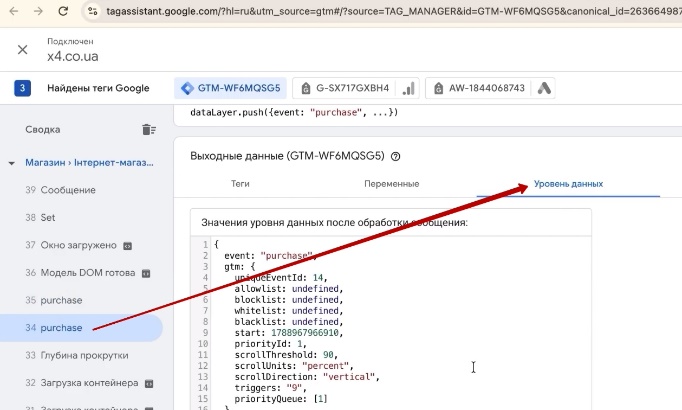
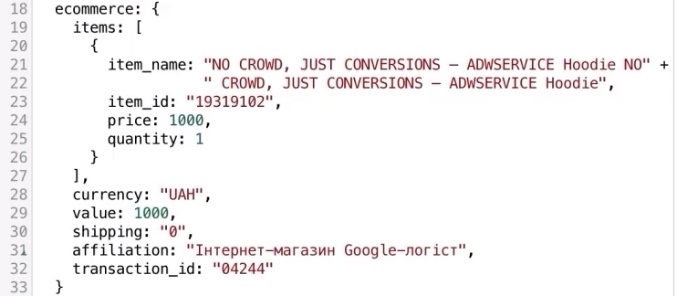
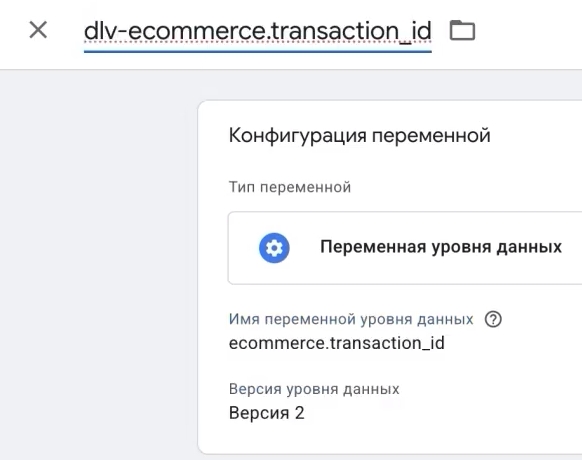
Based on this data, we create variables of the “Data Layer Variable” type:
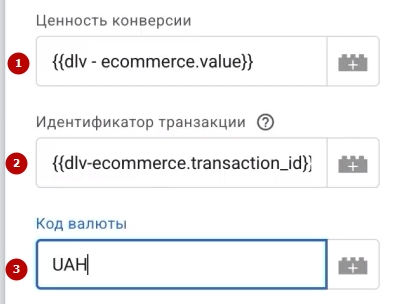
- Conversion Value → variable `ecommerce.value`.


- Transaction ID → variable `ecommerce.transaction_id`.

- Currency Code → if the site only uses hryvnia, just type `UAH`. If there are multiple currencies, create the variable `ecommerce.currency`.

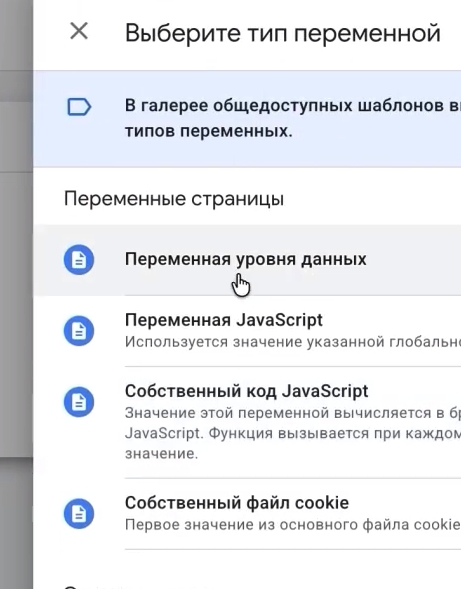
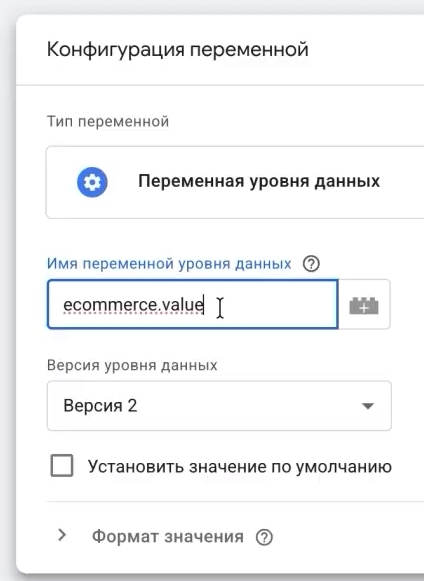
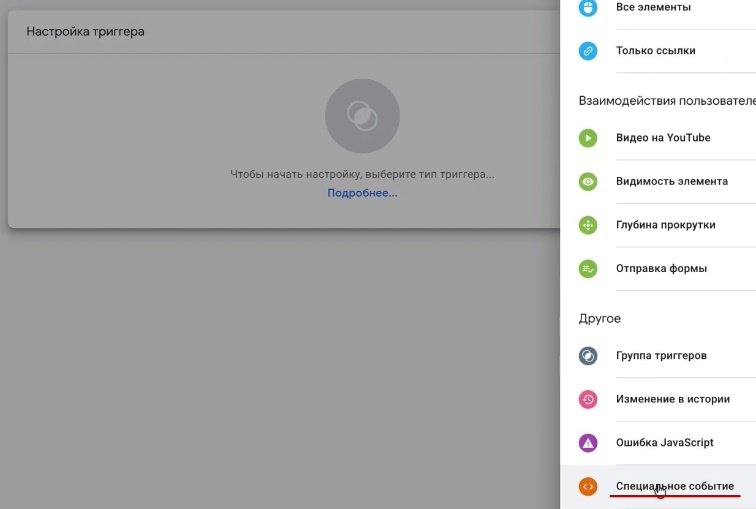
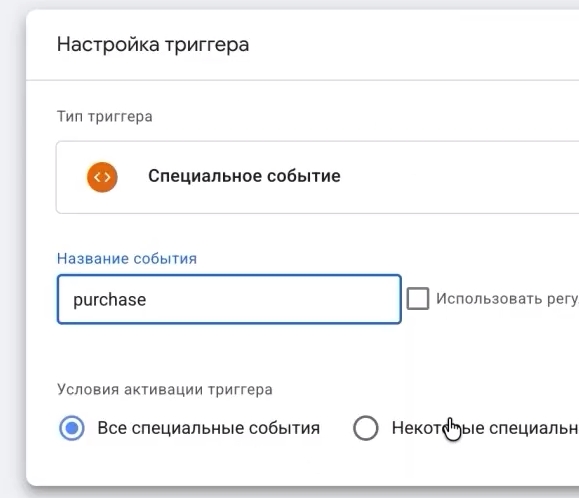
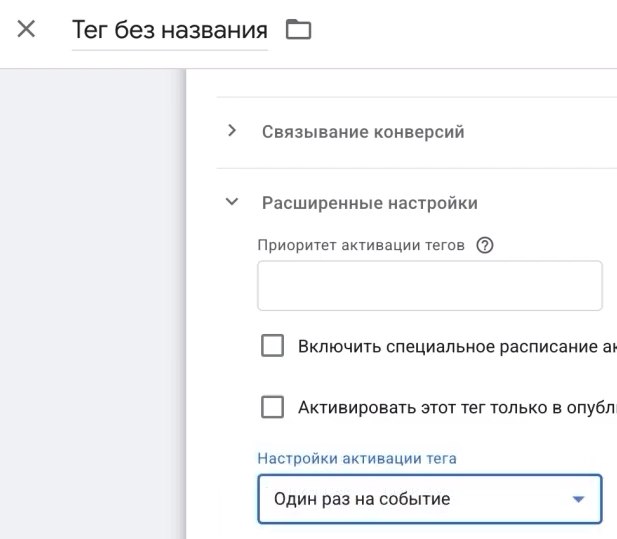
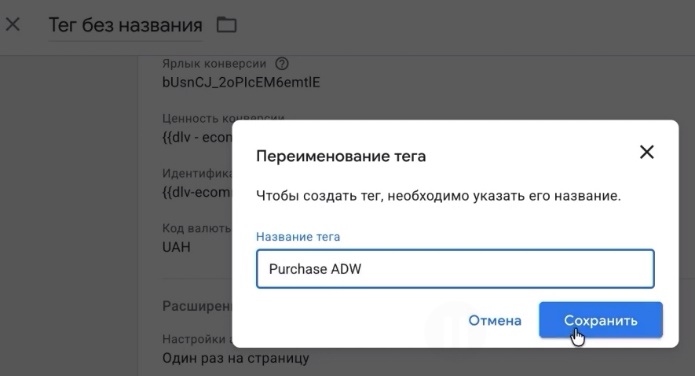
We do not touch the advanced settings. Under triggering, we choose the `purchase` event (a custom event with that name) and save. In the tag firing options, be sure to specify “Once per page” so the conversion is not duplicated. Give the tag a name, for example, “Purchase ADW”, and save.
Testing If Everything Works
Launch preview mode again and place a test order from start to finish. What should we see? Two `purchase` events, and our tag should only fire on one of them.
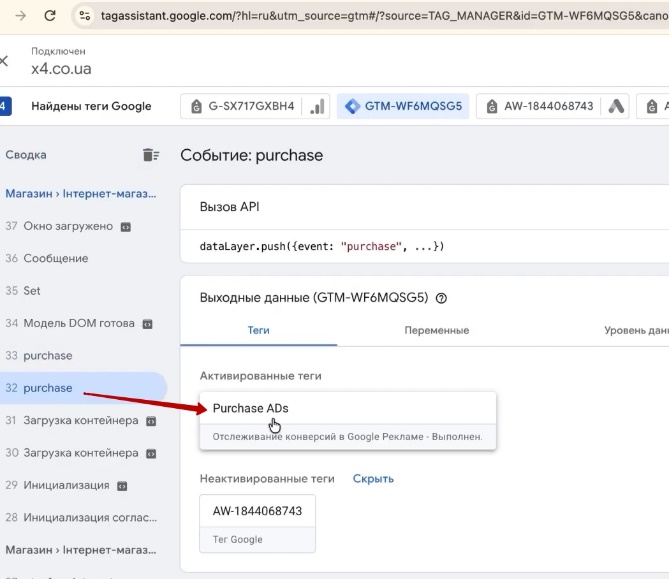
Open this tag and verify:
- the transaction ID was pulled;
- the conversion value matches the order amount;
- the conversion ID and label match those in the advertising account.
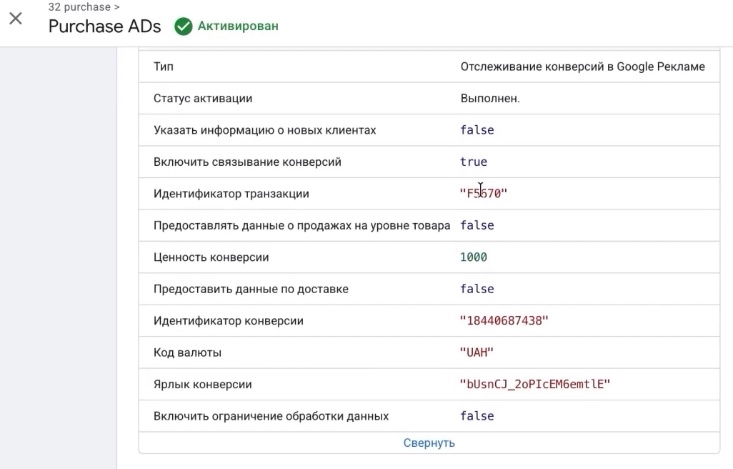
Everything matches—click “Finish”.
Do not forget to publish the container in Tag Manager! Without publishing, all the settings will remain only in the workspace, and not a single conversion will make it to Google Ads.
So, the basic “Purchase” conversion is ready. And by the way, not all specialists even set this up. But they should: it’s a “native” Google Ads conversion that reaches the account quickly and works best for campaign optimization by artificial intelligence.
Want to go further? There are a few more settings for this goal that will improve both the reports in the account and the algorithm’s performance. More on them below.
Importing a Pre-built GTM Container
Searching for data layer variables and manually creating dozens of tags is not for everyone. So there is an easier way: import a pre-built container with tags, variables, and triggers already configured. It is a standard file that is uploaded to Tag Manager in just a few clicks.
How to do it:
- In Tag Manager, go to “Admin” → “Import Container”.

- Click “Choose container file” and upload the file.
- Select “Existing” for the workspace.
- For import option, choose “Overwrite”.
- Confirm.
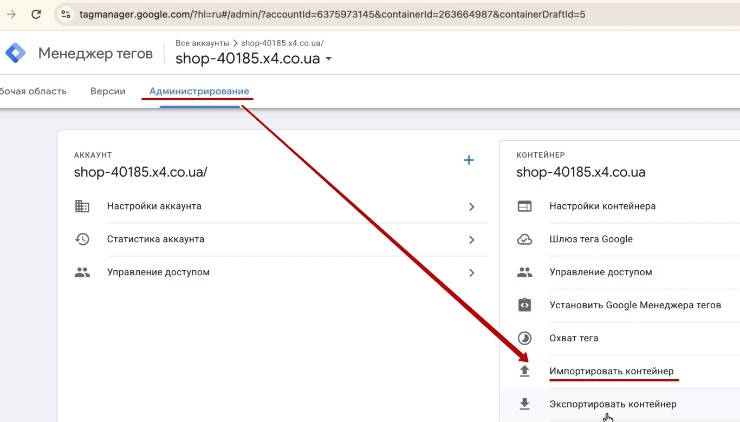
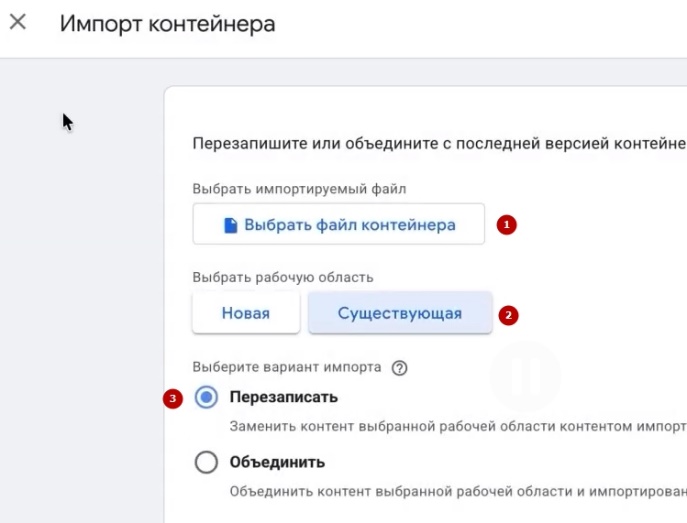
After importing, you will have the entire set of configurations. You just need to replace a few values with your own.
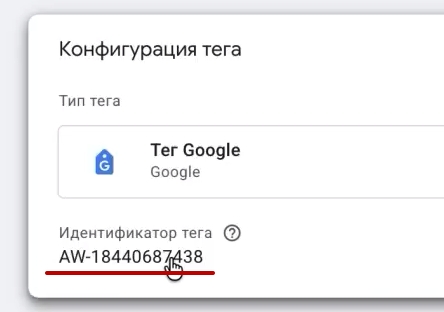
The first is the ID in the Google tag. You can find it in two places:
- in the goal we created: open “Purchase”, scroll down, and click “Manage” → “See event snippet”;

- in the Data Manager: under “Manage” → installation instructions → “Install the tag manually”.

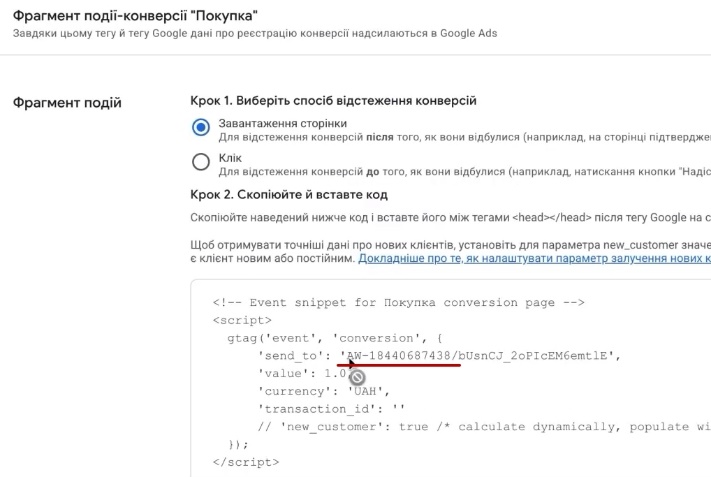
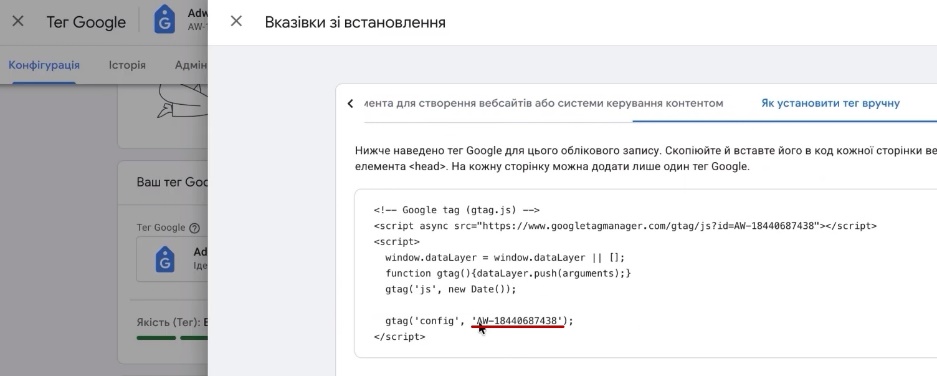
The second is the purchase conversion tag. Open it and paste your own conversion ID and label. They are found in the same place: “Purchase” → “Manage” → “See event snippet”. Copy only the numbers for the ID, without the AW- prefix, and copy the label entirely, from the first to the last character.
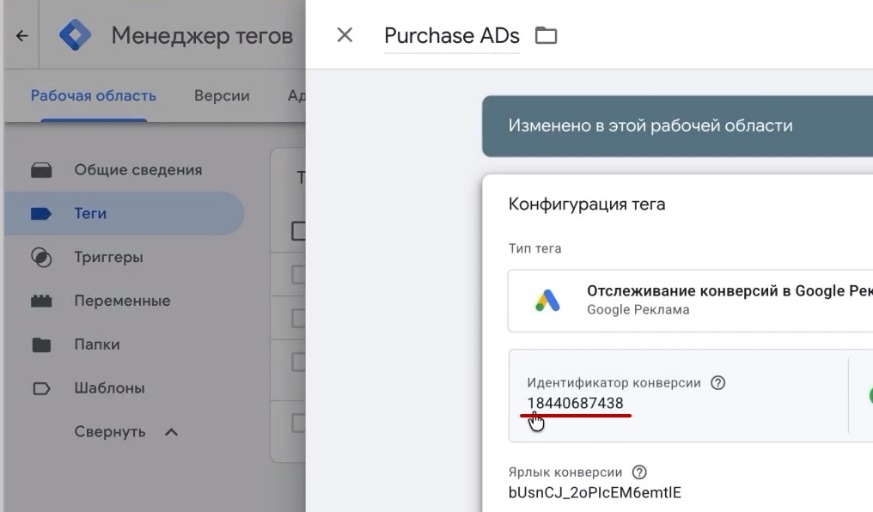
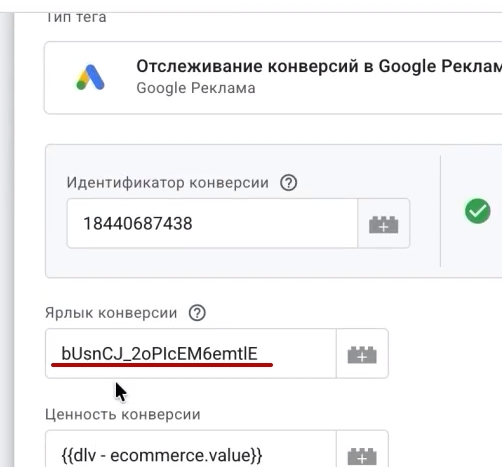
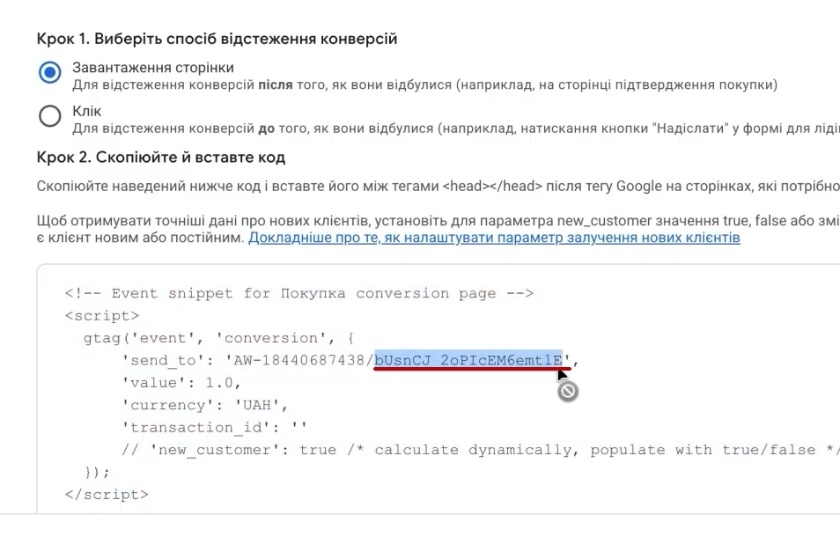
Copy the IDs very carefully. One missed digit—and the conversions simply won’t reach the account. I once lost a single character this way and spent a long time searching for why purchases weren’t being recorded.
What stays the same, and what is worth checking:
- do not touch the conversion value and transaction ID; the variables are already configured;
- change the currency code if you don’t use hryvnia;
- the checkbox for providing product-level sales data must be enabled;
- in the “Merchant ID” field, enter the ID of your specific Merchant Center.
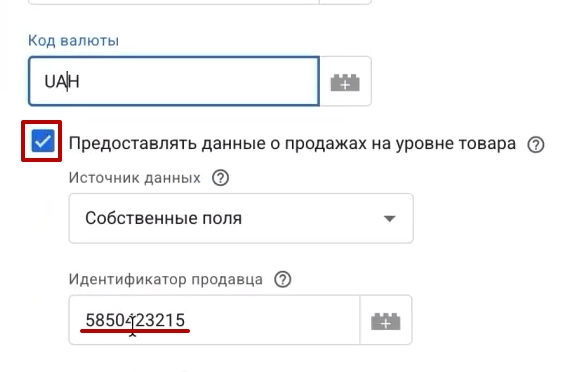
The product data (the `items` array) will be pulled in automatically; everything is already configured there.
If there is a separate gtag in the container for ecommerce events, and Shop-Express is already sending them via the GA4 integration, disable or delete that tag. Otherwise, some events will be duplicated, and the statistics in the reports will be inflated.
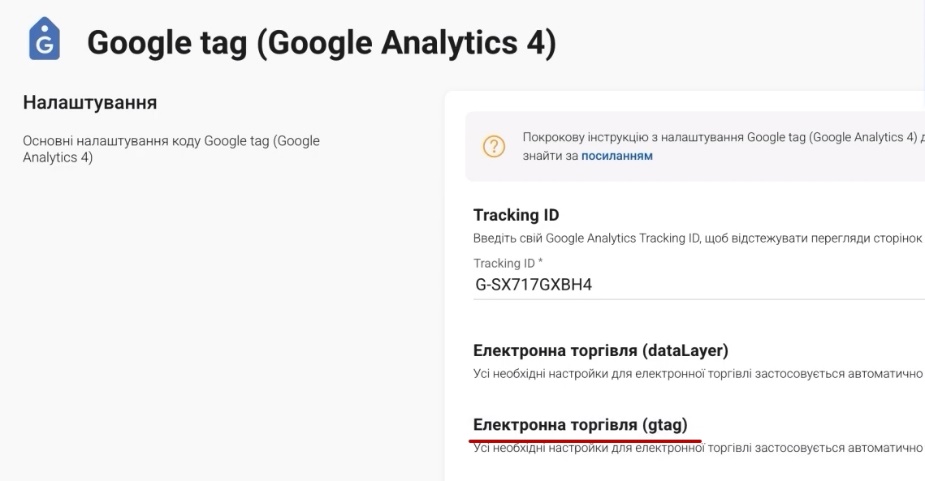
Save the changes, test everything via preview mode, and do not forget to publish the container.
Testing the Purchase Event Before Launching Ads
The container is imported, the data is swapped out. Now the main thing is to make sure the conversion actually fires. Turn on preview mode in Tag Manager again, connect the website, and go through the entire buyer’s journey: product card → “Buy” → “Checkout” → city Kyiv → “Place order”.
This time, there will be only one `purchase` event. But that’s not the most interesting part. Open the Google Ads tag for the purchase—there is now significantly more data there than in the basic version. At first glance, it looks like gibberish, but it’s not hard to figure out. You will see:
- data for enhanced conversions, i.e., the buyer’s email and phone number;

- product information: id, price, quantity.

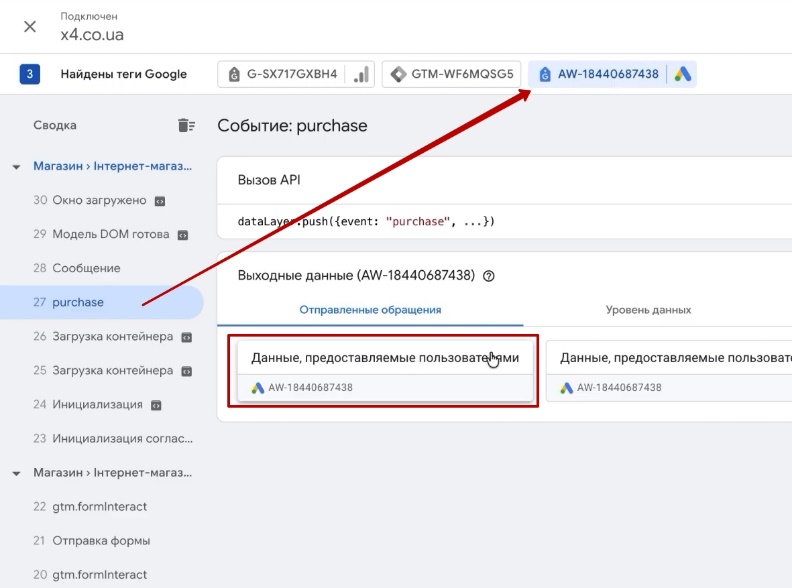
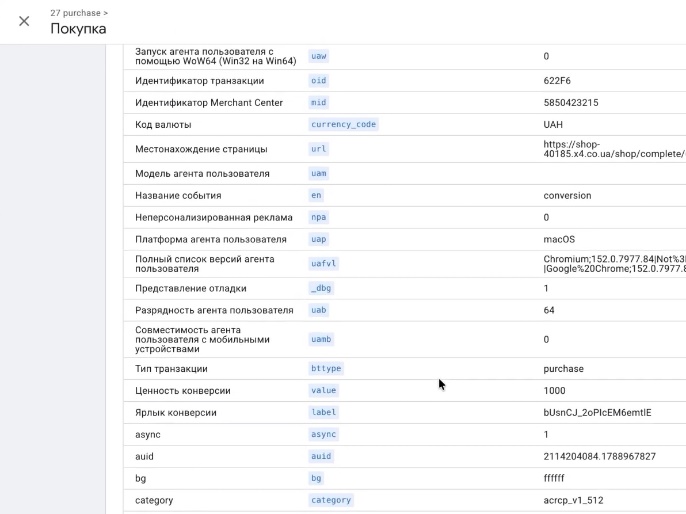
You can check the same thing in the “Variables” tab. If the enhanced conversion data is there and being transmitted, everything is working correctly.

After testing, be sure to go into the “Purchase” conversion settings in Google Ads, turn on enhanced conversions, choose “Google Tag Manager” as the method, and save. Without this step, the account will not use the emails and phone numbers, even if they are being transmitted.
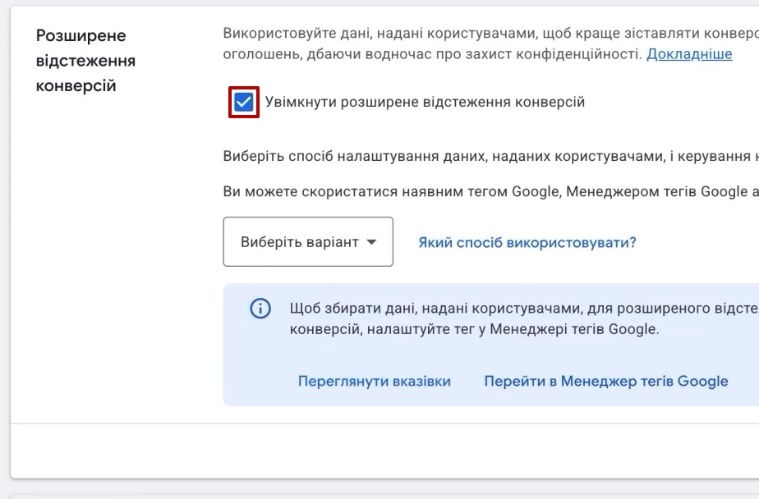
Briefly About the Data Collected
Why go through all this trouble with extra parameters? Let me explain.
Emails and phone numbers are currently the foundation for optimization in Google Ads. The system matches them with Google accounts and analyzes how these people behaved before purchasing: what they searched for, what they viewed, what they clicked on. As a result, the algorithm better understands who your buyer is and accurately finds similar people.
But the id, price, and quantity will be needed a bit later. When Performance Max launches, a cross-sell report will become available in your account. It shows which product a person clicked on and what they ultimately bought—complete with names and IDs.
This report is very telling. A situation where one product gets a lot of clicks but no purchases, yet orders come in for something entirely different, happens all the time. For example, you are advertising an expensive coffee machine for 18,000 UAH, but people click through, look around, and buy a capsule machine for 4,500 UAH. Without this data, you would decide the expensive machine “doesn’t work” and turn it off. But in reality, it is bringing in buyers. Plus, Performance Max accounts for this information in its operations.
Want even more? You can additionally set up dynamic remarketing with the correct events, and then the account will be configured practically perfectly. But that is a separate topic, so I will not dwell on it now.
After importing the container, do not forget to replace the data with your own and publish it.
Linking GA4 and Google Ads
Let’s do a quick recap. Products in Merchant Center are under review. Goals are set up in both Google Analytics 4 and separately in Google Ads. Only one small but useful step remains: linking analytics with the advertising account. This way, data about campaigns, UTM parameters, and conversions will accurately sync between both services.
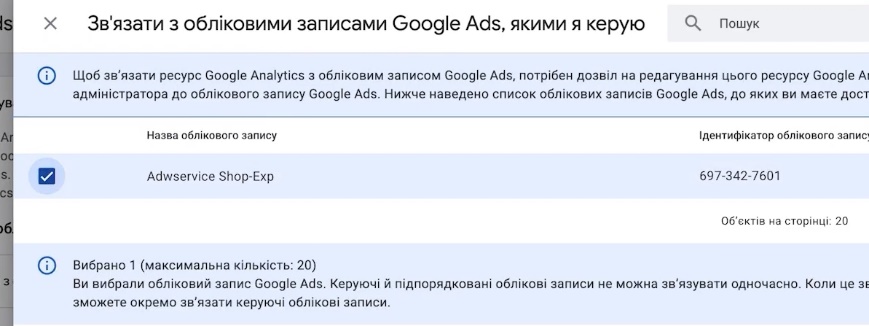
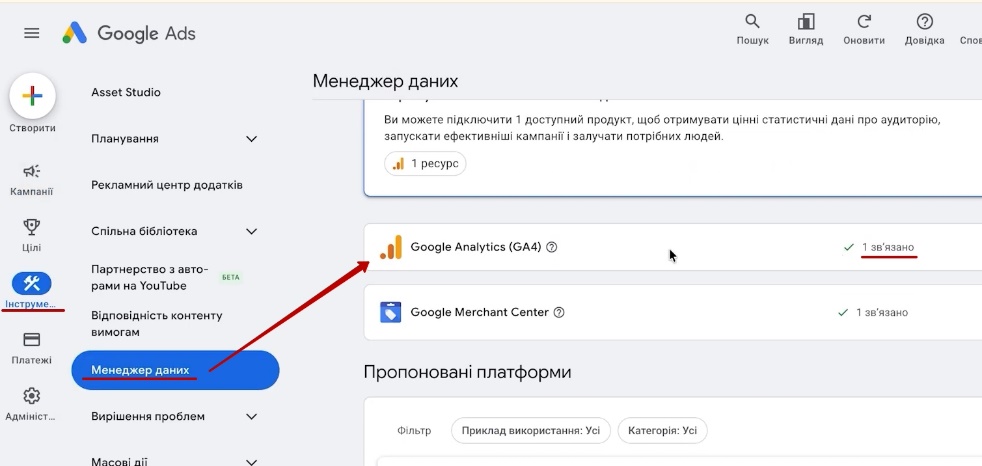
In Google Analytics, go to the Admin section, find Google Ads links, and select your account. The rest is simple: click “Next” → enable both toggles → “Submit”. Afterward, check in Google Ads to make sure the link has appeared. For me, everything synced immediately.
Creating a Performance Max Campaign
Alright, let’s move on to the most interesting part. First, we will create Performance Max, and we will cover Google Shopping a little later.
It is again convenient to create the campaign via Merchant Center. Open the “Ad campaigns” section and click “Create campaign”. Next:
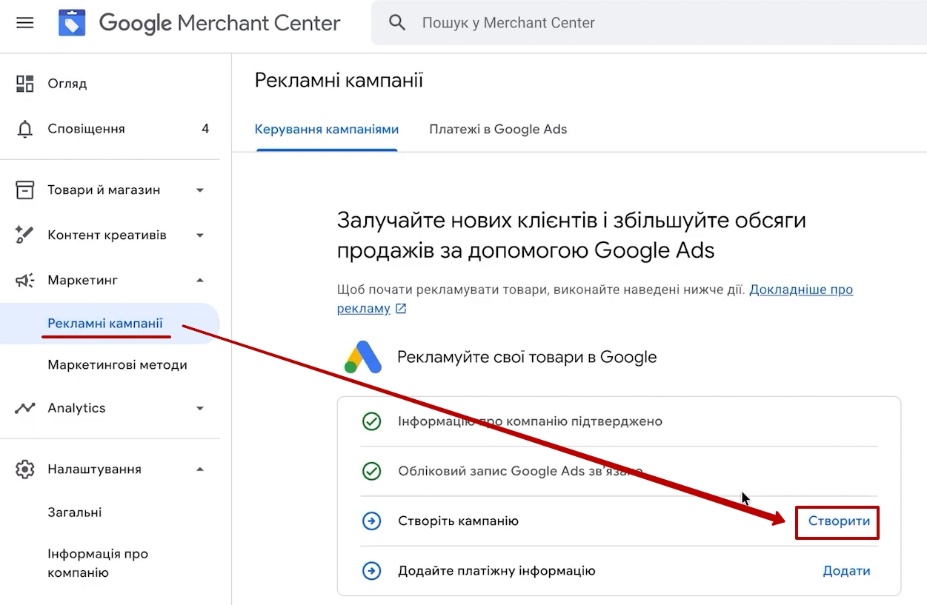
- Daily budget — for now, we set it to 10 UAH. This is temporary; we will fix it later in Google Ads itself.

- Name — anything, for example, “Pmax”.
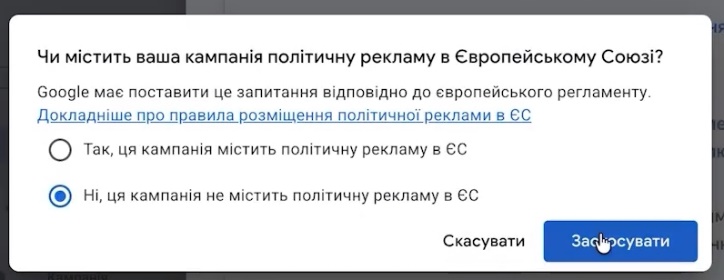
- When asked about political advertising, answer “No”.
- Click “Create campaign”.
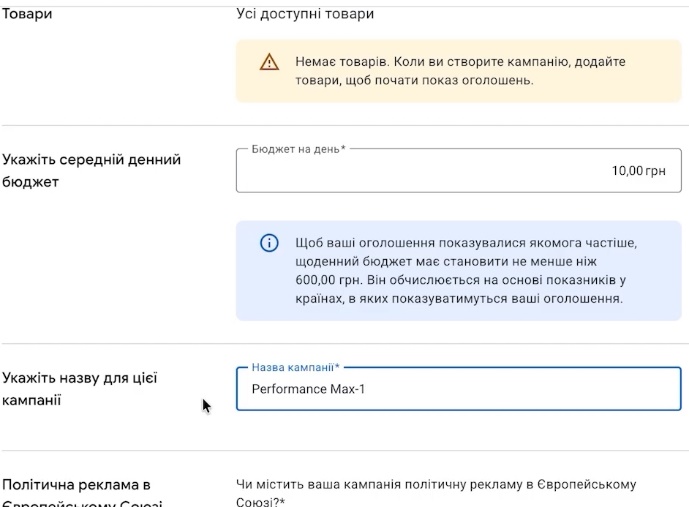
Don’t be alarmed if the system says there are no products. They just haven’t passed the Merchant Center review yet.
If you skipped billing data earlier, Google will ask you to fill it out now. For demonstration purposes, I chose money transfer and the “Private entrepreneur, VAT payer” type, and entered a dummy address.
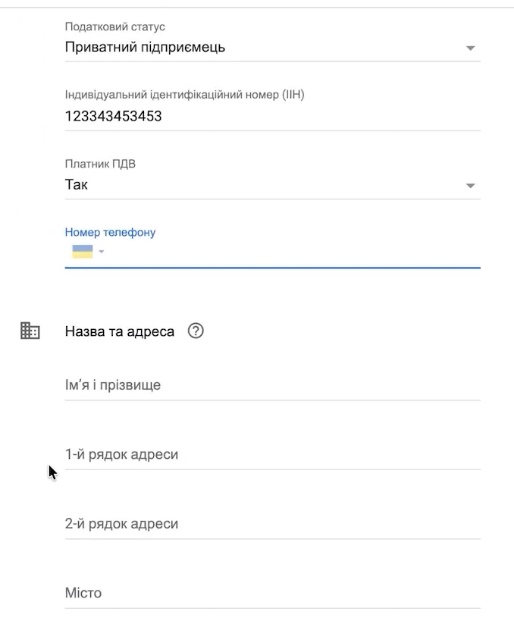
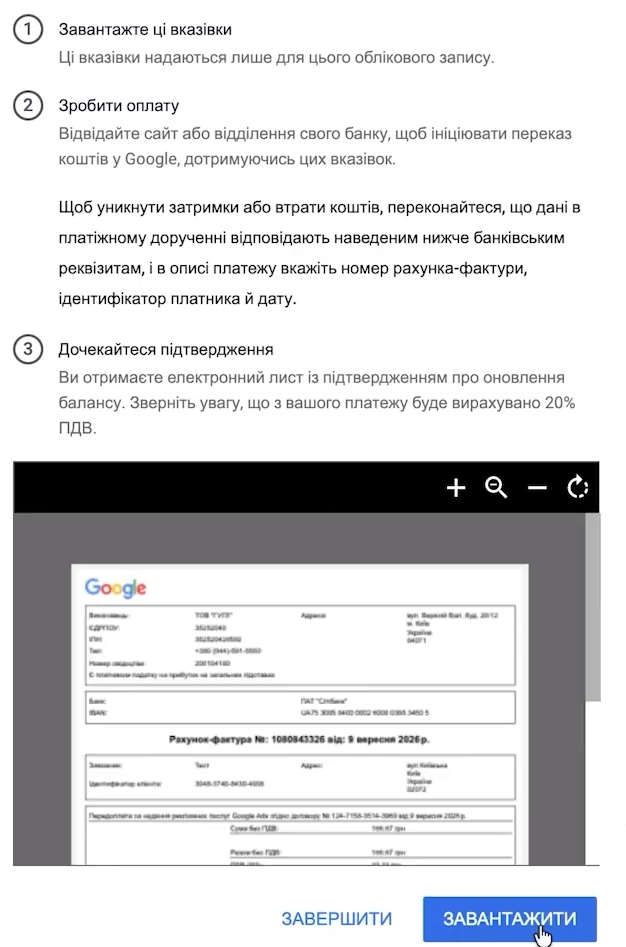
In a real account, the billing data must be accurate. Google matches it against the information in Merchant Center and may ask for documents to verify the address. Discrepancies are a direct path to suspension or delayed launch.
Click “Finish” → “Go to ad campaign”. Open Google Ads, refresh the page—the Pmax campaign is already there.
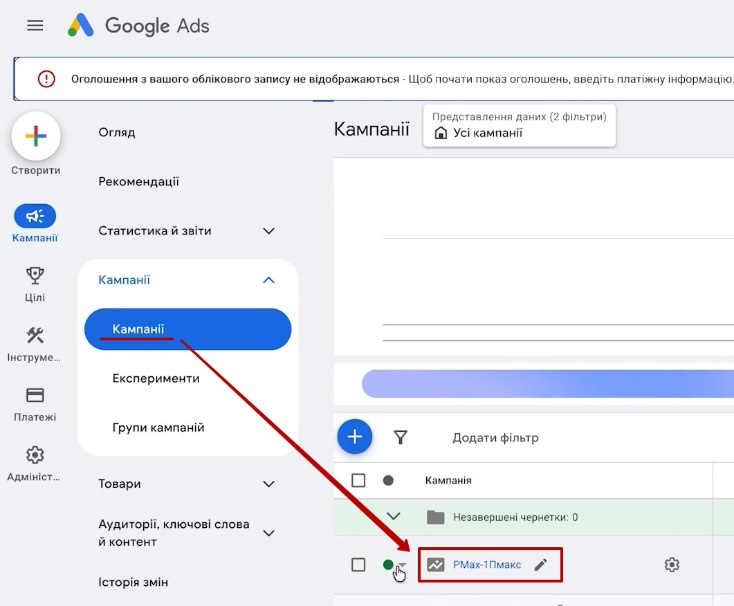
Pause the campaign immediately. First, you need to go over the crucial settings, and only then launch it.
Creating a “Feed-only” Campaign, Determining Budget
We are making a Feed-only format campaign. That is, we work exclusively with the product feed: no images, texts, videos, and other assets. We deliberately turn them off. Let the algorithm first learn from the products, and later, if needed, you can add the rest.
This is the most proven option for starting out. Later you can enable the full set of assets, but honestly speaking: for the Ukrainian market, it is far from always useful. Often, the budget just bleeds out into banners on partner sites with low-quality traffic.
The first thing to fix is the budget. How much should you start with?
For Ukraine, the standard benchmark for the learning period is the equivalent of $8–12 a day. Beyond that, it all depends on the projected CPC (which you can check in the Keyword Planner):
- limited budget and a CPC under 3 UAH — you can start with a minimum amount. But then your analytics must be set up flawlessly, because every conversion is worth its weight in gold;
- comfortable budget — it is better to allocate more for testing, say, 300–400 UAH a day;
- CPC from 5–7 UAH and higher — plan for 800–900 UAH a day.
The logic is simple. If a click costs 7 UAH and the budget is 150 UAH a day, the campaign will get a couple of dozen clicks. This is too little for the algorithm to learn, and it could get “stuck” for weeks.
Determining the Bidding Strategy
The next important point is the bidding strategy. In Performance Max, there are two main options to start with: “Maximize Conversions” and “Maximize conversion value”. Which one to choose? It depends on your inventory and average order value.
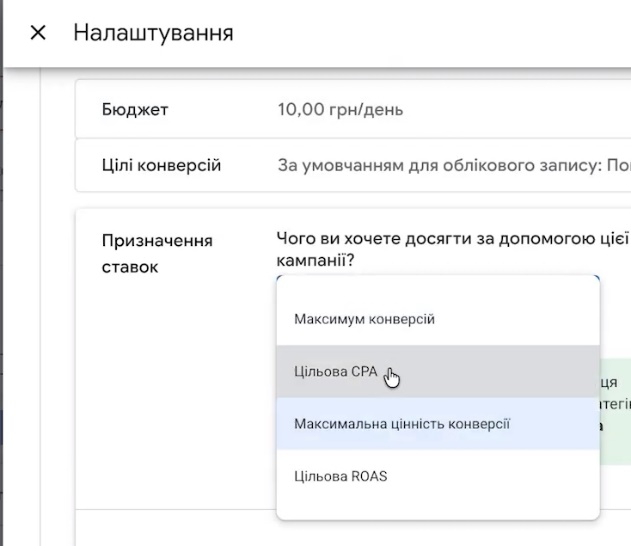
If most of the products in your catalog cost under 800 UAH, “Maximize Conversions” will almost certainly suit you. In Ukraine, this is the simplest and most stable option. But if the majority of your inventory (specifically the majority of the catalog, not the account average) has a price tag from 3–4 thousand UAH, you can safely launch with “Maximize conversion value”. Eventually, when stats accumulate, you will switch to a Target ROAS.
Now about the nuances of “Maximize Conversions”. In this strategy, you can set a target CPA right away. Do not do this at the start. Until the campaign has collected at least 5–10 conversions, and ideally 15–20, the restriction will only hinder it: you won’t hit it anyway, and the algorithm will learn worse.
The strategy operates by trying to find conversions that are about 10–15 times cheaper than the daily budget. So, keep an eye on the first week. If the campaign has already spent 500–600 UAH and there are no cheap orders, cut the budget in half and give it another week. Or try a different strategy.
Personally, I like working with Target ROAS right from the start. That way, the campaign learns to reach the necessary profitability level from day one. It doesn’t slow down learning or worsen results; it just gives the account clearer “boundaries”, which pays off later. But there is a vital condition: you should calculate your ROAS yourself based on your margin, and not just take the number recommended by Google.
If you prefer to follow the recommendations of Googlers themselves, the most proven options for starting out are still “Maximize Conversions” or “Maximize conversion value”. In short, who fits what:
- “Maximize conversion value” — for stores with a very diverse price range in their inventory. Start with a small budget, let the system gather 5–10 conversions, and only then try your personal target ROAS;
- “Maximize Conversions” — when the order value is roughly the same. For example, you sell car paints, items in the same price category, inexpensive impulse buy items, or dropshipping products.
Ultimately, the decision is yours: look at your niche and your numbers.
Specifying the Location
Most of the parameters on this screen can be skipped. But definitely check the location: it should be Ukraine only.
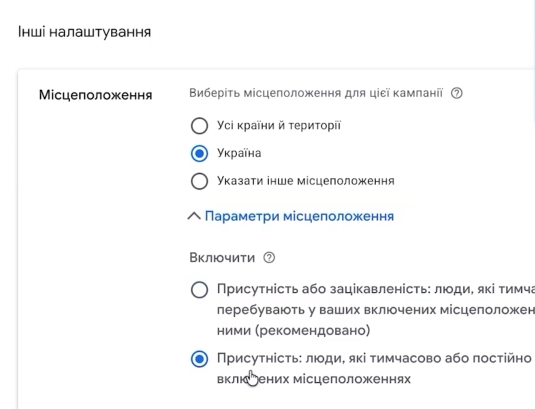
You can leave the whole country, especially since the front line constantly changes. There is usually no significant budget “drain” in temporarily occupied territories. Except maybe in niches like auto parts or electronics components—you should be more careful there.
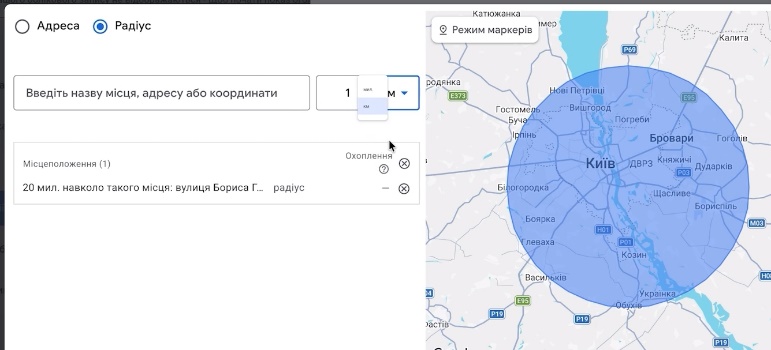
If you want more precision, use advanced search to target only the regions where you actually deliver. Or use radius targeting. Let’s say you have a store in Zaporizhzhia and you want to reach local buyers: enter the street where your office or pickup point is located and set a radius. The minimum is 1 km, and the maximum is limited only by your budget.
In the targeting parameters, select the “Presence” option. Especially if you are targeting specific cities or regions, for example, Kyiv and the Kyiv region. This way, you account for people who commute daily from the suburbs or regularly travel between regions.

To the question about political advertising, we answer “No” once again.
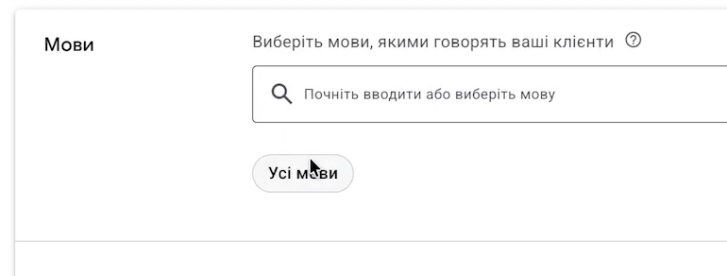
How to Properly Set Languages in the Campaign
For Ukraine, you can leave all languages. It won’t hurt. We have many people who have relocated and use phones with Polish, Hungarian, Spanish, or English interface languages. By restricting it to just Ukrainian, you will simply cut off a segment of your audience.
If you really want to keep things strict, the standard set is Ukrainian, English, and Russian. But, I repeat, “all languages” is a perfectly viable option.
Setting Up Other Options
Next is the “Asset optimization” block. I advise turning almost everything off here for now:
- image enhancements;
- video enhancements;
- text modifications.
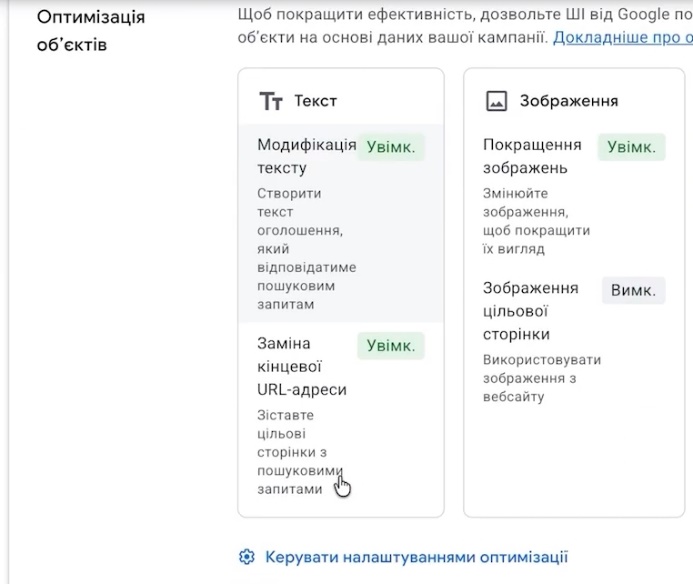
The first two are self-explanatory. Google generates a bunch of automated assets on its own, and to put it mildly, they don’t always look good. It’s better to develop creatives and videos yourself.
The text situation is even more interesting. Automated text modifications often produce Russianisms or just strange words. For instance, instead of “горщики” or “кашпо” (pots/planters), some weird “гіршки” might appear. So, if you are not ready to regularly check what Google has generated at the start, it’s better to leave this option off.
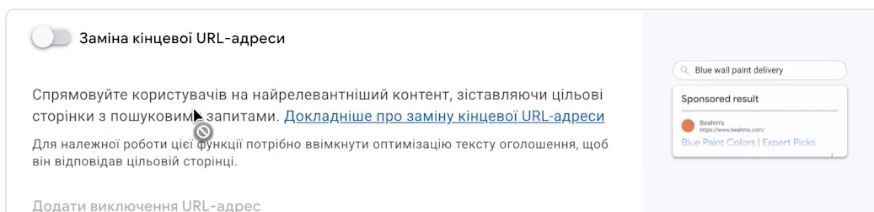
Final URL expansion isn’t as critical. But I would turn it off at the start too. Yes, the Performance Max ends up being quite “stripped down,” but for the initial launch, that is exactly what you need. The restrictions can be lifted later. And one more minor thing: exclude Smart TV placements; they almost never yield sales for an online store.
The rest of the settings are at your discretion. The foundation described is more than enough. You then regulate traffic volume using the budget: need more traffic—raise it, need less—lower it.
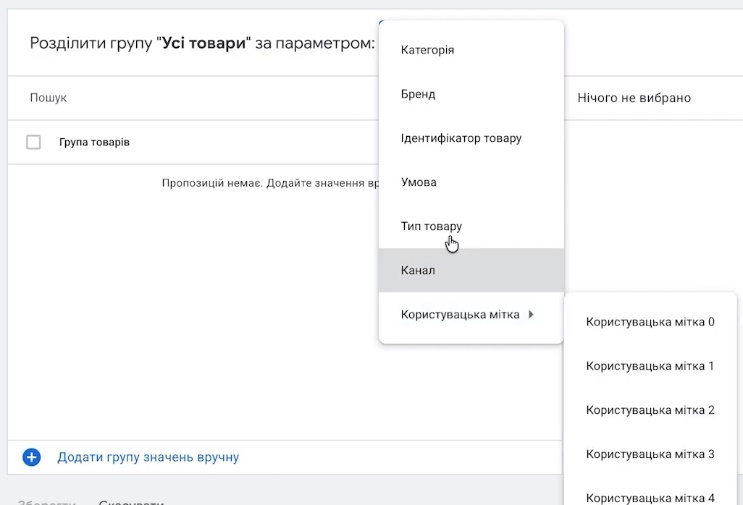
If you need to advertise not the entire catalog, but only a subset of products, go into “All products” in the asset group and split the inventory by attributes: categories, brands, or labels. For example, you can launch a separate campaign just for winter jackets while they are in season.
Setting Up Google Shopping
Now for a standard Shopping campaign. And don’t forget to turn on Performance Max when you are ready to advertise.
The sequence of actions is as follows:
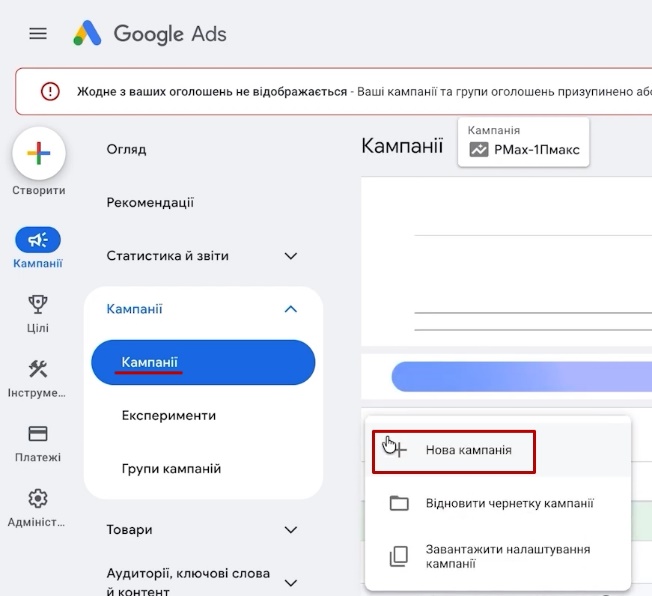
- In Google Ads, click “+” → “New campaign”.

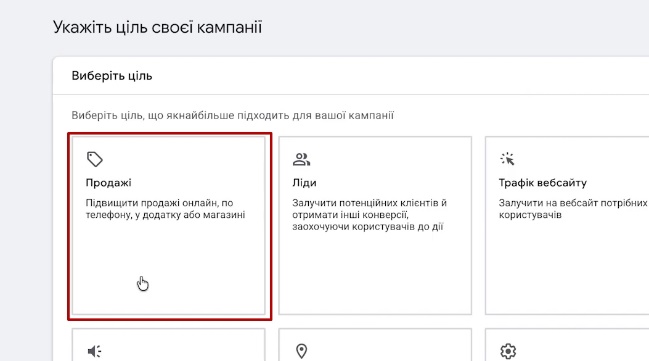
- Objective — “Sales”.


- Campaign type — “Shopping”.
- Subtype — “Standard Shopping campaign”.
- Ensure your Merchant Center is selected, and click “Continue”.
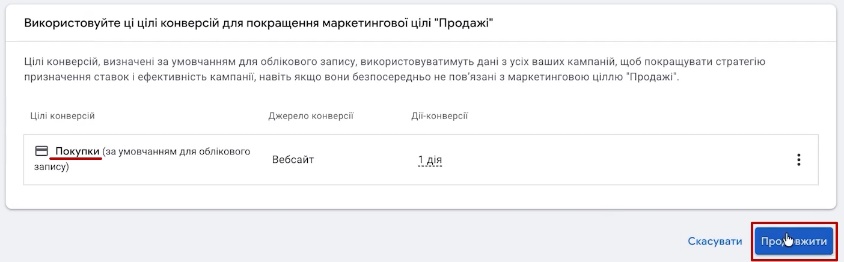
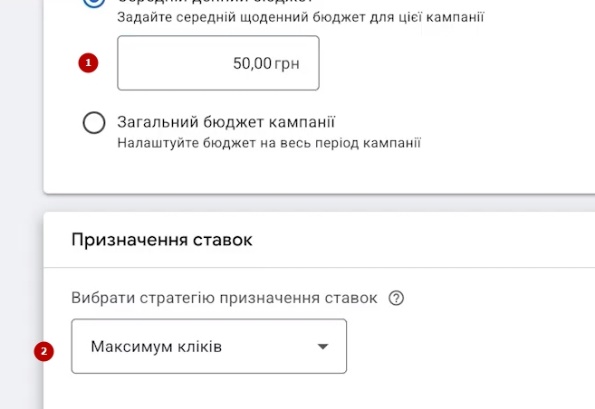
Set the budget to whatever you are willing to spend. Standard Shopping campaigns are usually launched on the “Maximize clicks” strategy, and here you can change the budget at any time: it does not affect learning in any way. The campaign is quite simple, without complex automation.
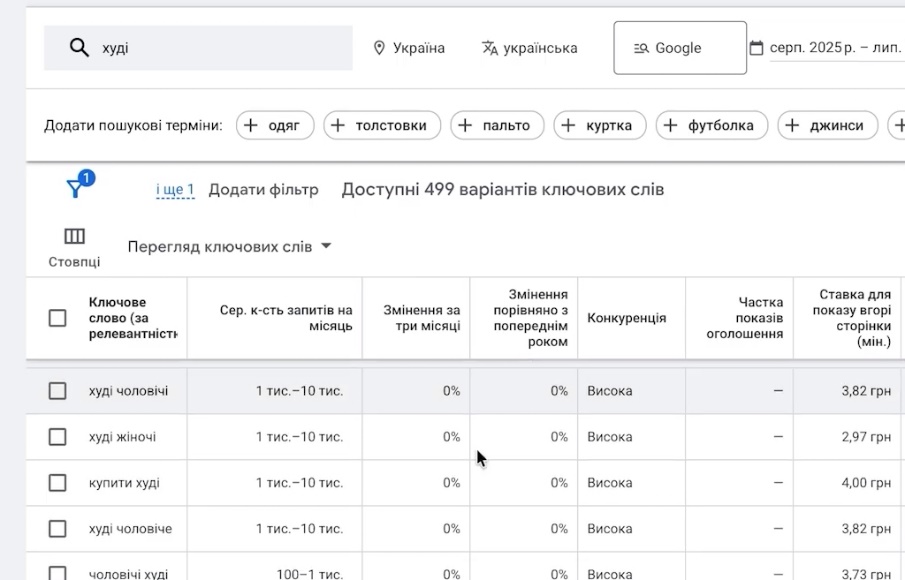
The only thing worth setting carefully is the max CPC bid limit. How do you determine it? Open the Keyword Planner, look for the average or closer-to-the-top bid for your niche, and add about a 20% buffer.
Let’s take an example. You sell hoodies. In the planner, you enter “hoodies”, language—Ukrainian, and click “Get results”. In the column with the top of page bid, you see, for instance, 12.82 UAH. We add 20%—which makes it roughly 15 UAH. If there are many search terms, export the report and ask Claude or ChatGPT to calculate the average bid and add a buffer. It will take a minute.
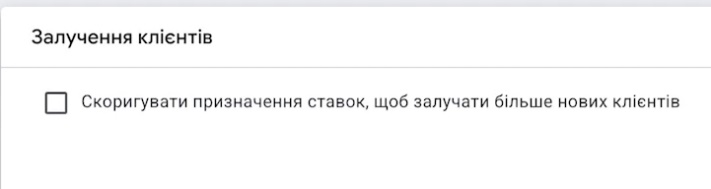
Do not touch the “Customer acquisition” block (bid adjustments to attract more new buyers) at the start: leave the checkbox unchecked.
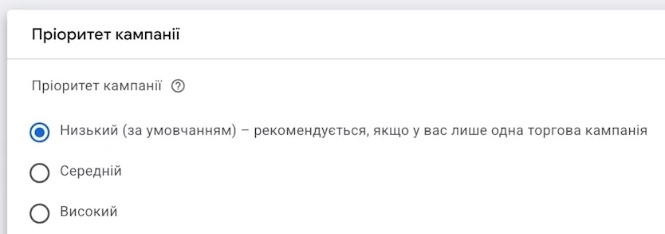
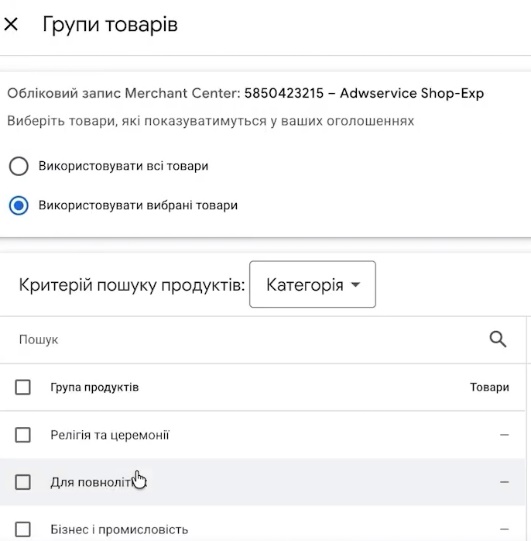
Campaign priority: if Performance Max is running in parallel, you can leave it at Medium or Low. Again, we do not choose political advertising. Products — “All products” or just the necessary categories. Mine still shows all categories globally because the products are still undergoing review.
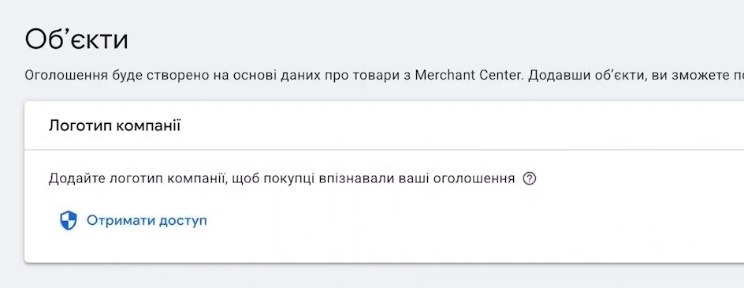
It is desirable to add a logo, but if you don’t get to it right now, nothing terrible will happen. That’s it, Google Shopping is ready.
Pause this campaign as well until the products pass review and you are ready to launch. And after launch, regularly review the search terms report and add irrelevant ones to negative keywords. This is especially important in Shopping, because there are no keywords here and showing up depends entirely on your feed.
Conclusion
Google is currently making its services so user-friendly that business owners can launch ads independently, without a freelancer or agency. And Shop-Express helps immensely with this: integrations with Merchant Center, analytics, and Tag Manager are set up in a few clicks.
Google Tag Manager might take the most time. But with a pre-built container, this stage goes much faster as well. The main thing is to carefully replace the IDs with your own and remember to publish the changes.
And finally. If you go through all the steps in this guide, your Performance Max will be configured better than many stores that come asking for an audit. Honestly, about 60% of specialists skip some of these settings, especially enhanced conversion tracking and passing product-level data. But these are exactly what give the algorithm the information it needs, without which it flies blind.