
Hello, everyone. My name is Yana Lyashenko. I am a Google logist—I help businesses attract the right target audience and scale online sales through Google advertising tools. Today, we’ll take a look at how to easily set up advertising campaigns for your Shopify store. But before we get started (you’ll find the timecodes below), let’s go over a few key points.
Steps for setting up commercial advertising campaigns in Shopify
The entire process is divided into three consecutive stages — you cannot skip any of them:
- Setting goals. Why are they necessary? First, you will be able to see in your advertising account which products generate sales and which do not. Second, without correctly set goals, you simply will not be able to launch Performance Max or smart shopping campaigns. The fact is that Pmax works on the basis of Google’s machine learning and artificial intelligence. And any predictive model requires source data — in our case, correctly set up conversions. Without this foundation, the algorithm will not understand what to focus on.
- Passing the Merchant Center review. This is one of the key and sometimes most problematic steps. Google is constantly tightening its moderation requirements, so be prepared: store verification can take up to 72 hours. If something goes wrong and your account gets blocked, you’ll have to make changes and wait for re-verification. Today, we won’t delve into this topic, but will look at a scenario where everything is already ready and approved.
- Creating advertising campaigns. Actually, launching a campaign according to the instructions takes less than a minute. Most of the time is always spent working with the Merchant Center—that’s where most of the nuances and pitfalls lie.
Two options for setting goals
Where do we start? With setting goals, of course. Goals (also known as conversions) are key user actions that we will transfer to the Google Ads system. Without this data, the algorithm simply won’t understand what to consider a successful result.
There are two ways to set up goals. The first is through Google Analytics 4: connect analytics, set up events, and import them into your advertising account. The second option is to create conversions directly in Google Ads. Since we will be running ads in this service, we have the opportunity to use its own “native” conversions.
Quickly generate conversions in Google Ads
Today, we will examine the second method, as it is faster and easier to get started with. If you require more advanced configuration (for example, a purchase event via GA4), I have a separate video on this topic. For now, let us focus on the basic option, which is guaranteed to get you started.
The only thing to keep in mind is that we will be using a free plugin, and sometimes there are nuances with the accuracy of conversion tracking. Therefore, after launch, I recommend running ads with a minimal budget to see if everything is being counted correctly and if any additional adjustments are needed. This will be more than enough to get started on your own.
What needs to be done at this stage:
- Ensure that conversions are recorded in your Google Ads account.
- Verify that basic dynamic remarketing is functioning on the website.
Google Channel plugin for Shopify
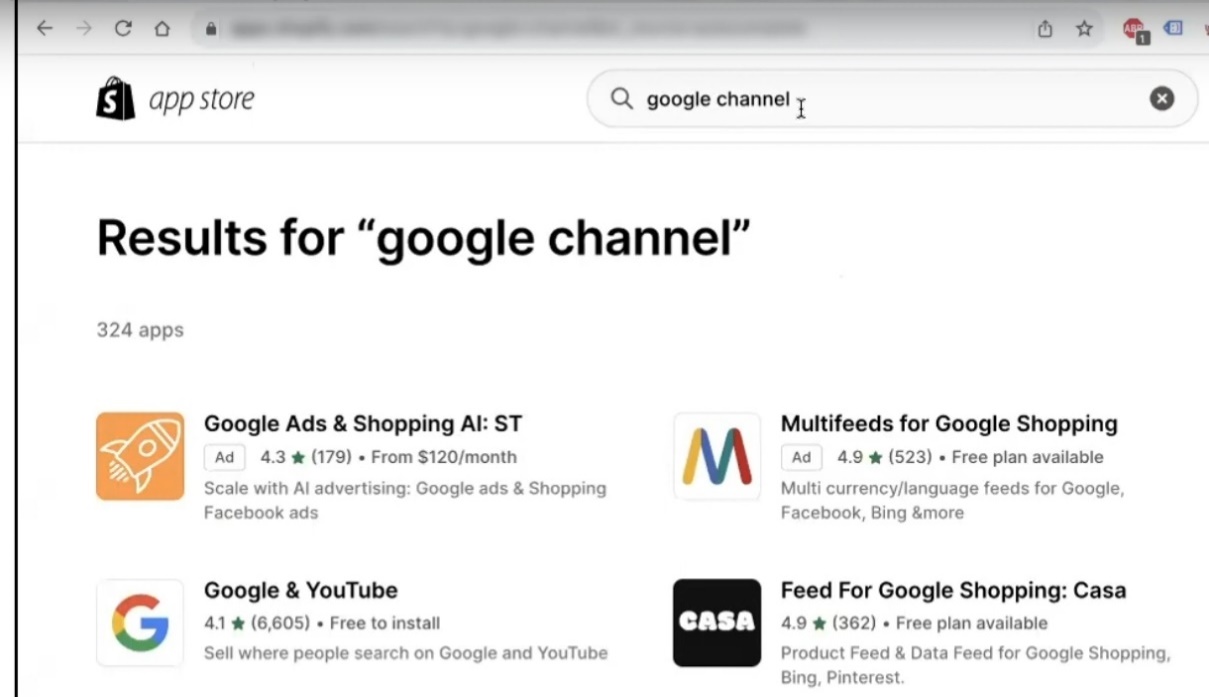
Both tasks can be accomplished using a single tool—an official plugin from Google developed specifically for Shopify. It is called Google Channel. You can find it in the Shopify app store—just enter the name in the search bar or use the link in the video description.
The rest is simple: install the plugin.
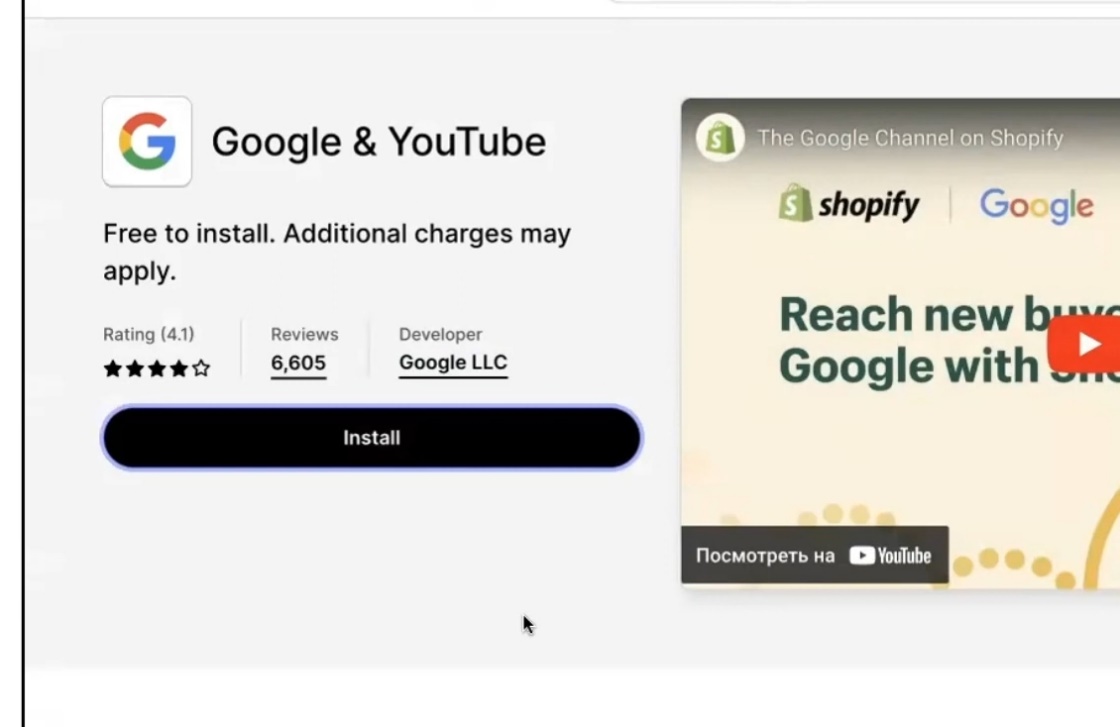
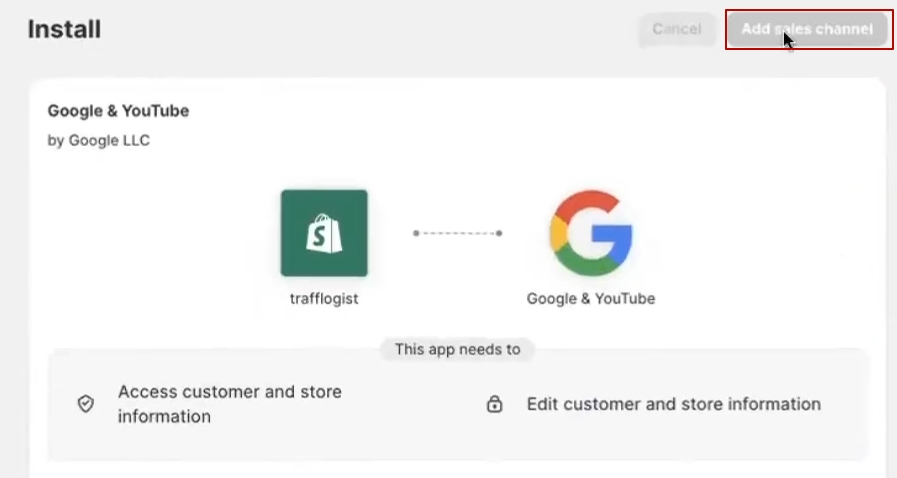
Before doing this, make sure you are logged into Shopify with the correct email address, otherwise you may encounter problems linking accounts later on. Click Install, then on the next screen, you don’t need to change anything — just click Add sales channel and move on.
Adding the Google Channel plugin to Google services
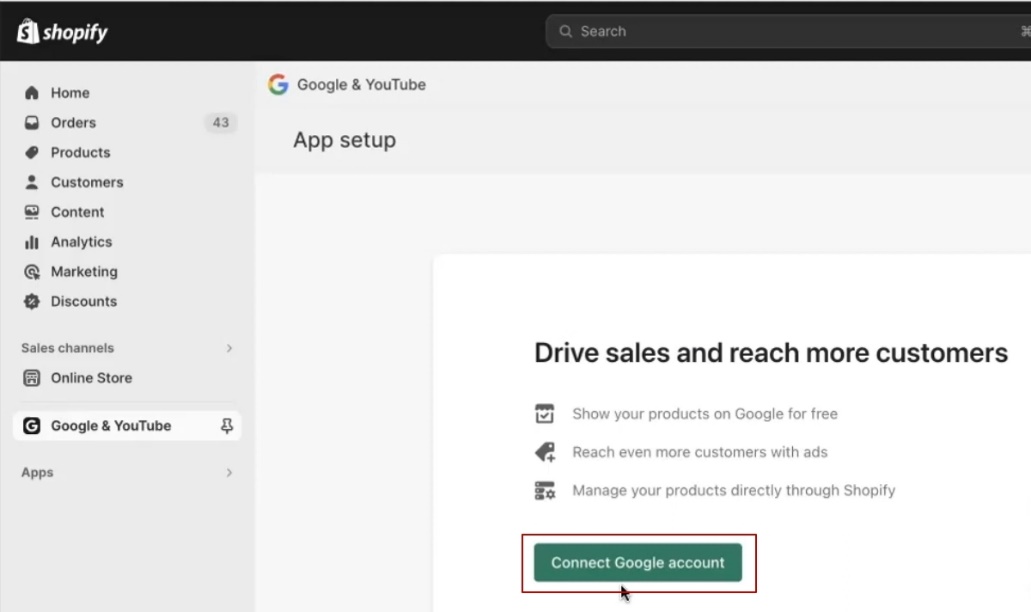
Now pay attention — this is important! You need to link the plugin to Google services. The entire Google ecosystem (advertising account, analytics, Merchant Center) is connected through one key element — your email address. Email is the link between all services.
My advice: create a separate email address specifically for working with Google services. Do not use your personal email address, which receives newsletters, notifications from social networks, and so on. Create a “clean” account and use it to log into Google Ads, Google Analytics 4, and create a Merchant Center. Why is this important? First, you won’t mix up accounts (and this happens more often than you might think). Second, you can easily grant access to colleagues or contractors if necessary. The main thing is to keep the password for this email in a safe place, because restoring access to a “bare” account without any links can turn into a quest.
Don’t want to create a new email account? Then use any existing Gmail or corporate email account on Google servers — that’s also a viable option.

Click Google Connect, select the desired email, and allow all requested access (yes, Google likes to request them — this is normal). After that, the plugin will display a checklist of steps to follow. Usually, most items are already checked, but in new stores, one block is often inactive. Click on it, and Shopify will redirect you to the Refund policy and Terms of service section. The Terms of service can be generated using Shopify’s built-in generator. However, the Refund policy will have to be written manually, and in detail — Google pays attention to this during moderation. I will leave a link to the official requirements in the description.

Save, confirm, and let’s move on.
Creation of a new Merchant Center
If you are using a new email address, the system will prompt you to create a new Merchant Center. Select Create New Account, and you’re done. The account will have a digital ID; remember it or write it down. The email address you used to connect Google Channel to Shopify will have access to this Merchant Center. Click Connect.
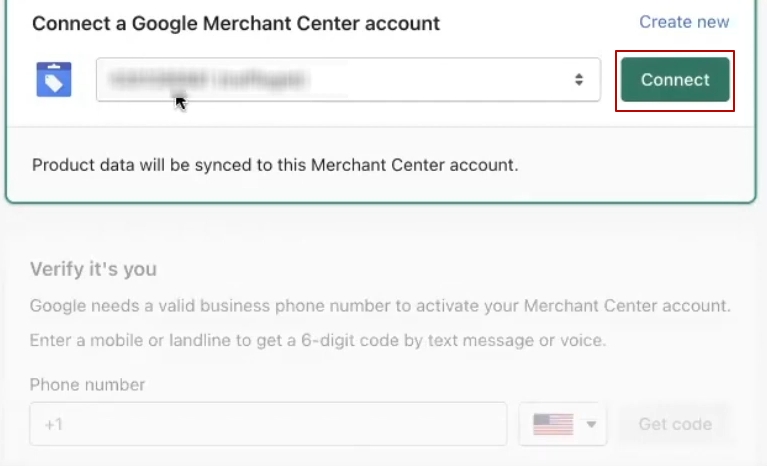
The next step is to confirm your phone number. This is a mandatory procedure related to verifying your rights to the website. If, like me, you already have other Merchant Centers for this domain, the Transfer to my domain option will appear — simply transfer the website to the new account. For most people, however, this will be a standard connection: connect to the new Merchant Center without any additional steps.
Enter phone number
The next step is to enter your phone number. Take this step very seriously! The number you enter here must match the phone number on your website. Why is this critical? This number will automatically be pulled into the Merchant Center settings and will be verified — first by robots during the automatic moderation stage, then by live Google employees.
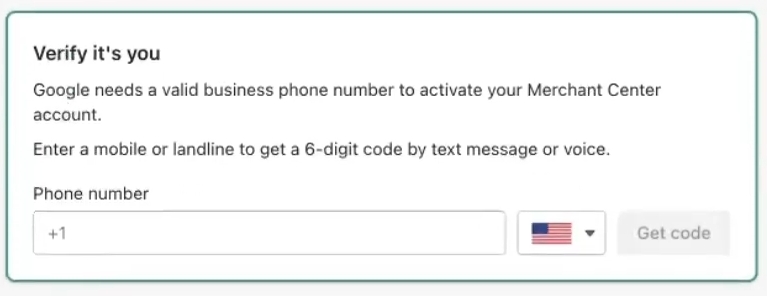
Do not enter a random number here — not your personal number, your mother’s number, or some old work number that has nothing to do with the store. Only the number listed in the contacts on the website. Discrepancies are a common reason for a store to be rejected during moderation, and then you will have to spend time making corrections and re-checking.
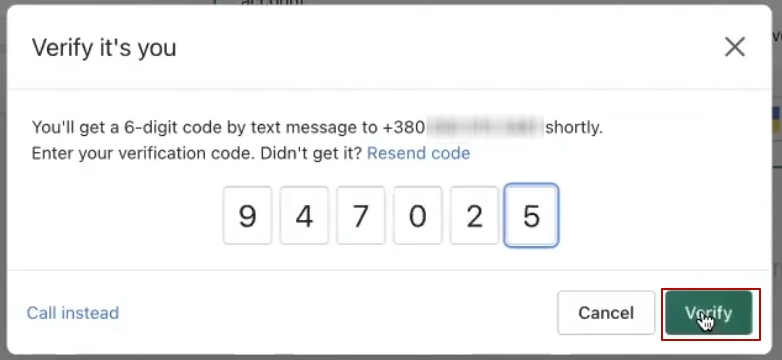
Enter the number and click “Get code.” A window will appear for entering the SMS code—enter the numbers and click Verify. That’s it, the basic setup is complete: the Merchant Center has been created, and some of the information has already been filled in automatically. But don’t relax just yet—there are still a few important steps ahead.
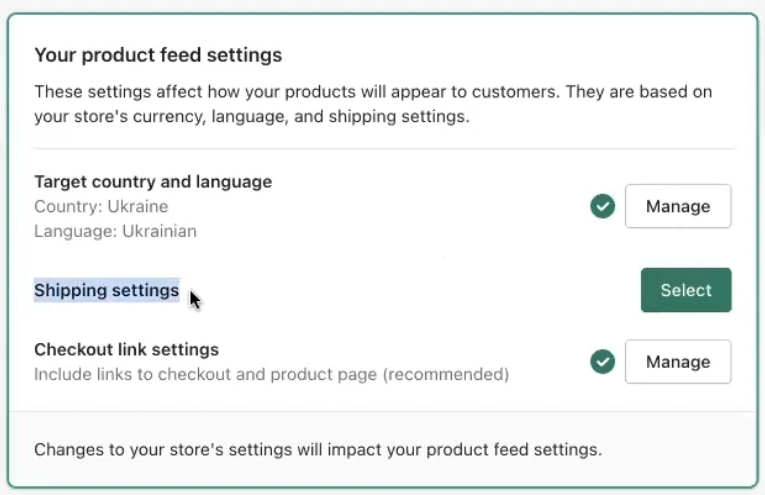
Country and language settings
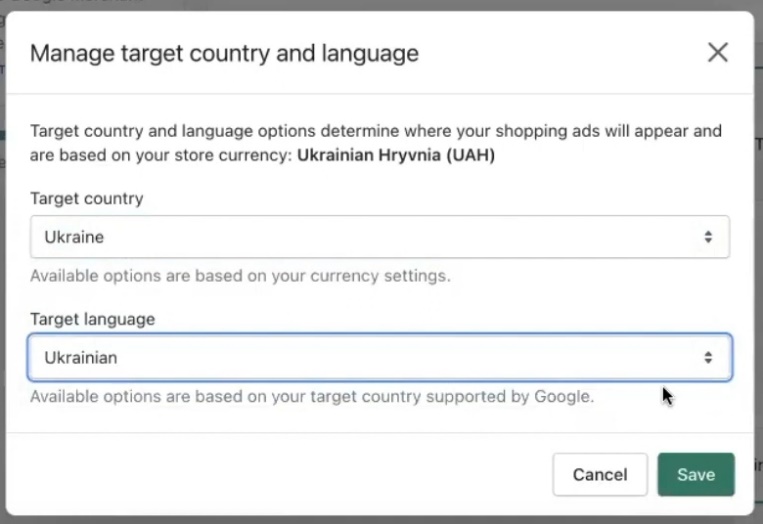
Now select Target Country and language. You need to be careful here, especially if you are setting up Google Ads campaigns for a store with only one language on the website. This is the scenario we are considering today.
If you have a multilingual website on Shopify (for example, English plus German for different markets), you will need a different plugin and a slightly different approach. If this topic is relevant to you, please write in the comments, and I will record a separate video.
For a monolingual store, it’s simple: select the country (usually the country you specified when registering with Shopify—the US, Canada, or one of the European countries) and the target language—the language in which you will display your ads. This is important: the system will generate a product feed in the Merchant Center for this language. If you choose the wrong language, the feed will not pass validation, or the ad will be shown to the wrong audience.
Have you made your selection? Click “Save.”
As you can see, setting up Google Shopping via a plugin is not a complicated process. The interface is intuitive, and everything is designed with the user in mind. But there are a few more points that I recommend noting — we’ll get to them now.
Configuring delivery terms in the plugin
The next mandatory step is to configure delivery settings. The plugin will prompt you to select how to transfer information about delivery methods and costs to Merchant Center. Shopify has a convenient feature: if you specify the weight for each product item, the system automatically calculates the delivery parameters and pulls them into Google Merchant Center. There is no need to manually enter rates for each region or weight category—everything is generated automatically.
Therefore, in most cases, I recommend choosing Automatically import shipping information. Especially if you have several delivery options with different conditions — automatic import will save you a lot of time and reduce the risk of errors.
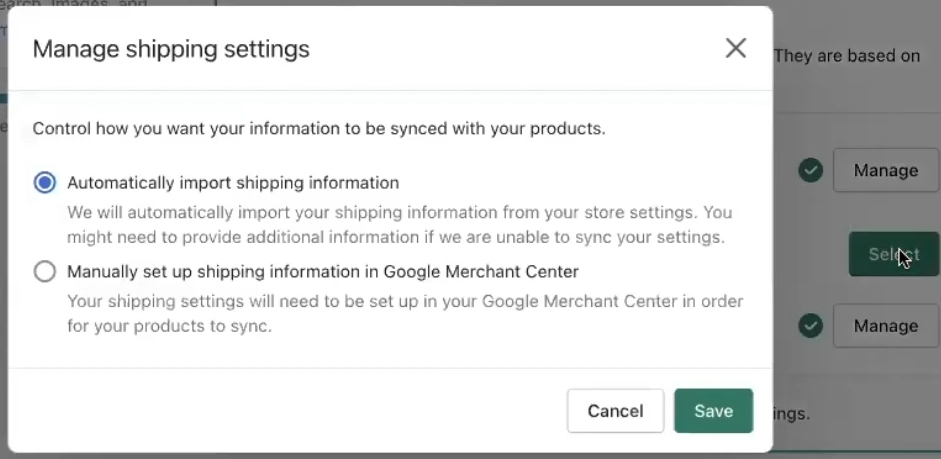
The second option, Manually set up shipping information, is suitable if you have a non-standard delivery calculation logic or want to specify a fixed cost. But keep in mind: when setting up manually, you will have to monitor the relevance of the data yourself. If you forget to update the rate, your ad may not pass moderation or show incorrect information to buyers.
From experience: for shops on Shopify, automatic import works more reliably and rarely causes problems during Google Merchant Center verification. So, unless there are compelling reasons to do otherwise, stick with automatic import.
Completing the initial setup of Merchant Center
Now, an important point—the Conversion tracking item. Here, be sure to select Turn off. Why? Because we will set up conversion tracking separately, in a more accurate way, a little later.
Check the box to agree to the terms of use, and click Complete setup.
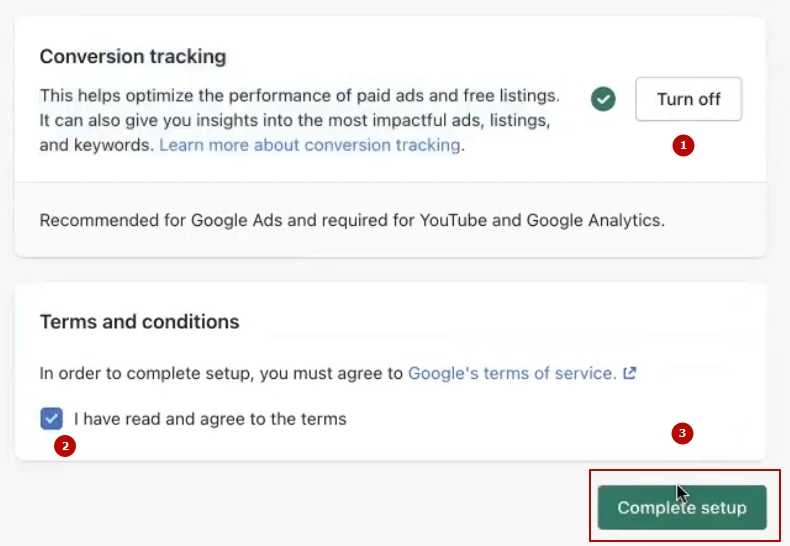
Congratulations—the initial setup of Merchant Center for Shopify is complete! The basic connection between your store and Google services has been established. But this is only the foundation. Next, you need to make sure everything is working correctly and move on to creating advertising campaigns.
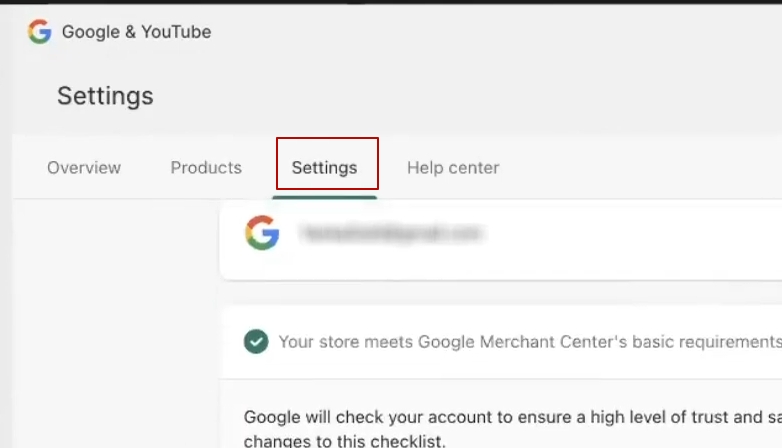
Viewing the specified settings in Merchant Center
What did we do in the previous steps? Let’s go to Settings and check. We created a Merchant Center and filled it with basic information: we selected a country, specified the language for the product feed, and set delivery parameters. All of this can now be viewed in one place and edited if necessary.
Setting up Product Title
Pay special attention to the Product title preference option — it affects which product names will be displayed in ads.
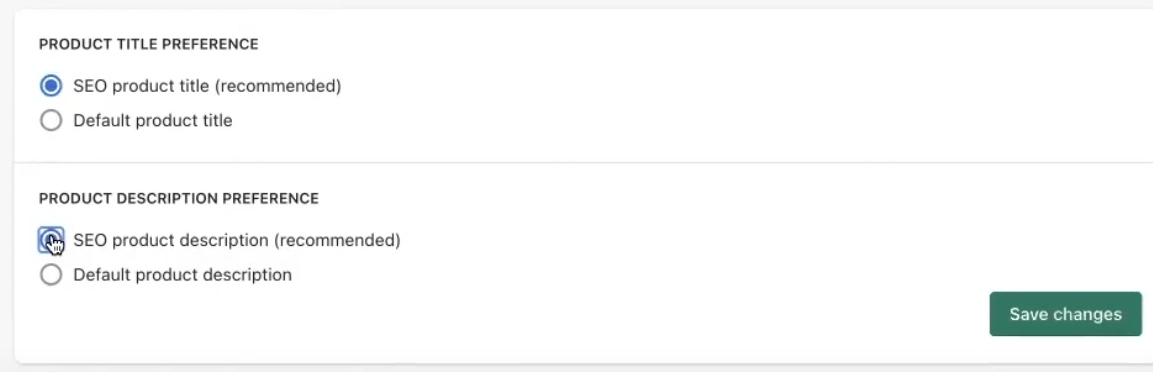
There are two options here: Default product title (standard name from the product card) and SEO product title (optimized name from SEO settings). I usually recommend choosing SEO product title — it is usually more rich and informative. For example, instead of “Nike sneakers,” the SEO version could be “Nike Air Max 90 men’s white sneakers” — you have to agree that this is more beneficial for advertising.
But there is no universal solution. If you haven’t filled in the SEO fields for products or the same text is duplicated there, it won’t make any difference. Check how both options look for several items and choose the one that gives more complete and attractive names.
Checking the stage of set goals
Now we move on to an important step—we need to make sure that Merchant Center is correctly linked to Google Ads and that the goals are set up correctly. To do this, open the Overview block in the plugin.
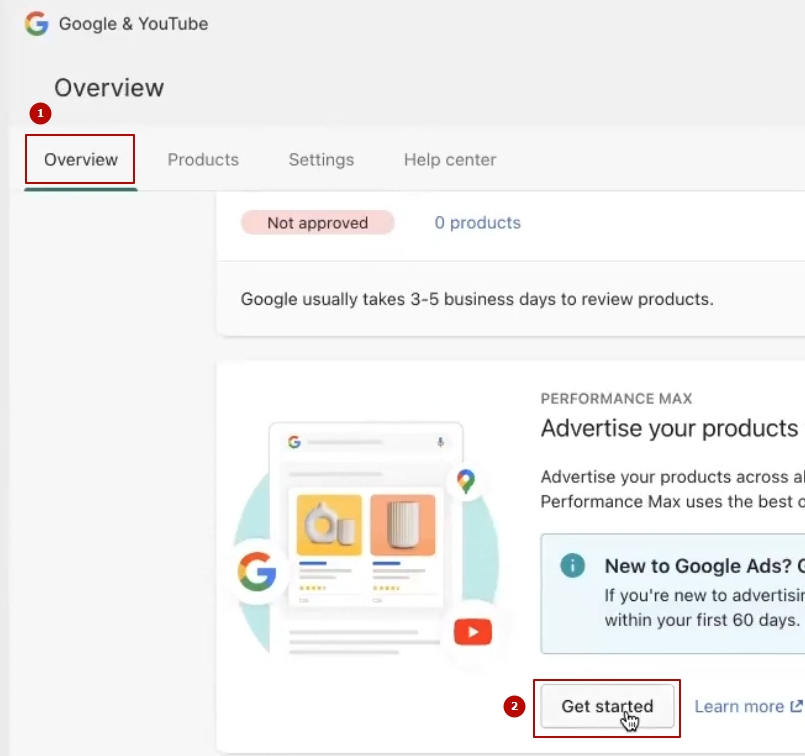
Click Get started — the system will prompt you to either select an existing advertising account (if you already have access to this email address) or create a new one. If you don’t have an account yet, create one from scratch.
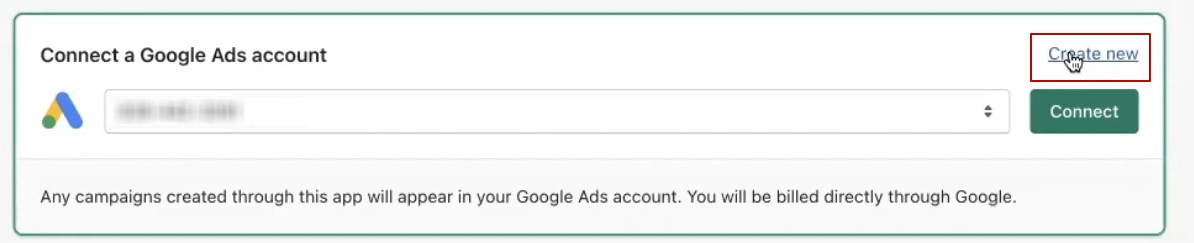
A nice bonus: when you create a new account, you often get an offer for a $500 credit. However, it is spent in different ways — sometimes it is deducted first before your own expenses, and sometimes it is spent in parallel with your main budget. But in any case, it’s a nice addition to get you started.
After creating an account, be sure to record its ID (number) — you will need it for further work. Click Create campaign.
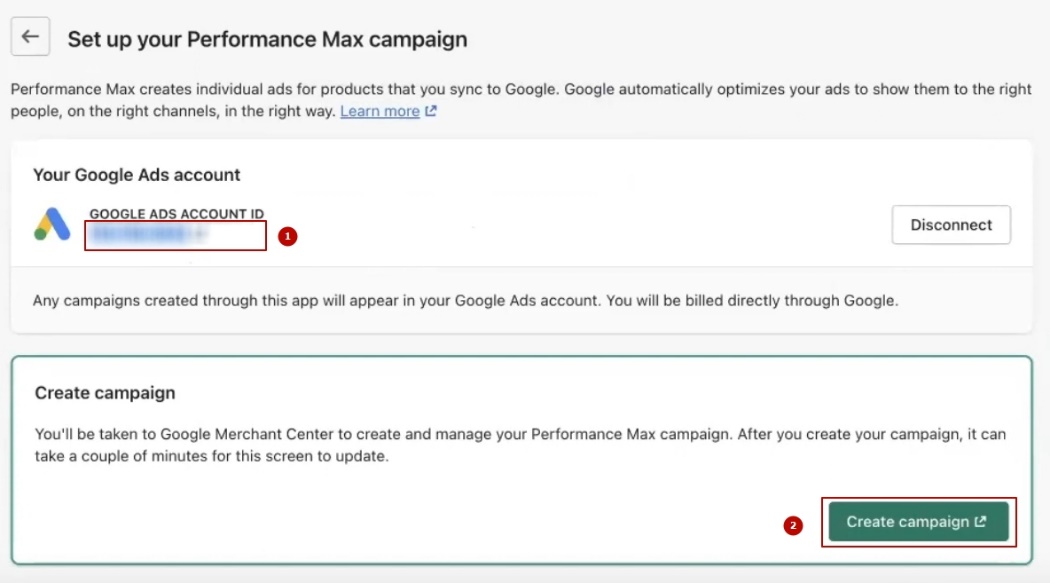
Next, the Merchant Center will open, but we need to check the Google Ads advertising account separately. Click on the account number—it works as a link—and you will be taken to the Google Ads interface.
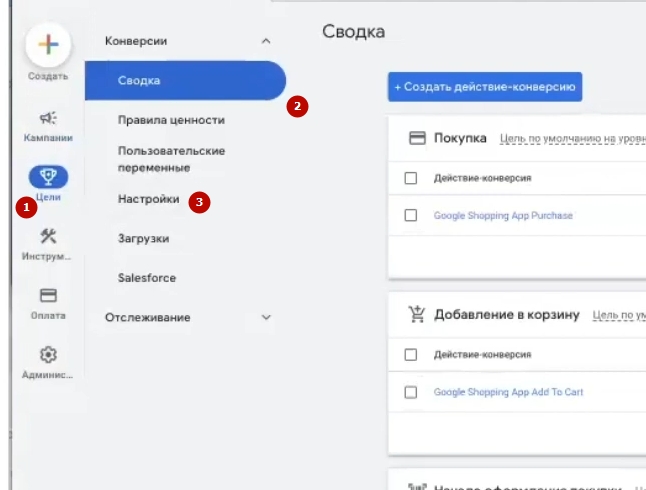
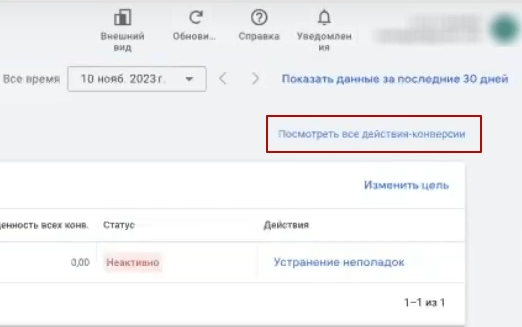
First, check whether there are any conversions that the Google Channel plugin creates automatically. Where to look? Go to the left menu: “Goals” → “Conversions.” You can select “Summary” or “Settings” — “Summary” will work for our task. Click “View all conversion actions” and see what’s there.
Viewing goals created by the Google Channel plugin
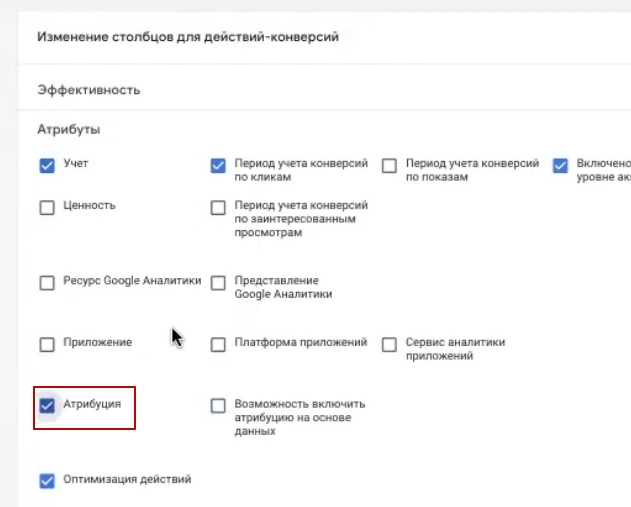
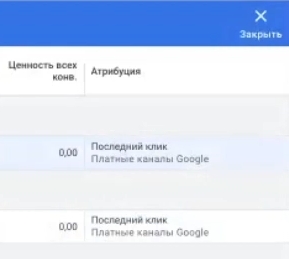
Let’s move on to verification. For convenience, add a column called “Attribution” — you will need it later.
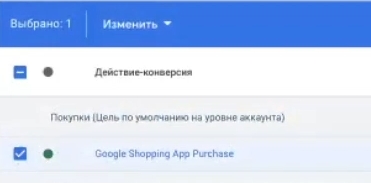
What do we see? The Google Channel plugin automatically created a set of conversion goals. Everything happened without our involvement — no need to figure out Google Tag Manager, dig into the website code, or manually configure the dataLayer. For Shopify store owners, this is a huge plus: the technical part is already done, all that’s left is to make sure everything is working correctly.
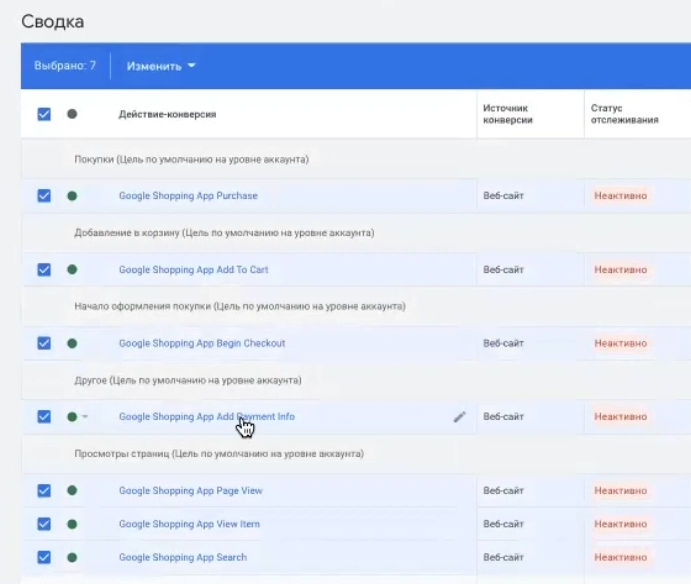
What should we look at first? Find the Google Shopping App Purchase goal—it should be in the “Shopping” category and marked as “Primary Action.” This is the key conversion that Performance Max will optimize for.
Next, check the “Attribution” column. For purchasing purposes, it is preferable to use the “Last Click” model. Why is this important? At the beginning, when there is still little data in the account, “Last Click” provides a clearer and more transparent picture: you can see exactly which click led to the sale, without the need for complex value distribution between multiple touches.
Configuring goals created by the Google Channel plugin
Sometimes the plugin sets priorities incorrectly. For example, the Add to cart goal may end up in “Basic actions,” even though logically it is an intermediate step rather than a final conversion.
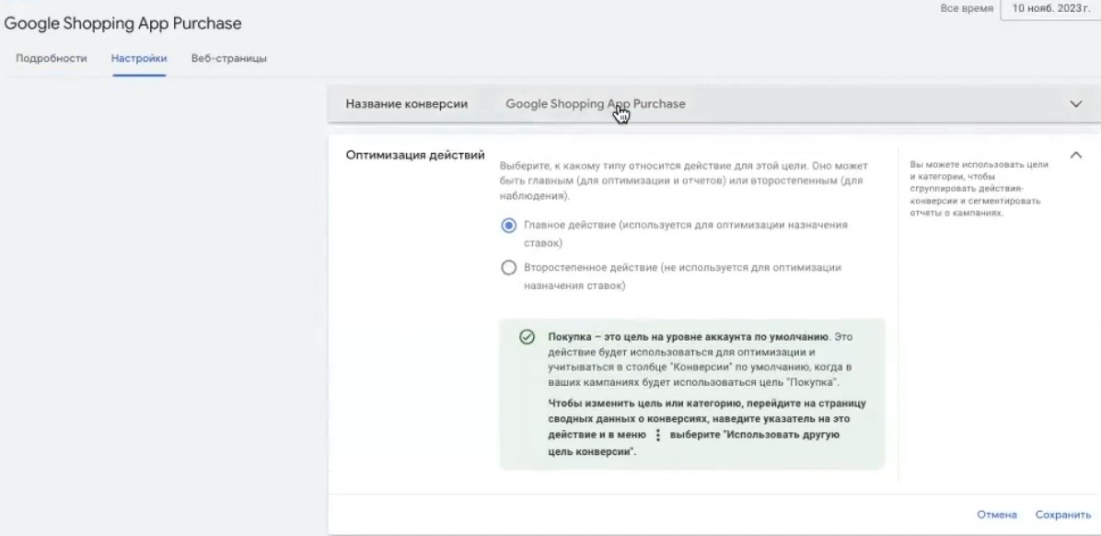
How to fix it? Go to the desired goal, click “Change settings” and change the status. Move Add to cart, Begin checkout, and similar micro-conversions to Secondary actions. Purchase should remain the Primary action — this is what the system will focus on when optimizing advertising campaigns.
Check the attribution model there as well. For a new account with minimal statistics, set “Last click.” If you already have a history and accumulated conversion data, you can leave “Data-driven attribution,” which takes into account the entire user journey and distributes value between several touchpoints. But to start with, don’t complicate things; “Last click” will be the best choice.
Checking conversions on the website
The goals have been set up — now you need to make sure that they actually work on the website. Without this check, you could launch your ad campaign and discover a week later that purchase data is simply not being transferred to Google Ads.

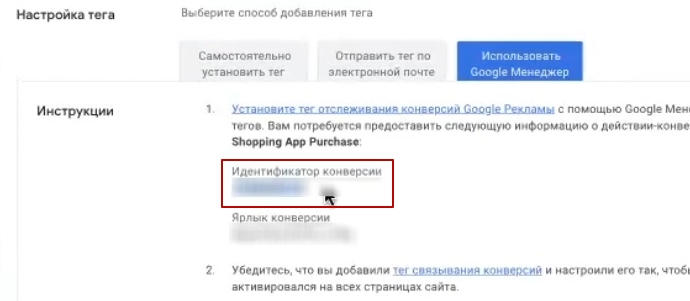
How to check? Open the store’s website. Then return to your advertising account, go to any of the conversions you have created, click “Tag Settings” → “Use Tag Manager.” Pay attention to the ID — these are the numbers you need to remember. In my example, it is 4175. There may be many different scripts and pixels installed on the website, so it is important to look for your specific number to avoid confusion.
For Performance Max, it is critical to check two key goals: Add to cart and Purchase. These are the ones that contribute to bid optimization. Other events are also useful, but these two are the minimum requirement.
Add to cart conversion check
Let’s start with Add to cart — it’s easier to check, no need to make a real purchase. Open this goal in the settings, find the Tag Manager section, note the number (4175), and copy the event tag.
Go to the website and open any product card. To check, you will need the Tag Assistant Legacy extension for Chrome. Yes, Google says that the extension is outdated and will soon no longer be supported — I will show you an alternative method a little later. But while Tag Assistant is still working, use it: it makes checking conversion tracking much easier.
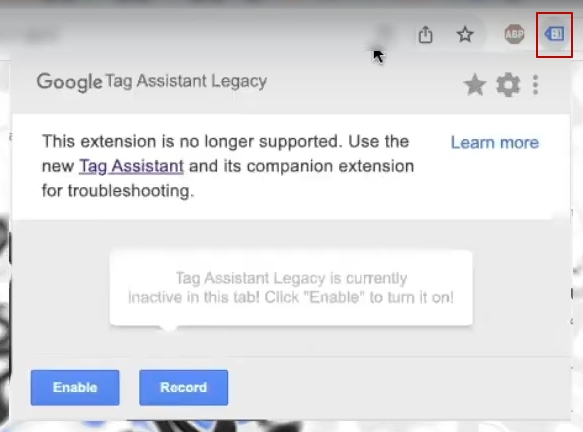
Install the extension, click Enable, and refresh the page. In the extension window, find the Global site tag with our number (4175). Found it? Great, the base code is on the website.
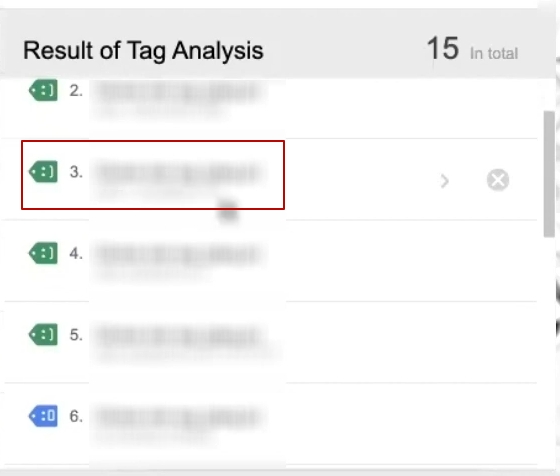
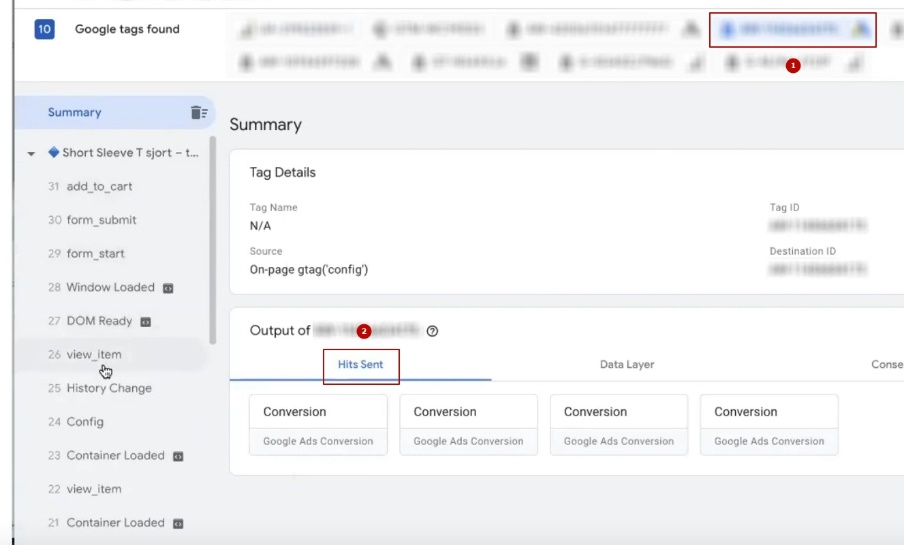
Now click the “Add to cart” button on the product page. Depending on your store’s template, the appearance may vary, but the principle is the same. After clicking, new entries will appear in Tag Assistant. Look for lines marked Google Ads Conversion Tracking and number 4175.
There may be several such entries — these are different events. How do you find the one you need? At the bottom of each entry, there is a Requests section. Click on them and see what event was recorded. Page view is just a page view, so we skip it. View item is viewing a product card, which is also not what we need. But when we see the event add_to_cart with the Value (product amount) specified, that’s exactly what we need.
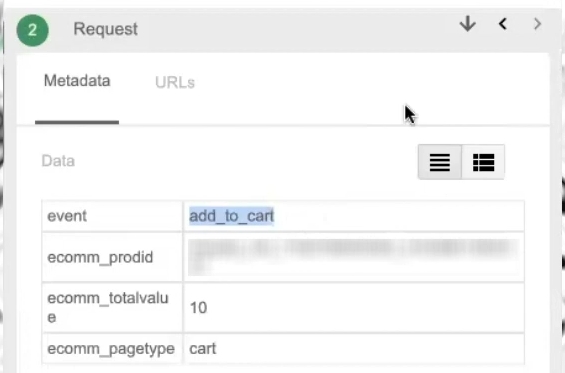
Check the event name in Tag Assistant against the label in Google Ads conversion settings. Does it match? If so, the Add to cart conversion setting is working correctly and data is being sent to your advertising account.
Purchase conversion verification
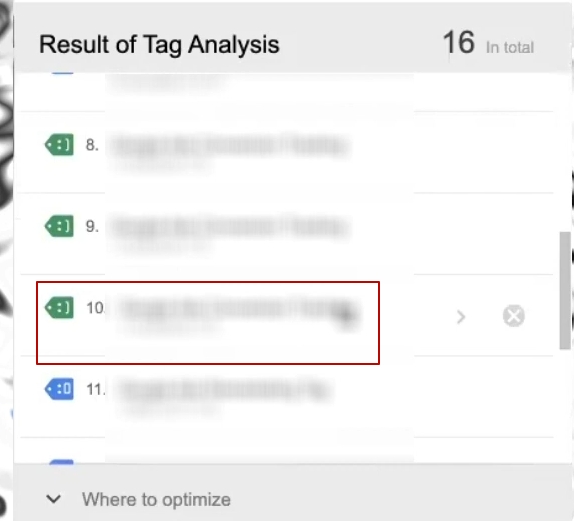
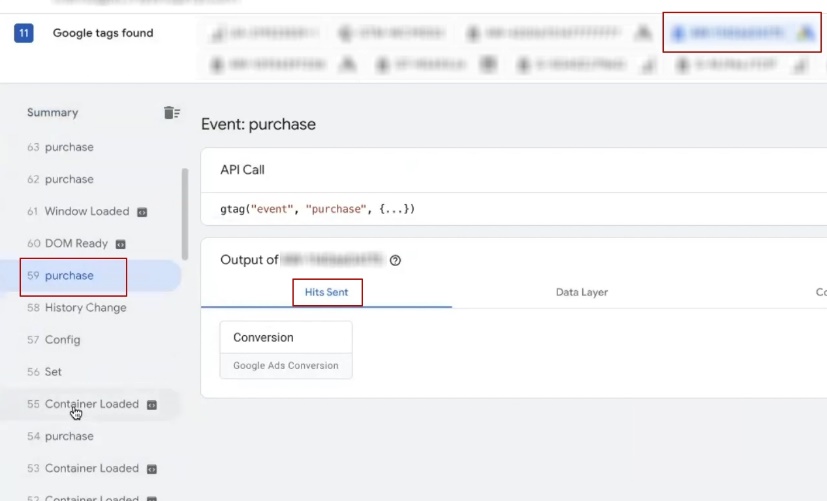
Now repeat the procedure for the Purchase goal. Here you will need to complete the test order in full — proceed to the final page “Thank you for your purchase” or “Thank you for your order.” Only on this page does the purchase event trigger.
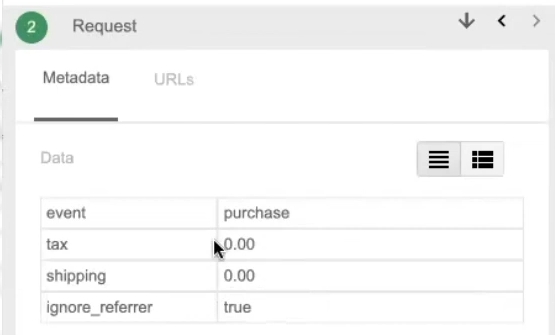
After completing the order, open Tag Assistant and search again for Google Ads Conversion Tracking entries with our number (4175). There may be several entries — we need the one with the value (order amount). Copy the tag from this entry, go to Google Ads, open the Purchase conversion settings, and check that the tags match.
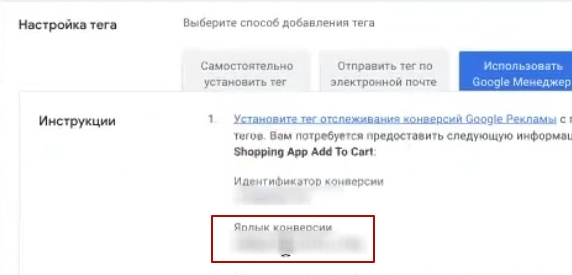
What must be passed in the Purchase event:
- Google Ads advertising account ID
- Ярлычок конверсии (conversion label)
- Value — order amount
- Currency — валюта
Additionally, tax and shipping costs can be transferred — this is a plus, but not critical for getting started.
Checking conversions with the Tag Assistant Companion extension
If Tag Assistant Legacy stops working or you want to try an alternative method, use the Tag Assistant Companion extension. I will leave the link in the description.
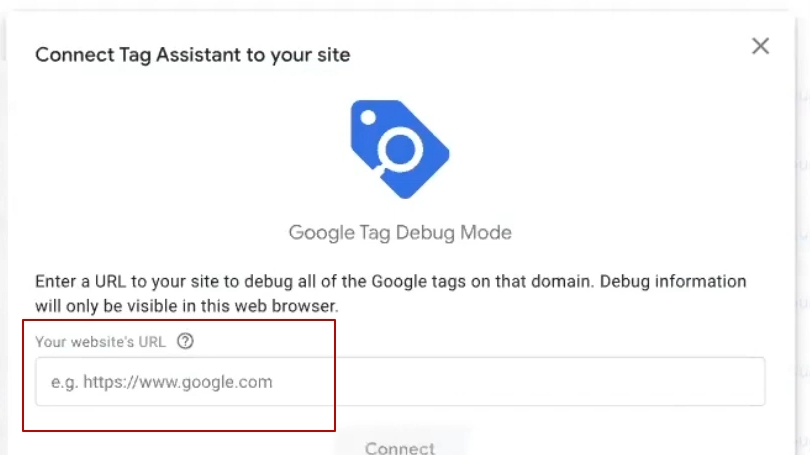
The interface looks unusual, but it’s easy to figure out. After installation, add your domain to the special window. The Tag Assistant Connect icon will appear on the website, indicating that the connection has been established.
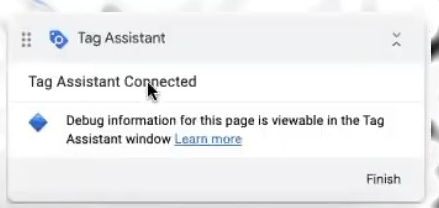
Then everything is as usual: perform actions on the website (add to cart, place an order), and track the results in the extension window. Find your code in the list of codes — it should end with your number (in my case, 4175). Go to the Hits Sent section and search for the desired event.
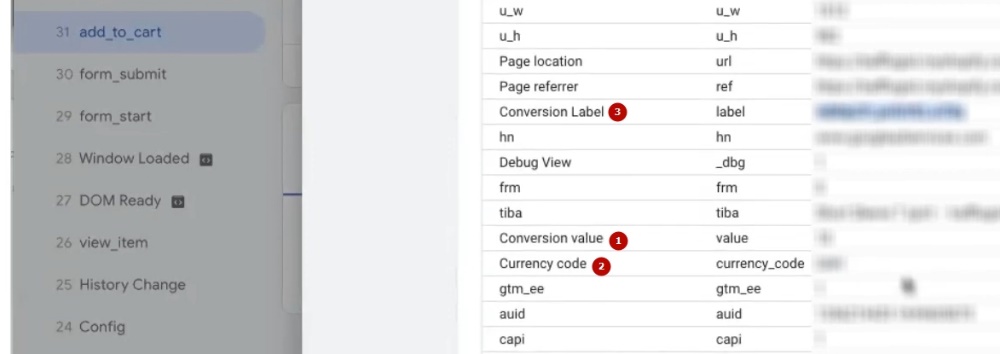
For Add to cart, check: conversion value (item amount), currency, conversion label. In the Data section, you can view details—which item was added and its cost.
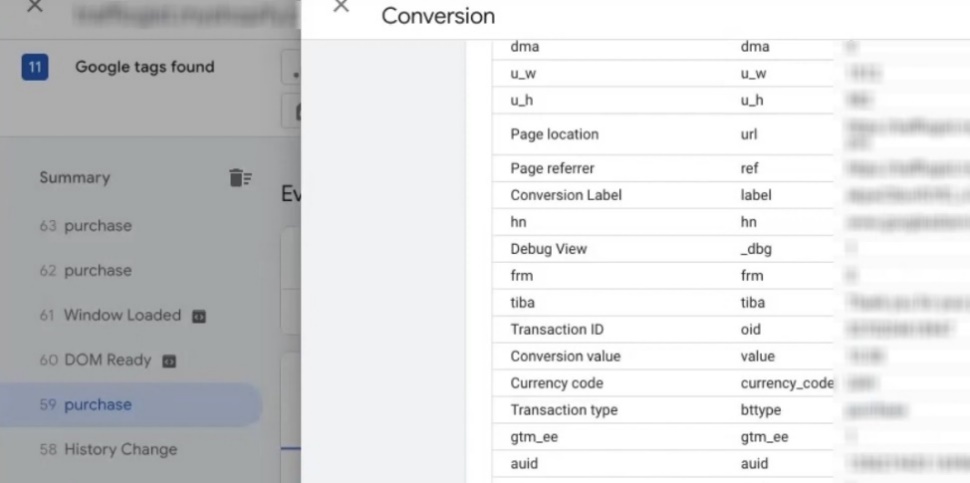
For Purchase, the list of parameters is broader:
- Transaction ID — order identifier (important for conversion deduplication)
- Conversion value — сумма заказа
- Currency — валюта
- Event type — должен быть Purchase
- Items — list of goods in the order
If all of this is transferred, the basic Google Ads conversion setup has been completed successfully.
Of course, there are more advanced options with an expanded set of data—enhanced conversions, transfer of additional user parameters, and so on. But if you are just starting out and want to try running Performance Max on Shopify, what we have set up will be more than enough. Fine-tuning and optimizing codes is the next step, when the ad is already running and you need to improve the accuracy of the data.
So, the conversion stage is complete. We have everything we need to launch smart marketing campaigns. Let’s move on.
Conversion optimization results
Important note: one element remains unconfigured—dynamic remarketing. Unfortunately, the Google Channel plugin does not solve this problem; separate work with the website code is required. We will skip this topic for now, but if you are interested in setting up dynamic remarketing on Shopify, please write in the comments. If I get at least 10 requests, I will record a separate detailed video.
What do we have at the moment? Conversions are set up, which is enough to start an advertising campaign. Everything related to further optimization — improving the product feed, connecting remarketing, installing additional tracking codes — are separate tasks for the future. Right now, we are creating a working base: we are launching, getting our first sales, and then we will fine-tune the details. We are done with conversions, so let’s move on to the next stage.
Merchant Center moderation review stage
Let’s return to Merchant Center. The account has already been created and linked to the store. You may see an interface called Merchant Center Next — this is an updated version of the service. The navigation will be almost the same as I am showing, with minor differences in the location of individual items. The concept and logic are the same.
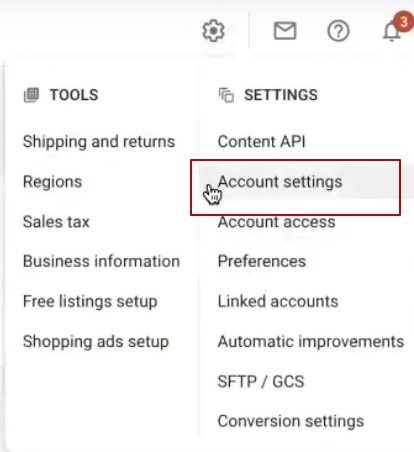
If you want to switch to the classic Merchant Center interface (I find it more convenient for detailed settings), here’s how to do it: go to Settings → Account settings (specifically account settings, not the Account Access section). Scroll down to the “Delete Merchant Center” button. It sounds scary, but don’t worry — when you click it, a window will appear with three options: delete account, cancel action, or switch to the classic version of Merchant Center.
Merchant Center Next is the future of the service, and Google is gradually transitioning everyone to the new interface. However, for fine-tuning, adjustments, and resolving moderation issues, the classic version is still more convenient. However, for our task today, this is not essential—work in the interface created by the Google Channel plugin. Everything you need is there.
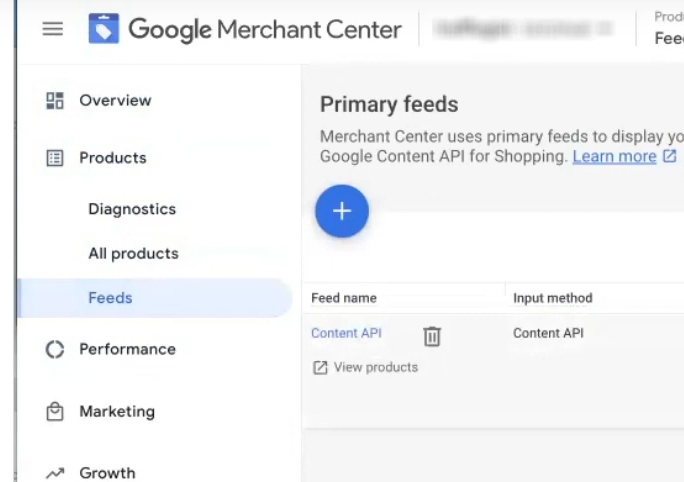
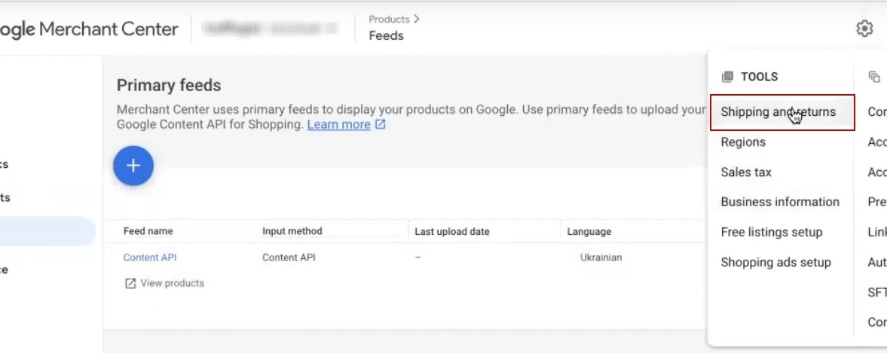
Feed verification in Merchant Center
Reload the Merchant Center page and check whether the product feed has loaded. The Feeds section should appear in the menu. Go there and check: if you see a line marked Content API, everything is fine and the connection is working.
Why is Content API beneficial? This type of feed for Google Merchant Center transmits product data in near real time. The system accesses the website approximately every 30–40 minutes and pulls up the latest information: price changes, out-of-stock items, updated descriptions—all of this will be displayed in Merchant Center fairly quickly.
For comparison: classic feeds via link (XML or Google Sheets) are updated automatically at most once a day. If you have a dynamic product range with frequent price changes, Content API is much more convenient. The Google Channel plugin configures this option, so you’re in luck.
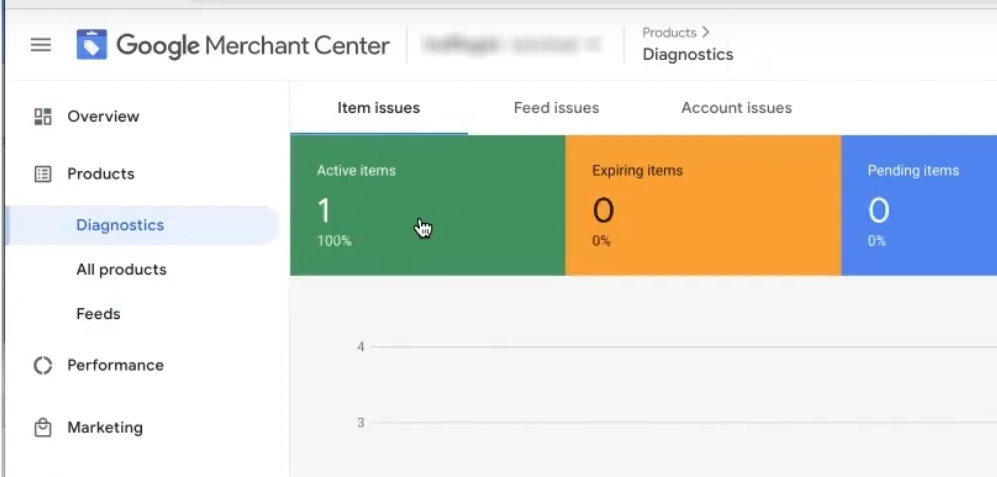
The goods may appear immediately or with a slight delay — this is normal. The main thing is that the feed has been created and data has started to be transferred.
Control over the verification process of the Merchant Center
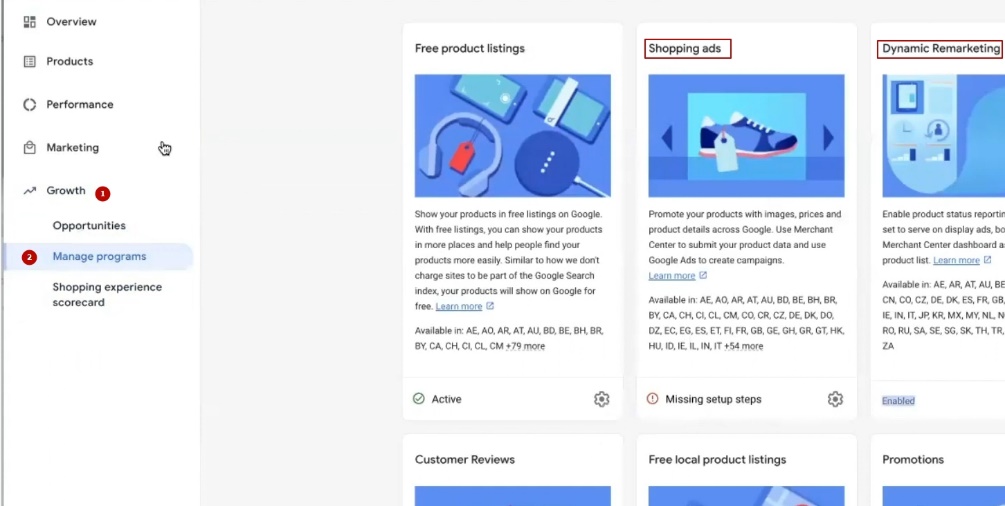
After creating an account, the Merchant Center verification process starts automatically. This is a mandatory step before launching advertising. The following should be displayed in the programs section: Shopping Ads, Dynamic Remarketing, and Free Listings. If any of the programs are missing, go to Growth → Manage programs and connect them manually. Let everything go through moderation at the same time.
How long will it take? Verification takes up to three business days (not calendar days, but working days). First, the website is analyzed by a robot. If something is not satisfactory, an error description will appear in the Account issues section.
To be honest, Google Merchant Center moderation is currently a sore subject for stores around the world. They block frequently, sometimes for no apparent reason. It doesn’t depend on the country, niche, or size of the business. Be mentally prepared that you may be blocked. If this happens, you will have to study the requirements, make changes to your website, and file an appeal. This is a broad topic, so if it’s relevant to you, write in the comments and I’ll address it separately.
When the verification is successful, the statuses of all programs will turn green (as Dynamic Remarketing is currently displayed for me). Free Listings may remain in Pending status for some time — this is normal, as the products are still being verified.
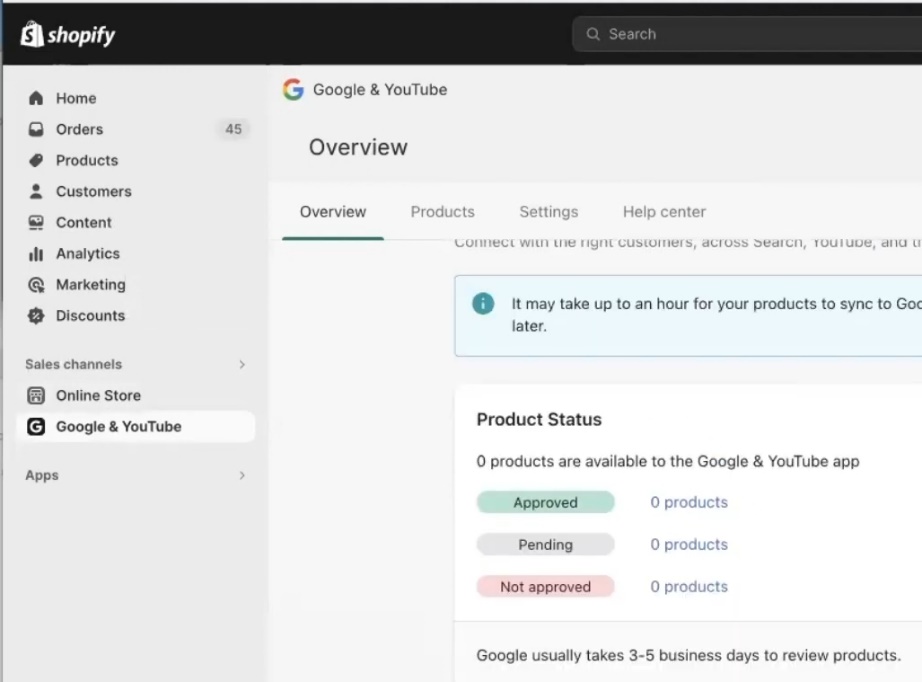
The same information can be tracked directly in the Google Channel plugin on Shopify. It displays the current status: Pending (under review), Approved, or Not approved. You can also see whether the Merchant Center account is blocked or not.
The main thing to understand is that until the Shopping Ads program receives green status, you will not be able to launch Google shopping ads. This is the stage where many get stuck. If everything is in order with the website—the policy pages are filled out, contacts are listed, products are correctly formatted—moderation will be quick. If there are problems, you will have to figure them out and fix them.
We are waiting for the review to be completed and moving on to the final stage—creating advertising campaigns.
We create advertising campaigns in Google Ads
The Merchant Center has been moderated, conversions have been set up — it’s time to launch your ads. Now let’s take a look at how to create Performance Max — smart shopping campaigns that use Google’s artificial intelligence to optimize impressions.
Frequently asked question: Can I launch Pmax right away, or is it better to collect statistics from other campaigns first? You can start from scratch. Performance Max collects data on user behavior on the website just like any other campaign, while immediately utilizing machine learning. So there’s no need to wait.
Creating advertising campaigns from the Google Channel plugin
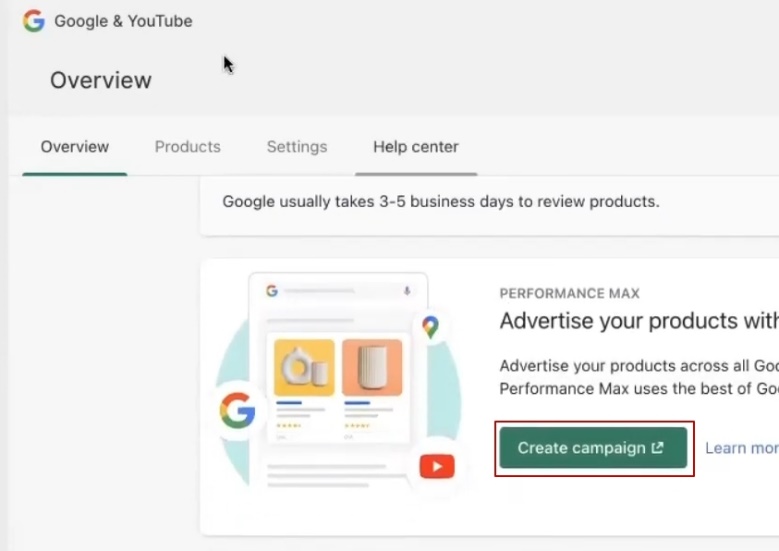
The fastest way to create Performance Max on Shopify is through the familiar Google Channel plugin. Click Create Campaign, and the system will take you to the Setup campaign section with a set of settings.
Why do I recommend creating your first ad campaigns through Merchant Center rather than directly in the Google Ads interface? First, there is less chance of encountering bugs and errors. Second, speed: in just a couple of minutes, your campaign is ready. In Merchant Center Next, the same functionality can be found in the Marketing → Ad campaigns section. Click Continue setup and follow the same steps.

The main advantage of this method is that you don’t have to worry about creative content, writing ad copy, or selecting images. The system will take data from the product feed and generate ads automatically. This is sufficient to launch Google Smart Shopping campaigns.
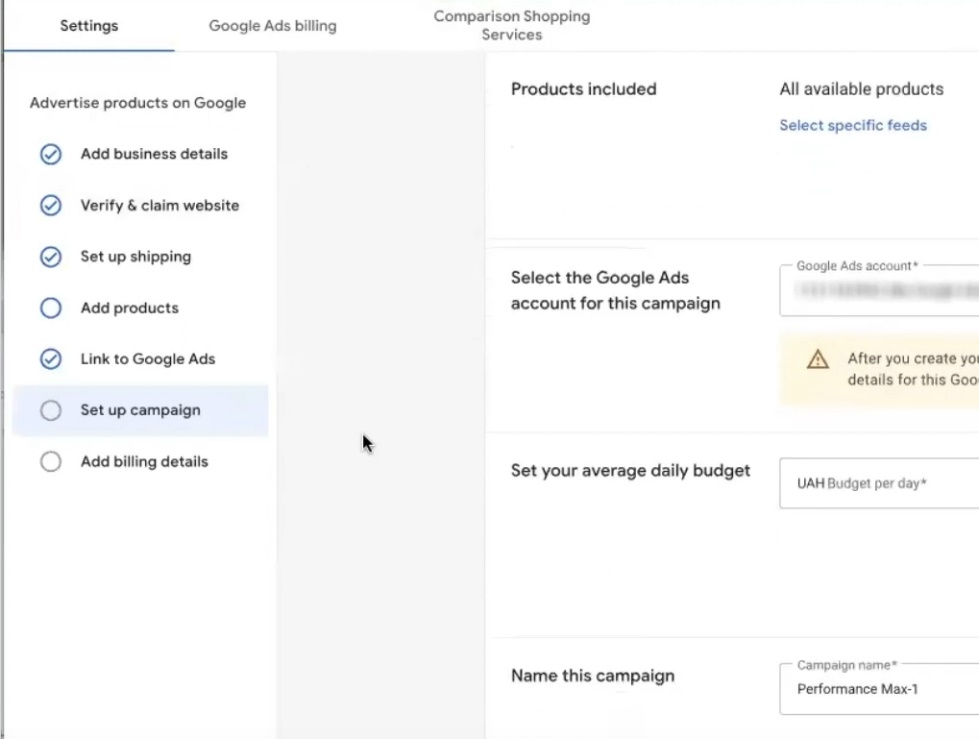
Which fields should we fill in? There are only four:
- Selecting products by feed label. If you have a single feed (which is the case here), skip this step. You can always filter products by category, price, or other parameters later in Google Ads.
- Google Ads account. Make sure you select the correct ID—it should match the number displayed in the upper right corner of your ad account. Confusion between different accounts happens more often than you might think.
- Daily budget. The minimum for most niches is $9–10 per day. This is what is called “the bare minimum” — enough to start showing up and collecting initial data. Google may recommend a higher amount — you can listen to their advice or stick with your own option. In my case, this is equivalent to 400 hryvnia.
- Name this campaign. Do not leave the default name “Performance Max 1.” It’s better to set up the logic right away: specify the product category, price segment, or other criteria. For example: “PMax_Sneakers_Nike” or “PMax_Electronics_under$100.” When several campaigns appear in your account, you’ll thank yourself for the clear structure.
Filled it out? Click Create campaign, then Continue. The system will run a check, and if everything is in order with Merchant Center moderation, the Performance Max campaign will start running.
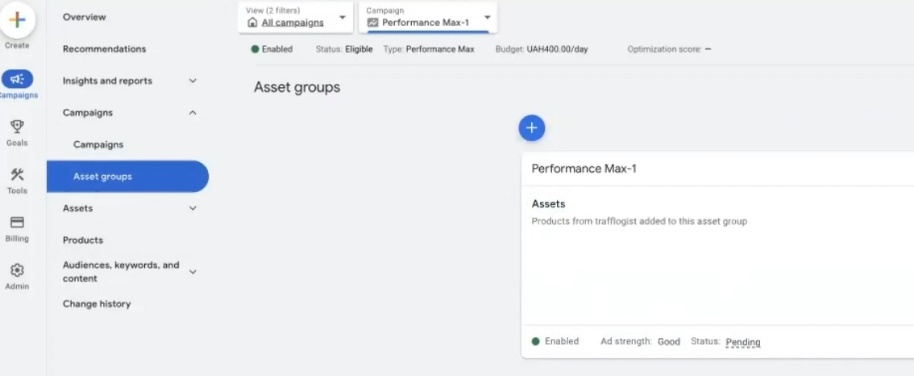
Subsequent settings for the created campaign
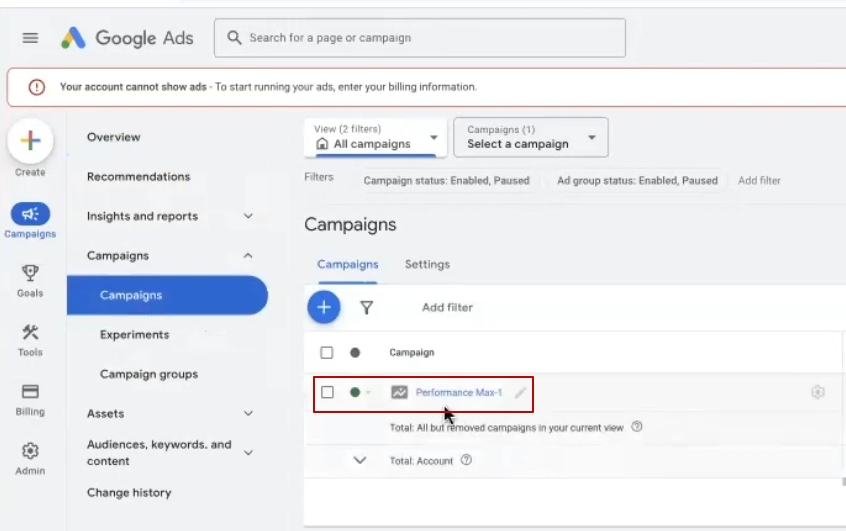
After clicking Create campaign, refresh the Google Ads advertising account page. Our new campaign with the specified name and budget has already appeared in the Campaigns section. But it’s too early to launch it as it is — we need to adjust a few important settings.
You can immediately pause the campaign (switch the status from Enabled to Paused) to calmly configure everything. Or leave it active, but then act quickly — every minute will consume the budget on impressions with suboptimal parameters.
Click on the pencil icon → Edit campaign → go to the Settings section.
Locations settings
The first thing we must change is geotargeting. By default, campaigns created through Merchant Center are set up for all countries and territories. This is almost never what you need.
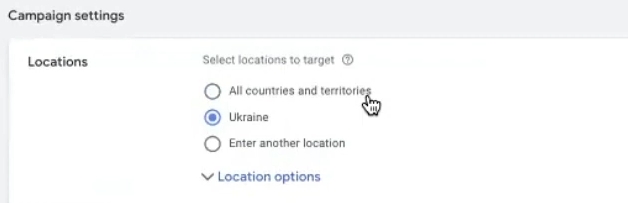
The golden rule for setting up Performance Max: one country, one campaign. Why is that? Different countries have different click costs, different conversion rates, and different average order values. If you lump everything together, one country may end up consuming your entire budget without generating any sales. Another country, potentially profitable, will be left without impressions. By dividing campaigns by country, you gain flexibility: you see the real picture for each market and can scale what works.
Let’s say you sell to the US, Canada, and the UK. Create three separate campaigns instead of one for all three countries. Yes, it’s a little more work at the start, but then you’ll have complete control over the results.
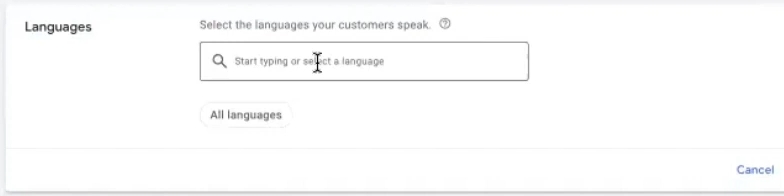
Setup Languages
The next point is languages. Here, everything depends on your audience and the specifics of the market.
Some countries are friendly with English, while others are categorically not. Take France, for example: most users there search for products in French, and advertisements in English will simply be ignored. The Netherlands, on the other hand, is a different story. English is almost like a second language there, so you can safely use both languages.
It’s even more interesting with multinational markets. The US is home to a huge Latin American community that often searches for products in Spanish. New York has neighborhoods with Russian-speaking communities where people have gone years without speaking English. If your store targets this audience, take this into account in your Google Ads language settings.
You can select All languages if you want to reach everyone. However, I recommend choosing specific languages spoken by your target audience. This will ensure that your budget is spent more effectively and that your ads are shown to those who are actually likely to buy.
Setup of Automatically created assets
Another setting that I recommend disabling at the start is Automatically created assets. There are two items here: Text assets and Final URL. If you leave them active, be sure to exclude the site’s service pages: blog, privacy policy, shipping policy, refund policy, and any other pages from which you do not want the system to collect keywords.
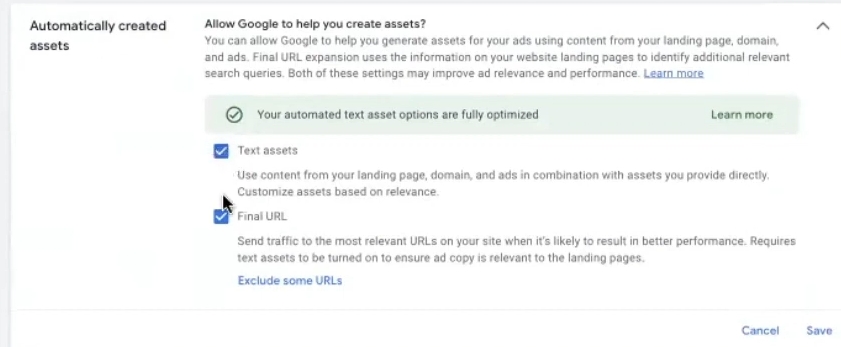
What does this feature do? Essentially, it enables dynamic search ads within Performance Max. The system scans your website pages, extracts keywords from them, and uses them to generate search ads. It sounds convenient, but in practice, it can drag irrelevant queries into your ads—especially if your website has informational sections.
My approach: for the first launch, I uncheck these boxes. Then, when the campaign has gathered statistics and it becomes clear how it works, you can create a duplicate and test the automatic assets separately. It’s safer that way.
Goals Setting
Let’s move on to the Goals section — this is a critically important point. If your goal is sales, select the “Purchases” category and the corresponding conversion (the same Purchase that we set up earlier).
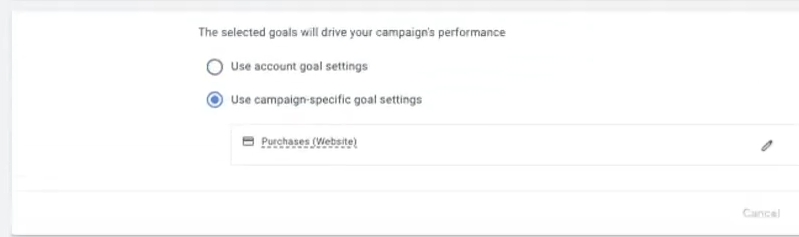
Why is this necessary? Performance Max uses machine learning to find potential buyers. The algorithm builds predictive models based on the goals you specify. If the goal is set incorrectly or vaguely, the system will not optimize for what you need. If you launch an online store through Merchant Center, then the main goal is clearly purchases. Make sure this is clearly stated in the settings.
Setting up Bidding strategy
The last important block is the bidding strategy. By default, the campaign is launched on Maximize conversion value. This strategy is not bad, but there is a catch: as soon as sales start coming in and you want to scale up, your profits will start to erode. Why? Because the system does not take return on investment into account. If your revenue is a couple of dollars higher than your expenses, Google considers the task accomplished. But you need real profit.
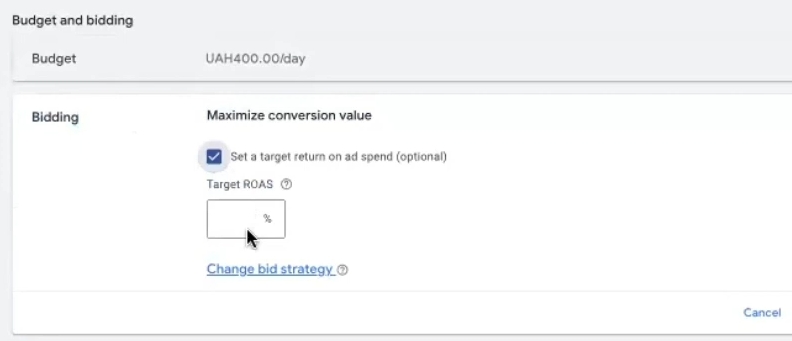
The solution is to set a limit using Target ROAS (target return on ad spend). What value should you set? It depends on the market and the marginality of the goods:
- For the US and Europe, you can start with 50–100% and gradually increase.
- In some niches, it is normal to get 150–200% right away.
- There are categories where you can actually earn 500% and above.
There is no universal recipe — you will have to experiment and find the optimal ratio for your store. Start with a small value so as not to overbid and drop out of the auction. Then, as you accumulate data, increase your profitability.
Monitor the final return on investment at the start by limiting your budget. We started with $10 per day, looked at the results, and adjusted both the budget and the Target ROAS. Both settings can be changed at any time, either upward or downward.
These are the basic settings without which you should not launch a Performance Max advertising campaign. If you skip something, you risk wasting your budget.
Setting up Assets group
Now, let’s talk about why I recommend creating Performance Max campaigns through Merchant Center rather than directly in Google Ads. The main reason is the Assets group section.
When you create Pmax through the Google Ads interface, the system requires you to fill in a bunch of fields: upload images, write headlines, descriptions, add logos, videos. Without this, you simply cannot create a campaign — the interface will not let you proceed. The process is long and sometimes glitchy: fields are reset, data is not saved, and you have to start over.
By the way, Google is currently actively implementing AI for asset generation. Enter the page URL, and the system will fill in all the fields itself: it will pull up images from the site and generate text. However, this feature is not yet available in all advertising accounts. If you are lucky and AI generation works for you, great, use it. If not, you’ll have to fill it in manually.
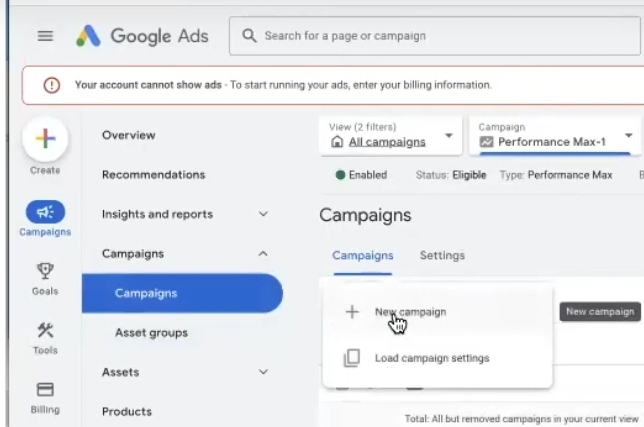
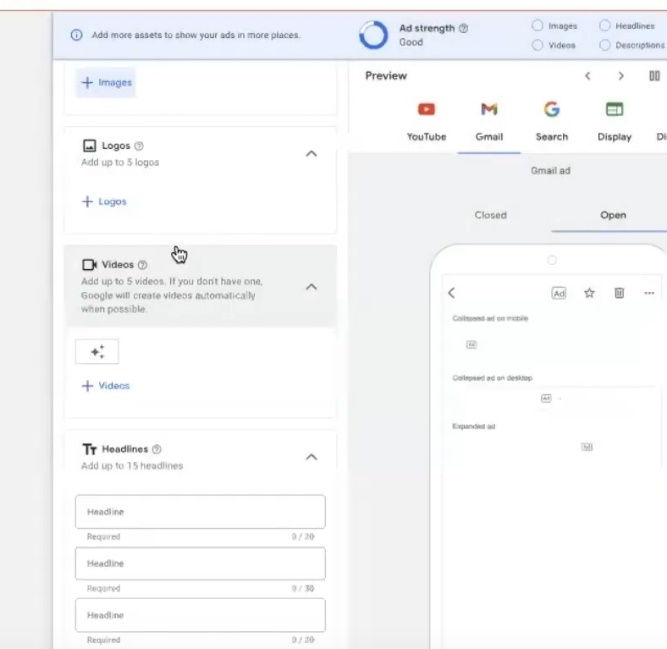
What does manual filling look like? Go to Google Ads, click Create Campaign → New Campaign, select the “Sales” goal, specify the desired conversion, then Performance Max, link Merchant Center, set the name, geography, languages… And now we’ve reached Assets. Here you need to add:
- Images — preferably your own, not from stock;
- Company logos;
- Video — if available;
- Headings — short and long versions;
- Descriptions of varying lengths;
- Business name.
All this takes time and nerves. But when you launch through Merchant Center, the system takes data from the product feed and creates a campaign without requiring you to fill in assets. It’s quick, simple, and without any unnecessary fuss.
When should you add assets manually? If you plan to use the Maximize conversions strategy instead of Maximize conversion value. Or if you don’t have a classic online store, but rather a lead generation site, where users leave requests instead of making purchases through a shopping cart. In such cases, assets are really necessary for the campaign to work properly.
But for standard launch of marketing campaigns on Shopify, create Pmax through Merchant Center. You’ll save time and avoid technical issues with the interface.
Signal settings
Another settings block worth knowing about is Signals. These are a kind of hint for the algorithm: which audience to target first when searching for buyers.
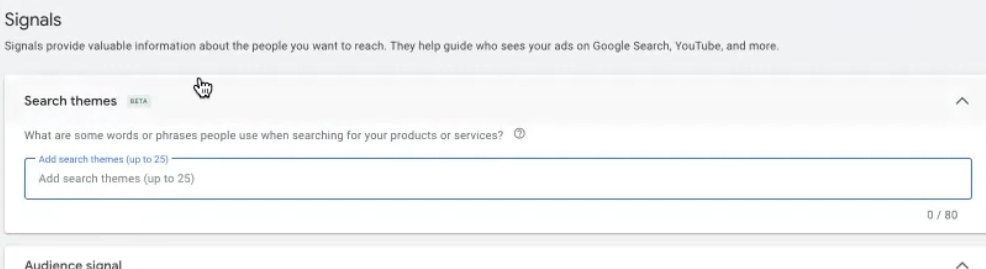
What signals are available:
- Search themes. A relatively new feature that recently came out of beta. Here, you enter keywords and phrases that potential customers might use to search for your products. For example, for a sneaker store, these could be “buy running shoes,” “Nike Air Max price,” or “gym shoes.” Artificial intelligence uses these queries to build a predictive model and find a similar audience.
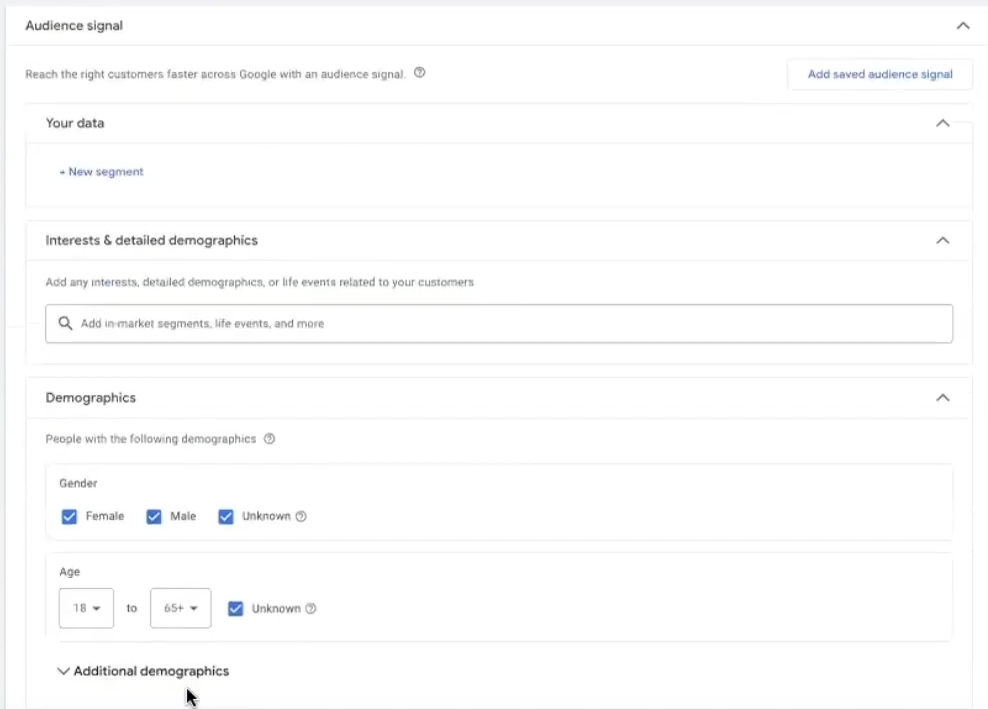
- Your data. This is where remarketing lists from Google Analytics are pulled in: people who have already visited the site, added items to their cart, or made purchases. If dynamic remarketing is set up, the system will use this data as well.
- Interests & detailed demographics. A huge section with the ability to target based on life events: got a dog, bought a house, got married, had a baby. Plus standard interests: sports, travel, technology, and so on.
- Demographics — basic demographics. For the US, there is an interesting parameter called Household income — you can exclude audiences with low purchasing power. Unfortunately, this option is not available in other countries.
It is important to understand that signals in Performance Max are not strict audience restrictions. They are guidelines, hints. The system will still go beyond the specified signals and look for buyers in a broader segment. It will simply start from the direction you have set.
Do you need to add signals right away when you start? Not necessarily. If you have a high-quality product feed with complete attributes and normal descriptions, Performance Max on Shopify will work great even without signals. The algorithm will figure out who to show ads to on its own.
When are signals really useful? After the first week of the campaign. Go to the Insights and reports section, view reports on search queries (Search terms), audiences, and auction statistics. If you see that the campaign is not going in the right direction, add corrective signals. If you see that your competitors are in the right auction and the queries are relevant, then everything is working as it should and no additional settings are needed.
The necessity of high-quality feed layout
The main factor that determines the effectiveness of Performance Max is the quality of your product feed. How much information does it contain? How well are the product titles written? Are the descriptions detailed enough? Are all available attributes filled in?
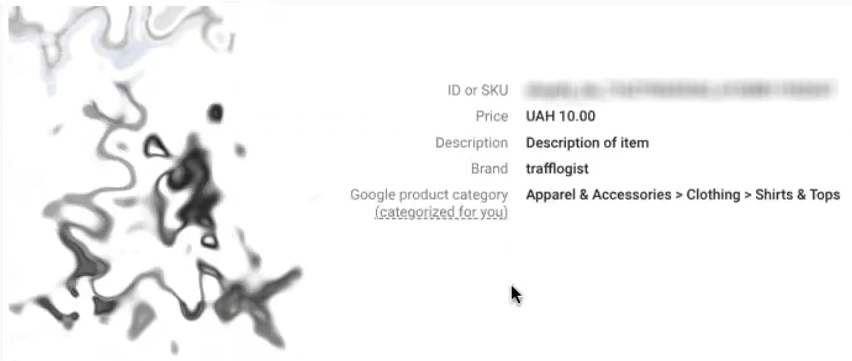
The more data you send to Merchant Center, the better the algorithm understands your products and the more accurately it shows them to the right audience. Empty fields are missed opportunities for optimization.
What should you do? Google the query “Merchant Center feed specifications” and go through all the attributes that apply to your products: color, size, material, brand, GTIN, age group, gender, and so on. Fill in everything you can. Yes, it takes time, especially if you have hundreds of items in your catalog. But this is what determines how well your ads will perform.
If the standard feed from Shopify does not contain the necessary fields, you will have to add them manually via supplemental feeds in Merchant Center. This is a separate topic on optimizing Google Merchant Center feeds, which is worth exploring after launching your basic campaign.
Filling in the Refunds section
Another setting I almost forgot about is the Refunds block in Merchant Center. This isn’t critical for Ukrainian stores, but it’s highly desirable for Western markets. Why? Information about returns can be pulled directly into Google Shopping ads. Buyers see that the product can be returned and are more likely to click. Trust in the store grows, and so does conversion.
Tax settings setup
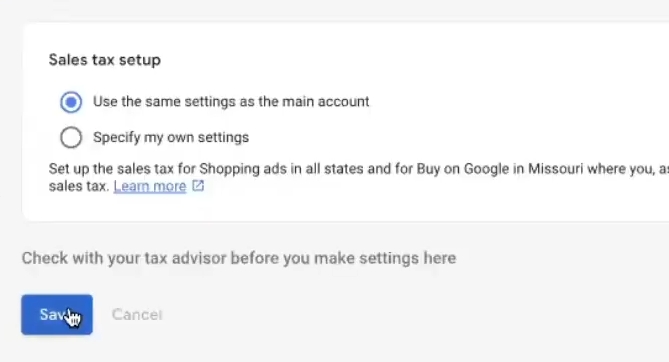
And one last important point for those who run ads in the US. Be sure to configure your tax settings. Go to this section, select “Specify my own settings,” then “Select all” for all states, and save. The system will automatically calculate taxes for each region.
This setting is not relevant for other countries, where taxes work differently. However, for the American market, this point cannot be overlooked, otherwise problems with moderation or incorrect price display in ads may arise.
Results
Let’s wrap things up and go over everything we’ve done:
- Goals are set up. Conversions are created through the Google Channel plugin, verified through Tag Assistant — data on purchases and additions to the cart are transferred to the advertising account. This is enough to launch smart shopping campaigns.
- The Merchant Center has been created and linked to the store. The product feed is automatically uploaded via the Content API. All that remains is to wait for moderation—remember, this can take up to three business days. Until the Shopping Ads status turns green, the ad will not run.
- The Performance Max advertising campaign has been created. We showed how to do it as quickly as possible through the Merchant Center interface. You know which settings you need to adjust: geotargeting, languages, and bidding strategy with Target ROAS. If necessary, you can add signals, adjust budgets, and create additional campaigns for different countries or product categories.
And don’t forget about billing information! Without payment details, your ad won’t run — you’ll get zero impressions and clicks, no matter how much you configure it. You can top up your advertising account within Google Ads. Google will remind you about this, of course, but it’s better to set up a card or other payment method right away so that your campaign can start running as soon as it passes moderation.
That’s basically all you need to get started with Performance Max on Shopify. These are Google’s smartest shopping ad campaigns, which use machine learning and deliver excellent results in different markets. Get started, collect data, optimize, and watch your sales grow.
That’s all. Good luck with the launch!


