
Shopify is a content management system designed specifically for e-commerce needs. With it, you can create websites for online stores. There is everything you need for this – from design templates to a mechanism for accepting payments.
Rather than struggling with any site management system to ensure organic marketing activity and analytics gathering, PPC and web analytics professionals can use Shopify’s internal functionality. But the original functionality of the platform is not a panacea. There are also certain subtleties.
This article is about setting up contextual advertising for a Shopify store.
How to set up contextual advertising on Shopify?
If you received a request to set up contextual advertising on Shopify, then first you need to request access to your account for editing. Standard procedure: a registration link will be sent to your email.
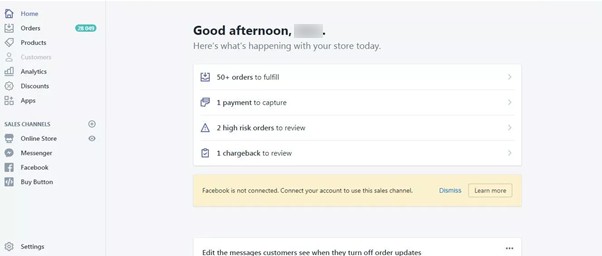
If you are logged in and see the administrative panel in front of you, you can start configuring the basic parameters for the contextologist.
Setting up Google Analytics for a Shopify store
Before setting up contextual advertising on Shopify, you need to link your account with Google Analytics. And in this matter, the developers took care of the users of the system – Shopify is fully integrated with Analytics.
This is easy to implement – you need to register the number of the Analytics counter in the corresponding module by selecting the “Preferences” item in the “Online Store” submenu.
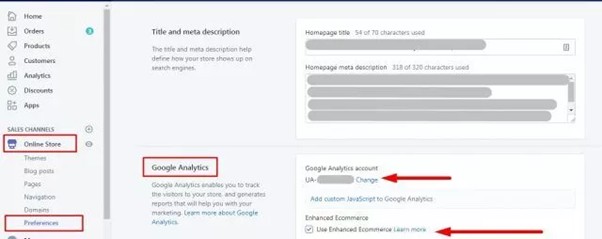
Enable the “Use advanced e-commerce” option, then check if this option is active in the analytics account.
Google Analytics Conversions
After installing advanced ecommerce on Shopify, you can view your purchase data in Analytics. However, sometimes this information is not enough. In cases where it is important for you to create intermediate targets, the advice “copy and paste the URL” is not suitable.
The reason for the problem lies in the way links are generated in Shopify. They are dynamic and contain an array of numbers that change with each new order. The platform captures only aggregated statistics, while Google Analytics does not provide data on such pages at all.
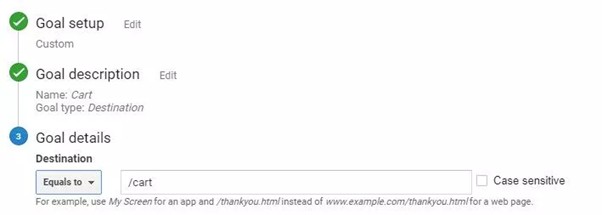
To analyze intermediate conversions, use the following goals in the analytics system:
- /cart – the page where the cart is placed;
- /checkout/contact_informantion – a page intended for filling in user information necessary for filling out an application;
- /checkout/shipping – allows you to select the conditions and method of delivery of goods;
- /checkout/payment – here you can select the appropriate payment option.
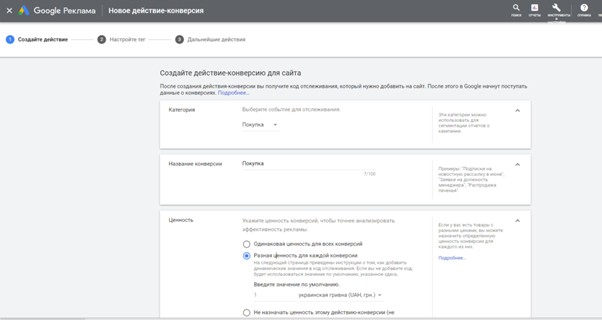
How do I set up Google Ads conversion tracking for Shopify?
In order for automatic strategies to work correctly, experienced contextologists advise when setting up contextual advertising for Shopify CMS not to import goals from Analytics, but instead take conversions from AdWords.
First you need to create a conversion, then put the global tag and event code on the website.
In the upper right corner of your Google Ads account page, click on “Tools”. Next, find the “Conversions” module and click on the “Create” link there. In the “Website” block, enter the required data:
The algorithm will generate the code that needs to be moved to the part of the theme.liquid file of your Shopify online store that is marked with the tag.
After that, the event code should be placed in the “Additional Scripts” block. You can get to it through the “Checkout” module in the “Settings” menu.
Facebook Pixel
A pixel is placed similar to setting the Analytics code. You need to register the Facebook Pixel ID in the corresponding module by selecting the “Preferences” item of the “Online Store” submenu:
![]()
This tool will allow you to evaluate the effectiveness of advertising activity on Facebook and Instagram social networks.
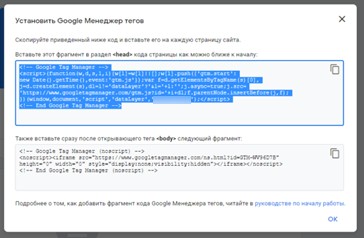
Google Tag Manager
Log in to the Tag Manager. If you don’t have an account yet, please register. Next, you need to copy the program code located in the upper field of the window that appears when you click on the GTM ID:
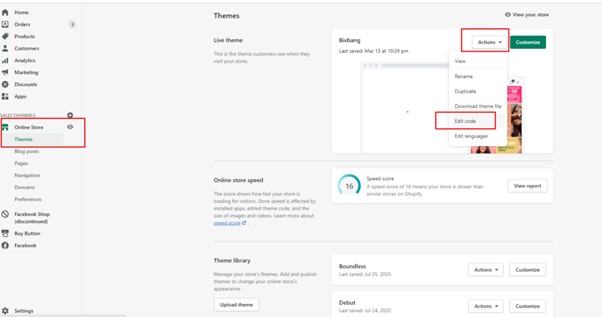
Look for the “Edit Code” link in the “Actions” list. The list itself is located in the “Themes” section, “Online Store” submenu:
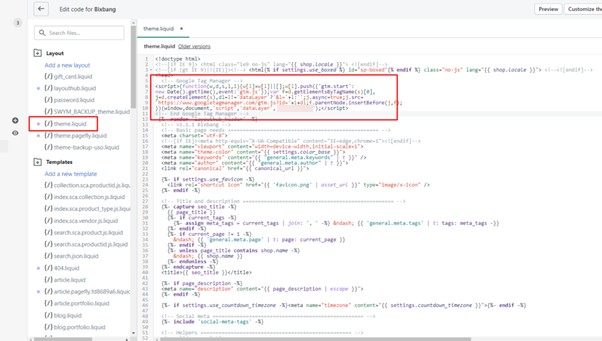
Type “theme.liquid” in the search box to find the matching block and paste the code you copied into:
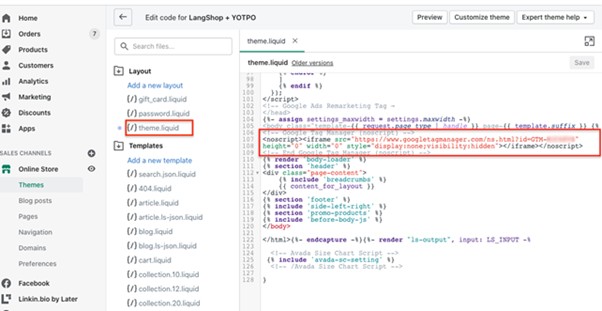
The other piece of GTM code needs to be done in the same way, but it is important to insert it not in the <head>, but in the <body>, and the higher the better:
After saving the changes, GTM will become available on any page, except for the order fill and “Thank you” pages.
In the standard version of Shopify, editing the order filling algorithm and adding any codes to it is not available. However, you can place a code snippet on the final “Thank you” page.
The copied code must be placed in the “Additional Scripts” block. You can open it through the “Order processing” link in the “Checkout” module located in the “Settings” menu:
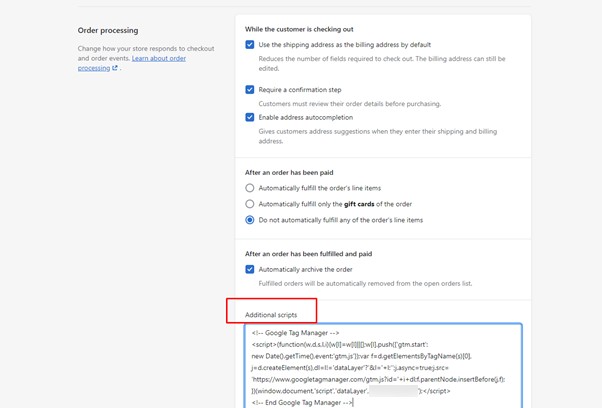
GTM will then appear on the website pages, including the “Thank you” page. It will still remain unavailable at the intermediate steps of filling out the order, but it will work on the page of an already completed transaction.
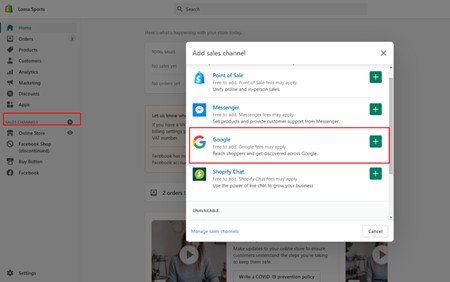
Setting up a Merchant Center feed for Shopify CMS
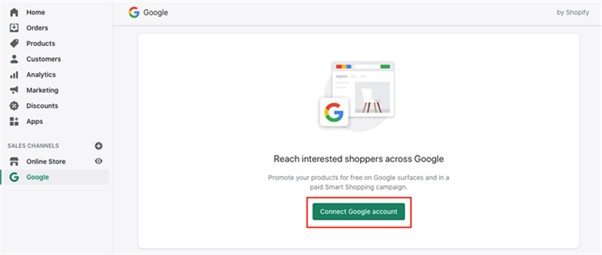
The Google Channel app allows you to add GMC feeds to Shopify. It is available in Sales Channels. It’s free:
Establishing an association between the Channel and the email address used to sign in to GMC and AdWords. If there are no such accounts yet, they will be automatically registered with the login you specified.
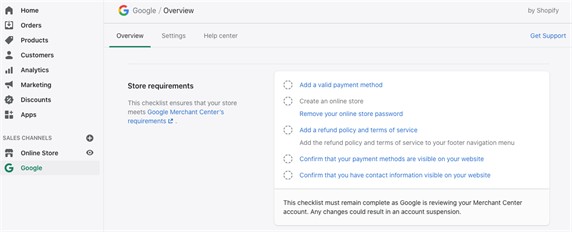
The next step is to bring your site into compliance with Google’s guidelines. To do this, click on each item of the “Store requirements” block and enter the required data or confirm that the store meets each requirement:
Once the information is entered, on the screen you will see the fields for placing GMC and GA accounts, where the options linked to the previously entered mail will appear in the list. If there are no accounts, the system will offer to register them.
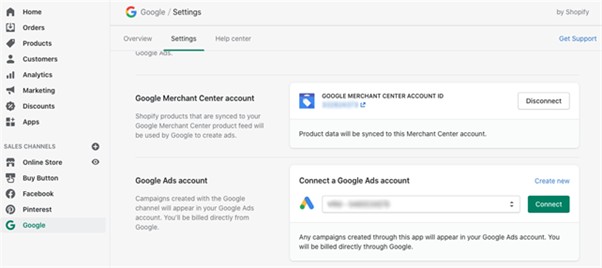
After saving all the changes made and going to the “Product Feed” module, you will see the status of product items synchronized with GMC. Adjustments in Shopify will be reflected in the GMC. This is necessary to keep the information up to date.
The free version of the Google app does not allow you to set up Shopping campaigns for multiple regions. If you work in different countries, then you will need to download a paid plugin (for example, Data Feed Watch Shopping Feeds).
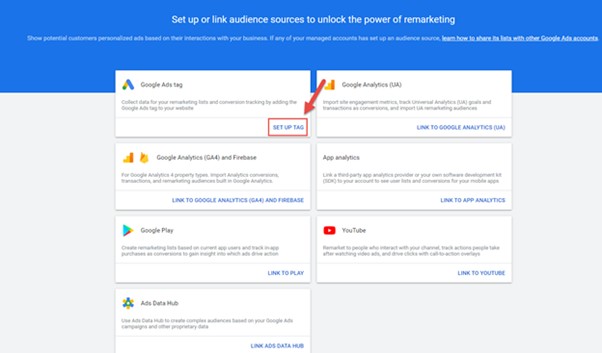
Dynamic Remarketing
Used to serve personalized promotional offers to users who have viewed or acted on certain items in your online store.
There are two options to run dynamic remarketing in Shopify stores:
- Manually adjust the site code, but this can lead to errors and problems.
- Download the Google Dynamic Remarketing app, which is free to use.
Regardless of which method you choose, an AdWords remarketing code is required. To create it, open your advertising account, where you will find the link “Install a tag in the Google Ads section”, after going to the “Audience sources” module located in the “Audience manager” submenu of the “Tools” section.
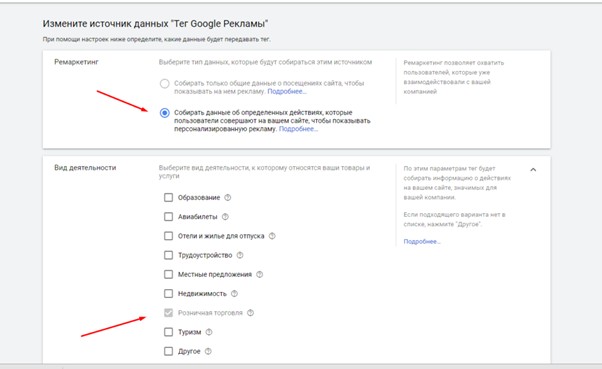
Then check “Collect data about certain activities…” in the top box, and “Ecommerce” in the box below should also be selected:
The generated tag must be placed in the store code (similar to GTM) or loaded into the installed Google Dynamic Remarketing module.


