
To start working with advertising and analytical web services, you need to place special code on all pages of your site. This task is easily solved if you need to install only a few such tools, you are familiar with the HTML language or can seek the help of a professional developer.
Difficulties appear at the stage of making adjustments to the already added code or adding new services. First of all, this process is time-consuming. The second problem is that any careless movement related to code editing can affect the performance of several pages or the entire web resource. But there is a tool that allows you to forget about such problems. It is Google Tag Manager. Along with the official name of the service, the abbreviation “GTM” or “Tag Manager” is often used.
What is Google Tag Manager?
Google Tag Manager is an auxiliary service that makes it possible to manage JavaScript snippets and HTML tags without involving programmers. Or practically without any programmers – you only need to use the services of a professional once to correctly integrate GTM itself.
Tip! As a result, you will have a convenient mechanism at your disposal, with the help of which you can install new services and adjust existing scripts by your own efforts through the interface of the Tag Manager.
This solution makes the work of marketing specialists more flexible, while programmers are not distracted by trifles and can fully devote themselves to serious tasks. The tool is designed primarily for marketers, who get the opportunity to manage all the tags on a web resource through a single application.
Who will benefit from Google Tag Manager?
- Specialists working in advertising and marketing – for more independent and autonomous work with web services, monitoring key site performance indicators and developing a convenient structure of end-to-end analytics;
- Contextologists – Google Tag Manager facilitates independent configuration of remarketing and goals, helps to analyze the effectiveness of marketing activities;
- Owners of small websites – for setting up external services without involving a webmaster;
- Digital marketing companies – for more efficient management of customer accounts.
Why do you need GTM?
You can constantly write technical tasks for developers, wait endlessly for their implementation, then look for errors and make adjustments to the existing TOR, and wait again. Or you can delegate 90% of tasks to the convenient GTM service, which will save not only finances and time, but also keep your sanity when integrating web tools.
Here’s why you need Google Tag Manager:
- Link the site to analytics systems, such as Analytics from Google or Metrica, developed by Yandex, for correct data transfer;
- Add social media remarketing tags and contextual advertising systems to the site;
- Edit HTML scripts that perform various tasks: displaying advertising banners, organizing A/B testing, and so on;
- Promptly change existing tags;
- Track all visitor actions on the site and direct them to the service you need;
- Set up call tracking;
- Provide cross-domain monitoring;
- Evaluate user satisfaction with a web resource using GoogleOptimize.
When is the tag manager particularly effective?
Google Tag Manager is a versatile tool that is effective in a wide variety of usage scenarios. But the best way to use it is if you:
There is a need to use several analytics services
Each web analytics tool has its own features and benefits. Google Analytics is good for analyzing traffic sources, Facebook Pixel allows you to track conversions by users who come to the site from this social network, and Hotjar is especially good at tracking visitor behavior on the site.
Installing several separate scripts for each service will take a lot of time. But with the tag manager, you can insert just one code into your site, and then add new counters in a convenient web interface.
No developer on staff
To install any new script, you need to understand HTML, understand what file you need to edit, work with FTP-client. If you already have GTM installed on your site, this is not necessary.
You will not need to contact the developer every time you update external scripts or the counter. You will save on programmer’s services and will be able to activate the tools you need.
It is necessary to run A/B testing on a regular basis
Tag Manager will help you track which page variant worked better in A/B testing. With the help of the tool, you can instantly analyze the results and determine the best landing page variant.
Multiple projects running at the same time
From a single GTM account, you can control analytics and tracking codes for all sites. If something needs to be changed or added, the changes can be made in one interface without having to open several different accounts. This saves the internet marketer’s time for more important tasks.
Main advantages of using Google Tag Manager
You should use GTM if only because it makes a marketer’s life and work easier and saves time and money. But this tool has other important advantages as well:
- The service is completely free;
- Impressive number of supported integrations. To explore the list, take a look at the help section;
- Using the Tag Manager allows you to reduce code and, consequently, increase site speed – web pages will open faster;
- Using the check and debug function it is convenient to test the work of new or modified tags before transferring them to the site;
- Change history allows you to quickly find out who made corrections and when, as well as to return to the previous version in case the new code does not work correctly;
- The ability to work together with several users with different levels of access to the account – both their own employees and managers of third-party agencies engaged for promotion;
- The system allows you to confirm the rights to the web resource for GSC without much effort.
Are there any disadvantages to working with GTM?
With all the above mentioned advantages of using Google Tag Manager, the tool has disadvantages:
- If you accidentally delete or change the GTM code while working with the site code, it can cause all previously created customizations and integrations to be lost. In this case, you will have to manually search for the error and fix it, which can take a lot of time. During this entire period, other counters and scripts that are displayed through the Tag Manager will not work.
- To correctly add the service code to the site, you need to have at least a basic understanding of HTML markup. If you do not have the necessary knowledge, you will have to engage a specialist – a web developer or programmer.
- The interface of the service itself does not collect any statistics. To analyze the collected information, you still need to log in to Google Analytics or other connected analytics systems. The tool also lacks online support via chat or phone. You have to look for answers to your questions in help documentation or on forums.
What is the structure of the Tag Manager?
- Account. A single Gmail can be used to create multiple GTM accounts, which is especially useful for web studios or marketing agencies working with multiple clients and projects. That said, for most online resource owners, a single GTM account is sufficient. When creating an account, you can add users and assign them roles (administrator, editor, contributor) to work together.
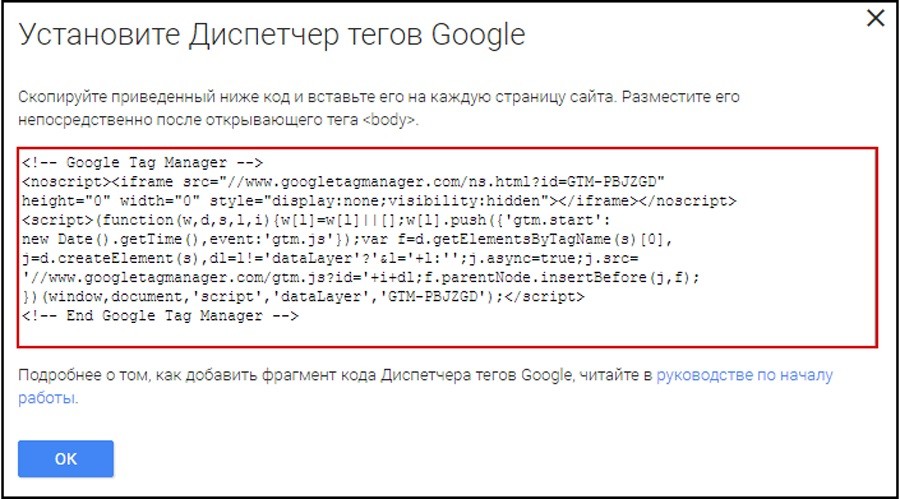
- Container. In essence, it is a single JavaScript code fragment added to the site sections. It serves as a “shell” for the other GTM elements. The container is loaded on the web page and controls the launch of various tags depending on the configured conditions. When you create it, you get a unique code to add to the site. Usually it is placed right after the opening <body> tag for correct operation.
- Tags. These are small fragments of JavaScript or HTML code responsible for various tracking, analytics and marketing functions. They are codes of third-party web applications – Google Analytics, AdWords or Facebook Pixel, call tracking services, etc. Instead of adding them one by one, you can manage them centrally through GTM. Tags allow you to track user interaction with the page (views, clicks, form fills, purchases, etc.), analyze the effectiveness of advertising campaigns, set up remarketing and personalization.
- Triggers. They allow you to fine-tune when the tag is activated depending on the triggering of certain events. The simplest and most common trigger is page load. It triggers the tag every time a user opens a certain page on your online resource. You can also customize the trigger activation when clicking on certain buttons or links, submitting forms, scrolling, triggering JavaScript events, etc.
- Variables. These can be the URL of a page, the name of a button clicked by a user, the name of a field from a form that was interacted with, etc. The system provides a number of built-in variables for collecting standard data (page title, browser language, etc.). In addition, you can create your own variables. They can be used when configuring GA4 to pass dynamic values.
- DataLayer. A special JavaScript element used to exchange information between the site and the Tag Manager. It works as an array into which you can put various information in the form of key-value pairs. For example, you can put information about the product being viewed, order parameters, etc. All this can be used when customizing GTM. For example, you can set up a trigger that will be activated only if there is a certain value in the dataLayer (a product from a certain category or an order for a certain amount).
How to customize Google Tag Manager?
Step 1: Click on the “Start for free” link on the GTM home page. Make sure you are logged in to Google. This is necessary for registration and further work in GTM.
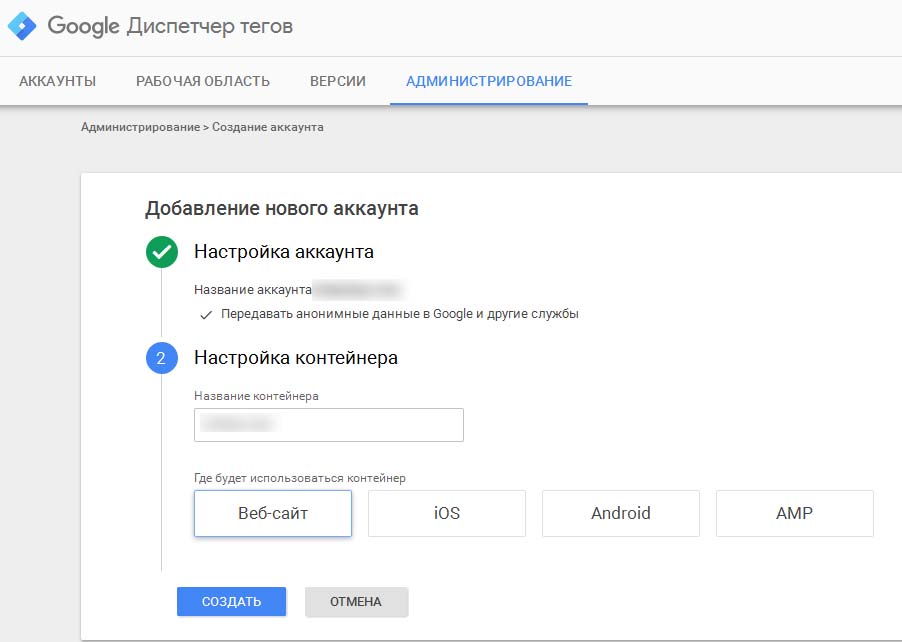
Step 2: Create an account by setting all the parameters requested by the system. Careful attention should be paid to the target platform. This is where it is specified where the tool will be integrated: on a web resource or in an online application. Next, click “Yes” when answering the question about agreeing to the user agreement.
Step 3. The system will redirect you to your personal account cabinet, and the script code will be displayed in the window that appears. This is exactly what we need. This fragment should be copied and pasted into the pages of your site right after the <body> tag.
Step 4: To create a pageview variable and further customize Google Tag Manager, use the “Custom Variables” item in the “Variables” section. In the list offered for selecting the value of the “Variable Type” field, click on the “Google Analytics Settings” line and enter your unique counter number in the corresponding box.
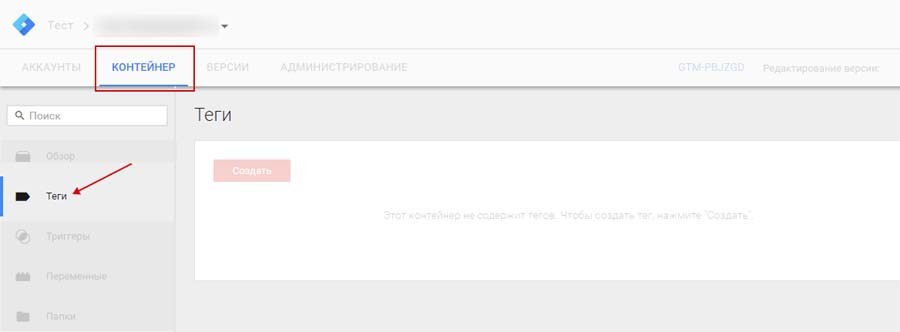
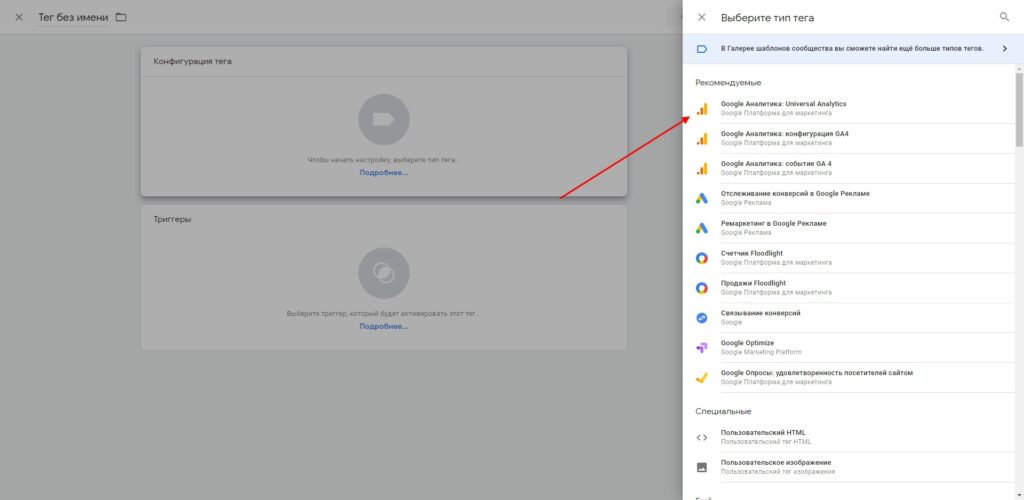
Step 5: In the “Tags” subsection, generate a tag with the function of information transfer to the analytics system.
Specify its type – “Google Analytics – Universal Analytics”, and set the tracking parameter as “Page View”. Select the variable that was created in the previous step in the “Google Analytics Settings” column. Check the “All Pages” trigger, come up with a tag name, and commit the changes.
Step 6: Activate the adjustments made to the container by clicking “Submit” in the workspace. In the form that appears, select the new container revision, click “Publish”.
Tip! To avoid duplication of information, the analytical system code previously placed on the pages should be removed.
Step 7. Check the tag functionality by loading the “Real-time – Overview” report. If the integration is successful, data will start appearing in it.
How to add a trigger to GTM?
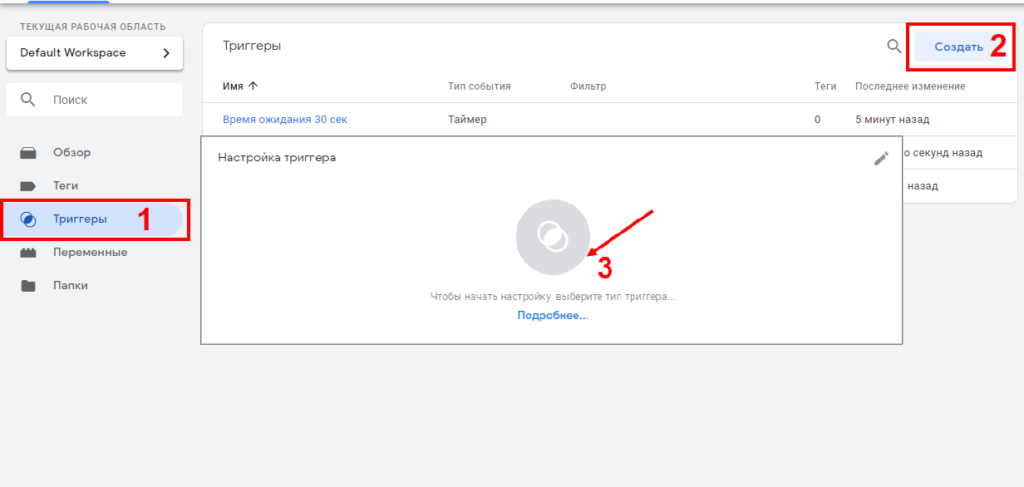
The process of adding a new trigger is quite simple. Log in to your GTM account and select the container where you want to add a new trigger. In the left sidebar, find the “Triggers” block and click on it. A “Create” button will appear in the upper right corner of the screen. Click on it to start the process of creating a new trigger:
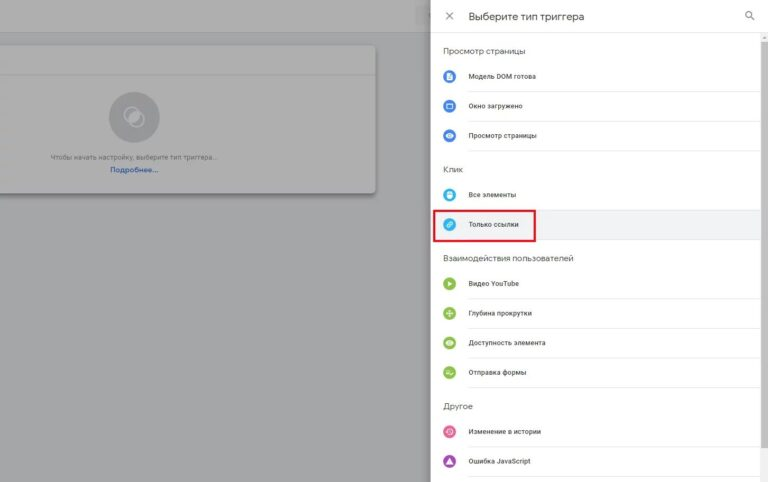
From the drop-down list, select the appropriate type corresponding to the event that you want to track. For example, “Page load”, “Click” or “Form submission”:
After that, you need to configure additional trigger conditions. If you have selected the “Page Load” trigger, you should specify one URL or a group of URLs where this trigger should be triggered.
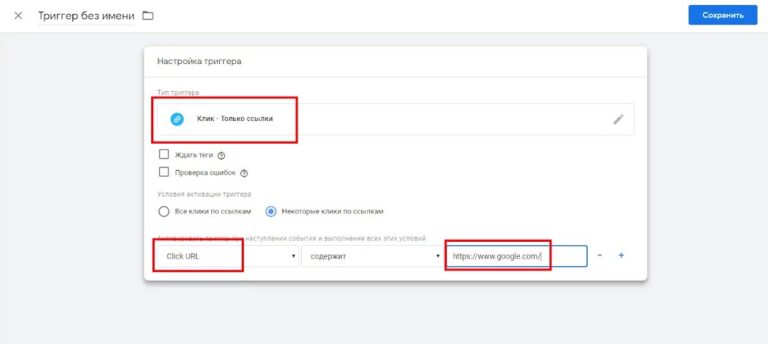
Give a clear name that will allow you to easily identify the purpose of the trigger in the future, and then save your changes by clicking the appropriate button.
Customizing variables in the Tag Manager
Variables in the Tag Manager can be used to:
- Storing information to define triggers. For example, you can create a variable that stores the address of a user’s open page and use it in a trigger to fire a tag only on specific URLs.
- Passing information to tags. They can be passed from DataLayer, JavaScript, cookies or HTML elements. Thus, you can pass the parameters of transaction ID, order amounts, product names, etc. to a Google Analytics tag.
- Setting the connection between triggers and tags. Using variables, you can customize the conditions when a particular tag is triggered. For example, you can create a trigger that activates a tag only if the “Scroll Depth” value exceeds 75%. Or set a trigger to send information to GA4 only after the user agrees to the processing of cookies.
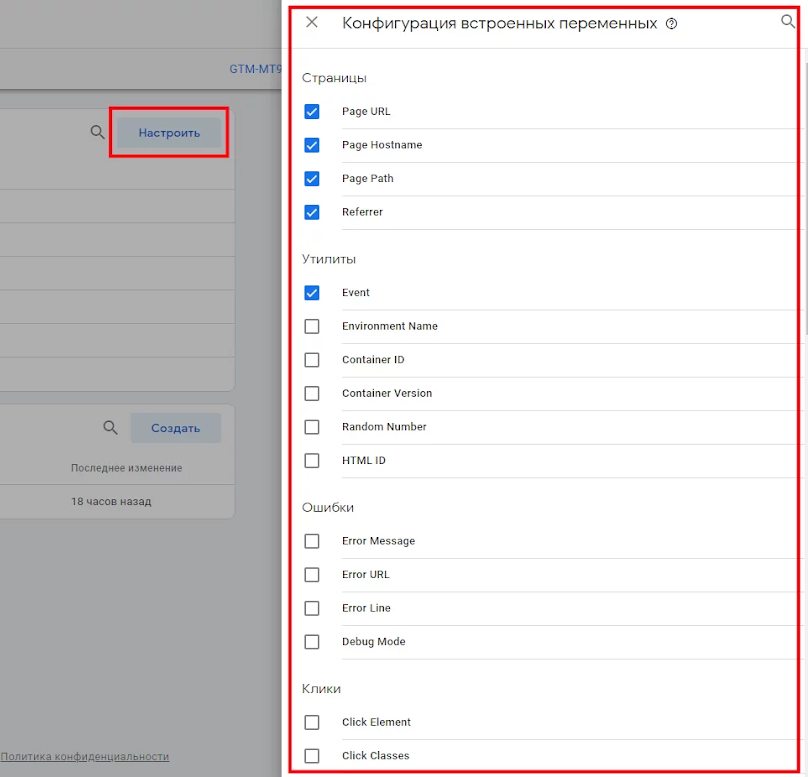
To connect a new variable in the Tag Manager, use the menu on the left side of the screen. The system will offer you a choice of built-in variables that can be further customized to your needs. You can also create a custom variable:
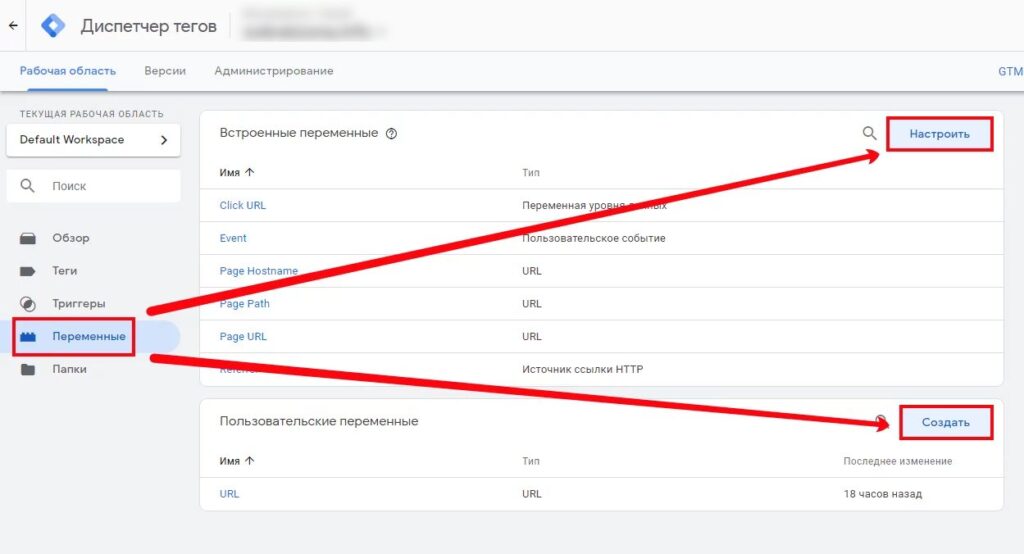
In the drop-down list, you can explore the options for built-in variables. Check the appropriate option and the desired variable will appear in the trigger filter:
What problems are possible when working with the Tag Manager?
- Tags work in debugging mode, but data is not transferred to Google Analytics. This problem is often caused by an incorrectly entered tracking ID. You can correct the situation by checking if the entered ID is correct and replacing it with the correct one. Additionally, make sure that the correct tracker type is selected in the settings.
- A sharp increase in the number of sessions and users after switching to GTM. This usually happens if the Google Analytics code and GTM with the GA tag are installed on an online resource at the same time. As a result, information is duplicated and transmitted to the analytics system twice – directly and through GTM. The problem can be solved by deleting the old Analytics code on the web resource.
- Changes do not appear in debug mode. If you have made changes to your settings but they do not appear in debug mode, you may have forgotten to refresh the preview page. The problem can also occur if you are working in several workspaces at the same time and have selected the preview mode of the wrong workspace.


