
If you have an online store on WordPress and WooCommerce, without analytics you are essentially operating blind. How many people viewed the offer, were ready to make a purchase, where they abandoned the process — without these numbers any marketing turns into a game of roulette.
Google Analytics 4 is the tool that solves this problem. But simply placing the code in the site header won’t do anything. You need a combination of GA4 + Tag Manager + GTM4WP. And yes, all of this can be set up without a programmer — in one evening.
Below is the path from creating an account to verification in DebugView, without unnecessary words and with real examples.
What advantages does GA4 provide for a WooCommerce online store?
Universal Analytics has been disabled for a long time, so GA4 is no longer a “new version” but the only available solution. For a WP store, it solves several tasks at once:
- You see the entire funnel: viewing product card → readiness to purchase → starting checkout → payment → purchase. Every step is a value that can be analyzed. If out of 1000 product card views, 200 people add to cart, but only 30 reach payment — you know exactly where the problem is.
- Monetization becomes possible. Real money. You understand revenue per product, average order value, conversion. No need to manually dig through the admin panel.
- GA4 easily integrates with Google Ads. This allows easy synchronization of many elements automatically — this option becomes available as soon as you link the accounts.
Important: GA4 does not collect e-Commerce data “out of the box”. Basic code installation is not enough — you will need a data layer (Data Layer) and properly configured GTM. Otherwise you will get traffic, but revenues and transactions will remain empty.
What is needed for setup?
Before starting the process, make sure you have:
- Access to WordPress with administrator rights;
- WooCommerce plugin configured and at least one product in the catalog;
- Site on HTTPS (without a certificate GA4 won’t connect properly);
- Google account to which you will link the analytics.
From third-party services — Analytics 4 and Tag Manager. Both are free. From extensions — GTM4WP. This is the optimal option if you don’t want to interfere with code and pay for a subscription.
Why exactly the combination of GTM + GA4 + GTM4WP?
You could, of course, install a separate plugin, embed gtag.js directly into the theme, or use Tag Manager. The latter requires more time at the beginning, but is almost always more advantageous.
But imagine this situation: in six months you launch Performance Max, and you urgently need to add a Meta pixel, an additional crm_purchase conversion, adjust tax accounting in one day. With GTM you will enter one interface and fix everything in five minutes. But if the code is embedded in the theme — you’ll have to write a technical specification for a developer.
Tag Manager provides a single window for all scripts: GA4, Google Ads, Meta, TikTok, Microsoft Clarity. One container, tags separate. Google’s requirements changed (and the company changes rules approximately every quarter) — you edit the tag without touching the site.
The GTM4WP plugin does the most difficult part: it forms the dataLayer with events. Without it you would have to write JavaScript for each step. The plugin does this automatically and uses exactly those event names that Google recommends for GA4 (view_item, add_to_cart, begin_checkout, purchase, and so on).
How to set up Google Analytics 4 on WooCommerce?
Next is the practical part. After completing these steps, the store will be technically ready to transmit information to GA4 — you’ll only need to configure GTM and conduct testing. Allocate 30-40 minutes for this stage if you’re doing it for the first time.
Creating a Google Analytics 4 account
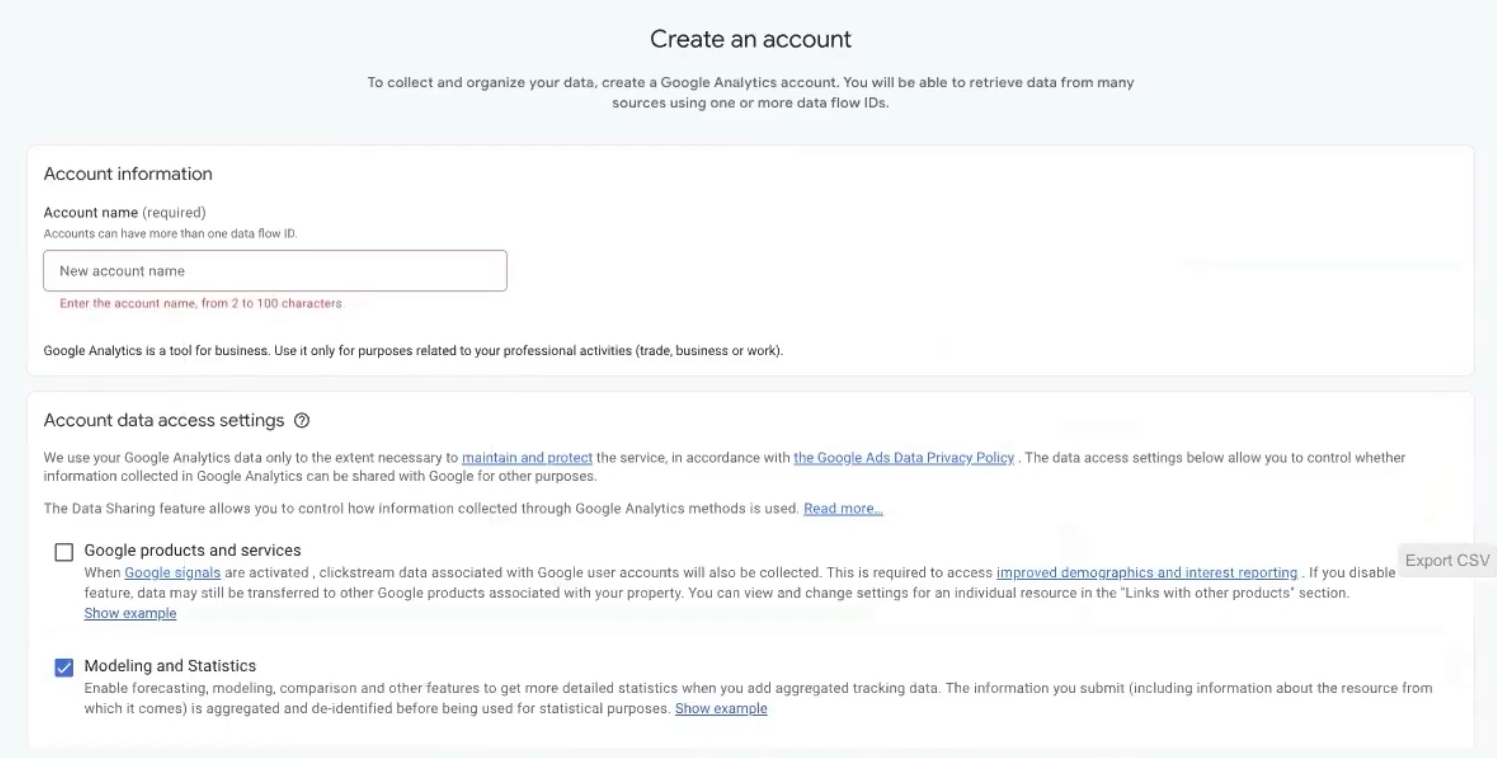
Go to analytics.google.com using your Gmail account and click “Create account”. It’s better to name the account with the domain name of the online store — for example, myshop.com.ua. This is not a whim but a purely practical matter. When in a year you have three or four projects with advertising, searching for “my site” among all accounts will take a long time: search in the analytics interface doesn’t work with IDs, only with names.
Next select country, time zone, and currency. If the store operates in the Ukrainian market — Ukraine, hryvnia. If you’re testing a project for another region — select the corresponding options (dollar, euro, or whatever you have there).
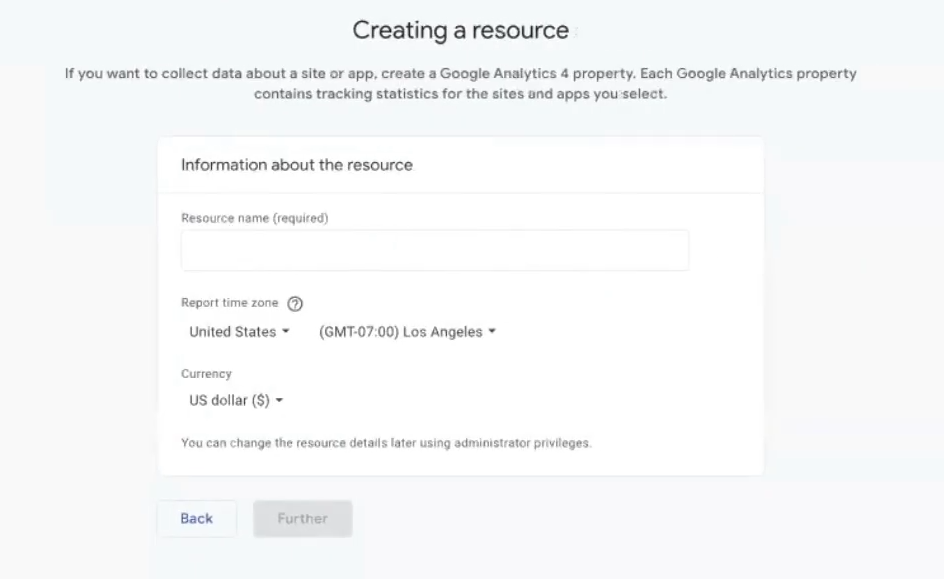
When setting up the property, specify the URL. In the stream name you can leave the domain. Then click “Create” — and the system will issue a Measurement ID in the format G-XXXXXXXXXX. Remember where it is located — you’ll need it in a couple of steps.
Creating a GTM container
Go to tagmanager.google.com and click “Create Account”.
The logic is the same here. For the container, it’s also better to specify the name as the domain, platform — Web. Click “Create”, accept the user agreement (the system won’t let you through without the checkbox).
After creation, Google will show two code fragments — one in <head>, the second in <body>. Close this window — we only need the ID. It has the format GTM-XXXXXXX and is displayed in the upper left corner of the interface.

Copy this ID. You’ll need to add it to GTM4WP.
Installing GTM4WP on WordPress
In the admin panel, open “Plugins”. In the search field enter GTM4WP. We need the solution from Thomas Geiger. Click “Install Now” and “Activate”.
Now go to the “Tag Manager” section. Enter the GTM-ID in “Tag Manager ID”. Be sure to check that the Container Code ON/OFF option is in the ON state. This is a frequent stumbling block: if you turn off this switch, the plugin will continue to send dataLayer, but the GTM snippet itself won’t be inserted. Tags won’t work.
Check: after saving, open the site in a new tab, right-click → View page source → Ctrl+F → search for GTM-. If you find it — the snippet is in place.
Integration with WooCommerce in GTM4WP
In the same plugin, go to the “Integration” tab. Here we enable the transmission of e-commerce data from WooCommerce.
What to check:
- Track Enhanced Ecommerce — the main switch, without it nothing will work. The name is inherited from Universal Analytics, but it activates exactly the modern GA4 scheme.
- “Cart as first step of checkout” — optional. If you enable this function, going to the cart will be counted as the beginning of checkout. This is convenient if you want to track the entire path in the sales funnel.
- “Cart content in data layer” — I recommend enabling. Displays current cart content on every page. Useful for remarketing and abandoned cart analysis.
- Use customer order data — let it be “Auto”. Google will choose the optimal mode itself.
Separately about the “Products per impression” parameter. This is the number of products included in one package. Default is 10. You can set the value to 5, especially if you have long categories with more than 50 items and there’s a risk of exceeding the package volume. For most stores, the standard value of 10 works fine.
Now about revenues — a point that is often overlooked. Check two boxes:
- Exclude taxes from revenue;
- Exclude shipping cost from revenue.
The logic is simple: if you calculate advertising profitability (ROAS, ROI), you need net income. Shipping and VAT don’t bring profit — they just pass through the cash register. Suppose an order is 2500 UAH, of which 200 UAH is shipping and 416 UAH is VAT. Advertising products at 2500 UAH is self-deception. The real figure from which you calculate margin is 1884 UAH.
If you, on the contrary, need “gross” turnover (for example, for reporting) — don’t check these boxes.
In the “Business vertical” field, select “Retail”. Other options (education, airline tickets, hotels) are for specific business directions and affect the structure of reports.
What is Product ID prefix and when is it needed?
A separate point that often causes difficulties. Imagine you’re setting up Performance Max. Go to Merchant Center → All Products and look at the ID. If there are just numbers (for example, 4010) — leave Product ID Prefix empty.
But if the ID looks like gla_4010 or wc_4010 — you’ll need to copy this gla_ or wc_ into Product ID Prefix. Otherwise, IDs in GA4 won’t work with Merchant Center and Google Ads, and you’ll have desynchronization: advertising attracts traffic to X, but in reports it appears as Y.
Importing a ready container into GTM
Your container is currently empty. You can configure tags manually — creating variables, triggers, GA4 Event. But the GTM4WP author simplified everything: he prepared a template that can be adjusted for goals in two minutes.
The template is in the official guide on gtm4wp.com in the section dedicated to Enhanced Ecommerce. Scroll the page to the link to the JSON file, right-click → “Save as”. The file will be saved in the needed format.
Now go to Tag Manager → Admin → Import Container. Select the saved file. Then the system will ask:
- Which workspace to import to — new or existing. If GTM is empty — choose “Existing”.
- How to handle conflicts — Overwrite or Merge. For an empty container, confidently choose Overwrite. If you already have some tags — Merge, then choose what to do with conflicts (Override — overwrite conflicting ones, or Rename — rename).
After import, you’ll have ready GA4 – Event – Ecommerce events, a set of variables and triggers. This saves at least an hour of manual work.
Adding Google Tag
The imported template contains an event tag, but it needs a “parent” Google tag that initializes GA4. We create it.
In GTM click “New Tag” → “Tag Configuration” → “Google Tag” (don’t confuse with GA4 Event — that’s different).
In the “Tag ID” field enter your Measurement from GA4 (the one with format G-XXXXXXXXXX). In “Triggering” select “Initialization – All Pages”. This is the trigger recommended by official documentation for the main GA4. Give it a memorable or simply understandable name — for example, “GA4 – Configuration” or “GA4 ID”. Save.
Now open the previously imported Event – Ecommerce events. In it, there’s probably a placeholder like {REPLACE THIS} or an empty Measurement ID field. Delete the placeholder and insert your real Measurement ID. If everything is correct — the inscription “tag found in this container” will appear under the field. This is a marker that the connection is established. Save.
Testing with Preview Mode and DebugView
Before publishing anything, you need to make sure that events are actually coming into Google Analytics with the correct parameters. For this we use two tools simultaneously.
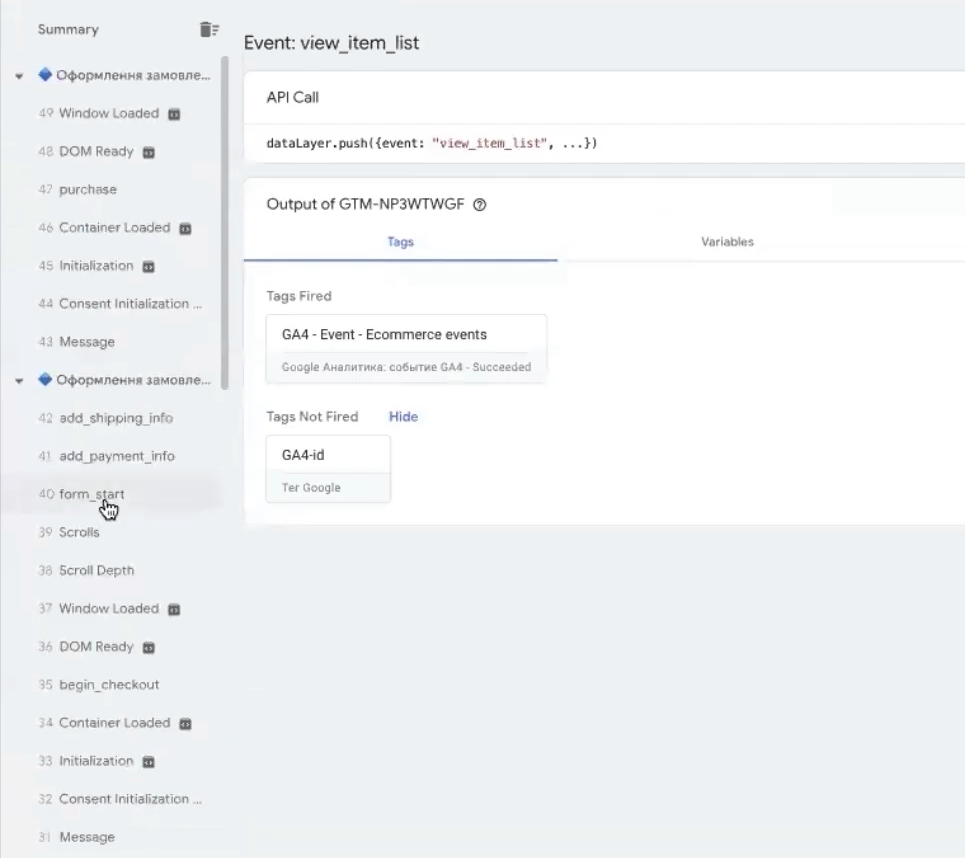
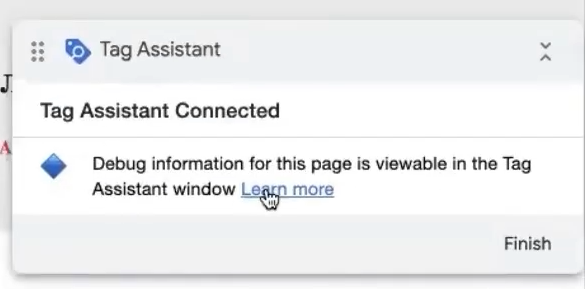
In GTM click the “Preview” button in the upper right corner. Tag Assistant will open. Enter your URL and click “Connect”. The site will open in a new window, and in Tag Assistant you’ll see events firing in real time.
And now — the most important thing. Make a full test order:
- Open a product card — view_item should fire;
- Go to a category or scroll the list — view_item_list;
- Add to cart using the corresponding button — add_to_cart (must fire when clicking the button, not when going to the cart);
- Go to cart — view_cart;
- Click “Checkout” — begin_checkout;
- Fill out the form, select payment method — add_payment_info, add_shipping_info;
- Complete the order — purchase.
Depending on the template, at the last step either a standard “Thank you for your order” page with a full set of data may display, or just a brief confirmation. This is normal.
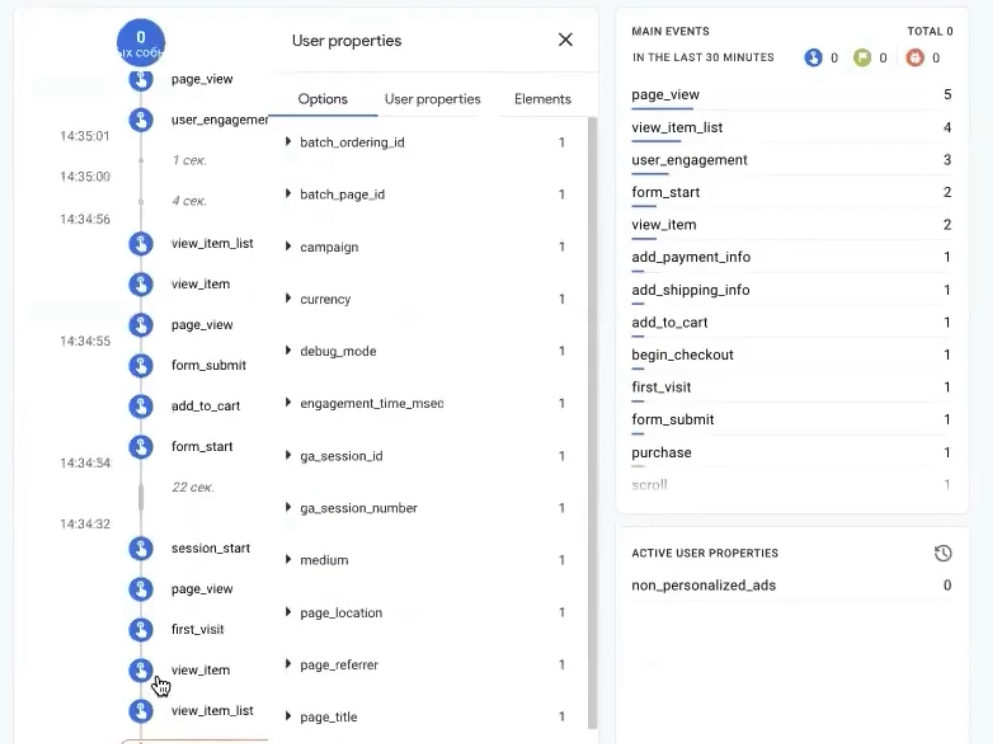
Now in Tag Assistant scroll down the events and open each of them. What to pay attention to:
- view_item — should have parameters currency (UAH), value (price), array with item_id, item_name, price, quantity, item_category.
- add_to_cart — the same, plus the quantity of added items. If you have two products, but add_to_cart passed one — this is normal: this tracks exactly clicks on add to cart.
- view_cart — value should match the total amount, items contains all positions.
- purchase — the most important. Should have transaction_id, currency, value, tax, shipping, full array of assortment data. The event highlighted in green is a marker of key conversion.
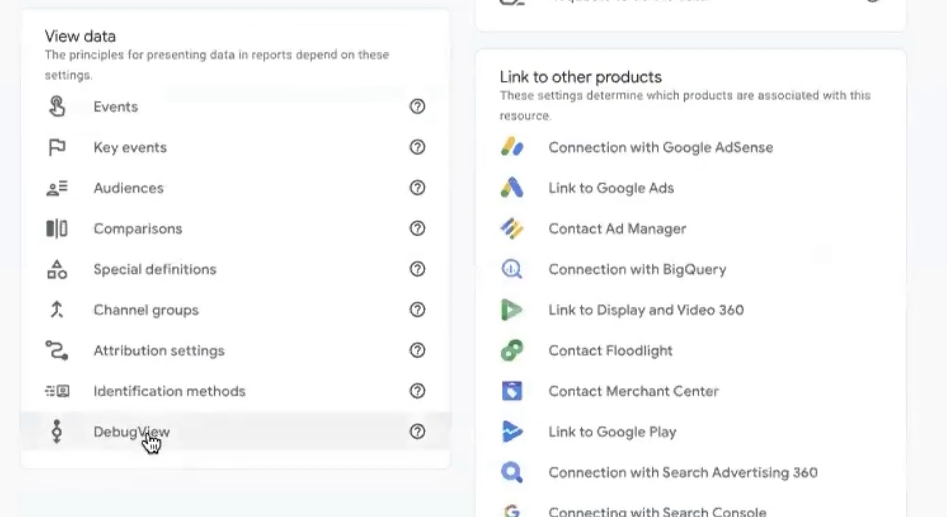
Now open GA4 → Admin → DataStreams → Your stream → DebugView (or Admin → Data Display → DebugView in the new interface). Everything appears here with a slight delay — from a few seconds to a couple of minutes. Find the same tags and open each of them, checking parameters.
If DebugView is empty: make sure that the “Container Code” function is enabled in GTM4WP, that “Preview” mode is active, and that the GA4 ID is correctly entered in the tag. In 90% of cases, the problem is exactly this.
How to properly interpret e-commerce metrics in GA4?
Let’s understand what these events actually mean. This is important because the names are similar, but the logic is different.
- view_item — visitor opened a specific product page.
- view_item_list — they are browsing offers. Category, search page, “Similar offers” block, “Bestsellers” on the main page — all these are listings. Therefore view_item_list usually fires more often than view_item.
- add_to_cart — click on the add button. Don’t confuse with view_cart. If someone added a product and left, only add_to_cart fired.
- begin_checkout — started the purchase process (clicked “Checkout”).
- add_shipping_info / add_payment_info — selected delivery / payment.
- purchase — final transaction. This is what you’ll then import into Google Ads as a conversion.
Separately about duplication. Sometimes on sites due to plugin overlap or theme features, one view_item is recorded two or three times for one action. This spoils statistics: Google will think a person viewed the card 30 times when in reality it was 10. This is fixed either by editing the trigger (adding a blocking trigger condition), or by reviewing conflicts. If in DebugView you see duplication — it’s worth investigating separately.
Publishing the GTM container
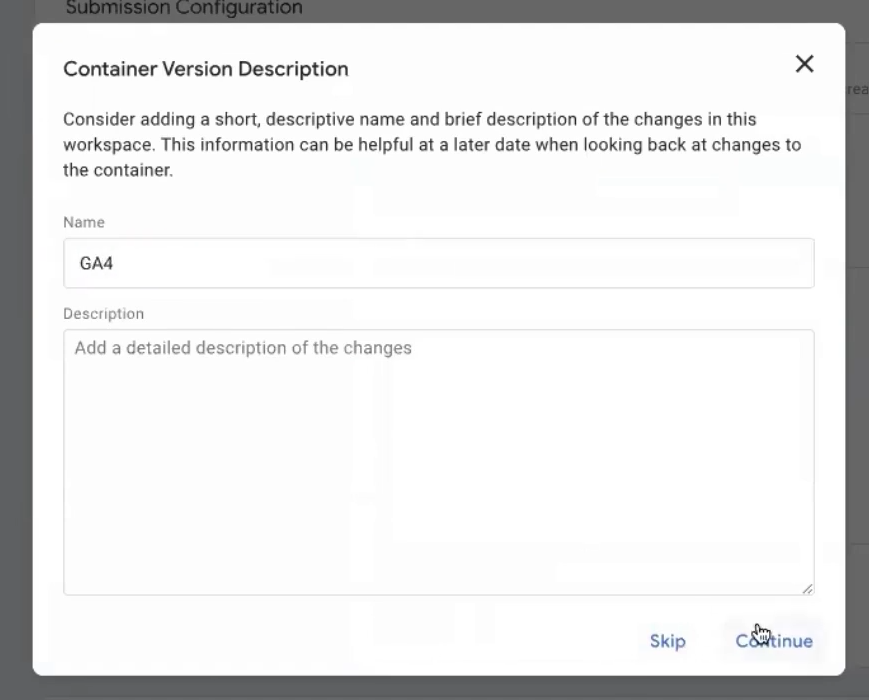
You checked, data matches everywhere — time to publish. In GTM click “Submit” → give the version a clear name (for example, “GA4 ecommerce – initial setup”) → “Publish”.
From this moment GTM is active, and GA4 starts collecting real statistics not in DebugView, but in main reports. But note: statistics comes to standard GA4 with a delay of up to 24-48 hours. In real-time mode (Reports → Realtime) you’ll see the main situation instantly, but for monetization, ecommerce-purchases and other elements — the next day.
Connecting user identification
The final touch that is often forgotten. Go to Data Settings → Reporting Identity. By default, “Blended” is selected — it uses userID, Google Signals, and device-ID simultaneously.
I recommend switching to Device-based. Why? Blended sometimes confuses analytics for small stores: when Google can’t connect a user through Signals, it starts making assumptions, and data becomes unstable. Device-based gives a clear and predictable picture: one device — one user. For most Ukrainian stores, this is more than enough.
To switch, click “Show all” and select “By device”.
How to check if GA4 is working correctly on WooCommerce?
24 hours after publication, go to GA4 → Reports → Monetization → E-commerce purchases. Statistics should appear here.
What to check first:
- Revenues are displayed correctly. If value equals 0 — most often the problem is in the currency parameter: Google can’t calculate without specifying currency. Check if all triggers pass the currency parameter: UAH (or needed currency).
- Purchase count matches WooCommerce. Acceptable gap is 5-10% (due to ad blockers, cookie refusal). If the difference is 30% or more — something is configured incorrectly.
- Transactions are unique. If one order is recorded twice — this is duplication. Check the purchase trigger: it shouldn’t fire on reloading the thank you page.
- Items parameters are filled. The report displays names, categories, and IDs. If it’s empty — something is wrong with items transmission in dataLayer.
Especially useful is viewing the Realtime section in the first days: it reflects current activity and helps quickly identify errors.
Common problems and solutions
- Purchases exist, but GA4 doesn’t see them. Most often this is related to the payment gateway. Some gateways (PayPal Standard, some Stripe configurations) don’t automatically return the user to the thank you page after payment. If the person closed the tab during payment — the code simply didn’t have time to fire. Solution: enable Auto Return in the payment gateway.
- Custom thank you page. If you use CartFlows or your own thank you page, GTM4WP may not recognize it as an endpoint. In this case, the purchase trigger won’t fire. You’ll have to either configure your own trigger, or add a hook to the functions.php file.
- Revenue in GA4 is higher than in the store admin. Usually this is related to accounting for taxes and shipping. Make sure that “Exclude tax” and “Exclude shipping” checkboxes are unchecked in GTM4WP.
- view_item or add_to_cart are duplicated. Plugin conflict. Often happens when both GTM4WP and another analytics plugin (Site Kit, MonsterInsights, or other) are installed — both send activity to dataLayer. Leave only one solution for ecommerce tracking.
- IDs in GA4 don’t match Merchant Center. This is that case with Product ID prefix we talked about above. Go to Merchant Center, check the ID format and accordingly specify the prefix in GTM4WP.
How to connect GA4 to Google Ads?
After GA4 starts stably collecting information, the platform must be linked to Google Ads. This is done in the GA4 interface. After connecting you will be able to:
- import the “purchase” conversion as a target action;
- create remarketing audiences based on behavior;
- transmit e-commerce information to Performance Max for optimization;
- view GA4 metrics in Google Ads alongside clicks and expenses.
This is a separate extensive topic that makes sense to consider together with advertising account optimization.
Useful tips for the future
A few tips that will save your nerves in a month or two of working with analytics.
- Make GTM backups before serious changes. Admin → Export Container — and you’ll have a JSON file that can be restored with one click. Sounds like a small thing, but when you accidentally delete purchase on Friday evening — you’ll thank yourself.
- Name GTM versions in understandable language. Not “Version 17”, but “Added FB Pixel + purchase”, “Fixed view_item duplication”. In six months you’ll understand what exactly and when you changed.
- Once a month compare revenue in GA4 with WooCommerce. A difference of 5-10% is normal. 20% or more — a reason to look for an error before it leads to accumulation of a large amount of incorrect information.
- And one more: GTM4WP is actively developing. Once a quarter check the WordPress extensions section and update it, as new versions add support for new GA4 elements and fix bugs. Before updating — just in case, make a GTM backup.


