
Hello, everyone! My name is Yana Lyashenko, and I am a Google logistician. Today, we will discuss how to set up advanced conversion tracking on Khoroshop with the transfer of the user’s email and phone number.
Let me clarify right away: I will not be discussing how to set up a purchase tag in this article—I have a separate video for that. You can find the link somewhere nearby, or just check out the playlist on Khoroshop.
Here, I will show you exactly how to set up advanced tracking, as recommended by Google itself. Let’s get started!
Placing a test order, filling in the fields
Where do we start? I have Google Tag Manager open, and I click the Preview button to preview it. I won’t show the website itself — I don’t want to reveal the project of the client I’m setting this up for.
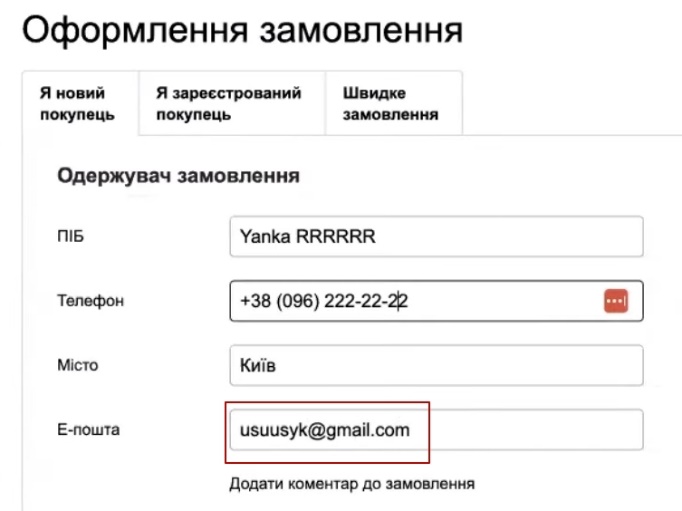
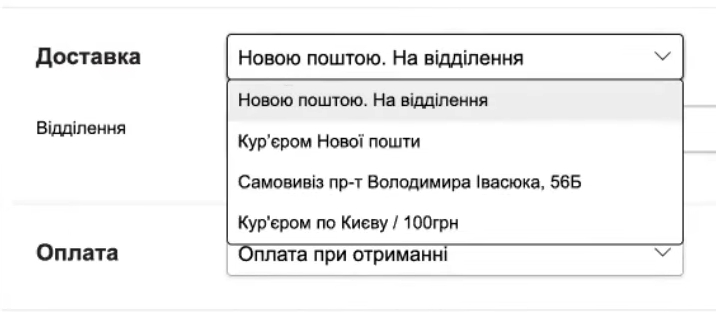
What do we do next? Your task is to place a test order. I have already added the product to my cart, so I just click “Place order.”

Everything except the design block will be hidden so that you only see the necessary fields. Look at what I’m entering: let’s say the name is “Yanka test.” My phone number has already been filled in automatically, but let’s enter something of our own for clarity. And, of course, we need to specify an email address.
This is what the form looks like before sending a test order to Horoshop.
Setting up phone number forwarding
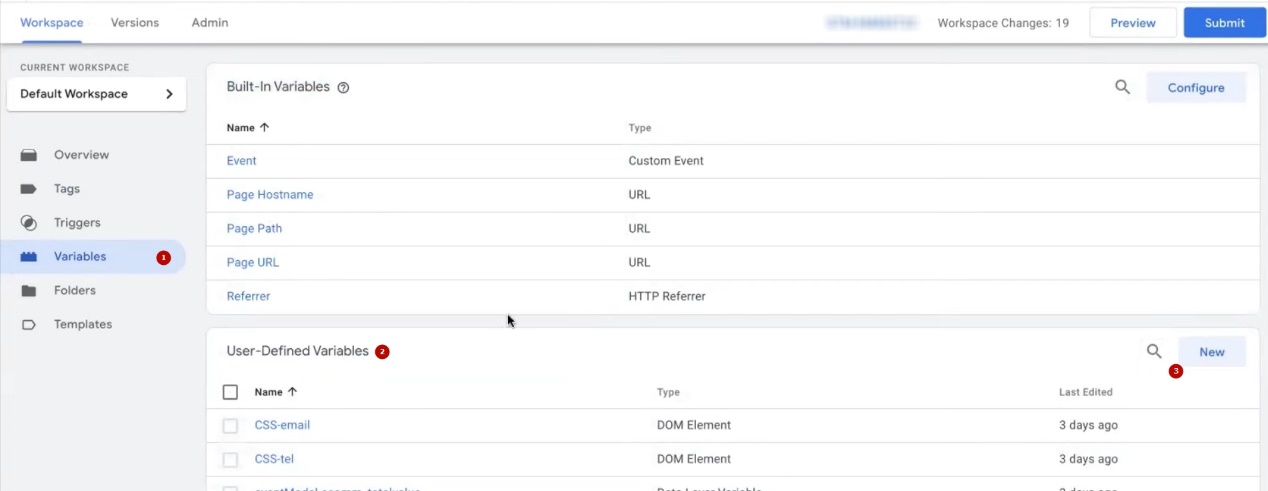
Now let’s move on to the practical part — setting up phone tracking in Google Tag Manager. Open your GTM and go to the Variables section (if your interface is in Russian, it will be called “Переменные”).
Inside this section, we find the User-Defined Variables block. Please note: there are usually two blocks here — built-in variables and those that we create ourselves. We are interested in the second one.
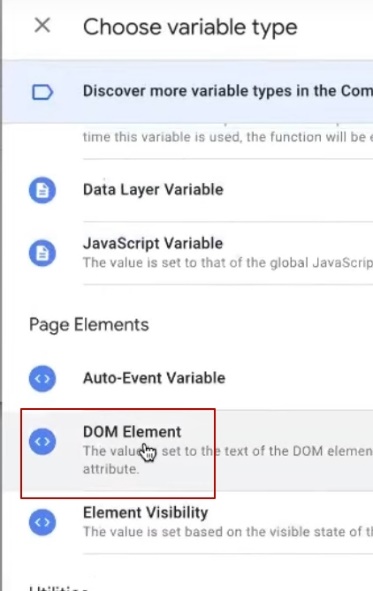
Click the New button, then Configuration. In the list of types, find DOM Element and select it.
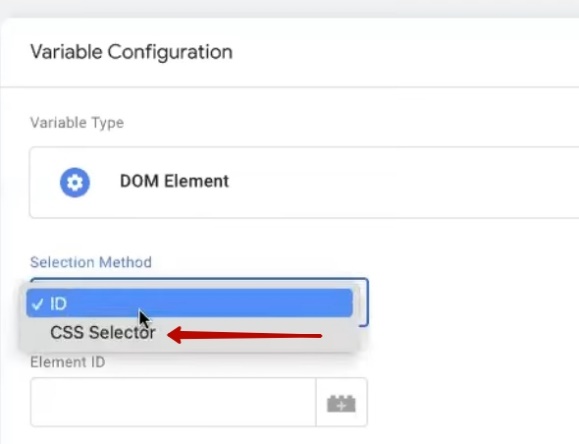
In the DOM Element settings, you need to specify the selection method — set CSS Selector. Remember this point.
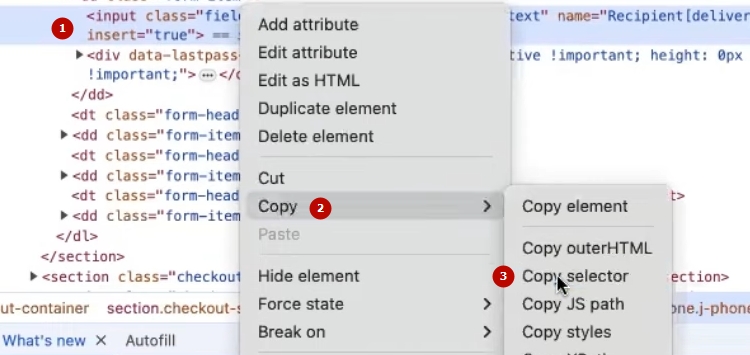
Next, we will need the selector itself. Don’t worry—it’s not complicated. Return to the website where you placed the test order. Right-click directly on the field with the phone number and select “View code” (or use the hotkeys—on Windows, it is usually F12, then Ctrl+Shift+C).
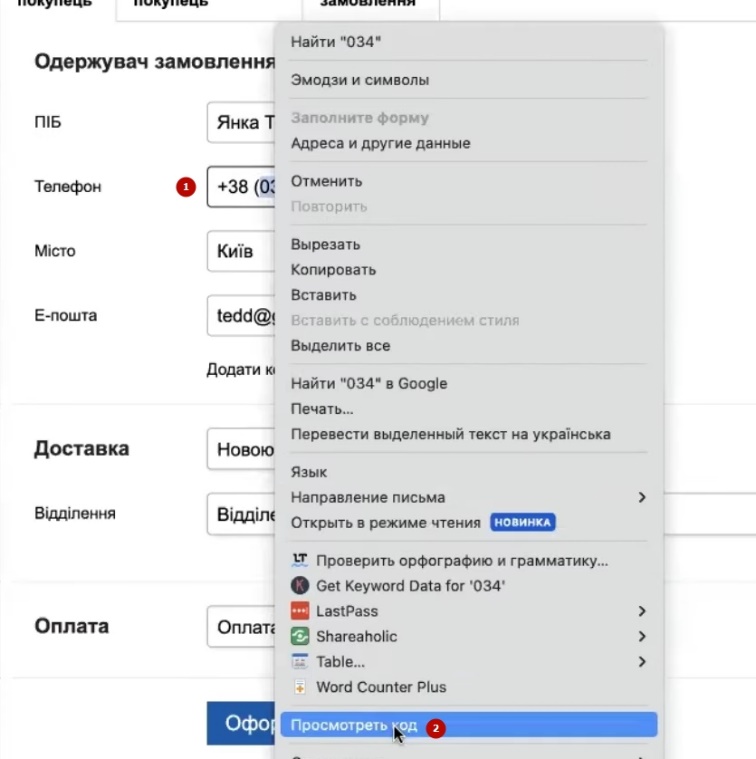
The browser will highlight the desired element in the code in blue. If you click, for example, on the field with the name, the name block will be highlighted. We need the phone number, so click on it.
When the desired element is highlighted, without clicking anywhere else, move the cursor over this code block, right-click, and select “Copy” → “Copy selector.” Done.
Return to GTM and paste the copied selector into the appropriate field. Yes, it will be long — that’s normal. Be sure to enter a value in the Attribute Name field — this will allow you to get the entered value, rather than just finding the element.
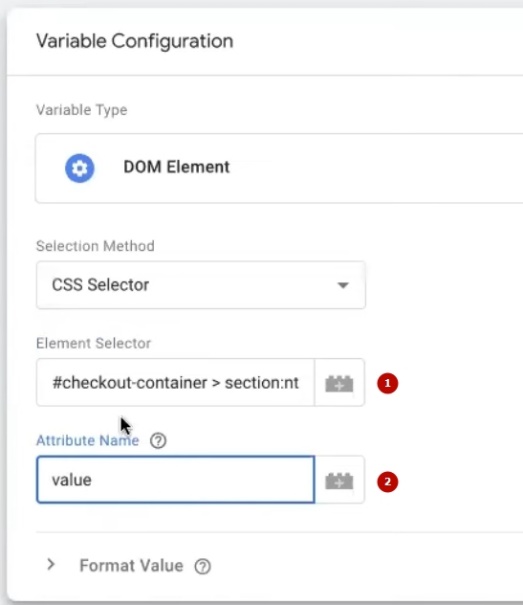
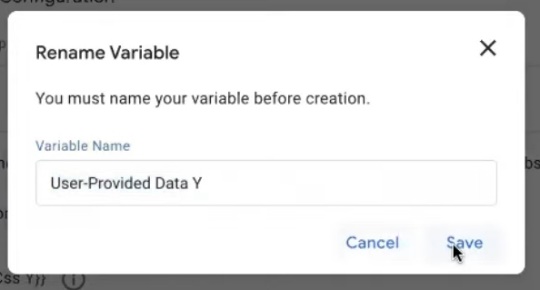
All that remains is to give the variable a meaningful name. For example, “Phone CSS” or “Phone Goodshop” — whichever you prefer. The main thing is to avoid confusion with other variables later on.

Configuring email forwarding
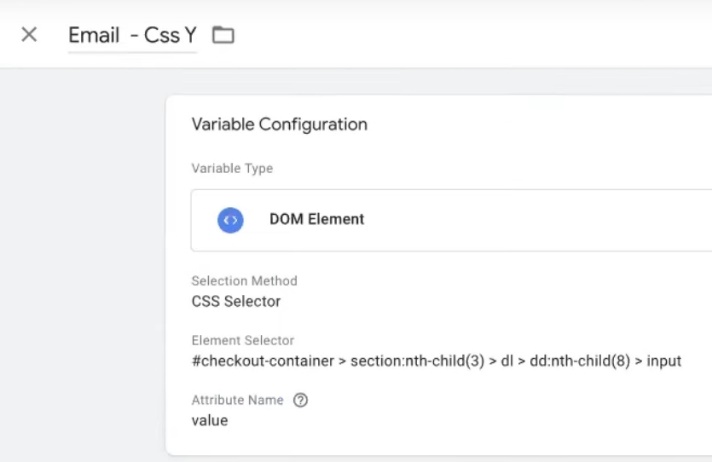
Now repeat the same procedure for e-mail. Create a new variable, select DOM Element again in the configuration, and change the method to CSS Selector.
Why is email so important? If you look at Google’s help section (while it’s still relevant — you know how things are constantly changing), it becomes clear that a phone number can only be transferred as a separate parameter if you have an email address. In other words, there is no real choice — email is mandatory.
Yes, technically you can also add your first name, last name, city, and address. But there’s little point in doing so: they are not used for targeting, and for address data, the system will also require a postal code, which is not usually included in the order form on Khoroshop. In short, don’t bother — an email address and phone number are enough.
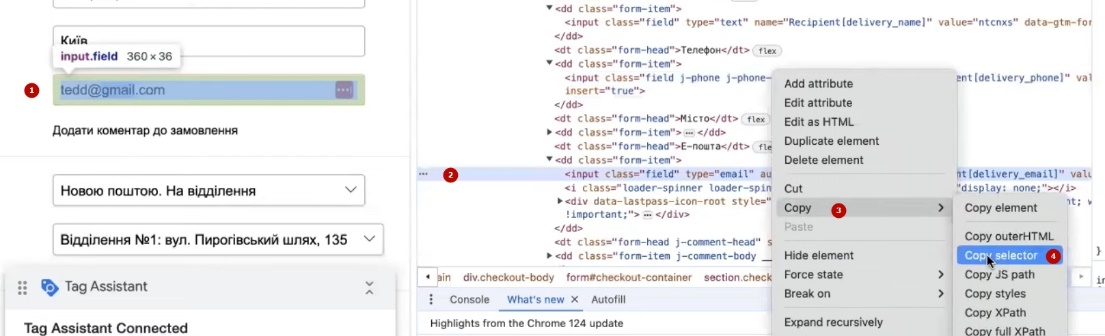
Return to the website, right-click on the email field, and select “View Code.” The element will be highlighted—right-click and copy the selector. Paste it into GTM, and enter the value in the attribute field. Name the variable, for example, “Email CSS,” and save.
Check: Are the parameters being passed?
You’ve set it up — now you need to make sure that conversion tracking is working correctly. How can you check this?

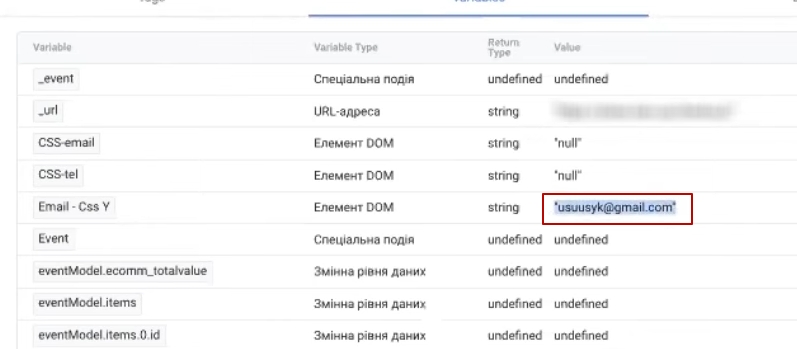
We click Preview in GTM again and go to the website. Since the product is already in the cart, I immediately open the checkout page. I fill in the fields with test data: name — “Yanka RRRRRR,” I change the phone number, and I also enter a new email address.

I return to the GTM preview window. I find the order form page and go to the Variables tab. I scroll through the list and—voilà!—I see my “Email CSS” variable with the value I just entered.
Now, here’s the trick: imagine that a user entered an email address with a mistake, noticed it, and corrected it to, say, “vsepusik@…”. What happens? We click somewhere on the page, return to the preview, and see the updated value “vsepusik”. The system records the current data, which means that ultimately, it will transmit exactly what the user sends along with the order.
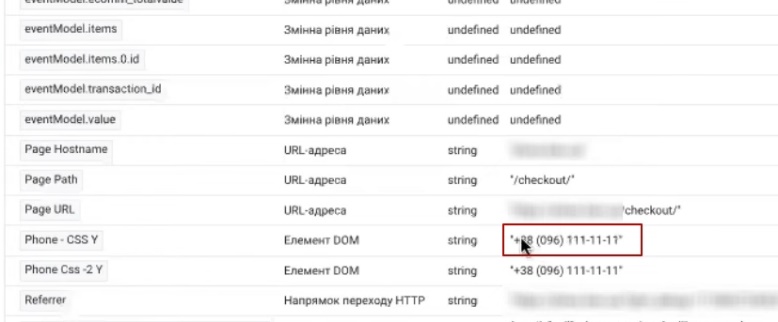
The same applies to the phone number. I change the number to ones, click on another field, check in GTM — the new number is in place. This is exactly what we need for correct data transfer settings.
If you want, you can use the same principle to set up the collection of first names, last names, or anything else. The rest is up to your imagination.
Setting variables in the purchase tag
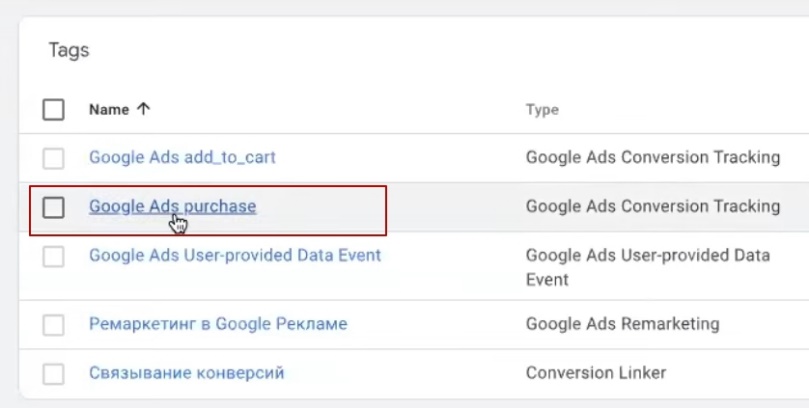
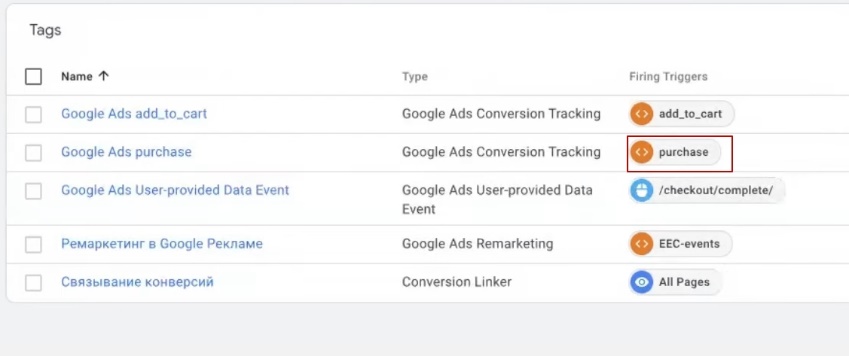
The variables have been created — now we need to connect them to the purchase tag. Go to the Tags section, find your purchase tag that was configured earlier.
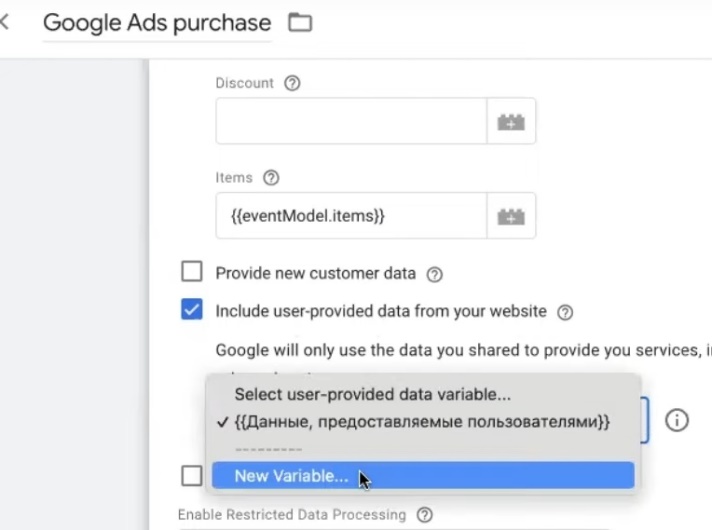
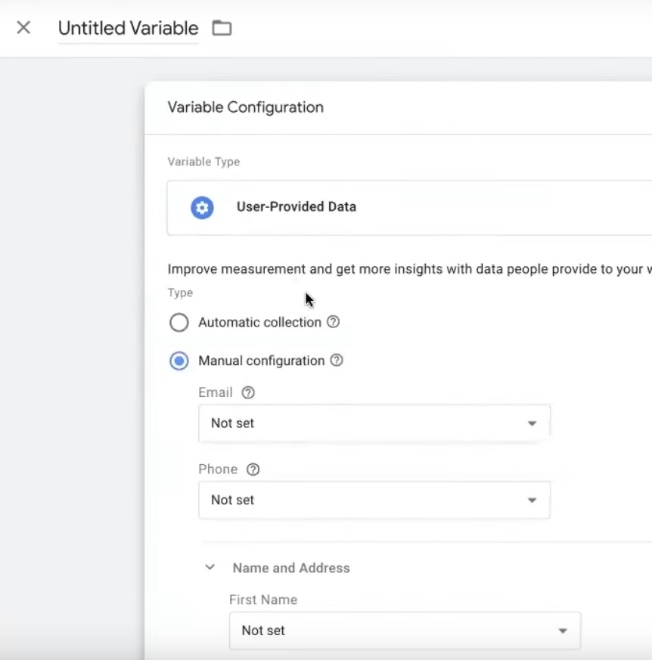
Open it and look for the Include user-provided data from your website block. If you haven’t configured this parameter yet, just click New Variable and select the User-Provided Data type, then specify “Set manually.”
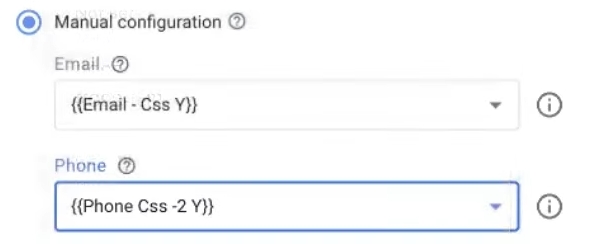
Next, we substitute our variables. In the Email field, we select the “Email CSS” variable that we created earlier. In the Phone field, we select the variable with the phone number.
What other data can be added? The system allows you to enter your first name, last name, street, city, region, country, and postal code. But let’s figure out what is really useful.
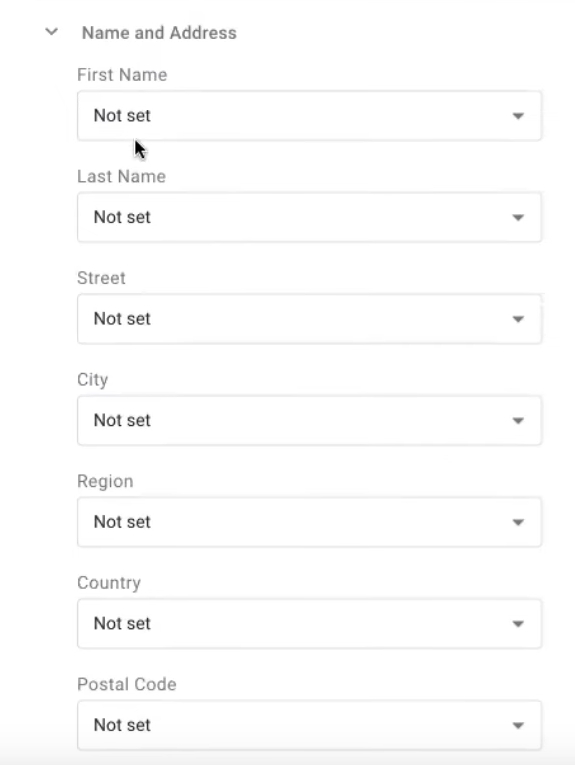
First and last name — Google once promised personalized advertising along the lines of “Yana, this offer is for you!” I haven’t seen this used on a large scale yet, so you can decide for yourself whether to track it or not. For Ukrainian websites, people usually provide their real details because they want to receive their parcels via Nova Poshta.
Address data is more complicated. On Khoroshop, there is no postal code in the order form, and without it, Google will not be able to use geodata correctly. Plus, the address itself often points to a Nova Poshta branch, not the buyer’s actual place of residence. Targeting based on this info is risky—the system might decide to pour the budget into the area around the post office, where people just come to pick up their packages.
For comparison: on American websites or Shopify projects, there are always fields for “address,” “street,” and “postal code” when placing an order—this is a standard requirement, including for correct operation with Google.
For the Ukrainian market, email and phone will suffice. Name the variable clearly and save it.
Important note: this setup will trigger on the purchase event. On Khoroshop, it triggers when the “Place order” button is clicked. This means that if a user first enters one email address, then notices a mistake and corrects it, the system will only send the final version. Exactly what you need.
Configuring variable collection using third-party scripts
There are situations when the purchase tag is implemented directly from Khoroshop via an additional script. To be honest, I don’t really recommend this method. It’s much more convenient to work through GTM: it offers more flexibility and complete control over data. Want to add a new parameter to purchase? Go ahead. Decided to remove or change something? No problem. No need to ask a developer or dig into the site code every time.
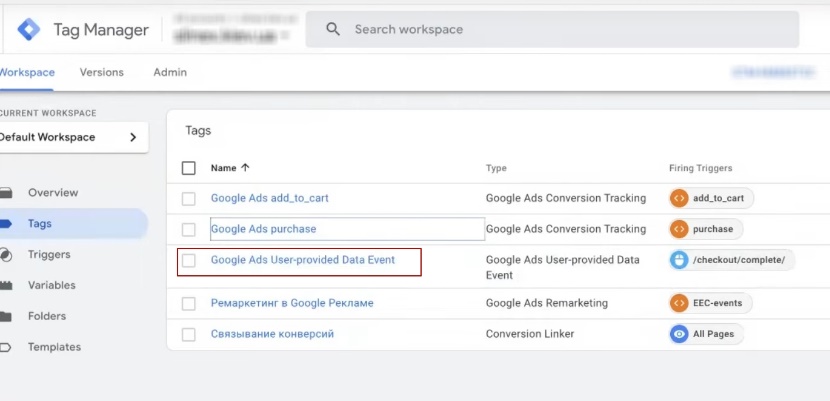
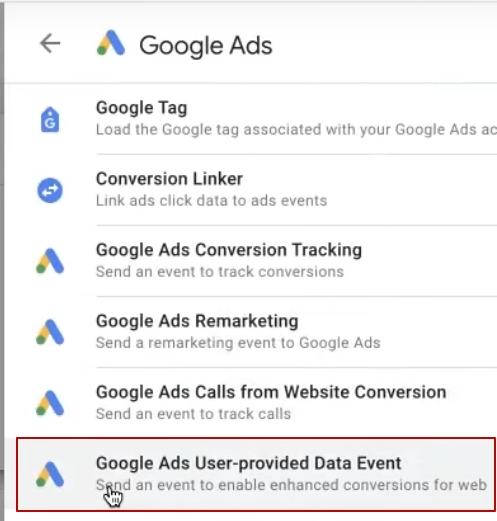
But if you have configured your settings directly in Goodcop using scripts, then you will need to create a separate tag. It is called Google Ads User-provided Data Event.
How to do it:
- Go to GTM, click on Create New Tag.
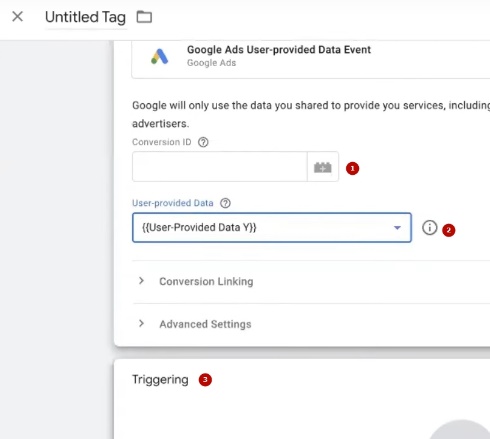
- In the configuration, select Google Ads, then look for User-provided Data Event — it’s usually at the end of the list, so you can’t miss it.
- Insert your Google Ads ID — this is everything that comes after “AW-” (you can find it in your conversion settings).
- In the User Data field, pull up the variables you created earlier.
- Trigger for Khoroshop — purchase event
Save, publish — done, the data will be transferred.
In my case, this tag is paused because all data is already being transmitted via the main purchase tag. A separate User-provided Data Event is needed when conversion tracking is configured in different ways or does not trigger at a single moment.
Publication and analysis of results
All that remains is to publish the changes and wait for Google’s response. Just a heads up: the system will often complain about missing data. For example, when reordering, the email address may not be displayed in the form — it is stored in cookies or the user’s profile. This is normal; most websites will have enough data that is transmitted.
In terms of timing: it will become clear within approximately three days whether Google has accepted the parameters or not. You will see the note “Requires attention” in the interface — or you won’t. But you can expect full analytics on advanced conversion tracking in about 45 days. Google itself warns about this.
That’s basically it. This is the simplest way to set up data transfer without writing complex scripts — ideal if you’re not a programmer. The method fully complies with Google’s official recommendations. Everything is tracked, recorded, and sent via the purchase event.


