
In this video we go over the mandatory steps you need to follow in order to run a successful profitable Pmax campaign, Performance Max campaigns. Just a reminder, these are Google Ads campaigns with AI functionality, that is, artificial intelligence. One of the important steps is, so I’m putting it in the second step, is setting up goals for this Performance Max. Remember that the AI-thing here is very smart, it can do a lot of things for you, but it needs to understand what exactly needs to be done and what indicators to focus on. Setting up goals is so fundamentally important for this type of advertising campaign.
You and I will be setting up a purchase, that is, an event called Purchase on your site, to which will be transferred income, the number of goods, what kind of product was purchased, what price it had, and so on. So, you realize, without this information, your pmaxes will work by relying on some kind of luck.
What are the stages of goal setting?
So, I would divide this goal setting into two sub-steps, they are not complicated. You will be able to implement them. Nothing here will be critical. But why have I divided it into two sub-stages? Because the first stage is setting up the fourth analytics on your site, and the second stage is setting up this very conversion, which we will need as a purchase (buy) in order for our Performance Maxes to work. You can skip the stage of setting up the fourth analytics and go directly to setting up the conversion itself – nothing critical will happen, it will be enough for you. Moreover, this is the only type of conversion that Pmaxes can really work effectively with. But the fourth analytics I’m going to specifically show you how to set up here. It’s very easy. There’s nothing complicated about it. Why? Because over time, you’re probably going to launch some other types of traffic. Maybe you will add SEO, some kind of promotion, some kind of newsletters or other sources of traffic, Facebook, targeting or something else you will add. It is the fourth analytics will allow you to analyze all types of traffic to the site, unlike the conversion “purchase”, which we will configure only for Google Ads. Plus it will allow you to see the number of add to cart, begin checkout or some other kind of useful information for you to understand the conversion rate of your site and stuff like that. That’s what the fourth analytics is for, to make it easy for you to analyze user behavior on your site. This is a short introductory part.
Module for setting up the fourth analytics in OpenCart
What do we need to do? We’ll start with the fourth analytics. What do we need to do for that? Go into our extensions, select our modules, and find our module called Remarketing All-in-One.
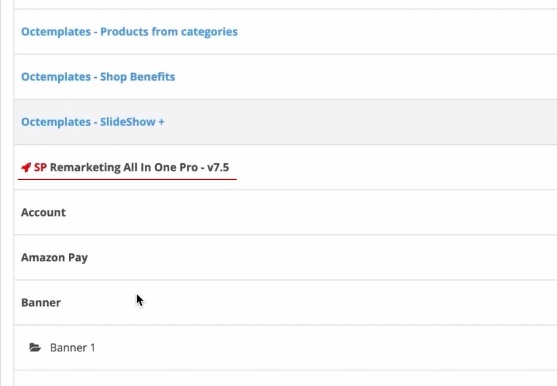
This is where we’re going to put this fourth analytics in a few items in the settings. It’s not super complicated, but we need to create this analytics account. How is it going to be created? I specifically recommend taking turns doing that, because there are variations of doing something there with Google Ads. I will not confuse you. Everything is according to the book, according to the manual. The least errors then technical in code processing.
Creating a new GA4 account
You can go straight to marketingplatform.google.com or you can go straight to a link called analytics.google.com – whatever. I’m going to start by creating a new account because I’m reblogging this video. But you’re going to have about the same situation. You’ll be able to create a new account, which is what we need. What do we put in here? Account details I usually put in, my domain name.
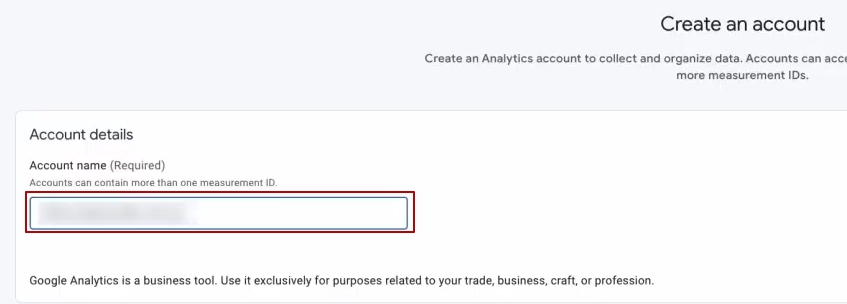
Why do I recommend putting in a domain name? Because if you have several sites, or if you have subdomains, or something else – you will make up your own, it will still be convenient for you to search for your respective fourth analytics profile. Because it used to be possible to search everything by analytics ID, but Google removed it for some reason. So by the name of the domain name, you’ll usually be in order. It’s clear where which account lies.
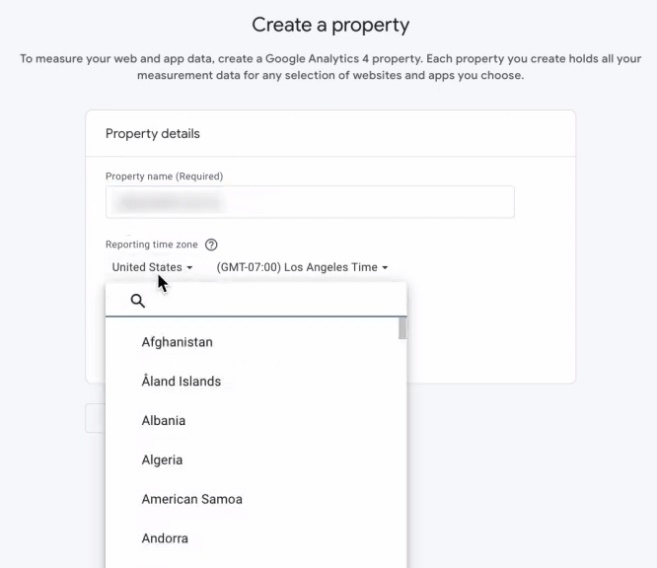
Next, do the same for our property. Then choose the country in which you will customize your sales. For example, for me it could be Ukraine. You choose the time. If it is the States, you select the States, time zone.
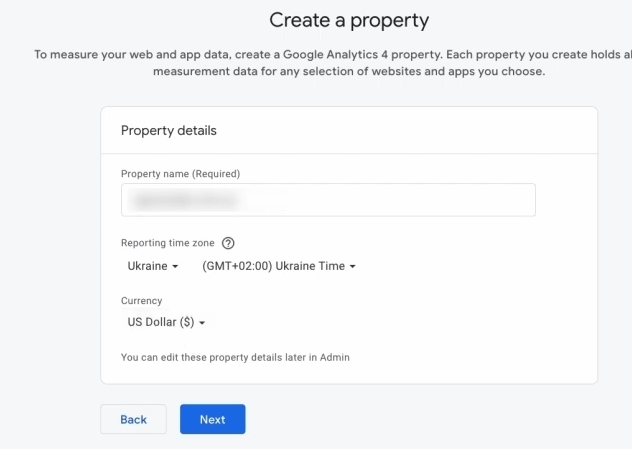
You choose the currency. What does the currency affect? The currency of the analytics must match the currency on your site. That is, whatever currency you have, you use that currency. If you have a site that is launched in different countries around the world, you can keep the currency in which you feel comfortable controlling your metrics. It’s not super critical, really.
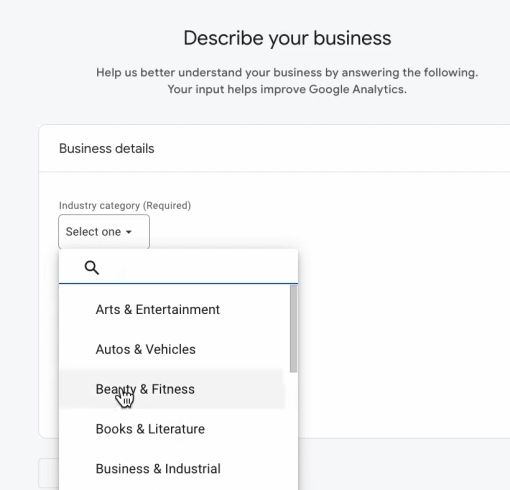
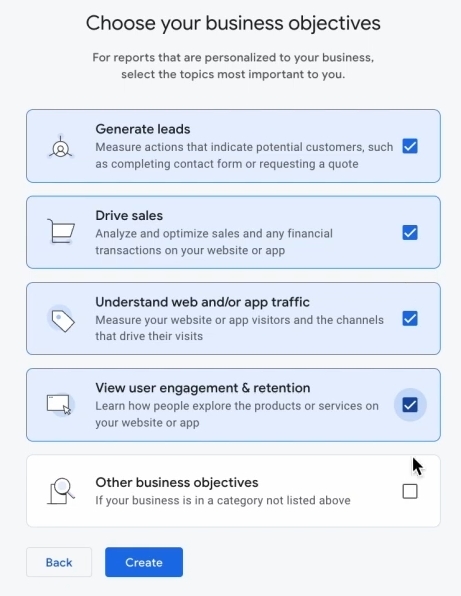
Next, we are prompted to choose our business category. You can choose shopping and don’t sweat it, if you want, you can choose something else. What is this for? It doesn’t affect anything in the fourth analytics especially, so it’s not super critical if you get something wrong there somewhere. We’re going to select all four of these checkboxes. You’re not going to select the fifth one, because it, you see, excludes these.
Let’s move on. Here we are asked to agree with the politicians. We accept them all, because we don’t really have a choice. And now let’s move on to the settings themselves. As you can see, it’s not super complicated.
Enter our domain name. “Stream name” we also enter the name of our site. Click “Create”, continue.

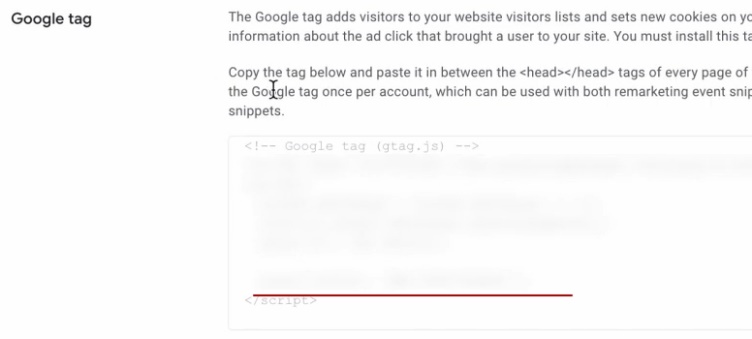
After that we will open a window like this. It’s okay, if I’m out somewhere, you can probably get a window like this.
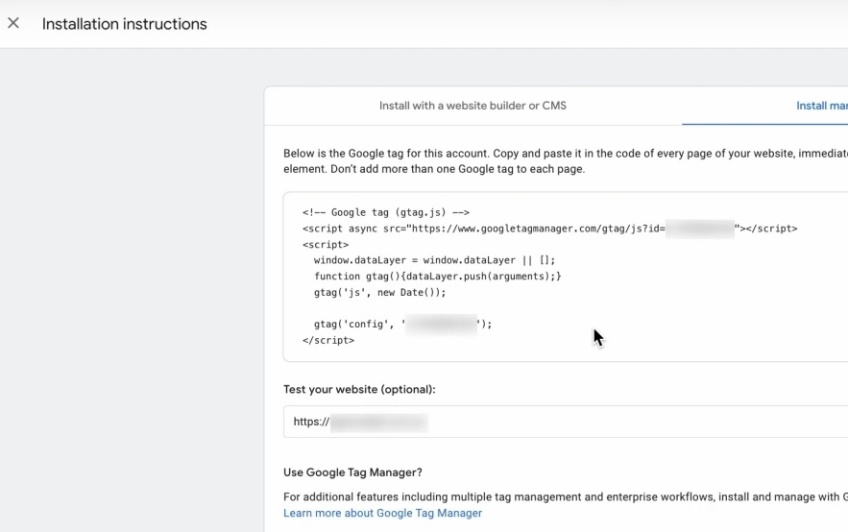
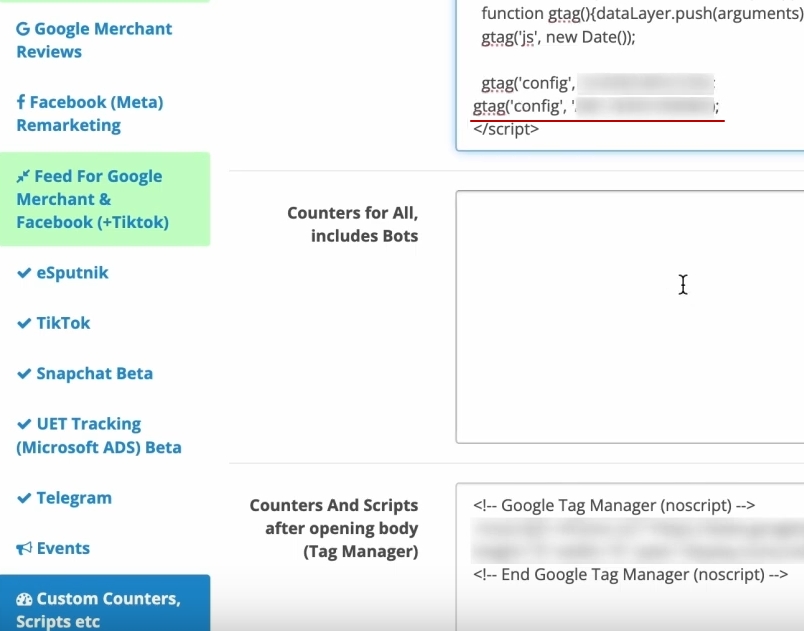
I’m showing you. We’re paying attention to him. How do we do that? We copy this piece of code. It’s very simple. We go to our module. We go to scripts. Just put our ribbon under Tag manager here.
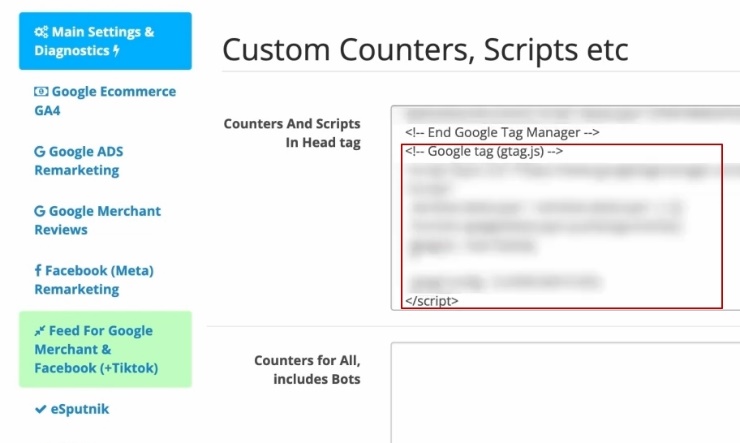
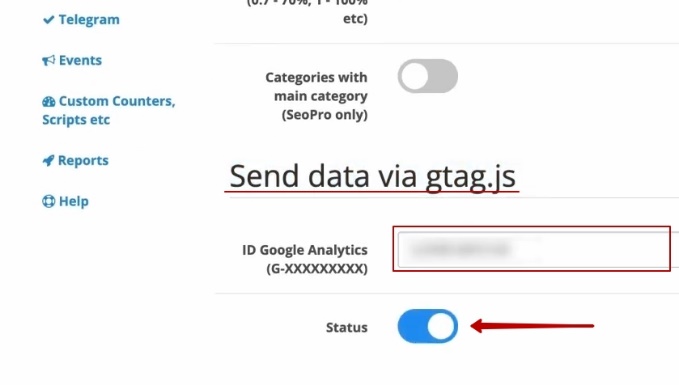
Put it in. And we also need to copy this analytics number. Copy it. Let’s go to this second block of Google Ecommerce GA4 settings. Let’s go down here. Send data via Gtag.js. Insert it and turn it on and turn it on. After that, be sure to click “Save”.
If you suddenly lost this analytics code, that’s okay. After you close this window, you will see a window like this. And there’s this Measurement ID, which is the ID of your fourth analytics.
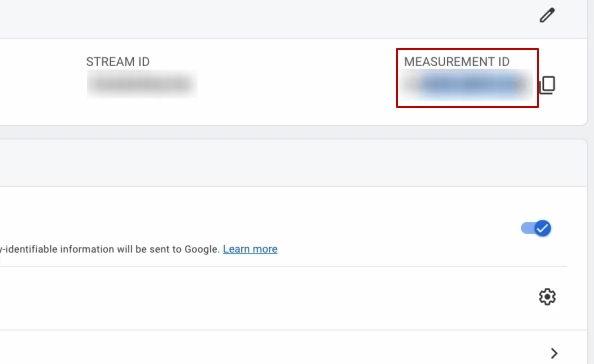
Do you have to do something else globally right there? No. If suddenly, just like me, something got logged out somewhere, something got lost somewhere, no problem. Click on admin, find this “Data Flows”, go here. And here’s our identifier, the code, it’s right here. Nothing critical. You won’t get lost for sure, I think.
Checking the correctness of data transmission
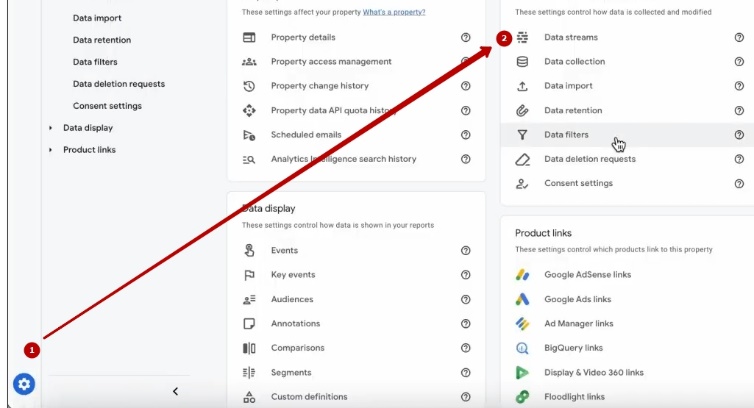
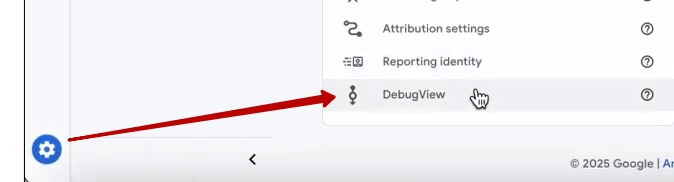
Next. Look, we have set up the fourth analytics and saved it all in the module. Now we need to check if we have everything in the data. How can this be done? The easiest option, unfortunately, which is offered to us by Google and not anyone else, is to check this via Debug View. Debug View is what is that? This is the mechanics of previewing whether our fourth analytics is receiving any data. To do this, we go into Admin and click on Debug view.
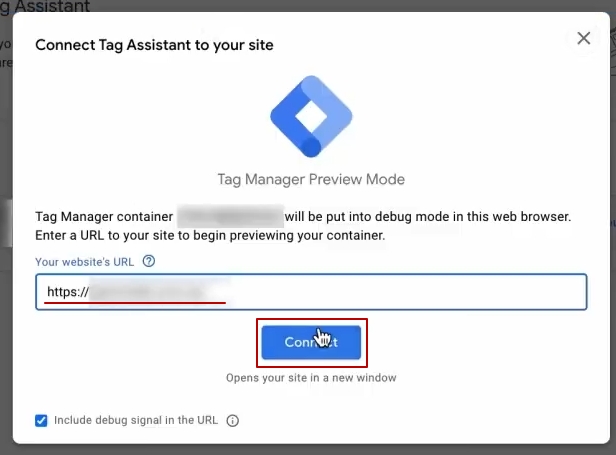
But there is one such nuance. This Debug view works in preview mode. What does that mean? It’s we need to use a certain toolkit that would do this preview in order for this debugger to work. To do that, go to Tag Manager, come back, click on our Preview. Add our domain name here as it is. Here we go.
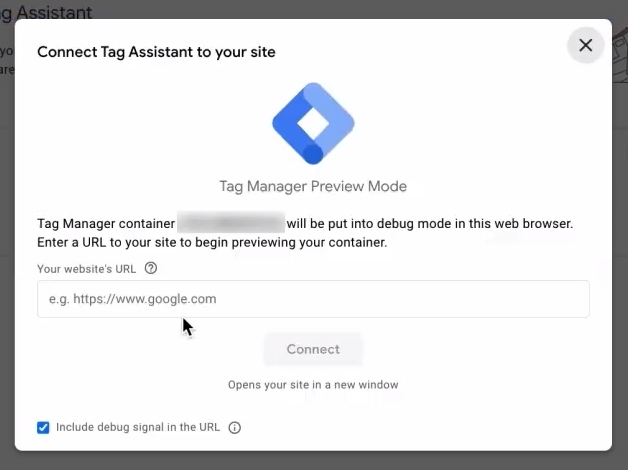
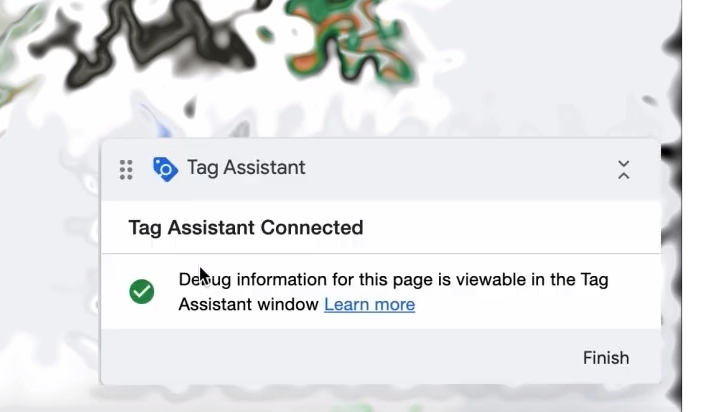
Click “Connect.” After that we have the site open. Make sure, it’s very important to check this block so that you have it written that Debug information for this page is viewable in the Tag assistant Windows, that it’s kind of connected, because sometimes Google’s block can be moving, you’ll think it’s not working. It’s actually working. It’s just that Google has glitches.
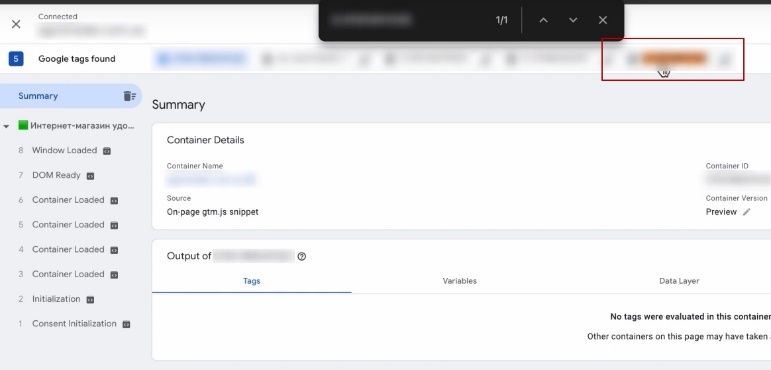
What do we do? We go in here, just in this preview tool, we go into our analytics. We can either start getting some data here from some time, or you can go back into Data Flows, copy this ID, come back here, press Ctrl+F, Ctrl+V and see this analytics. This is it’s it’s put on our site. There are a few other analytics here, but I don’t know whether or not to pay attention to that. The site is a little bit old in this context.
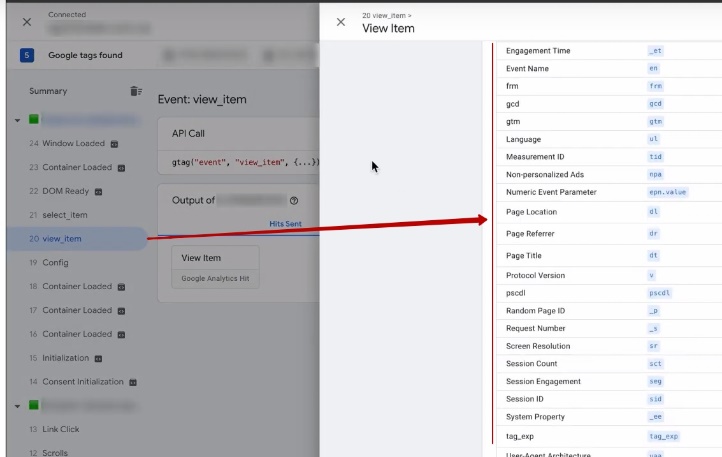
We have analytics in place. If you want to make a fuss and directly check if everything is fixed, if not everything is fixed, you have to wait a little bit, and in about 5-6 minutes you will see some events, some information will appear. We can go to the page, for example. Be sure to check that you have all the information here, because I can see that I have everything recorded here. Analytics is here. It even has events passed to it. I just select that analytics, I see my view_item, that’s the product card view. That’s it. With some out there in 5-6 minutes you can have this set of events.
It’s ideal to have clicked a few events on your site. Well, at a minimum went to the product card, added the product to the cart, ideally even completed the process, did a test order checkout. That would be ideal. For what? Just to see a set of these events in your analytics. Because OpenCart is, after all, a platform that allows you to modify some of your templates. And remember that this module just takes and standardized some things extracts, uses in order to generate this whole set of data for Google services.
If you suddenly changed some template to something else, it may happen that some events will not be available. Then you should write to the developer, or contact the programmer. The developer of this plugin can also help, if anything. There’s nothing critical here – it’s up to you to figure out what the cause might be.
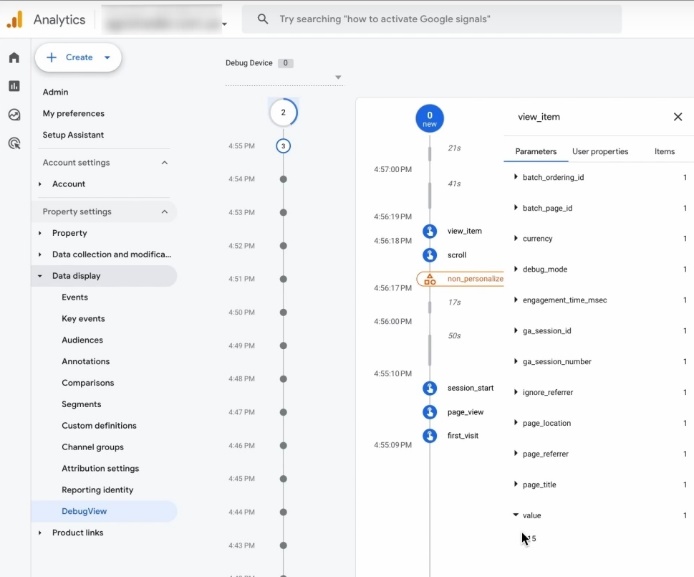
You know, here you can see what is being passed. I have both the cost of this product and the sets of products here, just like add_to_cart. The only thing is that this Debug View tool in fourth analytics is not quite perfect. That is, it can be dull, it can take a very long time to load data. So you see this whole data set. The main thing in Tag Manager is you see this data. And that’s the main thing. Why am I emphasizing the Tag Manager? Because it’s like the mechanics of previewing the data, whether it’s really delivered or not, it’s more correct. You will be able to view some reports later on.
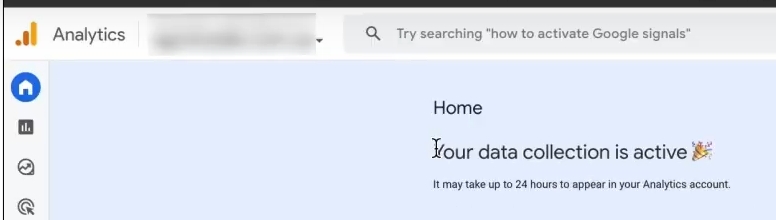
You see, I already have information here that I have “Data collection is active”. My data is being collected and in about 24 hours I will already see the behavioral characteristics of my analytics. That’s it, we’re done with analytics.
Setting up conversion goals for Performance Max
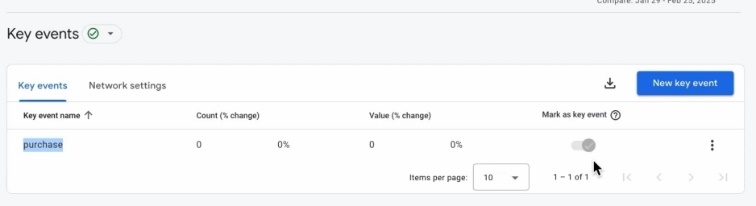
Regarding goals, look, we’re going to move on to the second step now. This is setting up the conversion goals directly, which are needed for Pmax. You can already try to use the purchase goal that will go into the fourth analytics. How to find it? You have this block called “Events” or “Key events”.
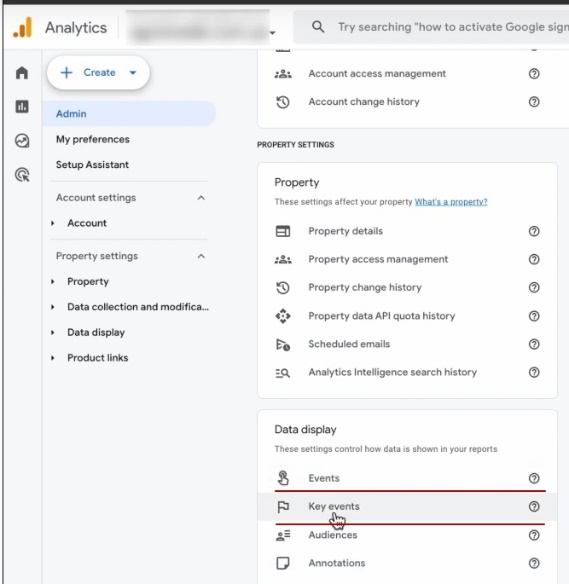
The difference between them is that Key events are the goal that counts as a conversion. So this Purchase event, it’s in every analytics, whether you want it or not, it’s labeled as a conversion. If suddenly you don’t want to customize Google Ads conversion by some events, you can use the Purchase event, which is in the fourth analytics. So far, we’re done with analytics.
The only thing we have left to do is to take care of such super important nuances…. I’m not going to dwell here on some super detailed analytics settings, because maybe it won’t be relevant for you right now, so the video won’t take too long. If you would like a set of basic settings for the fourth analytics that would actually be useful in analyzing the information and not just it hanging some data set, email me in the comments so I know to make a separate video. We’ll link this analytics to Google Ads a little bit more later. So that just in case you can see here advertising campaigns, names and so on. But we don’t have an ad cabinet yet, so we’re skipping this step.
Why install a tag from Google Ads?
So, the fourth analytics we’ve put in place. Now we need to do the most important thing for our Pmaxes, because you can work with this buy, right? But I still recommend working specifically with the Google Ads tag, which is a purchase that belongs to Google Ads itself. Why do I think this is super important? Why do I think it’s super important? Because this particular type of conversion is going to include a bunch of different data that’s going to be in the reports there in Google Ads-and do you a favor. For example, you’re going to be looking at crosstabs of which products are helping each other sell.
Not only that, the most important thing is that now all the Googlers are talking about it, and I really agree with them, they have added such functionality as advanced conversion tracking. This is when when a conversion (purchase) is made by a customer, phone information or email or two of these sets of data about the customer are passed to the cabinet. What do they give Google next? They give it the ability to optimize properly, to get the targeting mechanics right without advanced tracking. Accounts actually perform much worse.
In order for us to set up this basic conversion Tag purchase, we need what? We need OpenCart directly. We’ll be putting the story in multiple places. And the ad cabinet.
Creating a Google Ads account in Merchant Center
How do I create an advertising office? You can create an advertising office directly from the Merchant Center. There are no secrets, you can create it that way. And I even recommend creating advertising offices in this way. If you have an ad cabinet created before, nothing critical, it’s okay, it’s fine, it’s not a bug. It’s just that sometimes Google through the Merchant Center may not require a super broad structure for creating a campaign. Sometimes it does – they have some A/B tests going on during the creation process. And so and so will be correct.
Nothing critical will happen. It’s just that when we create a Google Ads account through Merchant Center, we get a nice picture of the linking of all emails at once. We don’t need to additionally link Merchant Center, make queries between them and so on. There’s nothing critical there. You can even cope with it. Look, all the functionality that is done by Google now, is made as simple as possible, so that it is convenient for you once, once, once to set up, to continue to work, to get sales. Really the interface is changing for the better.
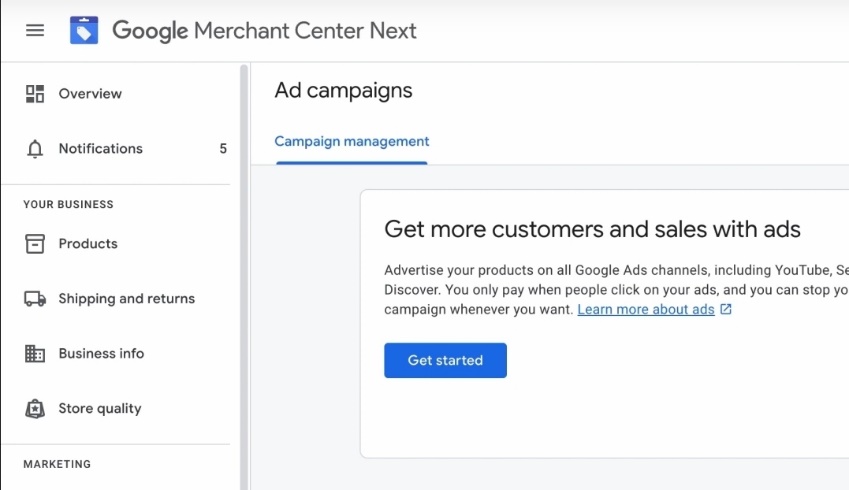
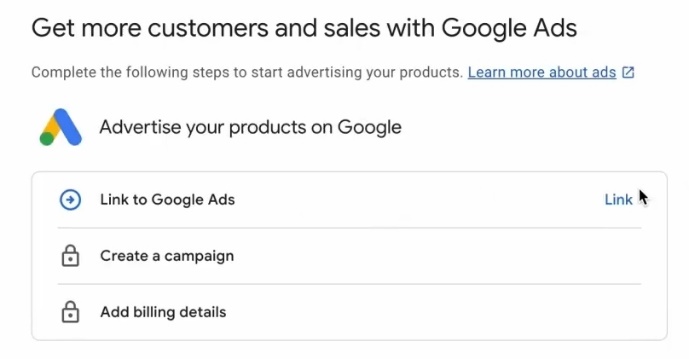
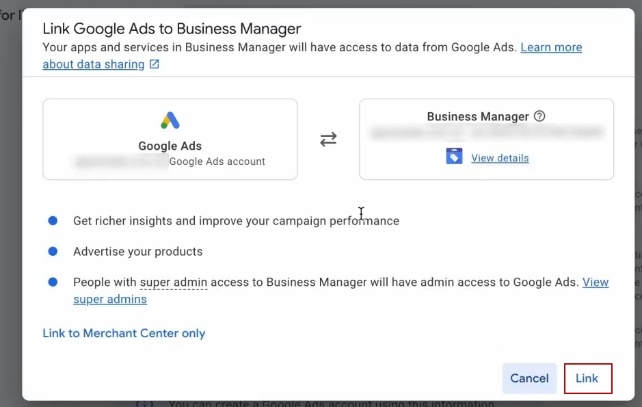
Where do we start to create our advertising office? Click on “Get started”, i.e. start. Here we will be offered to create an advertising account and link it to Google Ads.
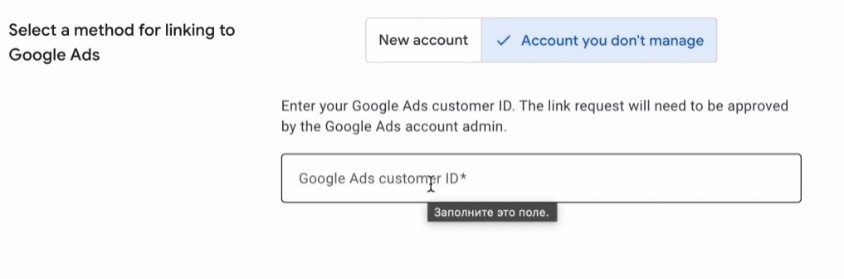
We will make a new account with you, although you can link to an old account if you have previously made one. Then you go to your Google Ads profile, take the 10 digits that you have on the top right above your email, put them in that field and click “Submit Request”. Then in your Ads profile you approve that request separately. You can link it that way, nothing critical will happen.
I will be making a new cabinet to show how it can happen in a different way. I have country, time, currency pulling up at once.
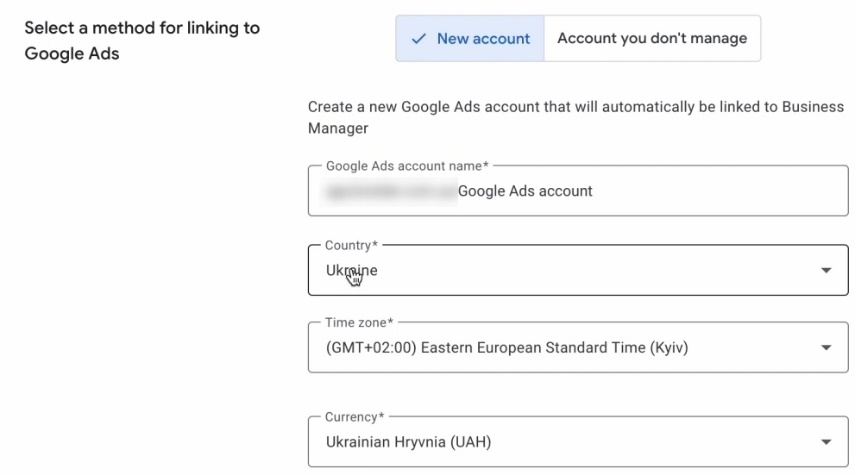
Look carefully. You will not be able to change the currency in the advertising cabinet, so decide in which currency you will pay for the cabinet. I give you a basic recommendation – the currency and country of the advertising cabinet should, ideally, match the country and currency of the physical bank with which you will make payments. If you, for example, are physically sitting in Latvia, Estonia and you have credit cards, real, not virtual, it is very important, otherwise you can get blocked by Google Ads, that’s its policy, it doesn’t matter. You have a card of this bank, it is better to choose everything according to the country of the bank card from which you will pay. If you have Ukraine, as I do, here it is hryvnia, the card is hryvnia, you can leave it. If you are in the States, it is different – you choose necessarily the country of the advertising account, currency, according to your payment method. Plus you can’t change the country and you can’t change the currency. You’d have to create a new office. Why bother with that? Making Connections, Link.
Creating a new campaign in Merchant Center
Now we’ll be prompted in Merchant Center to enter payment information, but it’s prompting me to just create a campaign now. Sometimes the interface part can change. I’m recording this video right now on March 26, 2025. I’ve got it looking like this so far, this is the new Merchant, the new Google Ads. You may be asked for payment information right away. Do not hesitate to enter these payment details, because they will be needed in order to make payments for your office.
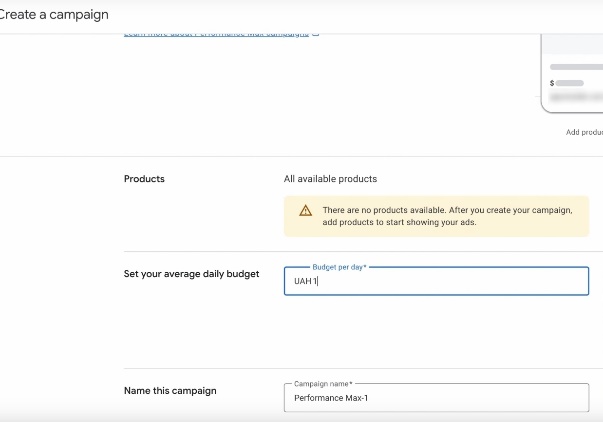
I’m going to choose a minimal budget. I will not change the name of the campaign for now. I’m going to click “Create Campaign.” Why do I like to create campaigns through Merchant Center? Because you don’t have to fill in keywords, ask the AI-thing to generate texts – because this stage has to be skipped very quickly. We do this for OpenCart. Types of ad campaigns of a proven format called Feed Only. And we don’t need that story at all. So that’s another reason why I like to create cabinets specifically directly through Merchant Center Next.
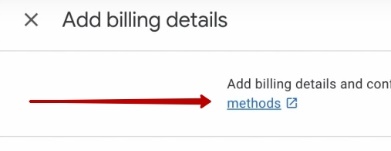
It literally took me less than a minute to create a campaign there. And now it’s asking to add billing details, my payment details. I’m going to enter them all now. You’ll see how you feel comfortable or uncomfortable. I can run through some of the formats. Here you go.
Specifying payment information
You can pay for your advertising account either manually or with automatic payments.
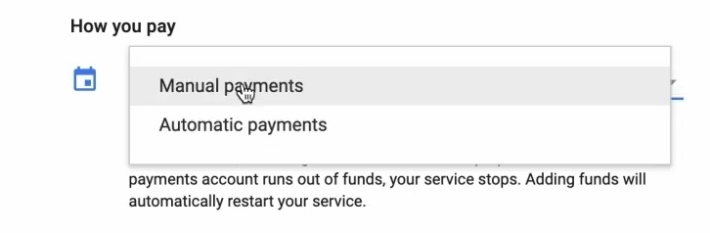
In order to understand whether automatic payments are available in your country or not, you should follow this link in the help, select the country for which you are making an account, and see what methods of funding your account are available to you.
As far as I remember, manual payments are not available for the United States of America, you should only choose automatic payments. So be careful with automatic payments.
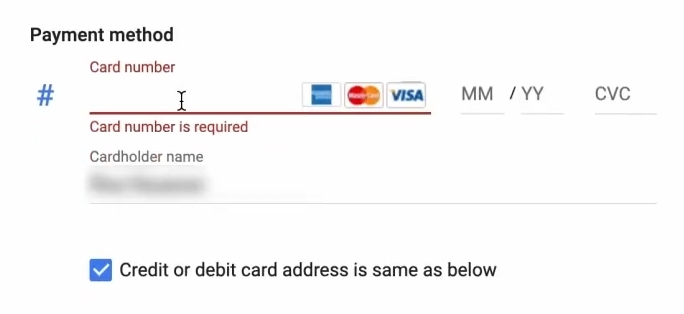
You will immediately be asked to fill in all the details of the card. Look carefully, I still recommend that you get a separate card just for replenishing your advertising account. There are situations when your payment profiles are hacked, not access to your account, but the e-mail under which you start a payment profile. And they can simply remove you from there and spin off large sums. So, so that it’s not your card that holds your main circulating finances, I would recommend that sometimes you get another card. But depending on your accounting, capabilities and so on – you decide for yourself. I have the possibility for this country to enter payments manually, so I leave it.

Payment method I have a bank transfer or add a credit or debit card.
It’s also important to pay attention to Customer info – immediately offers either individual or organization to start. What is the difference between them?
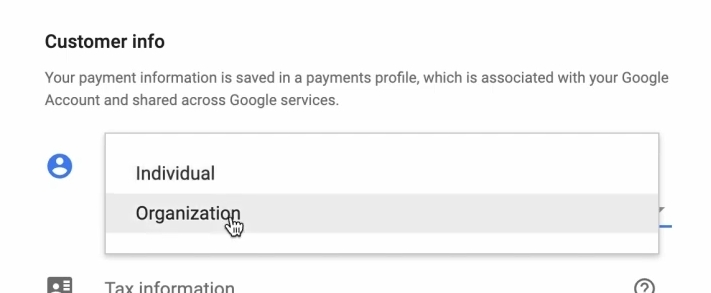
An organization is a legal entity. If we are talking about Ukrainian law, here you need to fill in the tax information. Usually it is you are a VAT payer or not a VAT payer. Enter this all information carefully! Why?
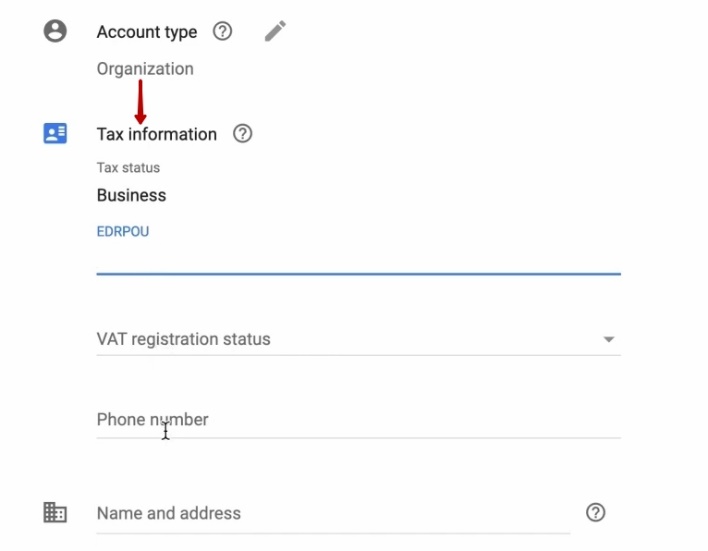
Because after some time you will receive a message in your advertising cabinet, which will be called “Confirm your payment data”, it will concern this very information. In order not to then make a request to the support “please change my data, because I once entered them incorrectly”, immediately enter as you have.
If you are an FLP, for example, a private entrepreneur or just a physical person, for example, Yana Lyashenko, choose private, choose the format of your taxation, you are a private entrepreneur, or you are just some kind of person. TIN for a person is not necessary to enter and enter all these details.

Carefully all the information you enter in that language, in that format clearly down to every punctuation mark as you have in these documents that you will provide to Google in order to confirm the information. Advertising offices in the United States can sometimes ask for even an insurance number when confirming payment information. They say they don’t store it anywhere, but who knows. So very carefully to these all values, because they are checked, as a rule, by real people, and they can one symbol, one digit, when you make a mistake, they may not pay attention to it.
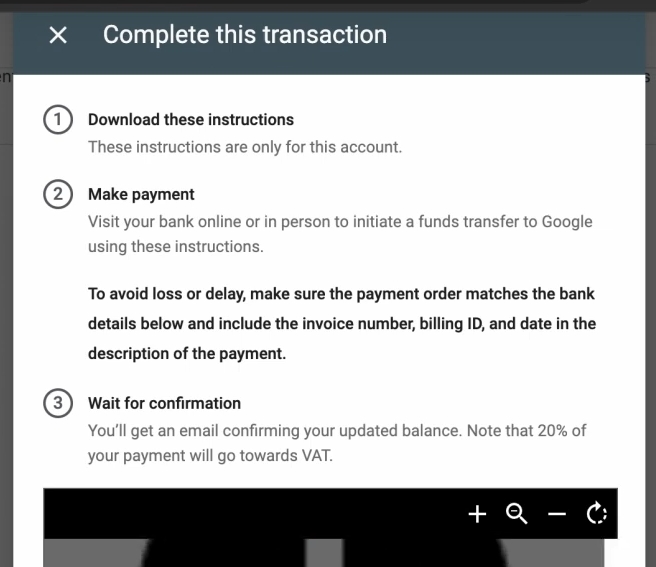
For now, I’m leaving all this information in the format that I have. Filling in some of the information I need. You’ll have to wait. I’m completing the creation process. Since I selected “Transfer payment methods”, I have an invoice here. I can download it here, download it, pay for it. Uh, okay. It’s not super important. It’s up to you to make it work with what you have. That’s why I won’t stay here.
That’s it, we have an advertising office set up very quickly. I love Merchant Center Next for that – it’s story perfect. It’s very fast for online stores. You don’t have to bother, you don’t have to choose any goals. Then separately somewhere Google is testing different formats for creating these offices. Everything is very fast. One, set it up, created a campaign. Perfect.
Setting up conversions in Google Ads
We’re going to be setting up conversions with you now. This is a must. Without it, our pmaxes will not work. For this we go to our advertising cabinet. Everything is very conveniently done. Thank googlers, finally they make everything great, everything perfect Even here he writes “Set up conversion tracking in your Google Ads to see your conversions and improve performance.”
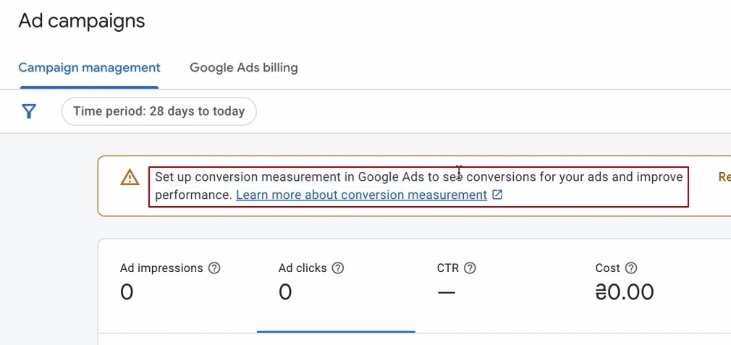
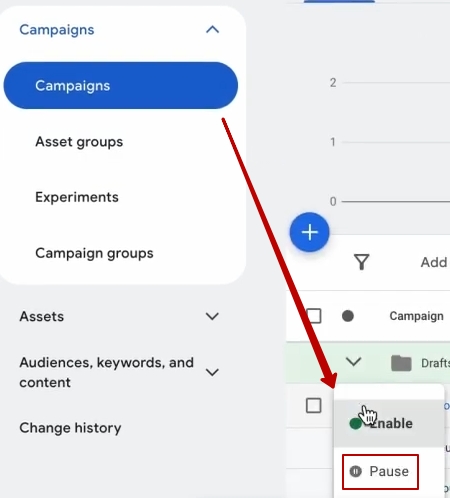
I’m closing out the guide, goes straight to setting up conversions. This is going to be the most interesting part. Before we set up the conversions, we created an advertising account with you. I’m not sure what payment method you’ve chosen. So we go to the “Campaigns” section and suspend this campaign for the time being, because it was a test campaign, without important settings, so we suspended it, we are sure that we are not spending anything in funds and we can set up our goals in peace.
Once again, this is one of the most important settings, this particular setting. You can skip the fourth analysis. It’s fine, it won’t be anything critical. You should create a cabinet anyway – it is one of the most important things. Remember, without it, Pmax will not work correctly.
Creating a new conversion
What are we doing? It’s going to be very simple.
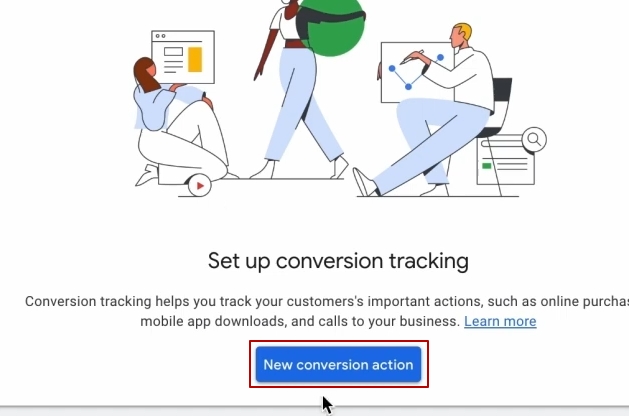
Click “Create a new conversion”, choose “Conversion on our site”. This is mandatory. Copy our domain name. Nothing complicated here.
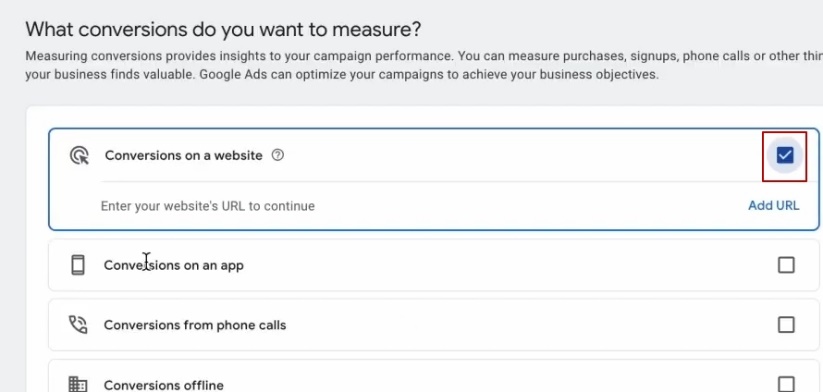
Add our URL. Click “Scan.” It’s already here seeing some Google Ads and analytics and stuff. You might just have a simple specify that no, customize tag. You just click through further as you have it. That’s how I have “via Google tag.”
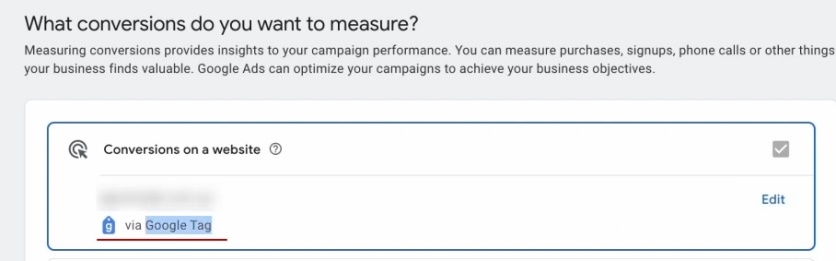
That’s the right way to do it. Click “continue.” Select “purchase”.
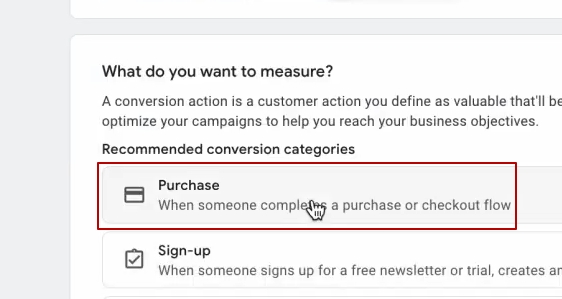
Add “conversion action” – “Add conversion action”.
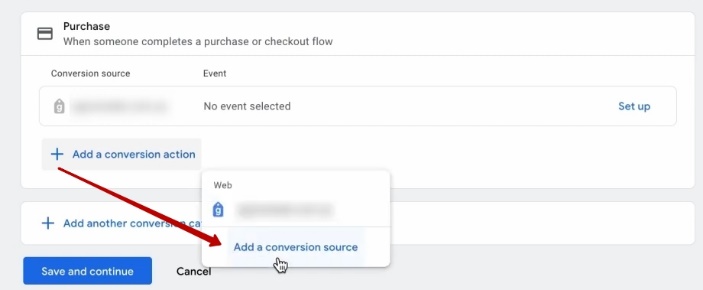
What? Oh, “Set up.” That’s what she created.
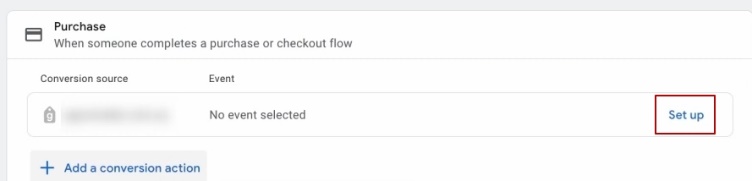
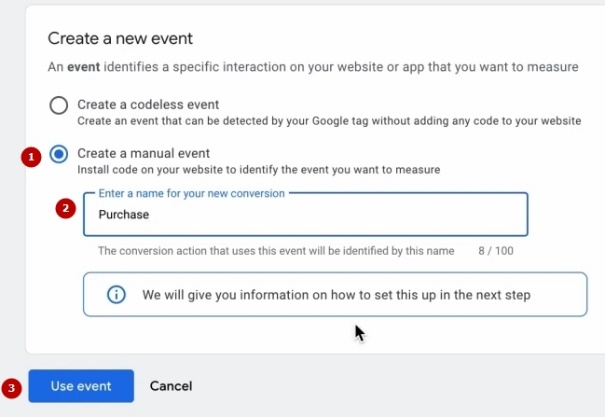
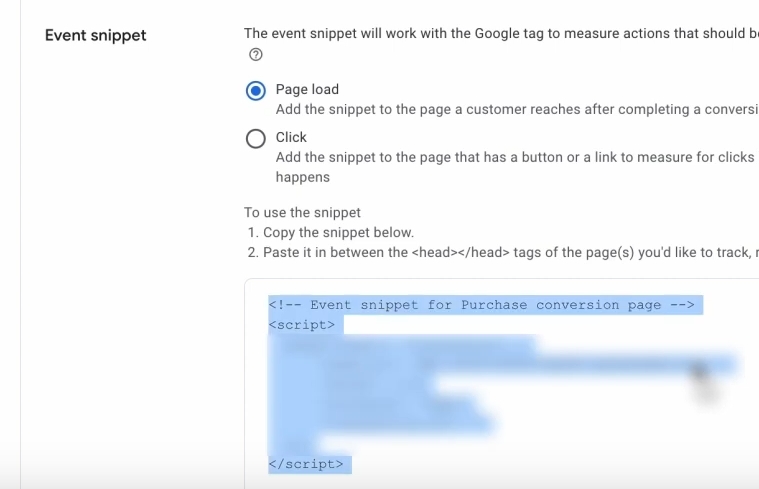
We need codeless. No, a manual event. And we call it Purchase. They change this interface every time. Use event purchase. Save. Continue.
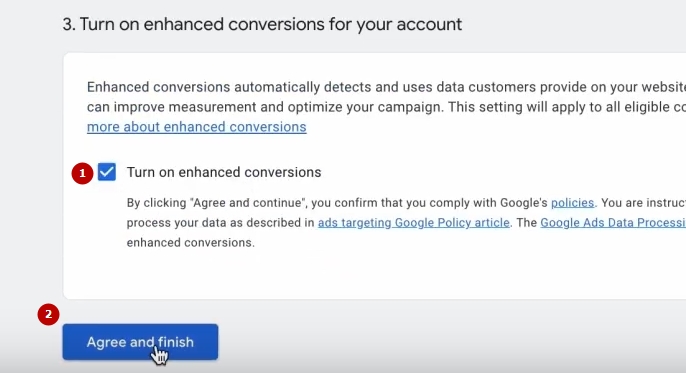
Scroll down here. Turn on our advanced conversion tracking.
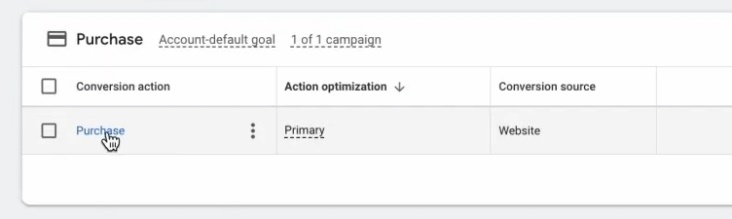
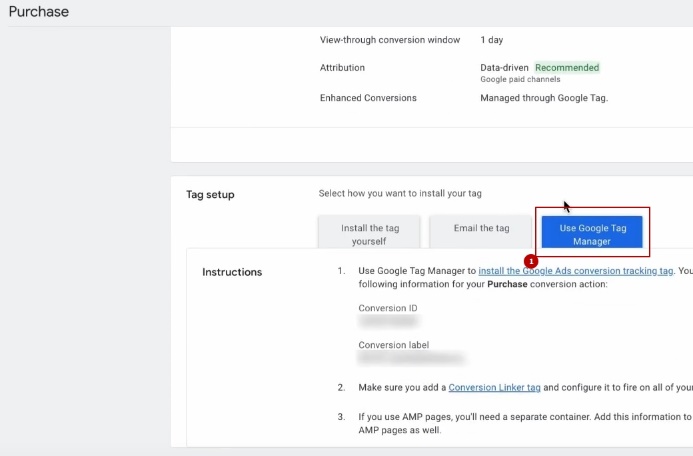
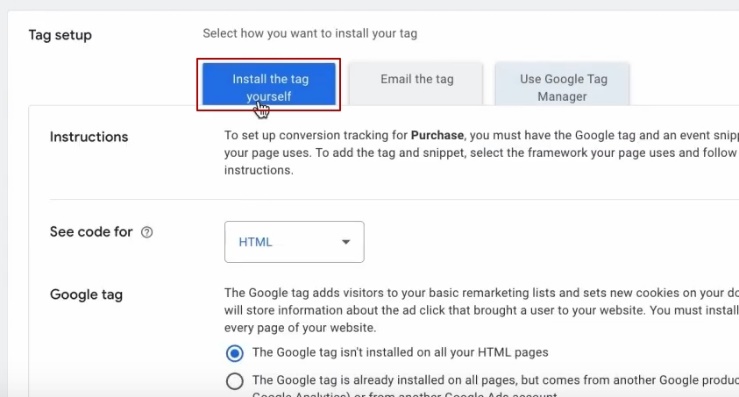
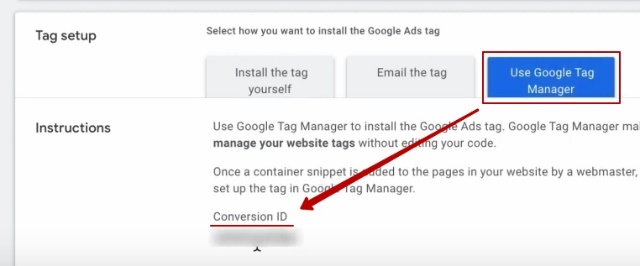
After that, we go into this conversion, open this and Tag setup.
Going to Google Tag Manager, this is going to be one of the most interesting things here.
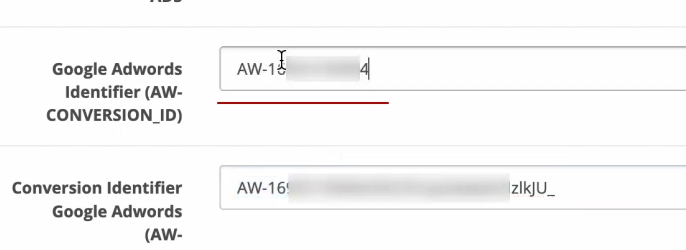
Let’s go back to our OpenCart, absolutely. Let’s go to this block, which is called Google ADS remarketing. And we’re going to have a very interesting story here. We’ll immediately be asked to tag our Google Ads code to track conversions. What do we do to do that? Here we have a block called “Conversion Identifier”.
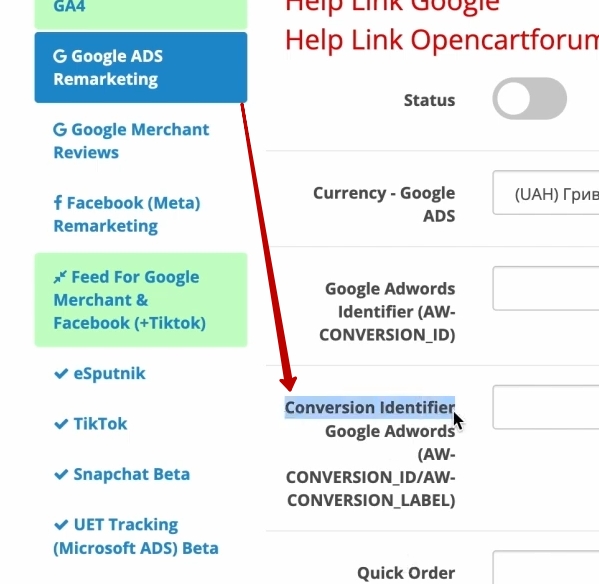
What does that mean? It’s an icon like this that we need to copy from this block.
We go in here, we go all the way to the bottom. And there it is right there.
You copy it completely with all the symbols that they are. Come back here, paste it in.
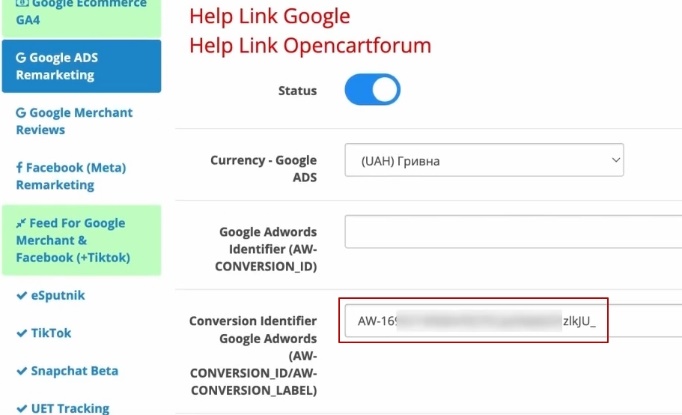
Turn on the whole story, save it. This should be enough for us. Almost enough to make all the conversions work.
But we’ll also add this Google Ads code here, because the system is accessing it now.
Setting up dynamic remarketing
Also at the same time you and I will be putting up a dynamic remarketing fence. It will require from you, literally, here is a style of work, and the benefits on the background of the work of your Pmaxes will bring a lot. What is the functionality of dynamic remarketing? This is when the system will independently collect all the events on your site and then use this analytics. Exactly what events will it be interested in? It’s viewing the product card, which products were added to the cart, which were purchased. What will it use this for? First of all, to understand who to target and which users to select, because after all, it is an AI machine. The more useful data we give it on who our client is, the faster it will be able to generate sales. Secondly, and importantly, it will be able to use dynamic remarketing functionality. This is when a user, your customer, will be chased by ads for the product they were browsing. Awesome! From us the customization will be very primitive, and the benefits will be very much. What do we need for this?
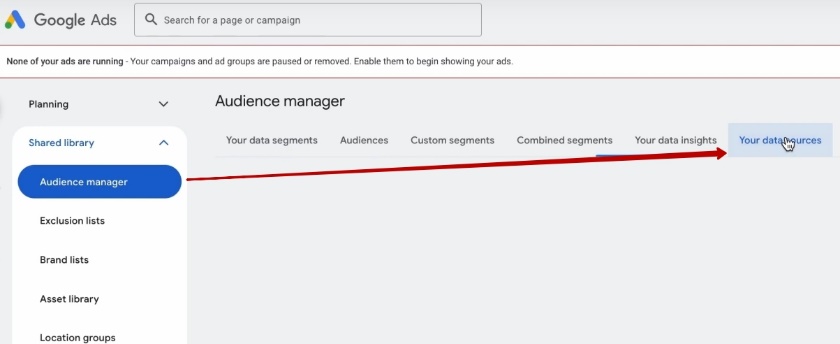
Go into these tools, go to “Audience Manager,” click on “Our Sources.”
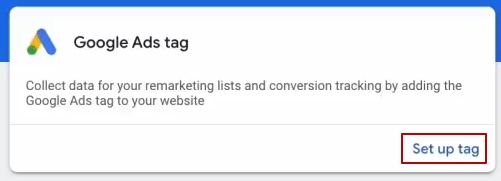
We have a Google Ads tag here. We click “Customize.”
After that we select “personalized advertising”, we select, “Retail”, because we are Retail.
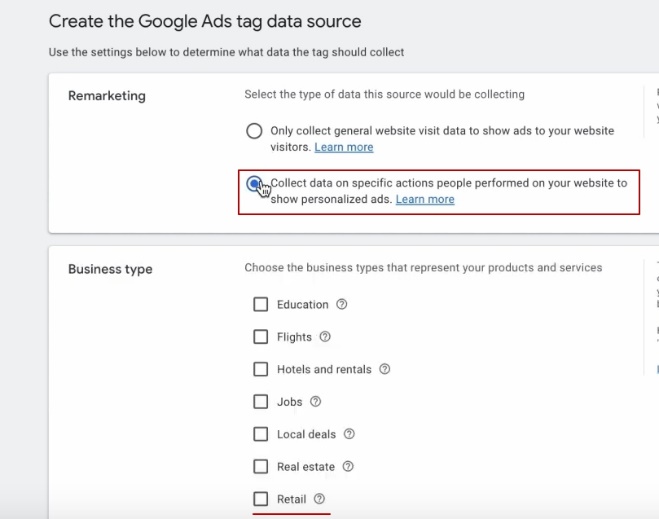
We don’t need that, except in those situations where you go out to that block of regions. Click “Customize.” What do we want to do next? Customize it ourselves. What are we doing? We need this ribbon of code.
Copy it. Copied it. We go back to these custom scripts. We go here, put the cursor here. Enter, paste. You can trim it. I like to keep it nice and tight. Save. Click “Continue”.
Checking the results
Now let’s check if it works. I copy this Conversion ID.
I go back into my Tag Manager. I click preview, I look for this tag. I’ve got it.
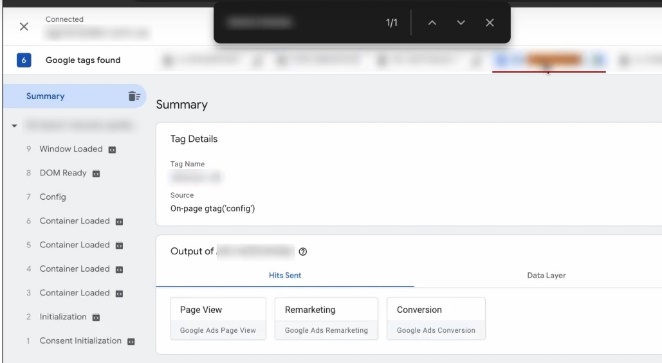
I can go to some other product card. Here, for example, I went to the product card, I’m selecting my tag. You see, I didn’t wait for the Tag Manager to reload. It went offline, so it happens. It’s no big deal. We have to wait for it to work. Google isn’t perfect, as much as we’d like it to be. See, I have to wait for my page to load, but I didn’t. We’ll try to post it now. Maybe the Tag Manager itself is still hanging. We’ll reload the page now, click preview. Put in our domain name.
What the hell is this? See, my Tag Manager won’t do it. It happens, it’s Google’s problem, not ours. Another option is to clean the cache in the site itself. Perhaps it also affects it, but I see such glitches on different site platforms, not only on OpenCart. Therefore, we have seen before that it is there.
How else do you verify that the data collection has started? Once you start getting some traffic to your site, you’ll, when you come in here, you’ll see that you’ll start having hits tracked here. They’re all going to be correct, they’re all correct, they’re all there.

The results of what we’ve done in the video
What did we just do in this short video? You and I set up the fourth analytics. We’ve set up the purchase that we need for Performance Max. And we have set up an additional bonus for our Performance Maxes – this is dynamic remarketing. All of this is set up through this module. There is nothing critical here. You can handle everything. Everything here works correctly, everything is wonderful, perfect, everything.
What ideally could be done? Ideally, it would be ideal to check that our purchase is recorded through the same Tag Manager at the very least. This would be the perfect story to make sure you have everything transferred. But it will be enough for you to realize that you have everything. But now let’s try if the Tag Manager will work for me, because unfortunately I have some problems with it. Yeah, it doesn’t want to connect for some reason. Oh, see? Well, here comes the heat, unfortunately. So I’m going to leave that one out for now.


