
Hello, everyone! My name is Yana Lyashenko, and I am a Google logistician. Today, we will discuss how to prepare a WordPress website for launching advertising campaigns, whether it be Google Shopping or Performance Max.
Let’s start with two basic things that are essential for moving forward:
- Setting goals. This is the configuration of analytics that will record all visitor actions on your website — from viewing pages to placing orders.
- Set up dynamic remarketing. Without it, you won’t be able to bring back visitors who viewed specific products but didn’t buy them.
In this article, I will show you how to do everything for free. We will set up e-commerce and dynamic remarketing using Thomas Geiger’s Google Tag Manager plugin for WordPress. If you have another tool that you trust, feel free to use it. However, this plugin has been tested on hundreds of projects and works consistently for almost everyone.
One thing to know in advance: free solutions are not tailored to all possible scenarios. Every website is unique: some use a standard theme, others use a custom theme with a dozen plugins. If your website loads slowly or has a complex structure, you may need to find an alternative way to integrate it. For example, you can connect the premium version of the plugin or configure data transfer through the developer.
Creating an account in Google Tag Manager
Let’s move on to the practical side. First, you need to install the plugin on WordPress, and then create an account in Google Tag Manager. The process is simple, anyone can do it.
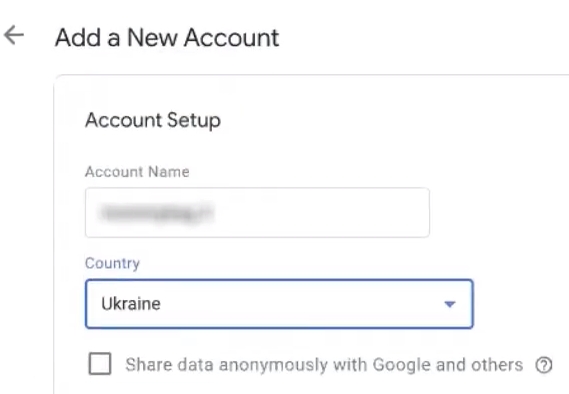
Go to tagmanager.google.com and click “Create Account.” Here, you will be asked to enter an account name.
My advice: name your account after your brand or website domain. For example, “myshop-ua” or “BrendName.” Why is this important? Over time, you may accumulate many accounts, and if they are all named something like “test123” or “new account,” you will spend a lot of time trying to find the one you need.
The next step is to name the container. Here, in the “Target Platform” field, select “Web” and click “Create.”

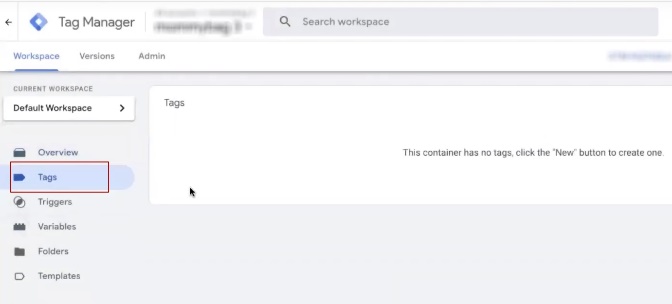
A window with the terms of use will appear. It’s simple: either you agree and continue, or you don’t. After confirmation, the system will display instructions for installing the code. If you go to the “Tags” section, it will be empty — this is normal, we will configure everything through the plugin.
Google Tag Manager plugin for WooCommerce
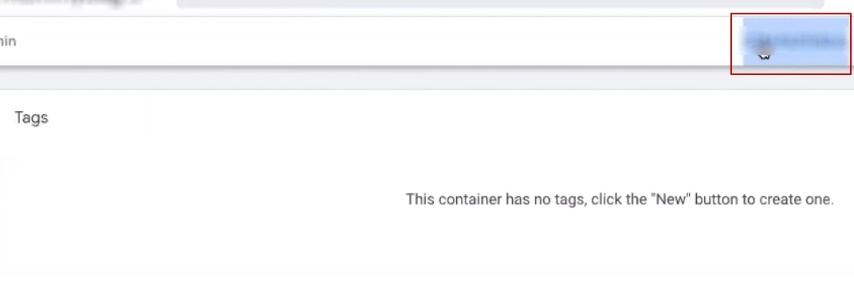
Now let’s link the account we just created to the website. To do this, copy the container ID—it’s a code in the format GTM-XXXXXXX, which is displayed at the top of the Tag Manager screen.
Next, go to the WordPress admin panel and find the plugin settings — the section is called “Google Tag Manager for WordPress options.” In the General tab, paste the copied ID into the appropriate field.
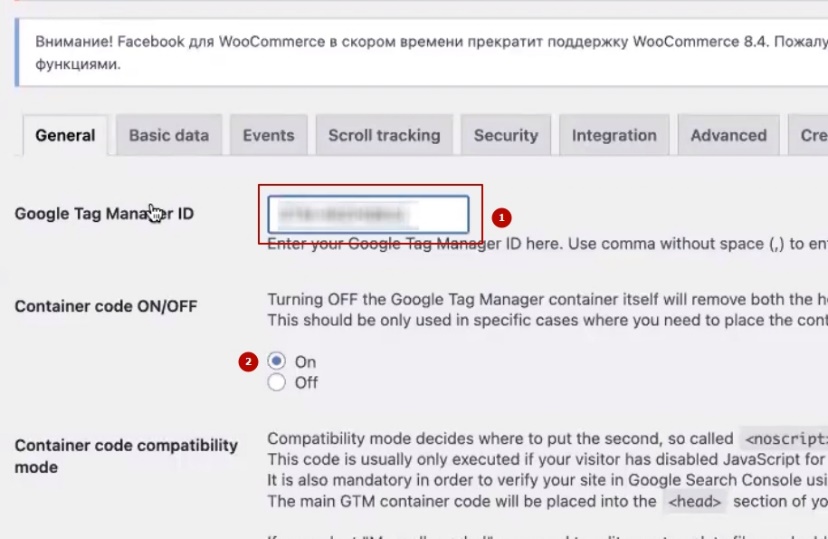
And one important thing: the Container code On/Off switch must be set to “On.” Without this, the container simply won’t load on the website, and all your settings will be useless.
Setting up Google Listings & Ads for WooCommerce
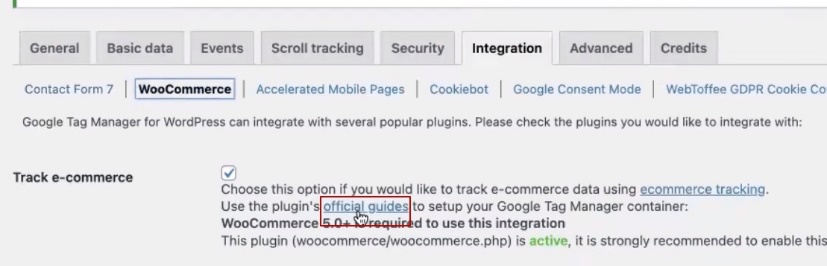
Let’s move on to configuring the plugin itself. Open the Integration tab, then the WooCommerce section. Here you need to set several important parameters.
First, check the box next to “Track e-commerce.” Actually, this feature is the whole reason we started messing with this plugin in the first place — without it, purchase data simply won’t be transferred.
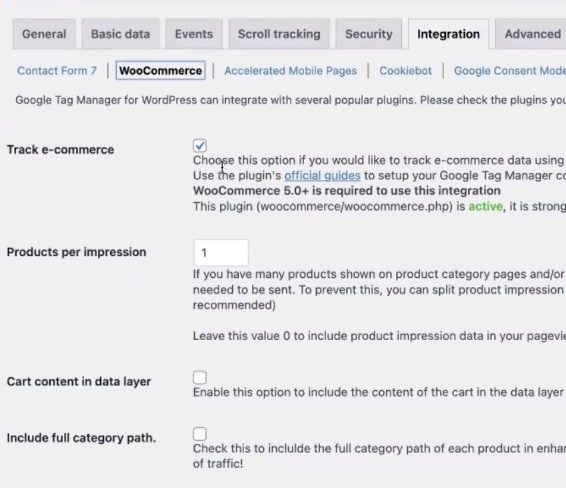
“Products per impression” — this indicates how many products are counted when viewing the list. The default value is 10 or 15, but I usually set it to 5. There are issues with the view_item_list event on WordPress, so we will create a separate manual setting for it later. For now, it is not critical which number you specify.
Next are checkboxes for additional data. I recommend checking “Customer data” and “Order data.” However, I usually exclude taxes and shipping costs from my income calculations. Why? If you want to see the real margin of your advertising, calculate the net order amount without these markups.
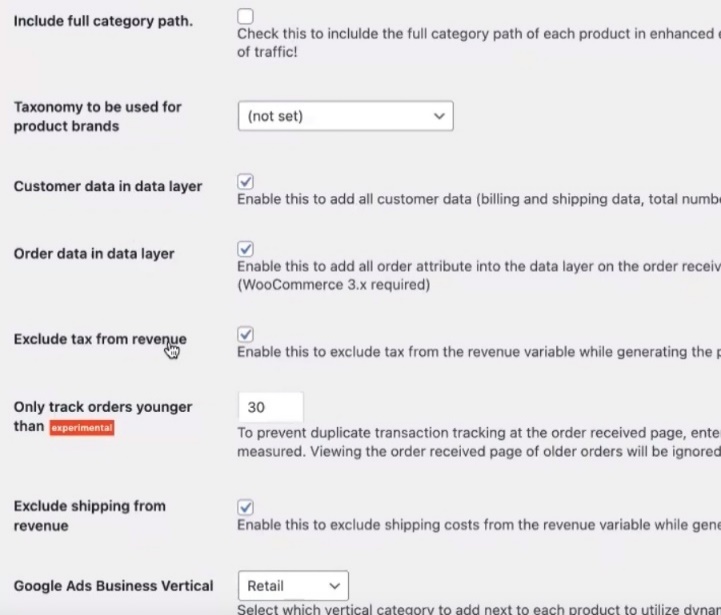
The next section contains settings for Google Ads dynamic remarketing. In the “Google Ads Business Vertical” field, select “Retail” if you have an online store. The other options (education, hotels, airline tickets) are for other types of businesses.
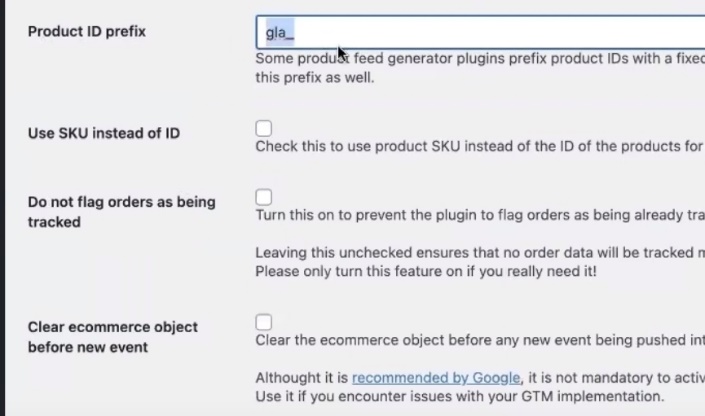
Now, an important point about the “Product ID prefix.” Mine is listed here as gla_. Let me explain why this is necessary.
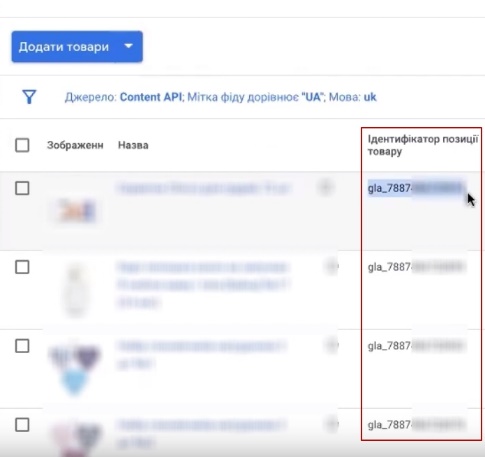
To upload the product feed, I use the free Google Listings & Ads plugin. It automatically adds the prefix “gla_” to product IDs. That is, if a product in WooCommerce has the ID “12345,” it becomes “gla_12345” in the feed.
For dynamic remarketing, it is critical that the product IDs in the feed match those transmitted from the website. If the feed contains “gla_12345” and the website simply sends “12345,” remarketing will not work because Google will not be able to match the data.
It is not possible to remove this prefix in the Google Listings & Ads plugin, and the conversion rules for the Content API do not help either. Therefore, we add the prefix manually on the GTM plugin side, and everything works.
After completing all settings, please remember to click “Save changes.” We have set the basic configuration; next, we will refine individual events.
Return to the Integration tab, open the WooCommerce section, and find the Official Guide link. Click on it.
I won’t make you manually create dozens of variables and figure out all the intricacies of Google Tag Manager. If you have an online store, it makes more sense to set everything up as quickly and easily as possible. For those who are interested in an advanced manual explaining where variables come from and how to work with them, write in the comments, and I’ll write a separate article. But this is more for specialists.
Right now, I recommend simply reading the official guide—it is written in clear language and covers the main scenarios.
Setting up analytics tags
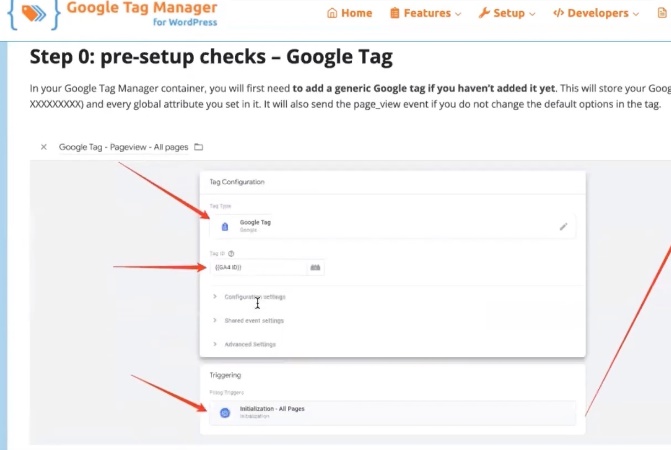
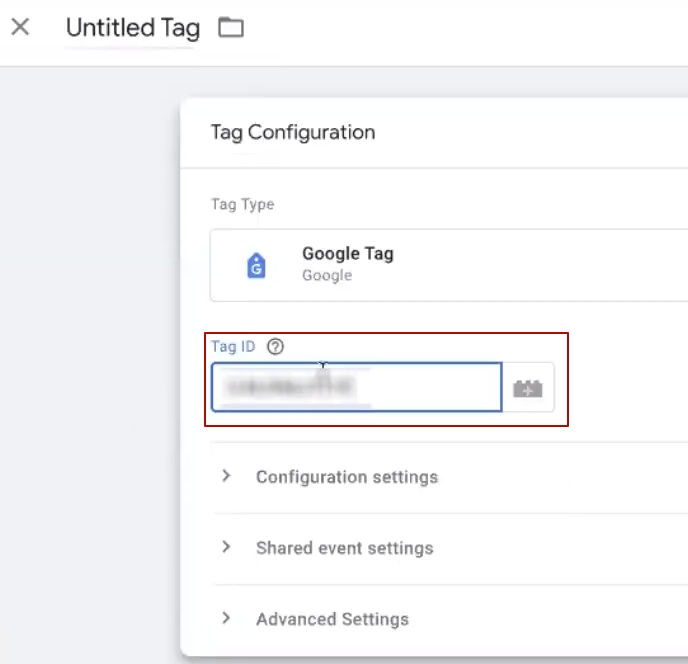
The first thing we need to do is install Google Tag. This is a Google Analytics identifier that links your website to analytics.
In Tag Manager, select the “Google Tag” tag type and you will see the Tag ID field. Where can you get it?
Go to analytics.google.com and create a new analytics account. I won’t go into detail about the creation process — it’s all intuitive. The main thing is to give the account a clear name. If you write something like “Test for GA4,” you’ll have a hard time finding the right account among a dozen similar ones. Google Analytics search works only by name, not by ID.
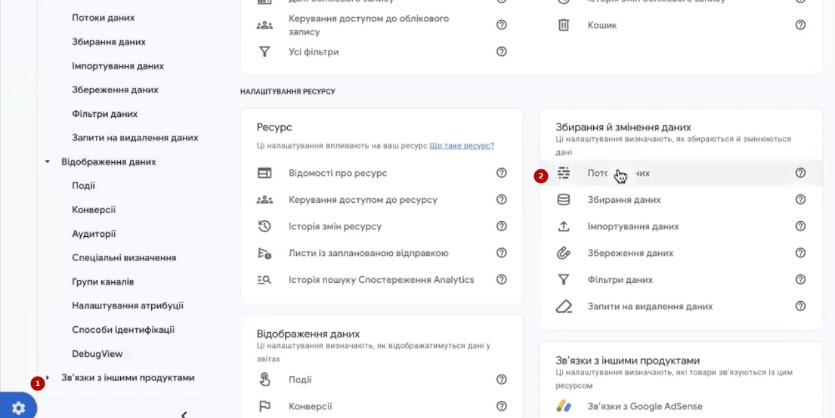
After creating an account, go to the “Administrator” section and find the “Data streams” item. Click on the desired stream — there you will see an alphanumeric code in the format G-XXXXXXXXX.
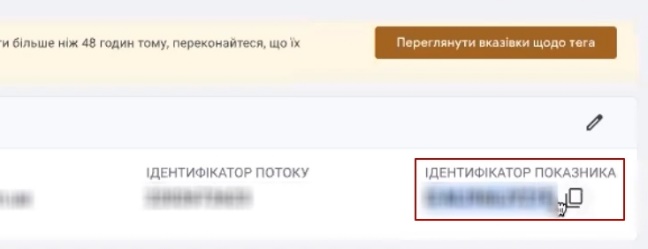
Copy this ID and return to GTM. Paste the code into the Tag ID field.
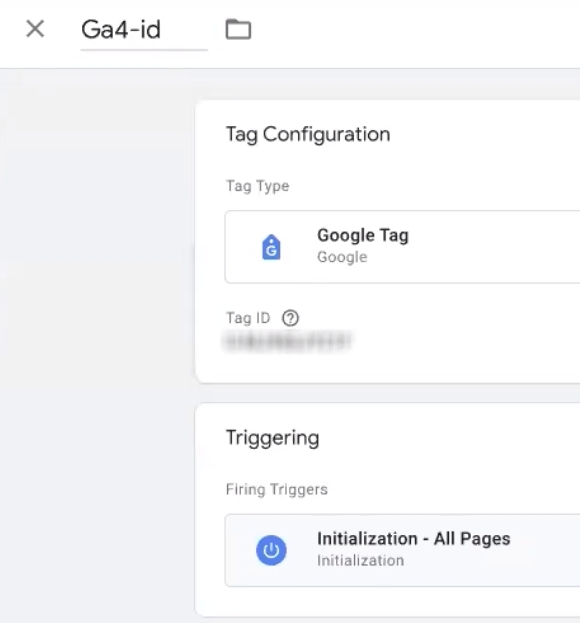
In the Triggering section, select the “Initialization – All Pages” trigger — this is what the official plugin guide recommends. You can also just select “All Pages,” but it’s better to follow the instructions.
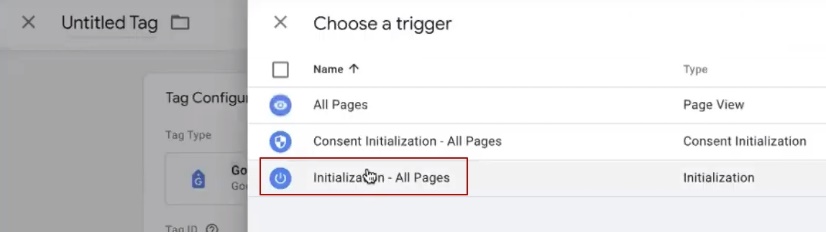
Give the tag a clear name (for example, “GA4 – Config”) and click “Save.”
Please note: if you spend too much time fiddling with the settings, GTM may report that the data is out of date. In this case, simply repeat the procedure: copy the ID again, paste it, select the trigger, and save.
Where can I download a ready-made container for Google Tag Manager?
Let’s return to the plugin instructions. We need to download the template (container template). Don’t worry, it’s easy: right-click on an empty space on the page, select “Save as” and save the file. That’s it — the template will be downloaded in the required JSON format.

Now transfer the downloaded template to our GTM. Go to the “Administrator” section, find the “Import container” item, and click “Choose container file.” Select the downloaded file and click “Open.”

Next, the system will ask where to import—to a new workspace or an existing one. Since our Tag Manager is still empty, we select “Existing” and specify “Default Workspace.”
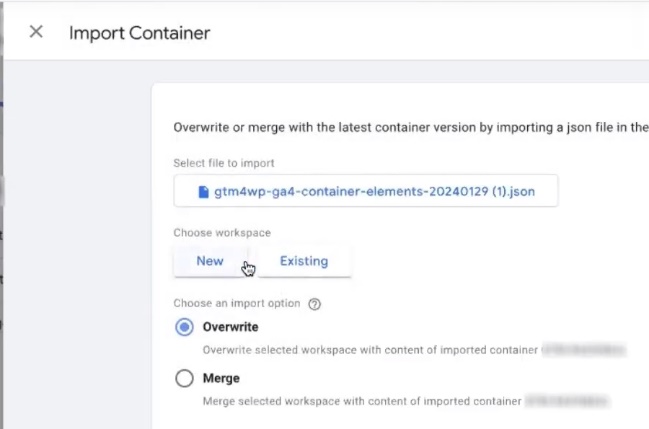
The next step is to choose the import method:
- Overwrite — completely overwrite the container
- Merge — merge with existing settings
If you have just created an account and there is nothing in it, feel free to select “Overwrite.” If you already have some tags that you want to keep, select “Merge.” In this case, the system will offer to rename conflicting items or overwrite duplicates.
After importing, you will see that a bunch of stuff has appeared in the container: tags, triggers, variables.
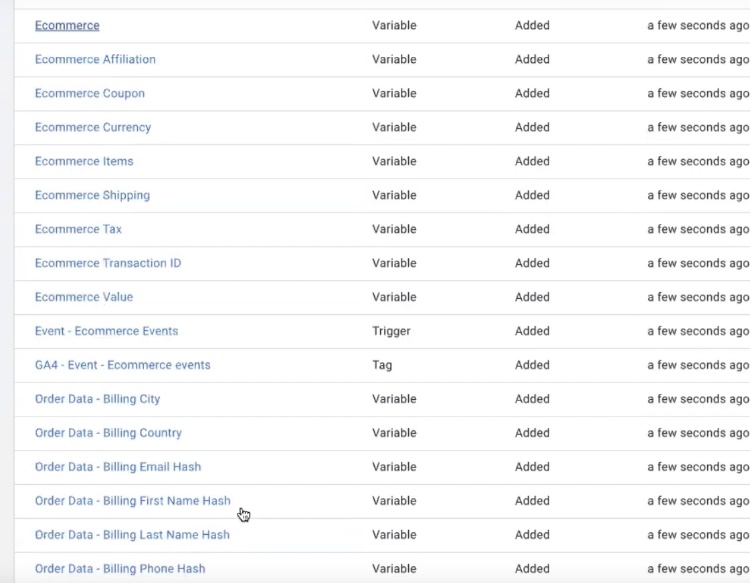
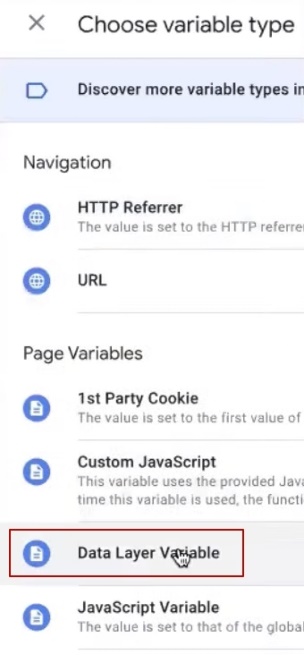
Why do we do this through import rather than creating everything manually? Because it eliminates routine, tedious work. There are about 18 variables in the template, and each one would have to be written by hand. The process itself is simple: go to “New,” select the “Data Layer Variable” type, and enter the variable name.
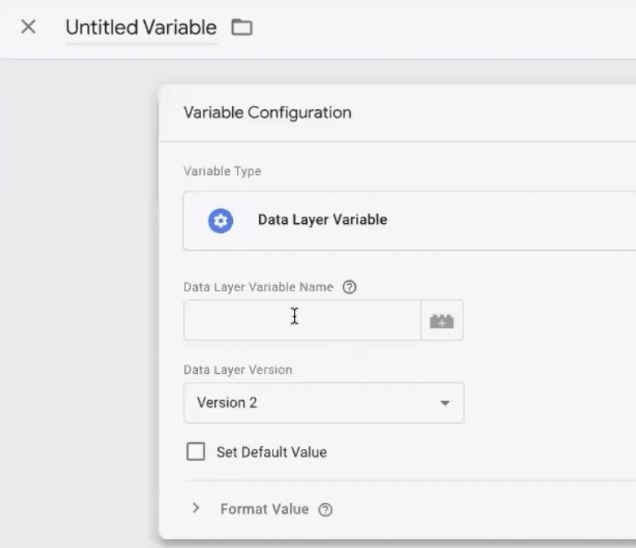
Some variables are simple, such as ecommerce.transaction_id. Others look like this: orderData.customer.billing.phone_hash. The only “difficulty” is the monotonous copying. But when there are nearly two dozen such variables, importing a ready-made GTM container saves a lot of time. Two seconds, and you’re done.
GA4 tag edit – Event
Important note: if you have overwritten the container, the Google Tag that we created earlier will be deleted. This can happen, but it’s not a big deal — you just need to adjust the settings.
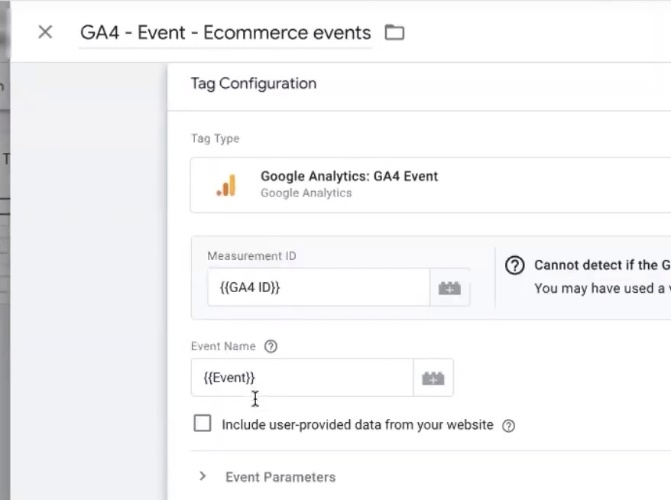
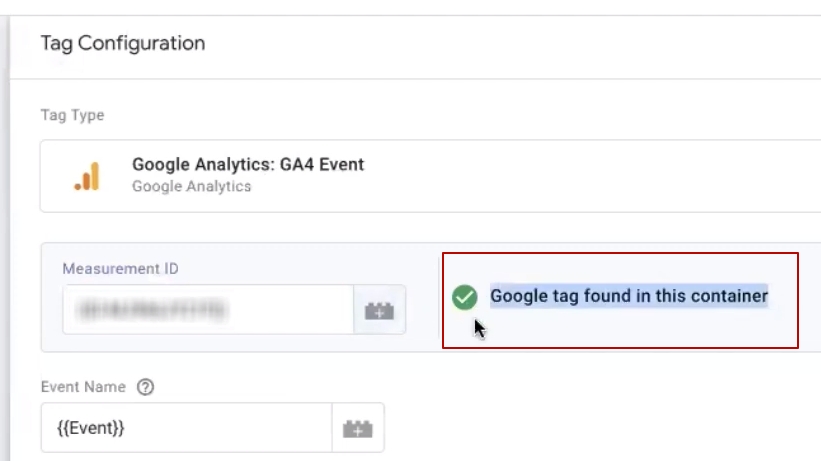
Find the “GA4 – Event” tag. Here you need to specify the analytics ID again. Delete the old value, click “Plus,” then click “Plus” again next to Variable Configuration. Find the “Constant” variable type and insert your analytics ID (the same G-XXXXXXXXX) there.

You can assign any name to the variable, even just an ID number. After saving, be sure to check that the “Google tag found in this container” checkbox is selected. This confirms that the link is working.
Verifying Google Tag Manager results
Now let’s make sure everything is set up correctly. Copy the address of our website, paste it into the field, and click “Connect” to start preview mode.
Before checking, be sure to log out of the WordPress admin panel—otherwise, the data may be transmitted incorrectly. Click Preview and start testing: go to the website, open the product page, click Buy, and go to the shopping cart.
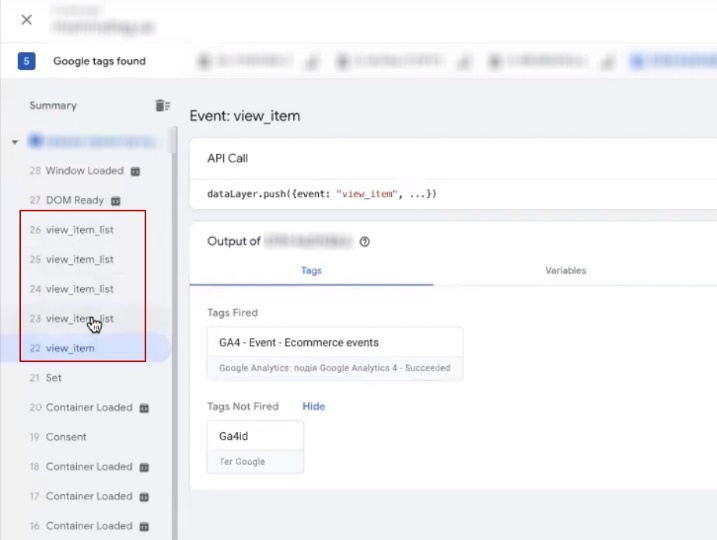
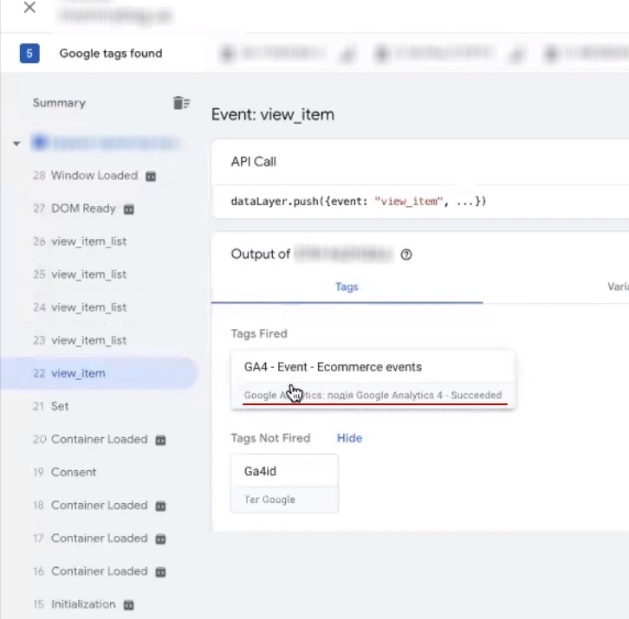
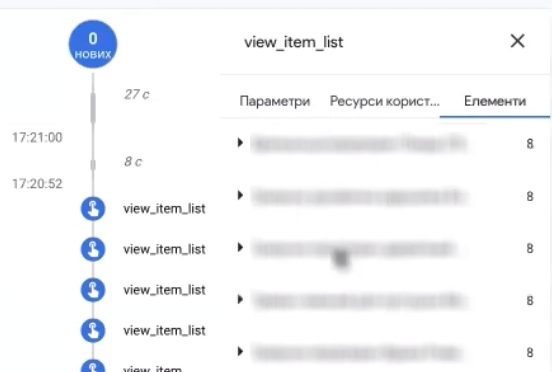
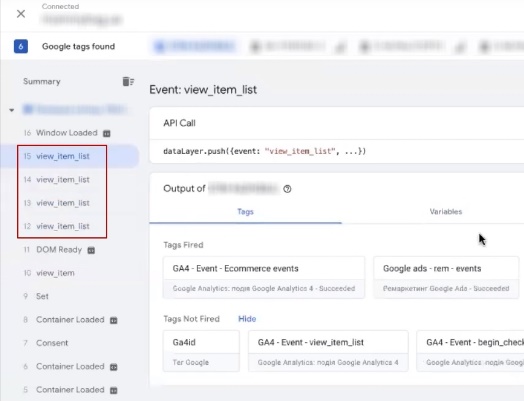
What should we see in preview mode? In the “Tags” block, when hovering over the View_item event, it should show that our tag has worked. Several view_item_list may also appear — this depends on the theme of the site, sometimes information is duplicated. We will clean this up later.
For a detailed check, go to Google Analytics, section “Data display” → “DebugView”. Events may appear immediately or with a delay of a couple of minutes.
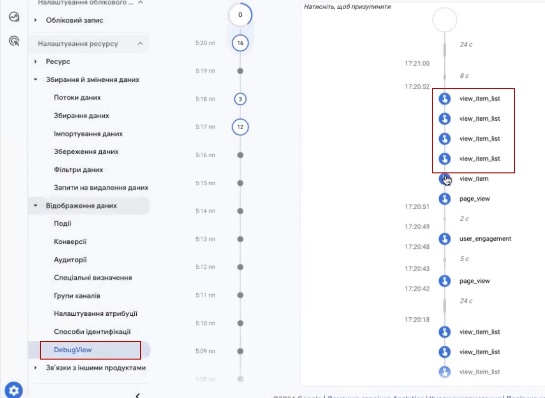
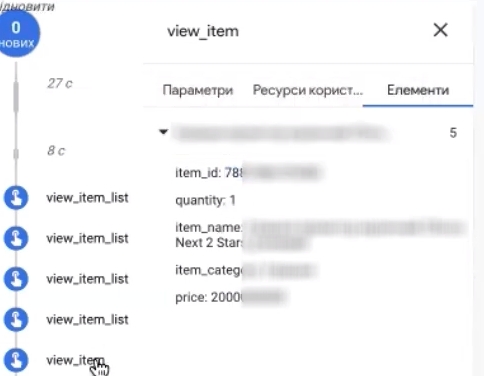
Click on View_item and check for the presence of mandatory parameters:
- Value — the cost of goods
- Currency — валюта
- Items — product data (Item_ID, Quantity, etc.)
Please note: view_item_list events may not have a Value parameter, and the items will contain different products. This is normal — such events record the viewing of a list of products, not a specific card.
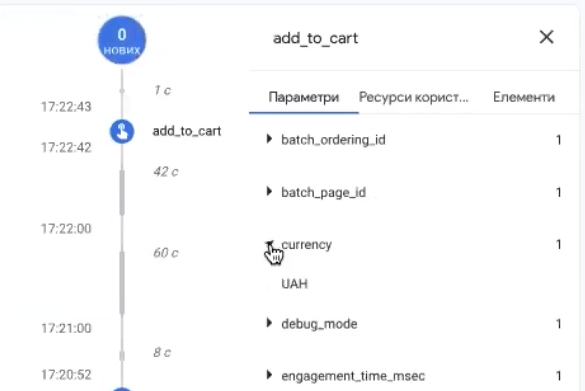
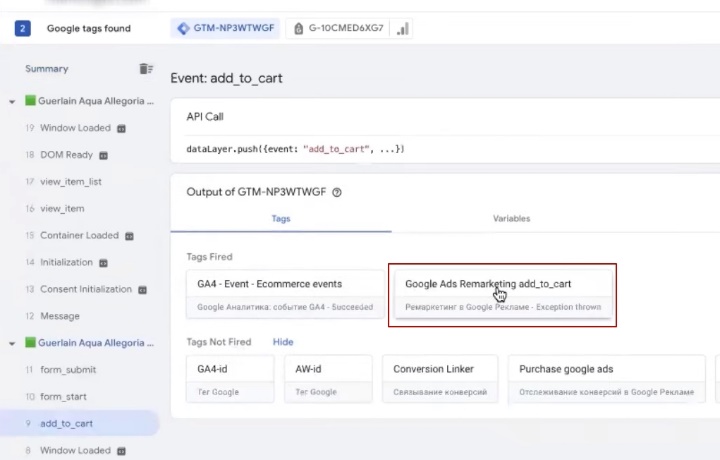
Next, click “Buy” and wait for the add_to_cart event to appear. In DebugView, it should also contain Value, Currency, and information about the added product. I recommend repeating this check with several products to make sure that data transfer is working consistently.
Correcting the display of multiple View_item_list
Before placing a test order, let’s deal with duplicate events. Remember how we saw four view_item_list events instead of one during testing? This clutters up analytics and distorts data. Let’s fix that.
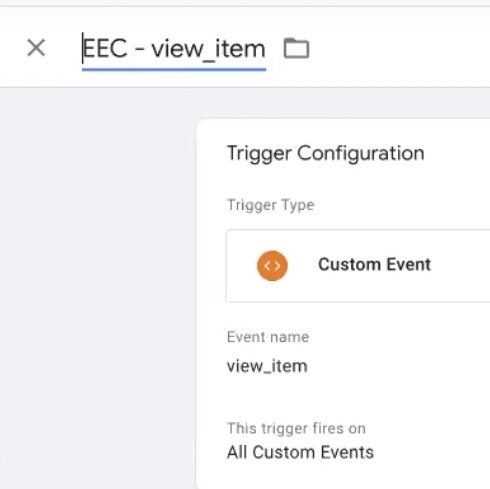
Go to Google Tag Manager, open the “Triggers” section, and remove view_item_list from the general list of events. Now let’s create a separate GTM tag for it.
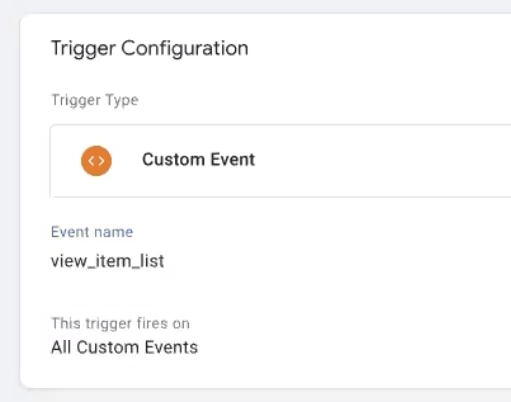
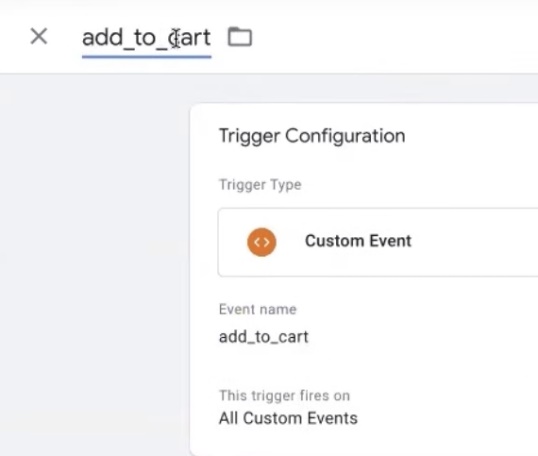
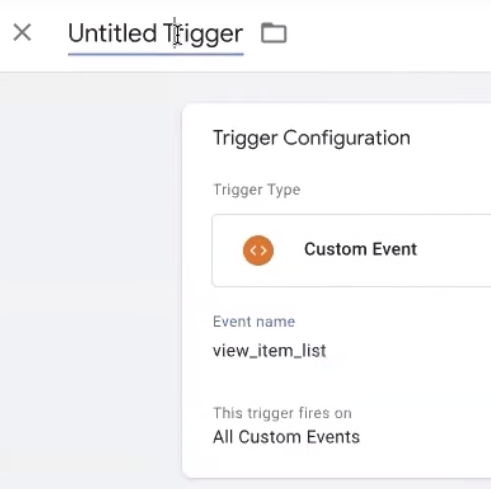
Duplicate the existing tag for view_item_list. Leave the settings as they are, but change the trigger: delete the old one, click “Plus” → “Trigger Configuration,” scroll down, and select “Custom Event.” Paste the name of the event you copied earlier and save.
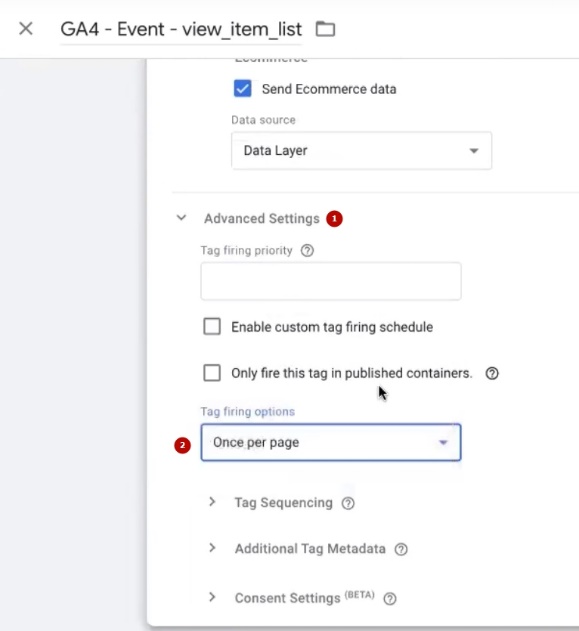
Important step: go to “Advanced Settings” and select “Once per page.” Now the event will only trigger once per page, without duplicates.
Re-checking results after configuring View_item_list
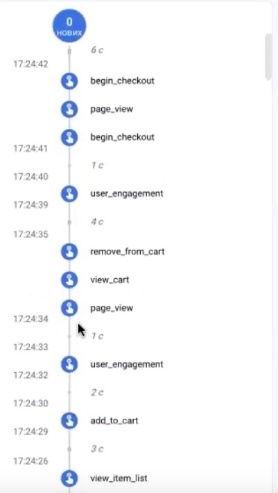
It’s time to test everything again — now with a full purchase cycle. We place a test order: add a product to the cart, go to the cart, remove one item, and complete the order to the final page.
In preview mode, we see which events have been triggered. Here’s what we can see:
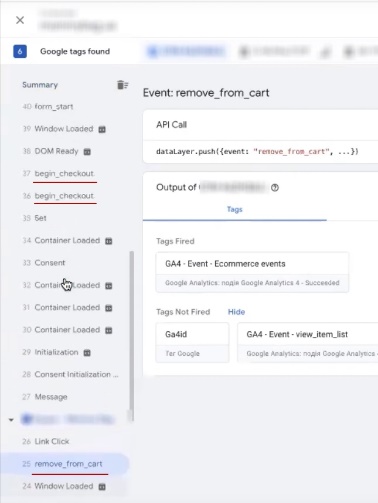
- view_cart — view cart (not duplicated — excellent!);
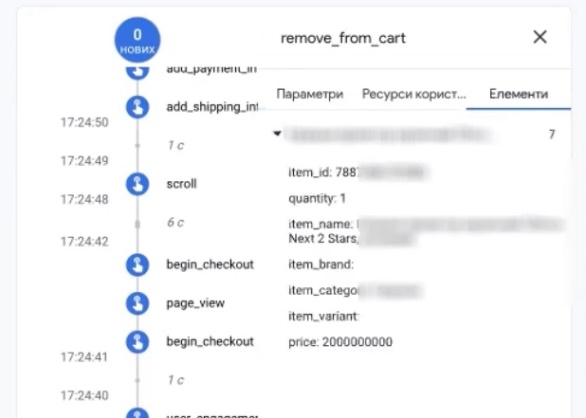
- remove_from_cart — remove item from cart;
- begin_checkout — start of checkout (may be duplicated);
- add_shipping_info — adding a shipping address;
- add_payment_info — select payment method;
- purchase — purchase completed.
If begin_checkout is duplicated, we apply the same technique as with view_item_list: we create a separate trigger with the setting “Once per page.”
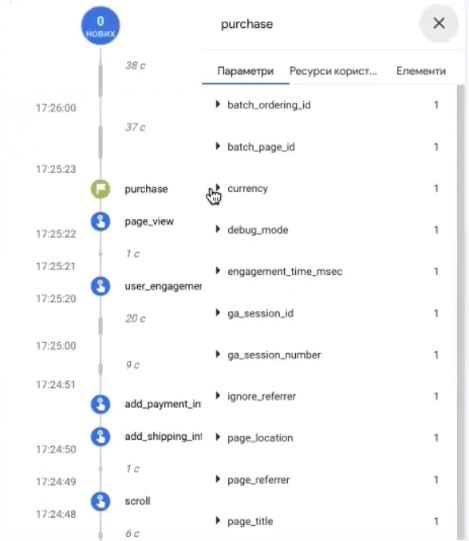
Go to Google Analytics 4, DebugView section, and check each event. Pay special attention to the Purchase event. It should contain:
- Currency — the correct currency;
- Transaction_ID — order number (check it against what is shown on the website);
- Value — purchase amount;
- Shipping — delivery cost;
- Items — a list of products with correct IDs.
Small discrepancies in the figures (for example, 99 instead of 100) are a feature of the website’s data transfer. This happens with free configuration, and you will have to accept it.
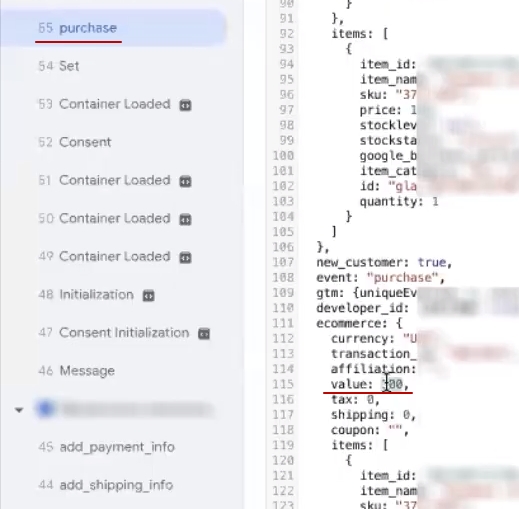
The main thing is to make sure that the product IDs match everywhere and no information has been lost. If everything is in place, the GA4 e-commerce setup has been completed successfully.
Eliminating duplication Begin_checkout
The final step is to remove duplicate begin_checkout events. Please note: you may have duplicates of other events, such as view_item, add_to_cart, or any other event. The correction principle is the same; simply do not leave the issue for later.

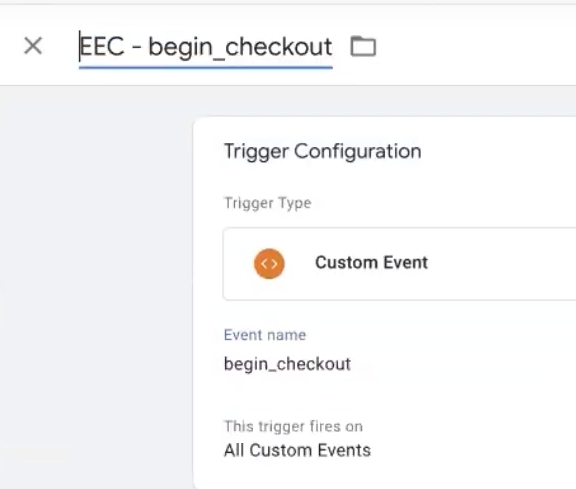
So, begin_checkout is duplicated. What should we do? Go to the main tag and remove begin_checkout from there. Then duplicate the tag and give it a clear name (for example, “GA4 – Begin_checkout”). Delete the old trigger, create a new Custom Event type, and write the name of the event. Don’t forget to select “Once per page” in the advanced settings.
This completes the setup of Google Analytics 4. All goals are recorded correctly, without duplicates.
Fine-tuning dynamic remarketing
But we’re not done yet. If you’re planning to launch Performance Max, it’s worth getting Google Ads dynamic remarketing up and running. Its machine learning algorithms work much more effectively when they receive complete data about user behavior on the website.
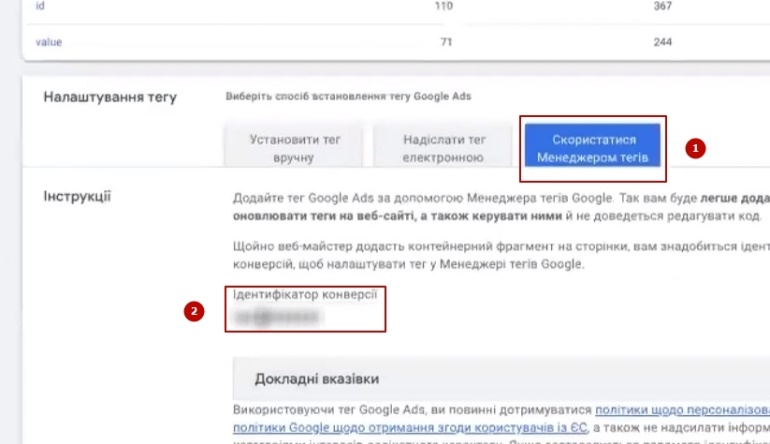
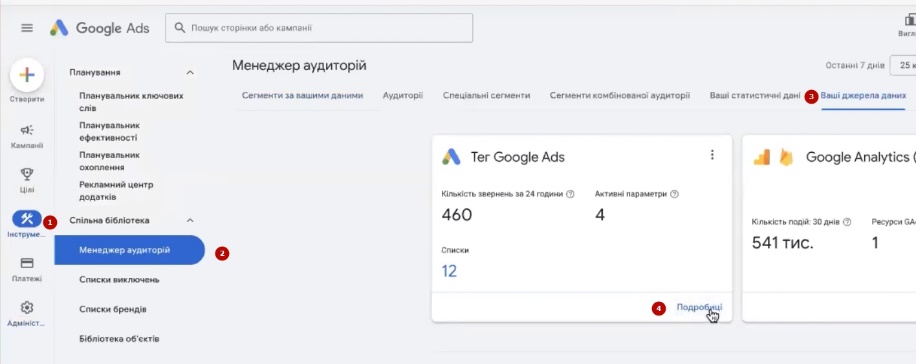
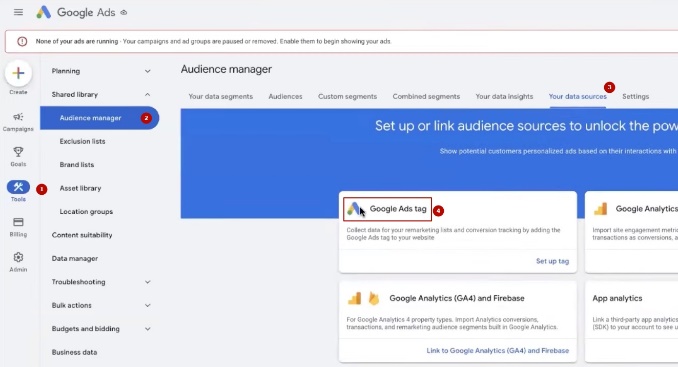
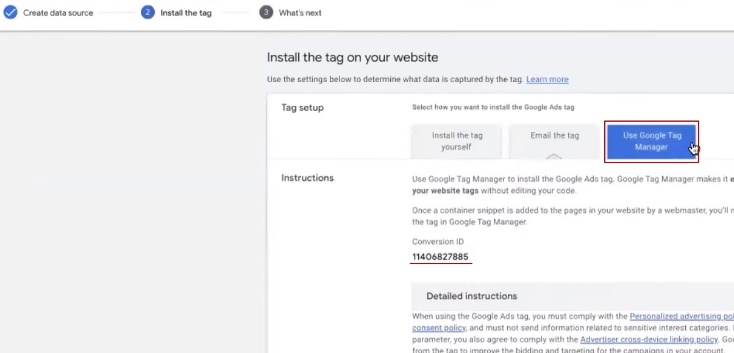
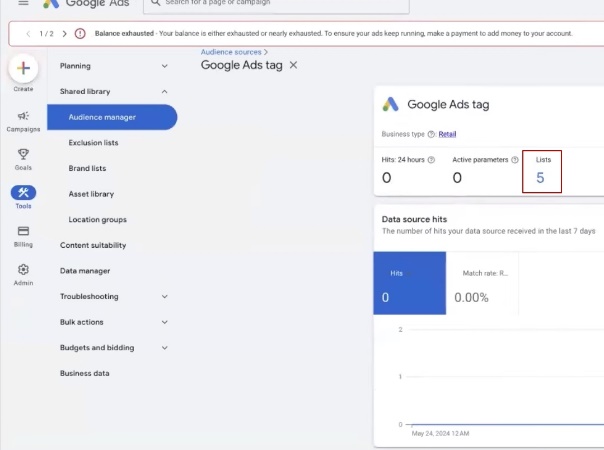
First, you need to set up a Google Ads tag. Log in to your advertising account, go to Tools → Shared Library → Audience Manager. Open the Your Data Sources tab and find the Google Ads tag. If it is not yet activated, you will see a Configure button.
Click “Details” → “Tag Settings” and select “Use Google Tag Manager.” Copy the digital ID.
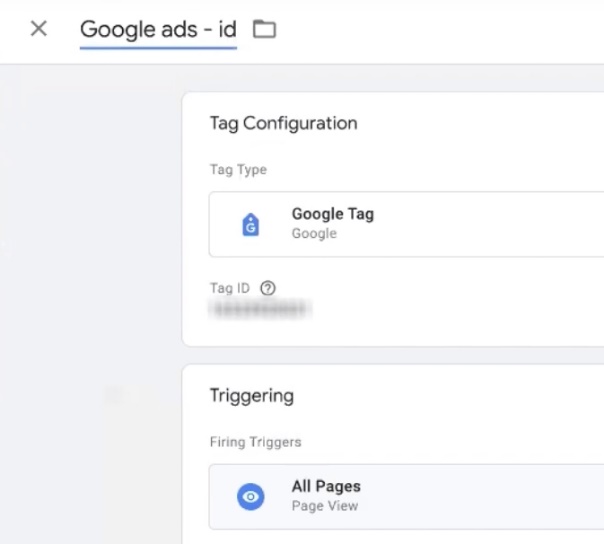
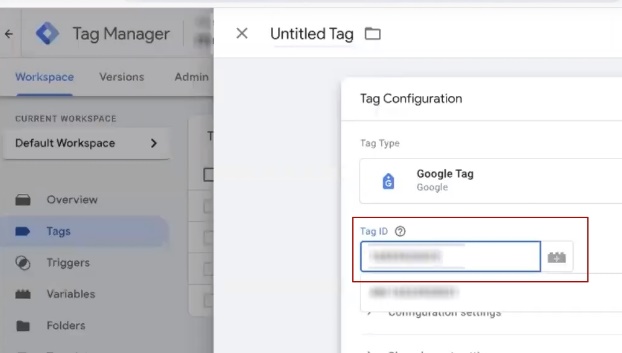
Return to GTM, create a new Google Tag type tag, and paste the copied ID. Select “All Pages” as the trigger. Name the tag, for example, “Google Ads – ID.”
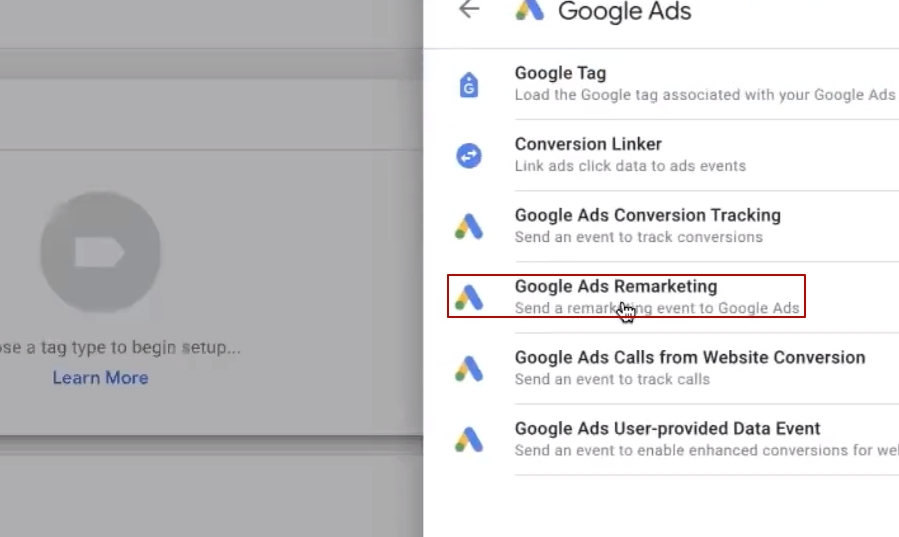
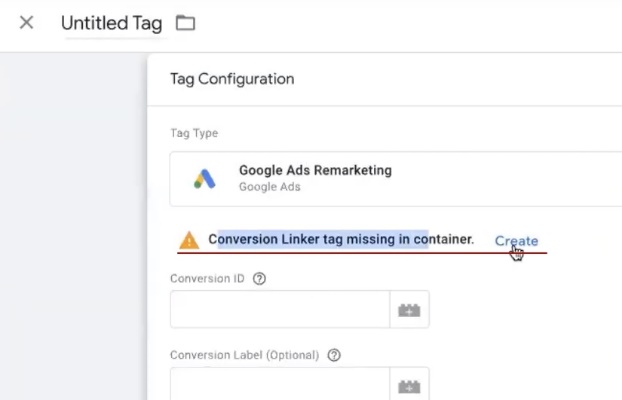
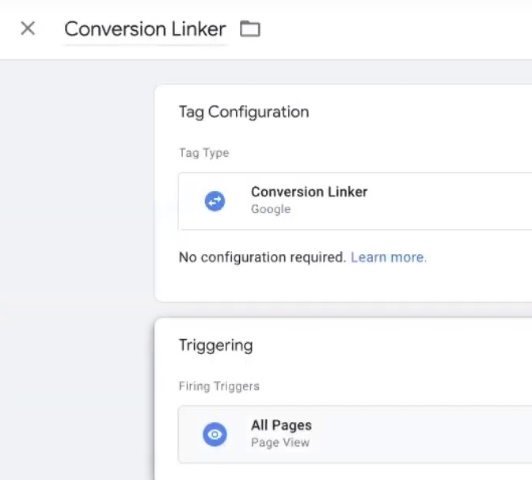
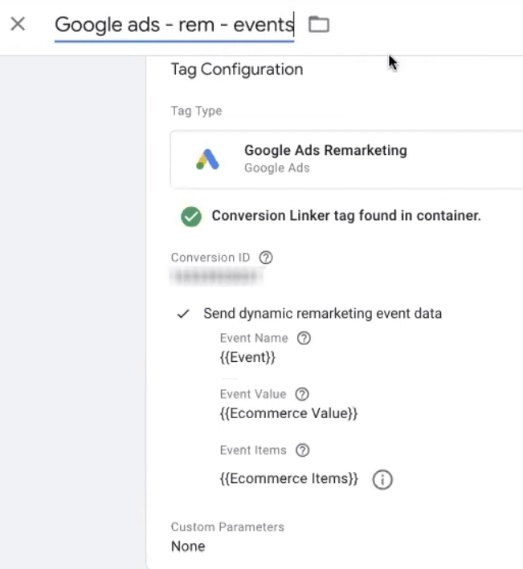
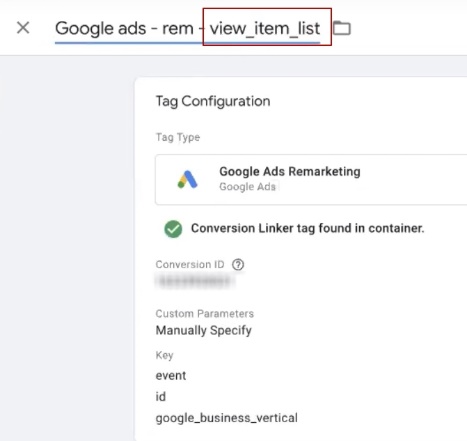
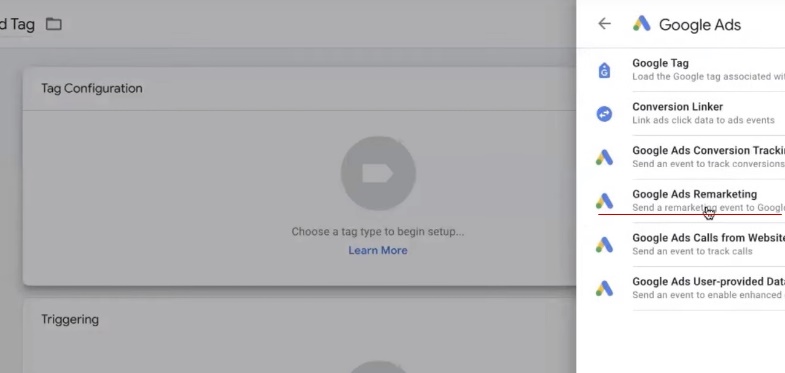
Now let’s set up remarketing itself. Create another tag: “Tag Configuration” → “Google Ads” → “Google Ads Remarketing.” The system will prompt you to create a Conversion Linker — agree and leave the default settings.
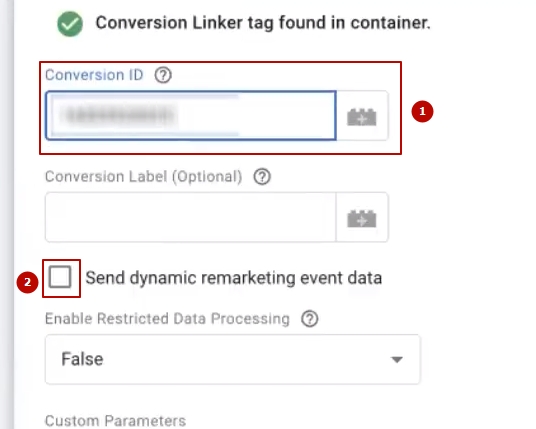
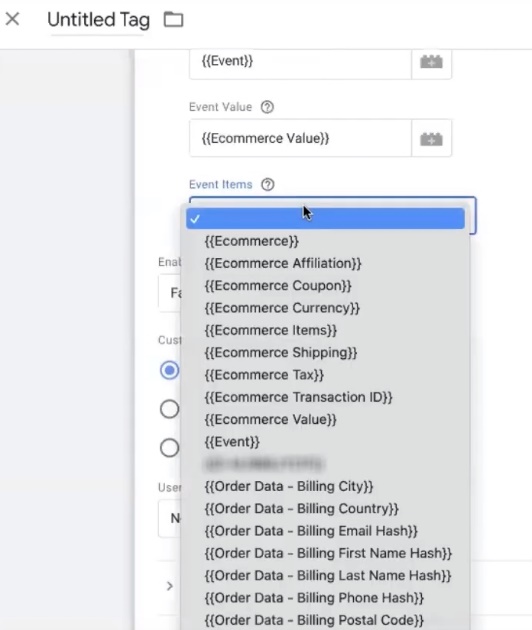
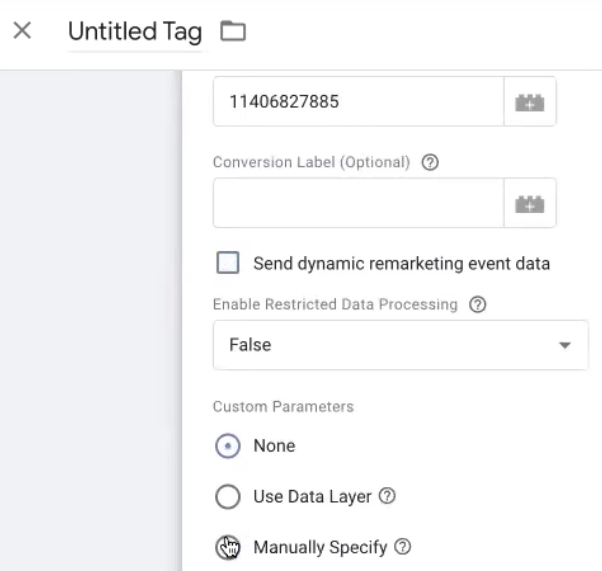
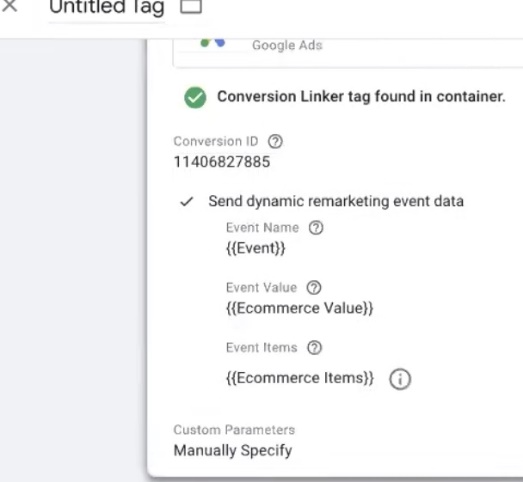
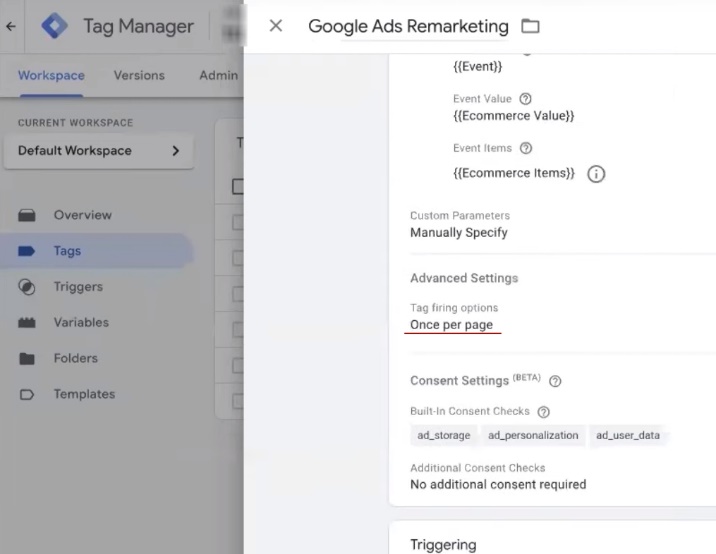
In the Conversion ID field, paste the same identifier. Enable the “Send dynamic remarketing event data” option. Next, pull up the variables that were created when importing the container:
- Event — name of the event
- Event value → берём «Ecommerce value»
- Items → берём «Ecommerce items»
We verify that google_business_vertical is set to “Retail” and the ID prefix is in place.
In the Triggering section, select the same principle as for analytics—a trigger for e-commerce events. Save. For duplicate events (begin_checkout, view_item_list), create separate tags as you did before.
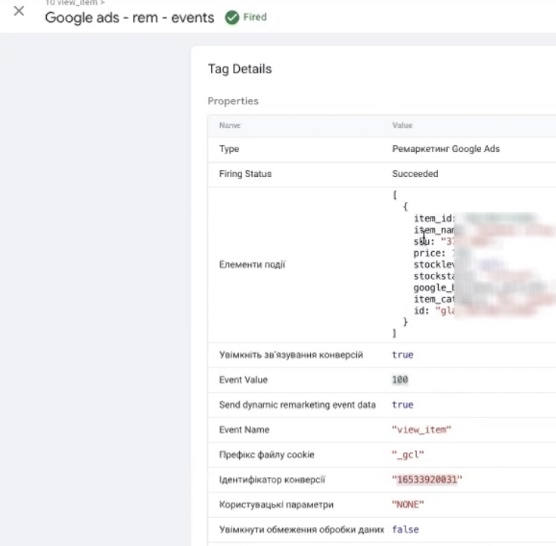
Verification of dynamic remarketing data transmitted
For Google Ads dynamic remarketing to work correctly, you need to make sure that four key events are transmitted:
- View_item — view product card;
- Add_to_cart — add to cart;
- Purchase — покупка;
- View_item_list — view the list of products.
Launch preview mode and go to the website. Sometimes WordPress may display errors or indicate that something does not exist, even though everything was working a minute ago. This is normal — just refresh the page and try again.
Open the product card and go to the Variables section in the GTM debugger. Check your variables: Ecommerce value and Ecommerce items should contain data. When you click on the View_item event, you will see a set of parameters — product ID, cost, items with ID.
However, there is a caveat: the Event variable may show “undefined” even though the event itself is triggered. Such minor glitches are common when working with free tools.
Fixing tag «Google Ads – rem – events»
The standard integration method offered by the plugin developer does not always work reliably. Therefore, we will modify the remarketing tag to gain more control over the data being transmitted.
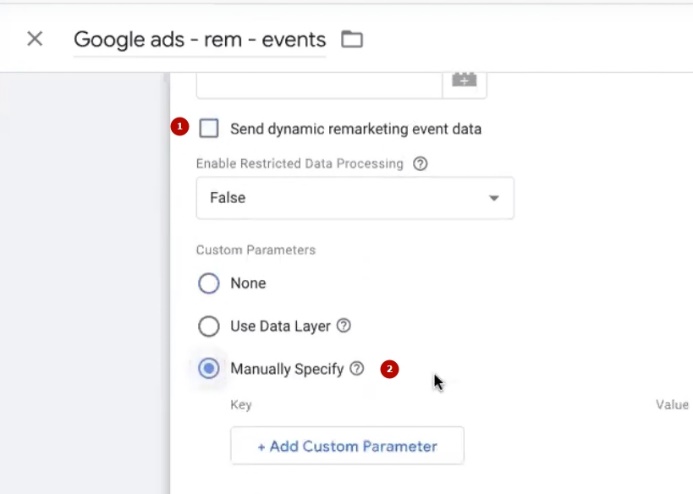
Open our tag and disable the “Send dynamic remarketing event data” option. Instead of automatic transfer, we will set the parameters manually.
What data needs to be transferred:
- Event — name of the event (set as a constant)
- Product ID — we will create a separate variable for this
- Google_business_vertical — leave “Retail”
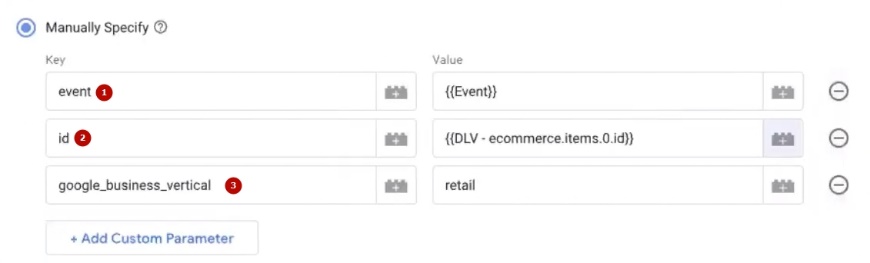
For the product ID, we create a new Data Layer Variable with the path ecommerce.items.0.id. This construction extracts the ID of the first product from the array. We check that the variable works on all the e-commerce events we need.
Checking the results of settings
Let’s see what we have. In the debugger, we see the view_cart event — the product ID with the prefix “gla_” and the google_business_vertical parameter are being transmitted. The system may complain about User Consent Mode, but if your business does not operate in the US or EU markets, you can skip this setting.
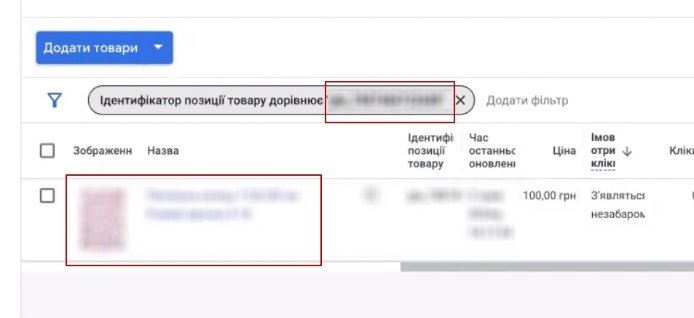
Check the variable ecommerce.items.0.id — it should contain an ID with the prefix “gla_”. Now for the most important part: go to Google Merchant Center and search for the same product. If the ID in Merchant matches the one transmitted from the website, everything is set up correctly. This is exactly what you need for dynamic remarketing to work.
In total, we pass three mandatory parameters: product ID, Event, and google_business_vertical. This is the basic set required by Google. If you wish, you can add Value (cost) and other parameters, but this is sufficient to start remarketing.
Correction of View_item_list duplication
Remember how view_item_list was duplicated? It’s time to fix that for the remarketing tag as well.
Go to the “Ecommerce Events” trigger and see what events are listed there. For Google Ads remarketing, only view_item, view_item_list, and purchase are essential. The other events (begin_checkout, add_to_cart) are a nice addition, but not critical.
Remove view_item_list from the general trigger and create a separate tag for it with the setting “Once per page” — just as you did for GA4.
Re-checking tag activation, refinement
We run the final check. We go through the entire user journey: product card → adding to cart → viewing cart.
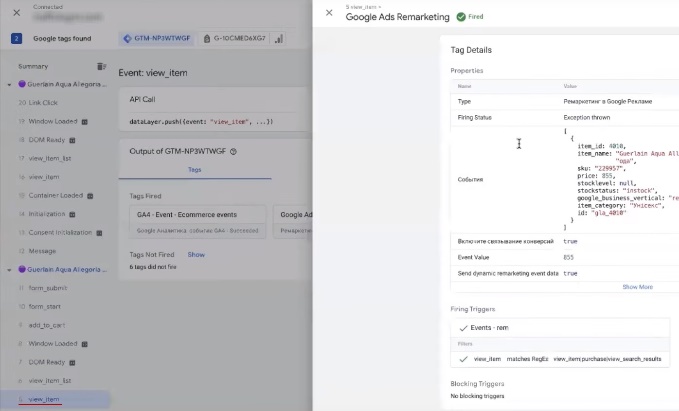
What do we see in the debugger? View_item_list fires several times, which means that the trigger has not yet been fixed. View_item may also be duplicated. In this case, we remove view_item from the general trigger and create a separate block for it.
After all the edits, we check again. Now view_item appears once, view_item_list appears once, and there are no repeats. This is exactly the result we were aiming for.
Ideally, you should place another test order and make sure that the purchase event is also transmitted correctly — with the correct product IDs and all the necessary parameters. If everything is in place, congratulations: the WooCommerce dynamic remarketing setup is complete, and Google is receiving exactly the data it needs to run effective advertising campaigns.
Setting up dynamic remarketing
Let’s move on to the final stage — activating dynamic remarketing in the advertising account. Return to Google Ads, open the Tools → Shared Library → Audience Manager section. Find the “Your data sources” tab.
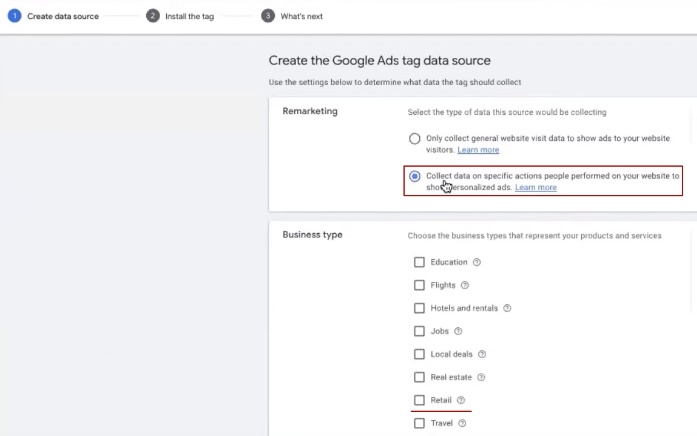
Here, we search for Google Ads tag and click “Set up.” In the settings, we select the option “Collect data about website visitors to show personalized ads.” Since we have an online store, we specify Retail in the business type field.
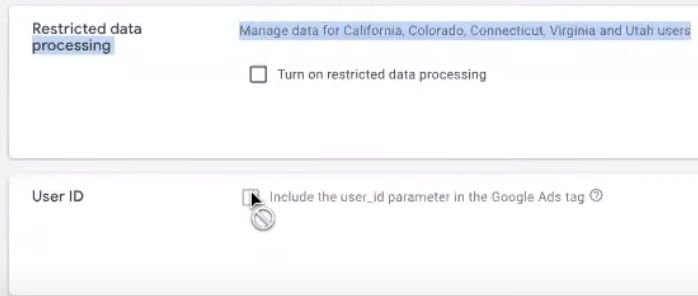
A separate item concerns requirements for California and Colorado — this is only relevant for the US market. If you work in Ukraine or other countries, you can leave this checkbox untouched. Click Save and Continue.
In the next step, select Tag Manager as the installation method. The system will only display the Conversion ID — copy it.
Now let’s transfer everything to GTM. Create a new tag: New → Tag Configuration → Google Ads → Google Ads Remarketing.
Paste the copied Conversion ID. Leave the Label field blank — it is not required for remarketing.
Next, we choose how to transfer data: automatically from the data level (Dynamic) or manually (Manual). I will show you the dynamic option—it is easier.
Configure settings:
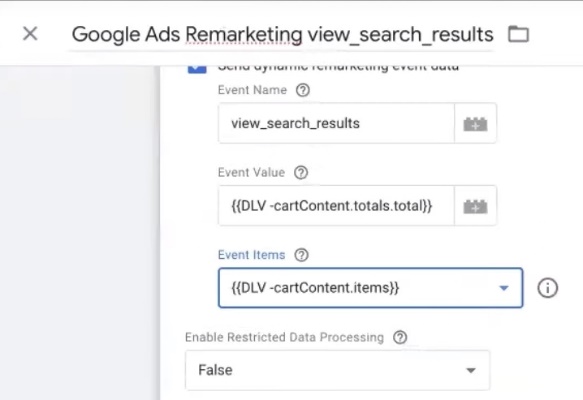
- Event — select the ready-made variable {{Event}}.
- Event value — specify the value here. To understand where to get it from, look at the Data Layer for purchase or view_item events. There you will see the Ecommerce value parameter without nested levels — select it.
- Event items — this variable collects data about products: ID with the required prefix and google_business_vertical. Thanks to Thomas Geiger’s plugin, the entire set is already ready, so just select Ecommerce Items.
Go to Advanced Settings. Here is an important point about Consent Mode: if your business does not operate in the EU or certain US states (California, Colorado), you can skip this setting. Consent Mode is not required for Ukraine.
Save the tag and proceed to testing — you need to make sure that all data is transmitted correctly.
Choosing triggers
Let’s move on to setting up GTM triggers. There are two ways to do this: either send all events in a row, or select only the ones you need.
If you decide to send everything, nothing critical will happen. But in fact, Google Ads only requires five mandatory events:
- View_item — view product card;
- View_item_list — view category or listing;
- Add_to_cart — add to cart;
- View_search_result — view search results;
- Purchase — покупка.
The remaining events (remove_from_cart, view_cart, begin_checkout) are not essential for Google Ads remarketing.
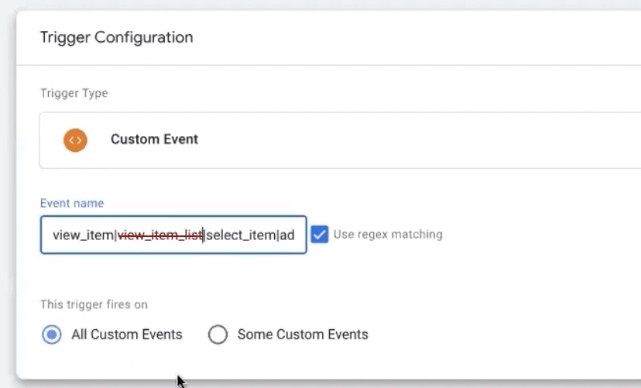
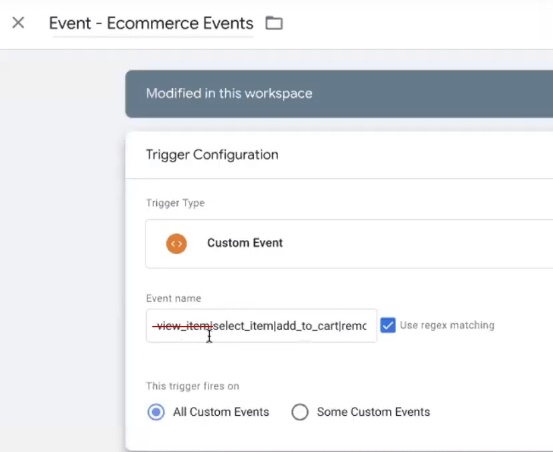
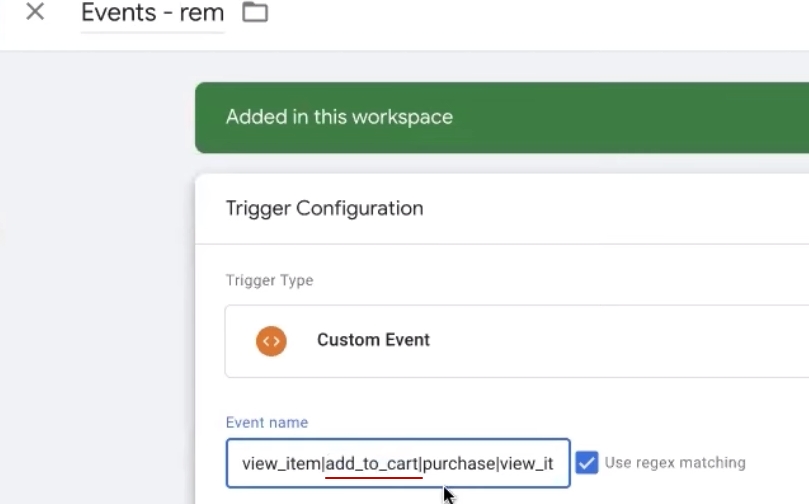
If you want to send only the necessary information, create a custom trigger: click “Plus” → Trigger Configuration → Custom Event. In the field, enter the names of events separated by a vertical line: view_item|add_to_cart|purchase|view_item_list|view_search_results.
To find out the exact name of the view_item_list event for your site, go to any section of the catalog and check the debugger to see which event is triggered. Copy it from there — that way you won’t make a mistake. The same applies to view_search_result: enter something in the site search and find the right event in the Data Layer.
Save the trigger and give it a clear name, such as “Remarketing Events.”
Verification of data transfer accuracy
The final step is to ensure that the WooCommerce remarketing settings are functioning correctly. We go through the entire user journey: catalog → product page → add to cart → search → checkout to the “Thank you for your purchase” page.
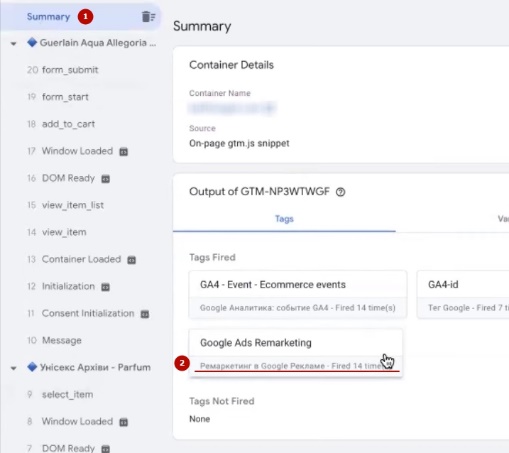
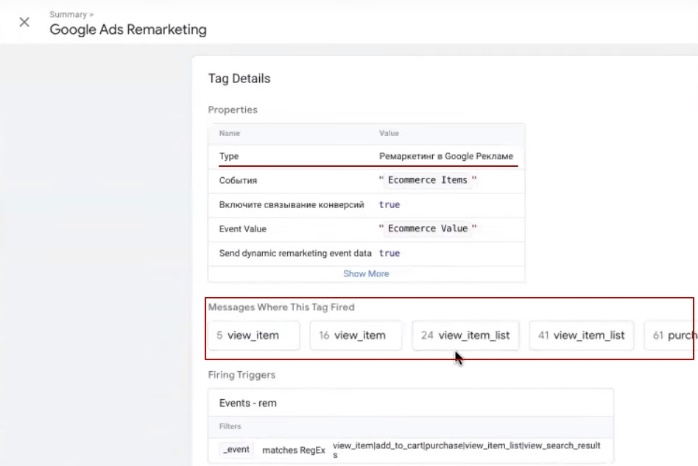
Open Summary in the GTM debugger. We can see that the remarketing tag has fired 14 times — that’s a lot, but we’ll figure it out now. Some of the fires are due to duplicate view_item_list — we’ll fix that later.
The main thing is to check that the necessary parameters are being transmitted in each event. Click on view_item_list: the data should contain the product IDs and google_business_vertical. Is it there? Great.
Let’s move on to view_item — the same check: ID and business_vertical are in place. This is exactly what you need for dynamic remarketing to work.
We check add_to_cart — here, too, the full set of data about the added products must be transmitted. And the final point is the purchase event. There should be only one (no duplicates) and it should contain information about the purchased products.
If events are duplicated somewhere, return to the triggers and apply the familiar technique with the “Once per page” setting.
Correcting data transmission accuracy
Now let’s organize the events for dynamic remarketing. Open the trigger for editing and register all five mandatory events via Custom Event:

- view_item;
- Add to cart
- purchase;
- view_item_list;
- view_search_result.
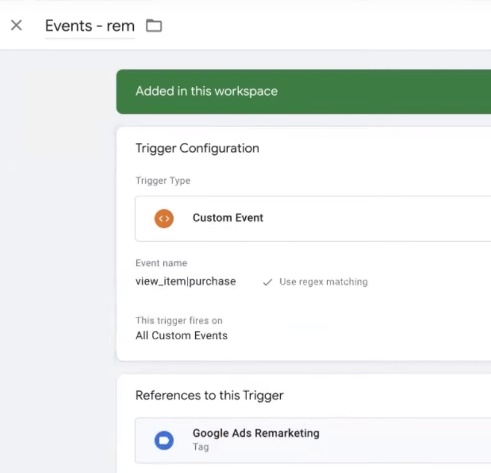
Separate them with a vertical line. Thomas Geiger’s plugin has already created all the necessary events, including Site Search — all that remains is to combine them into a single trigger. Let’s count: 1, 2, 3, 4, 5 — a complete set. Give the trigger a clear name, such as “Events – rem,” and save it.
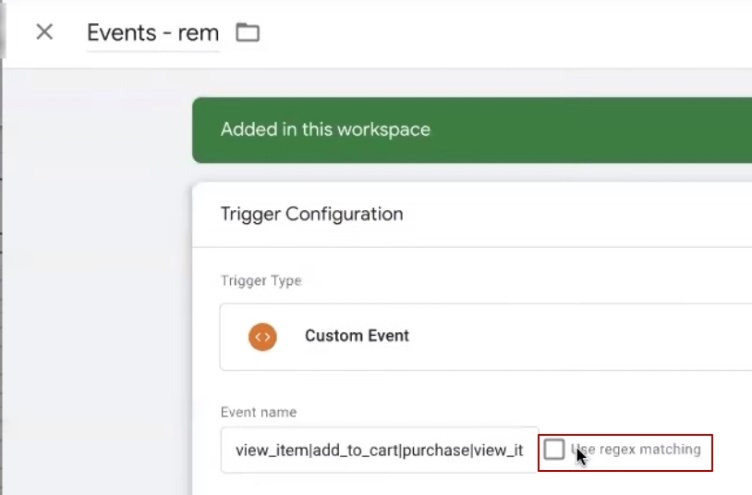
Important note: don’t forget to check the “Use regex matching” box. Without it, the trigger will not recognize events listed after a vertical line. It’s easy to overlook small details like this, especially when you’re spending a lot of time fiddling with settings.
Another recommendation is to add the “Once per page” restriction in the advanced trigger settings for events such as view_item_list. It is better to transfer less data, but of higher quality, than to clutter analytics with duplicates.
Double-checking the accuracy of data transfer
We launch the final testing. We click Preview and go through the entire user journey: we open a product card, add it to the cart, enter something in the search bar, go to the catalog, go to the cart, and complete the order.

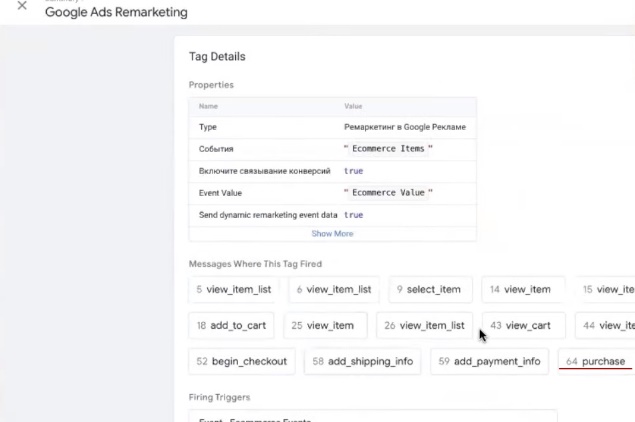
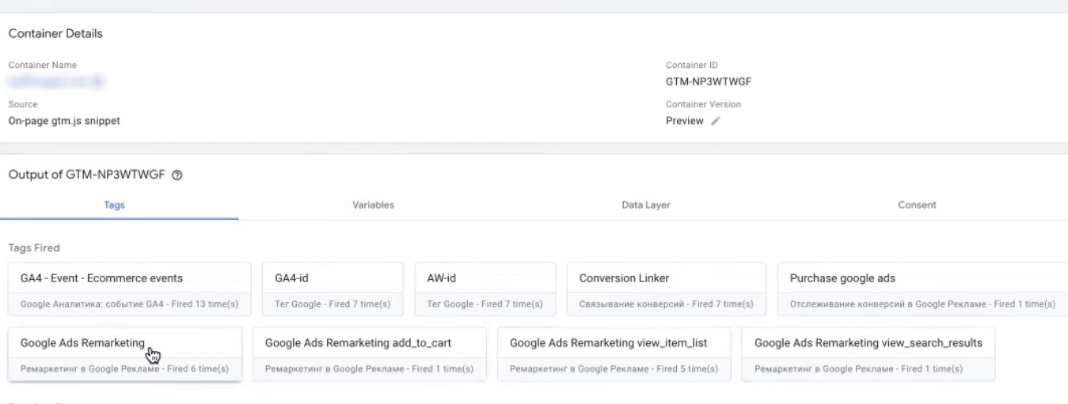
Open Summary in the debugger and view the result. The Google Ads remarketing tag has been activated, and now there are significantly fewer activations than before. No unnecessary duplicates, only the necessary events.
We check every event: view_item, add_to_cart, view_item_list, view_search_result, purchase. Product IDs with the correct prefix and the google_business_vertical parameter must be transmitted everywhere. If everything is in place, the WooCommerce dynamic remarketing setup is complete, and your advertising campaigns will receive all the data they need to work effectively.
Setting up a separate Add_to_cart transmission
We check all events and discover that add_to_cart did not work for some reason. Such nuances happen, nothing critical. We go to the trigger and see that the event is written correctly. So, the problem lies elsewhere.
The solution is simple: remove add_to_cart from the general trigger and create a separate tag for it. Open the existing remarketing tag and click Copy. In the copy, leave only add_to_cart, delete the old trigger, and create a new Custom Event specifically for this event. Save.
Reload the page — sometimes Google’s interface just glitches. Run Preview and check. Now in Summary we see: add_to_cart worked once. Great!
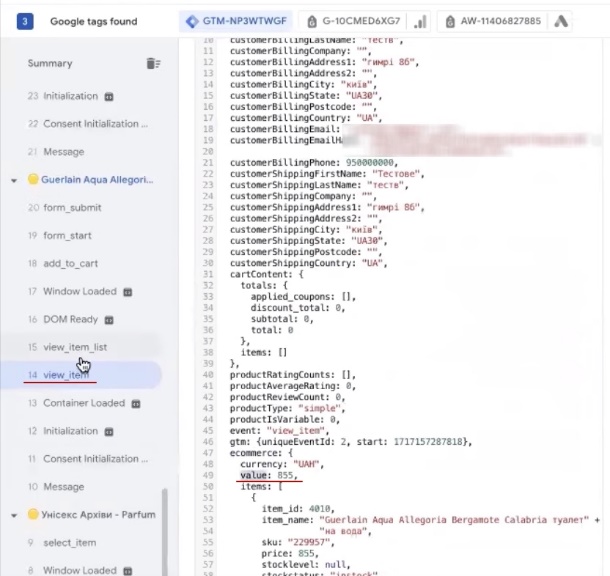
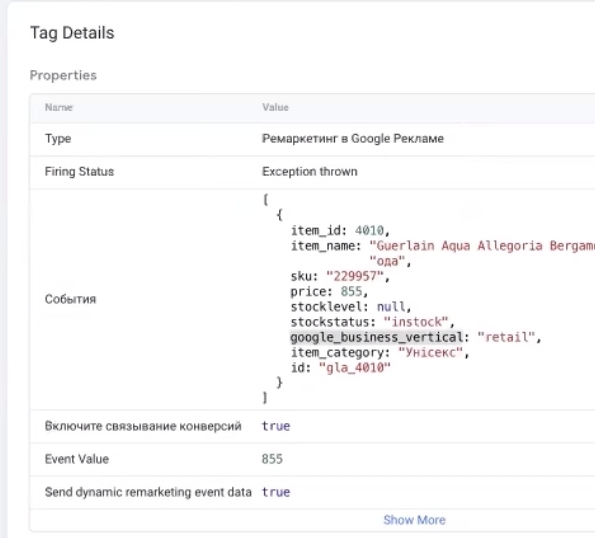
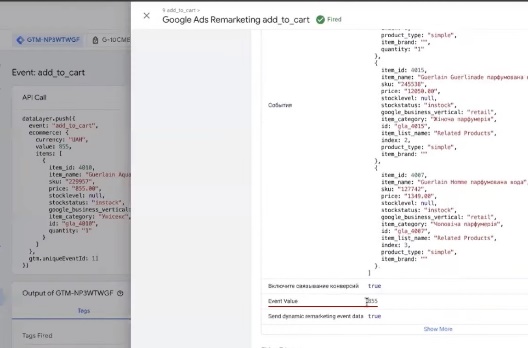
But there is a caveat: the data may contain several products instead of one. Why do IDs 4010, 4004, and 4023 appear, even though only one product was added? A common reason is that you did not log out of the WordPress admin panel. This is not a bug in the site itself, but a feature of how Google works. Simply log out and repeat the test.
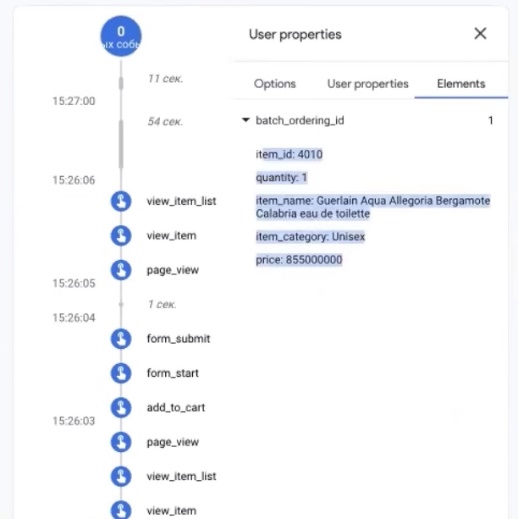
If several items are still added to the cart after this, create a new variable. Go to Variables → New → Data Layer Variable and enter the path cartContent.items. This will extract data specifically about the added product.
The same applies to the amount: if value does not match the price of the item, take the cartContent.total variable. Let’s check: value shows 855, which corresponds to the cost of the added item. This means that everything is working correctly.
Checking and editing tags by View_item
Now let’s check the rest of the events with the same attention. View_item — one position, worked correctly.
However, view_item_list may be duplicated again. To avoid this, we move it to a separate tag: copy the existing one, specify only view_item_list in the trigger, and set “Once per event” or “Once per page” in the advanced settings. Remove this event from the main trigger.
Save, run another check. Follow the path: product card → add to cart → catalog → search. Look at the results:
- View_item — remarketing worked, one position. Awesome!
- View_item_list — worked once, data is transferred. Excellent!
- Add_to_cart — one item, value 855. Perfect!
- Site Search — the event triggered, but the data is not being transmitted.
We will deal with search separately, but the main events of Google Ads dynamic remarketing are already set up and working as they should.
Editing and checking a Site Search event
We discovered that Site Search is not transmitting data. This happens sometimes — sometimes you have to make additional adjustments to get everything working properly.

Let’s check the event: it’s called view_search_result — that’s correct. The problem is where items and value come from. Standard variables don’t capture the data, so we’ll create new ones.
For value, remove the current variable, click “Plus” and create a new Data Layer Variable. Enter the path cartContent.totals — this will pull the amount from the right place in the code.
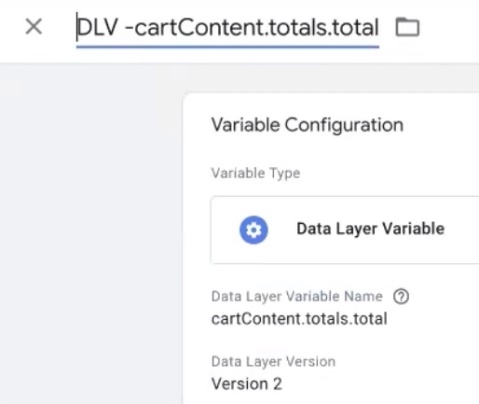
We do the same for items: we create the variable cartContent.items. If it already exists, we simply use it. We save the changes.
Launch Preview and go through the test path: add to cart → catalog → search query. Yes, testing takes time, but it’s better to make sure everything is working correctly than to figure out later why Google Ads remarketing isn’t collecting audiences.
Let’s take a look at the summary:
- Search_result — worked once. Excellent!
- View_item_list — five triggers, this can be fixed.
- Add_to_cart — once, as it should be.
- Purchase — yes, one item with four units (that’s correct — we ordered four units of one item).

The data is also displayed correctly in GA4: four items in one position. Everything matches up.
Retargeting adjustment
The final step is to clean up the main remarketing tag from unnecessary events. Remove add_to_cart and view_search_result from the general trigger, as separate tags have already been created for them. Leave only view_item and purchase in the main trigger.
To summarize: we have now configured all five mandatory events for WooCommerce dynamic remarketing:
- View_item — view product card;
- Purchase — покупка;
- Add_to_cart — add to cart;
- View_item_list — view category;
- View_search_result — search results.
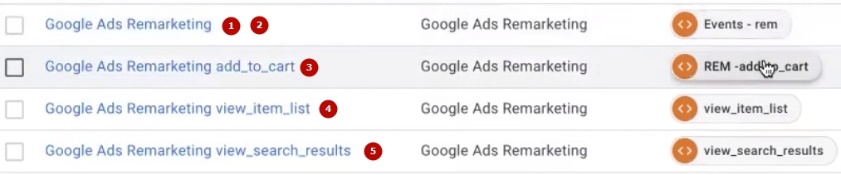
Each event triggers once, without duplicates, and transmits the correct data: product IDs with the required prefix and the google_business_vertical parameter. This is exactly what you need to launch Performance Max and run effective advertising campaigns.
Summing up — what has been configured
You can go through the entire user journey again and make sure that dynamic remarketing is working correctly. If all events trigger once in the GTM debugger and transmit the necessary data, then everything has been done correctly.
Audiences will now be automatically generated in Google Ads. Go to the data sources section, where you will find remarketing lists. They will be empty at first, but within a few hours, the information will be pulled in, and the system will start collecting your website visitors.
What we have configured as a result:
- Google Analytics 4 — full-featured e-commerce with all events.
- Purchase tag — conversion for order tracking.
- Google Ads dynamic remarketing — five essential events for bringing visitors back.
All that remains is to link the services together so that data is transferred correctly and Performance Max has access to all the information.
Linking Google Ads with Merchant Center

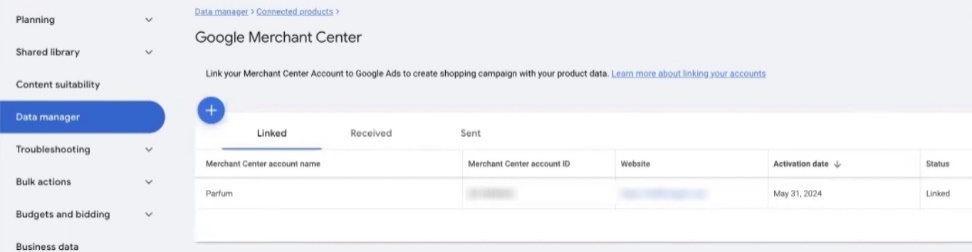
For product campaigns to work properly, you need to link Merchant Center to Google Ads. Go to the Data Manager section in your advertising account and look for the connection to Merchant.
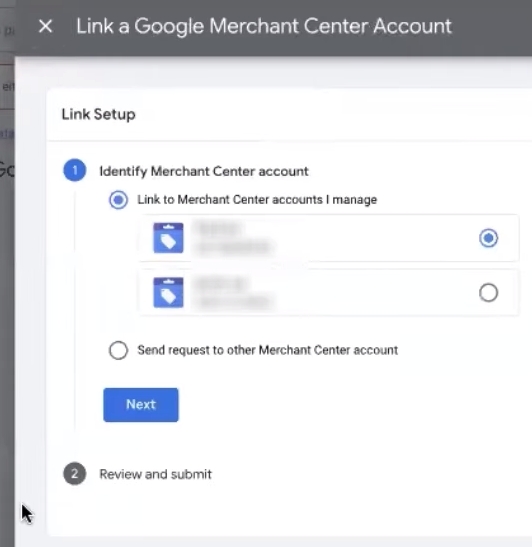
If the wrong account is specified there, click Unlink and unlink it. Then click the plus sign, select the desired Merchant Center (check the name or domain) and confirm the link by clicking Submit.
Check that the connection is correct: Data Manager should display the correct domain for your store.
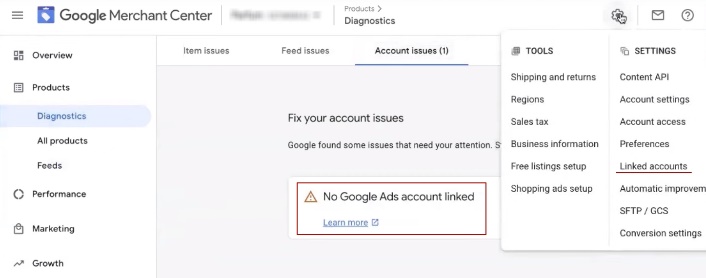
Now go to Merchant Center, section “Diagnostics.” If you see a message that your Google Ads account is not connected, go to “Linked Accounts” → “Google Ads.” Make sure that the account number matches your advertising account. After a while, the error will disappear.
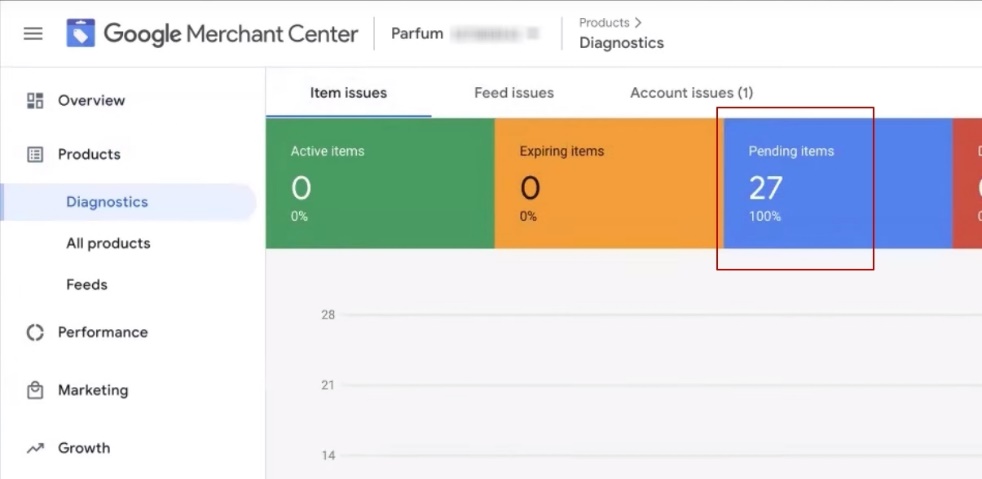
The diagnostics also allow you to track how products from the feed are moderated. After linking Merchant Center and Google Ads, positions will begin to load and go for review — this is a normal process that takes from a few hours to a couple of days.
Integrating analytics with Google Ads
The final step is to connect Google Analytics 4 to your advertising account. Why is this necessary? So that all services can exchange data and Performance Max can see the full picture of user behavior.
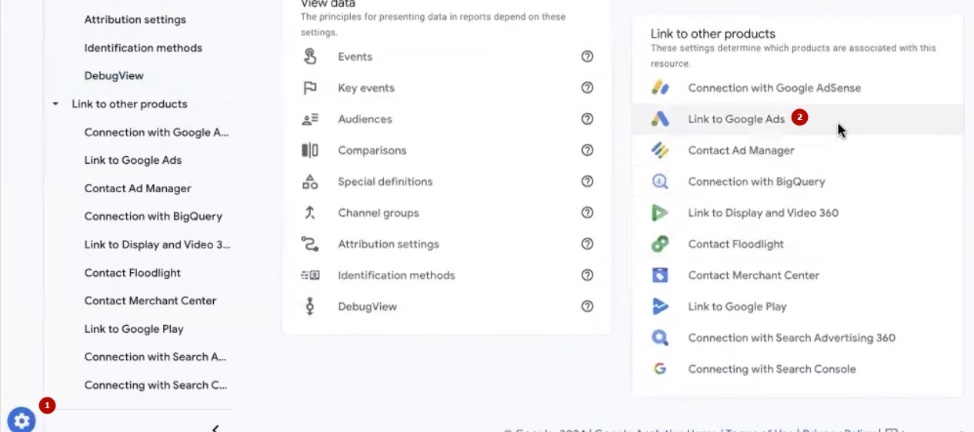
Go to Analytics, select the “Administrator” section, find the “Link to Google Ads” item, and click “Link.” Select the desired advertising account—if there is only one, the system will pull it up automatically.
If the account is not displayed in the list, check your access permissions: Your email address must have administrative rights in all three services — Merchant Center, Google Ads, and Google Analytics. This is a common reason why the link does not work.
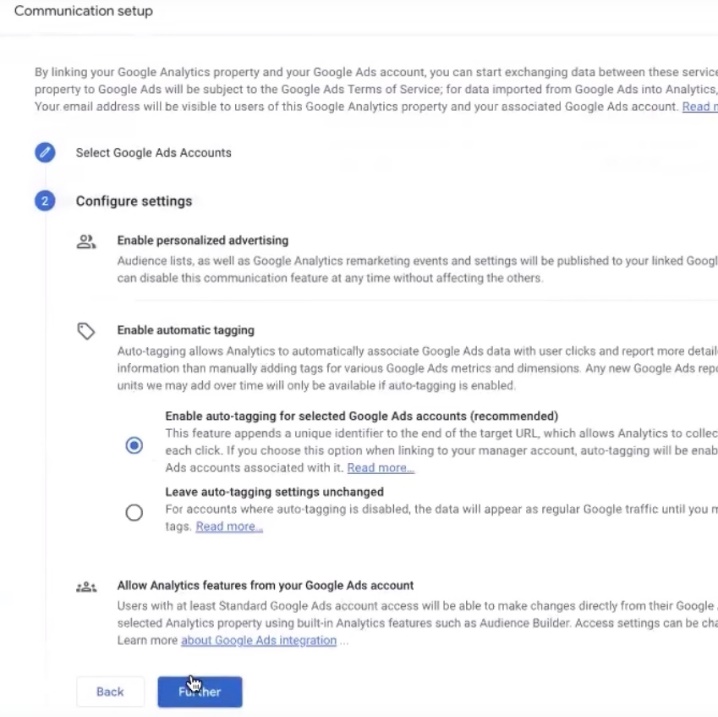
Leave the “Enable auto-tagging” option selected—it allows you to automatically tag traffic from ads. Confirm and save. If necessary, these settings can be changed later.
Conversion Tracking Setup
There is one more thing to do. Since we configured data transfer via GTM for WooCommerce, we need to specify this in the conversion settings.
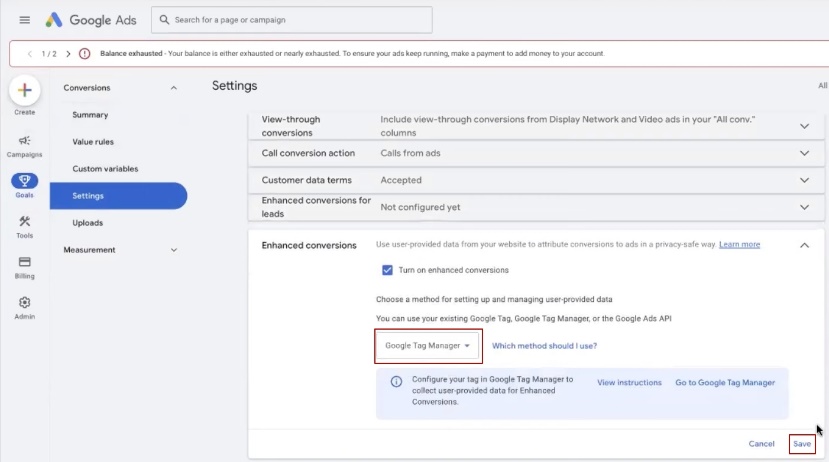
Go to Google Ads → Conversions → Settings. In the source field, select Google Tag Manager and save. Now the system knows where to get information about purchases.
Results
Let’s review the checklist of what we have accomplished:
- Goals in GA4 are set up, all e-commerce events are transmitted correctly.
- Google Ads dynamic remarketing — works, five mandatory events trigger without duplicates.
- Merchant Center integration with Google Ads — complete.
- Google Analytics integration with Google Ads — complete.
- Conversion settings — the source is specified correctly.
The basic setup is complete. Now you need to wait for your products to be moderated in Merchant Center — this usually takes from a few hours to two or three days. After that, you can move on to creating advertising campaigns. We will discuss this in the next article.


