
Hello! My name is Yana Lyashenko, and I am a Google logistician. My job is to help businesses attract the right target audience with specific characteristics. In this article, I will take a detailed look at the entire process of launching Performance Max or Google Shopping on websites running on WordPress with the WooCommerce plugin. By the way, many people use the term WooCommerce when talking about this combination.
What do you need to launch advertising campaigns on WordPress?
To launch commercial advertising campaigns on WordPress in any country in the world, you only need three components.
- Google Merchant Center with uploaded products that have passed moderation. Below, I will explain in detail what this tool is and how to work with it.
- Google Ads advertising account. Setting it up won’t take long — there’s nothing complicated about it. This is the account you will use to launch your ads.
- Properly configured analytics. This point includes several sub-steps, each of which we will discuss separately. I will explain why each element is necessary.
Brief overview of the creation of the Merchant Center
So, where do you start when setting up Performance Max or Google Shopping on WordPress with WooCommerce? The first step is to create a Merchant Center. I’ll say right away: this is the most time-consuming stage in the whole process.
Why does it take so long? Because product moderation takes up to 72 hours — approximately three days. Everything else can be set up much faster.
What is Merchant Center? It is a separate Google service where you upload information about your products and basic details about your store. Essentially, it is a “checkpoint” where Google decides whether to allow your site to advertise or not.
What does moderation look at? The design of the website, the presence of mandatory information (contact details, delivery terms, return policy), user-friendliness. If something is missing or the website looks questionable, it may be rejected. In the worst case, the domain will be blocked, and you will have to go through the moderation process again. But that’s a different story, which we’ll discuss another time.
Most online store owners do not encounter any issues—if the website is properly designed, moderation proceeds without complications. You simply need to be patient during the three-day waiting period.
About the Google Listings & Ads plugin for WordPress
Where to start setting up Merchant Center? In this article, I will show you the simplest and free method — let’s call it the budget option. I will only use tools and plugins that are free, easy to install on WordPress with WooCommerce, and available to everyone. If you find a paid alternative that you like better, feel free to use it. But here we will look at the most economical way.
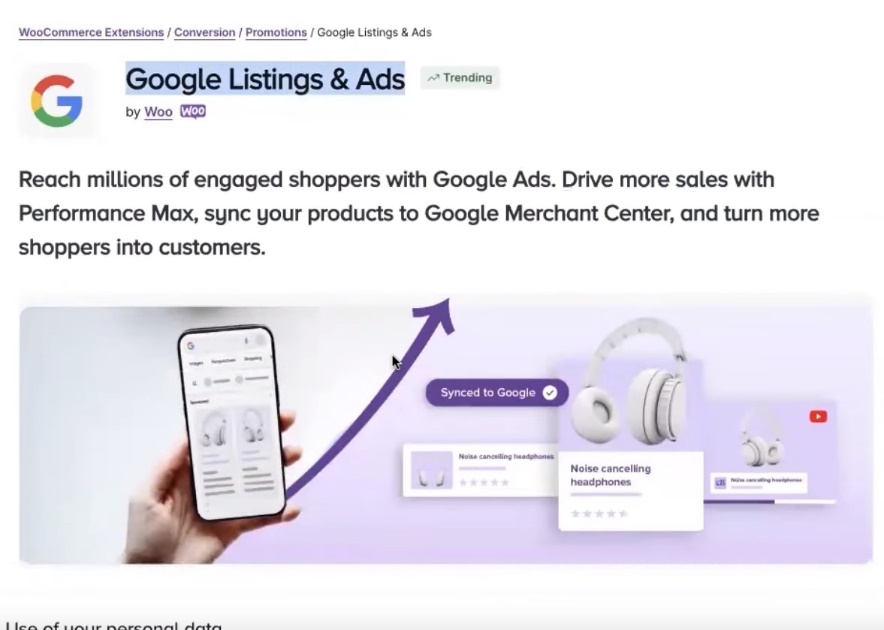
The first step is to install the Google Listings & Ads plugin on your website. This is a free solution developed jointly by the WooCommerce and Google teams. What’s more, Google officially supports this plugin — it’s cheap and cheerful.
Yes, you may notice that the rating is 3.7, which is not the highest. But for a budget option, this is the best choice.
Why this plugin? Here’s what it allows you to do:
- Quickly create a Merchant Center directly from the site admin panel;
- Automatically upload all product information to Google Merchant Center;
- Create a Google Ads advertising account with minimal effort — integration is as simple and quick as possible.
Essentially, it’s similar to what Shopify boasts about — just press a couple of buttons and you’re done. It’s pretty much the same story here: minimum effort, maximum automation.
Installing the Google Listings & Ads plugin
The process takes just a couple of minutes:
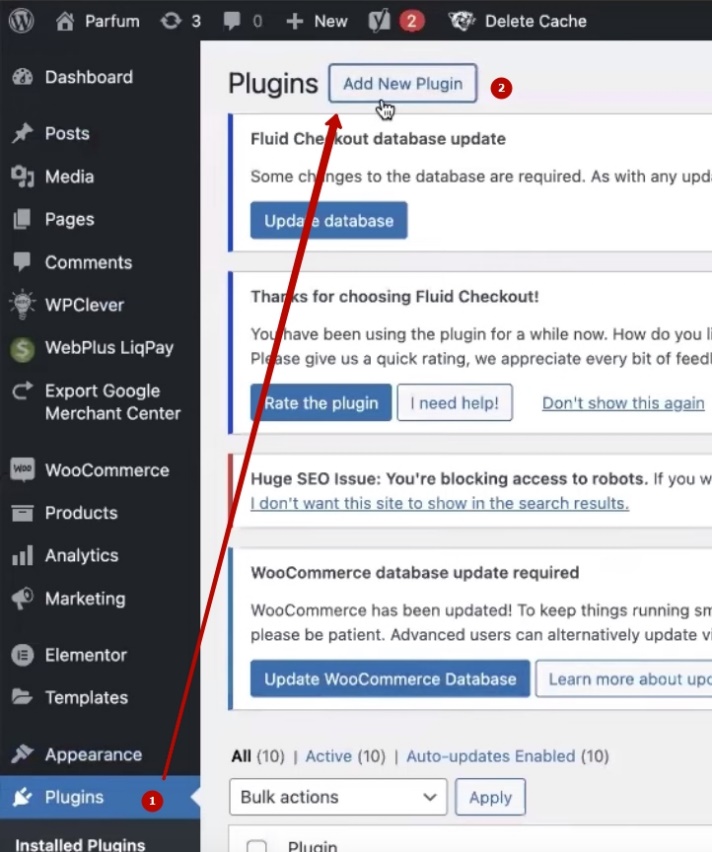
- Go to the “Plugins” section in your website’s admin panel.
- Click the “Add New Plugin” button.
- Enter the name in the search bar — Google Listings & Ads. The system will find the plugin you need.
- Click “Install Now” and wait for the installation to complete.
- After installation, click “Activate.” That’s it—the plugin is now activated.
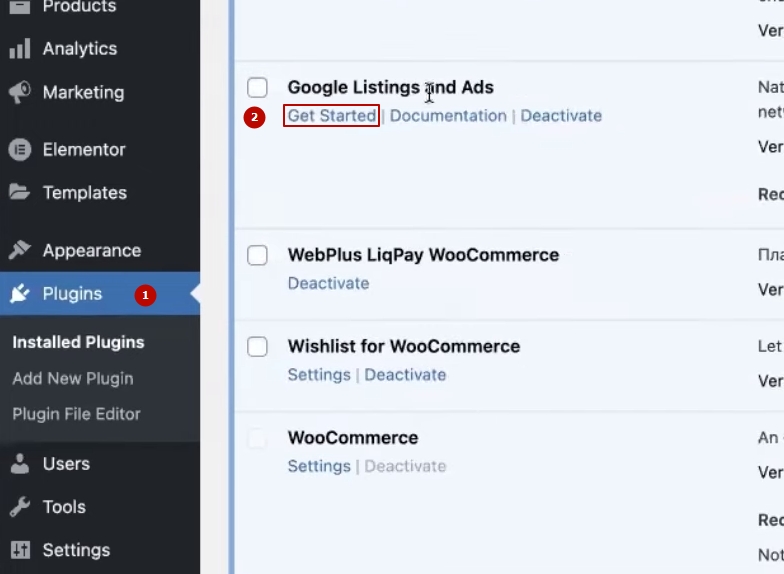
Now let’s move on to the setup. Go to Plugins → Installed Plugins, find Google Listings & Ads, and click Get Started. This is where the fun begins.
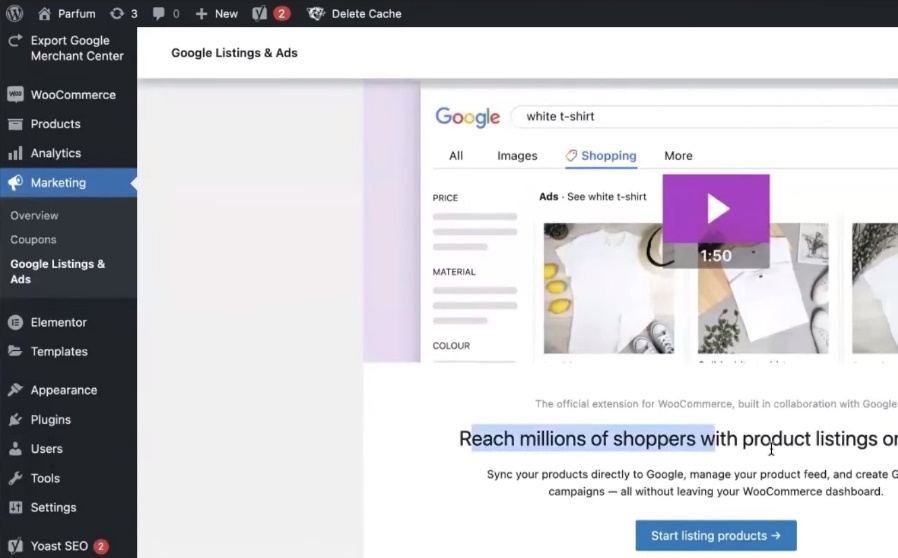
The first thing you will see is a welcome window promising “millions of buyers” and other marketing phrases. Don’t pay any attention to it — what matters to us is the process itself.
The good news is that integration here is as simple as possible. Everything will be done via your email, and accounts are created almost automatically. The main thing is to go through all the steps sequentially, without skipping any. Then setting up the feed for Google Merchant will go smoothly.
Setting up accounts in the Google Listings & Ads plugin
Click the “Start listing products” button and move on. There are several configuration steps ahead, but they are not complicated.
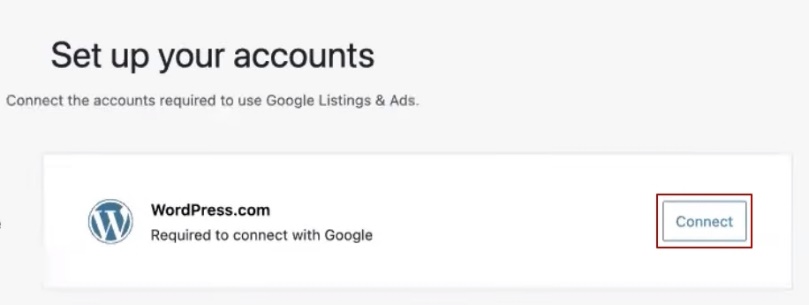
First, you need to connect your WordPress to the Google Listings & Ads plugin. Without this, further integration with Google services is not possible. What to do: an email will be sent to the admin email address linked to WordPress — you need to confirm it. This is a standard verification procedure that takes a minute.
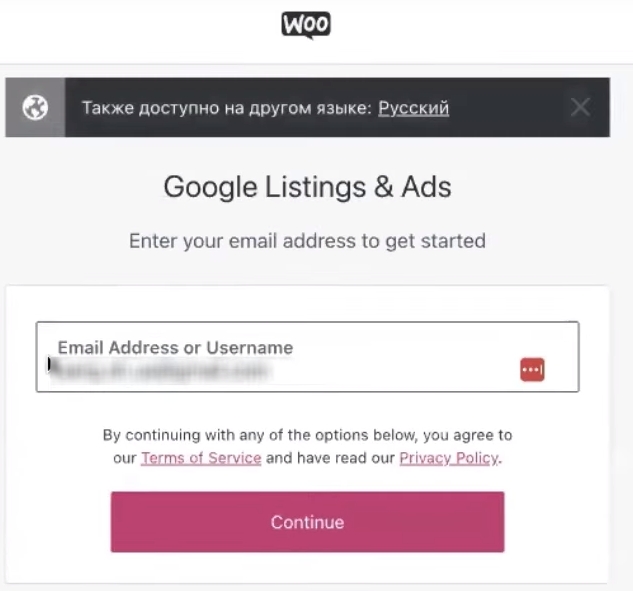
After verification, the plugin will prompt you to connect your Google email account, which will be used to integrate with Google Merchant Center and Google Ads.
My advice: create a separate email address specifically for advertising accounts. Or decide in advance which email address you will use to log into Merchant Center and Google Ads — this will make your life easier in the future.
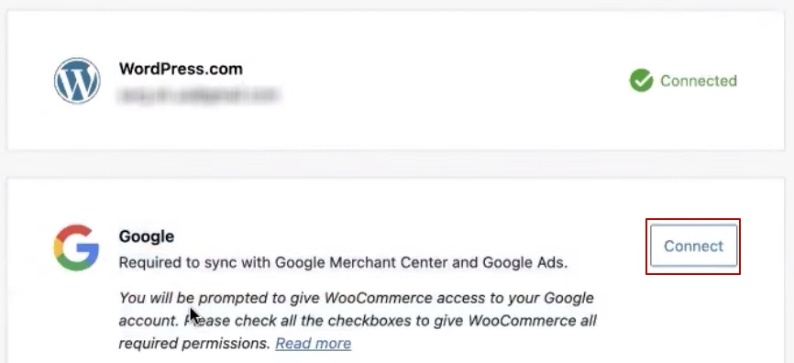
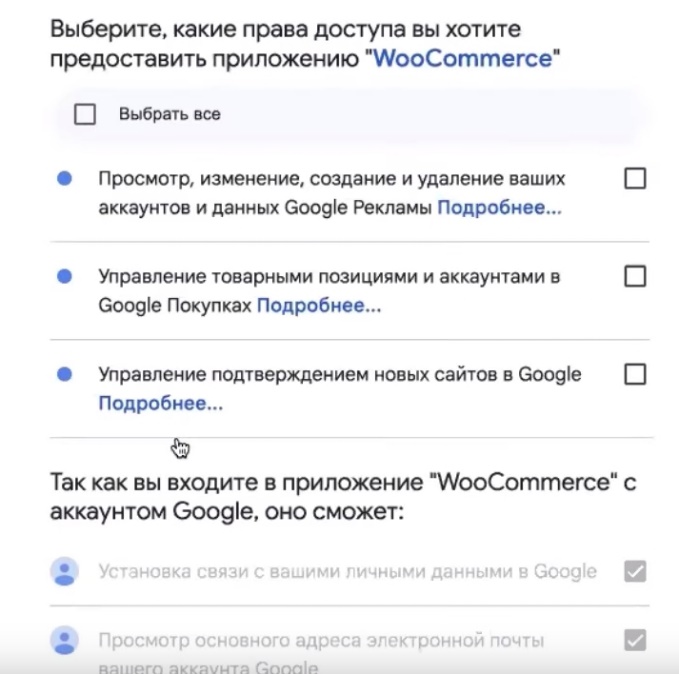
Click “Connect,” and the system will prompt you to log in to your Google account. Select “Continue,” check all the boxes with permissions, and click “Continue” again. The process is a bit lengthy, but that’s how it works.
Next, connect or create a Google Merchant Center account. There are two possible scenarios here:
- Merchant Center already exists. If you created it earlier and logged in with the required email address in the previous step, simply select your existing account from the list. By the way, several different Merchant Centers for different websites can operate under one email address.
- Merchant Center needs to be created from scratch. Click “Create a new Merchant Center account,” confirm your agreement with the Terms of Service (as if you have a choice, right?), and wait. The creation process will take some time—just wait for it to complete, as you won’t be able to move on without it.
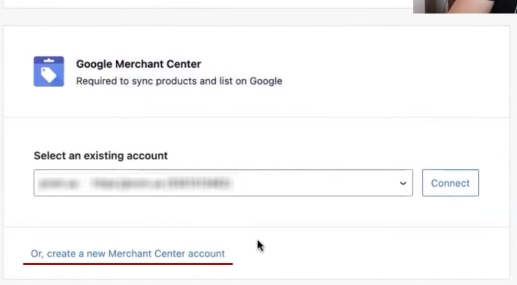
When everything is ready, you will see the domain name, Merchant Center ID, and “Connected” status.

Once you have finished setting up your accounts, the “Set up your accounts” section will look like this: there will be a green check mark and the word “Connected” next to each item. If this is the case, congratulations! You have finished setting up your Google Merchant feed at this stage. Click “Continue” and move on to the next step.
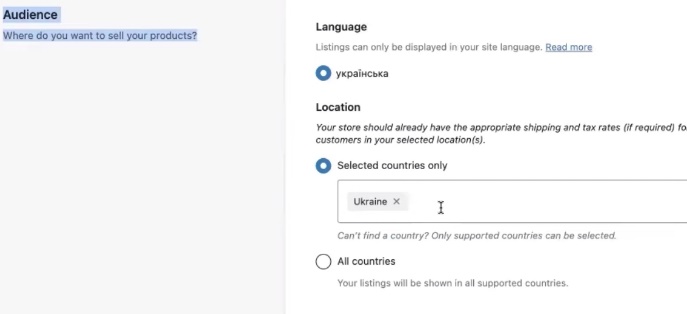
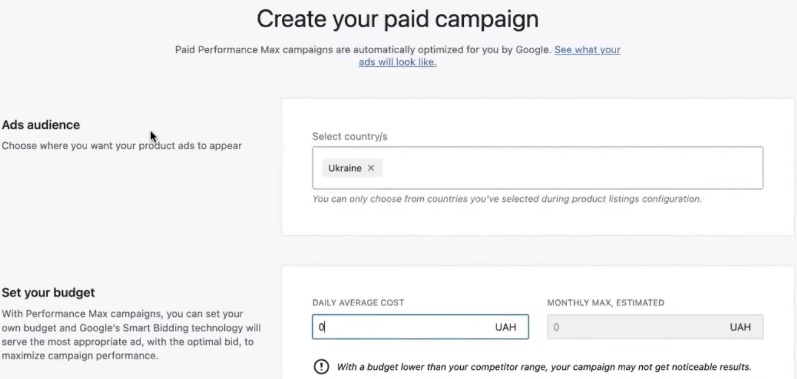
Setting up the “Audience” block
The next step is the “Audience” section. Pay close attention to this section, as it is important not to make any mistakes here. The language is automatically selected from the website settings. In my case, Ukrainian is selected, so I will leave it as is. We also select the country you will be working in.
What does this affect? These parameters will determine your Performance Max settings in the future and directly affect your Google Merchant Center feed settings. So don’t click at random — select a specific language and country, and then move on.
Setting delivery terms
Next is the “Shipping rates” section — delivery settings. This information will be loaded into the Merchant Center feed and, possibly, into the general account settings.
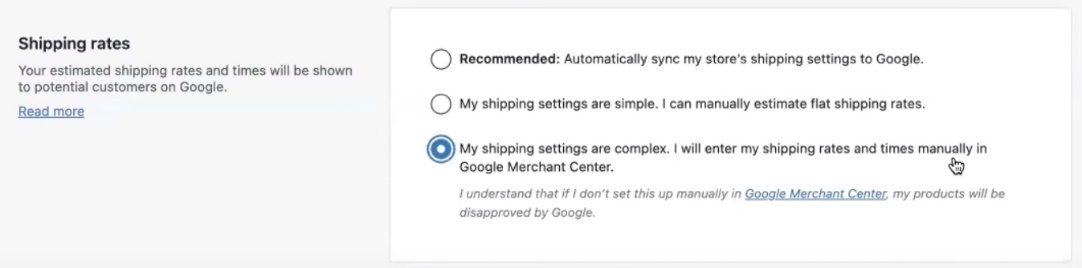
Which option should you choose? It depends on your situation.
- For Ukraine, I recommend selecting “My shipping settings are complex. I will enter my shipping rates and times manually in Google Merchant Center.” This means that you will enter all shipping settings manually directly in Merchant Center. It’s easier and more reliable this way.
- For Europe, Australia, Canada, or the US, the situation is different. If you have automatic integration with delivery services set up on your website, you can leave the “Recommended” block for automatic synchronization.

It is also convenient to set fixed delivery parameters right here. For example, specify the cost as “0” (free delivery for all orders) and the delivery time as, say, 3 days for Ukraine on average.
When to choose “Recommended” with auto-sync:
- You have automatic integration with delivery services;
- Shipping costs are calculated based on weight, volume, or another complex formula.
In other cases, it is easier for Ukrainian stores to set everything up manually in Google Merchant Center. I will choose this option so that I can show you what these settings look like inside Merchant Center.
Click “Continue” and proceed to the next step.
Providing a phone number and address
In the next step, the system will ask you to confirm your phone number. Why is this necessary? This number is linked to the Merchant Center and must match the one specified on the website.
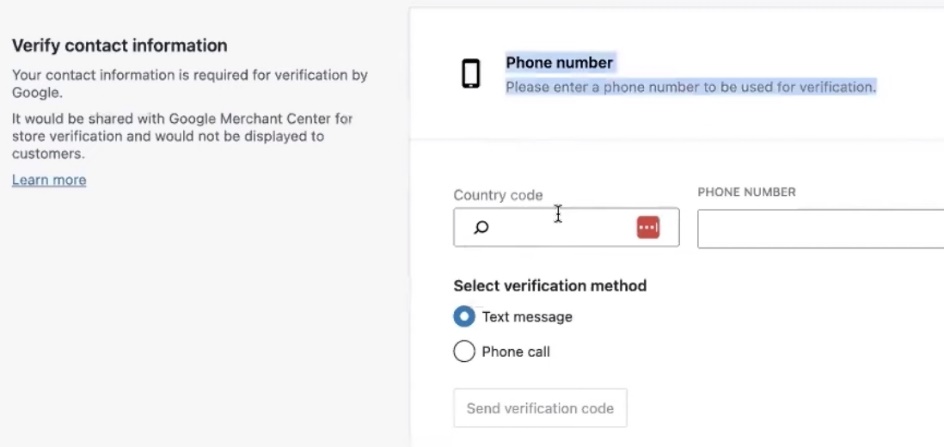
What does the phone number affect? It plays a role in the moderation process. If the number looks strange or does not match the information on the website, questions may arise during verification. Therefore, please provide a real, working number. Enter it, confirm it via SMS, and move on.
The next item is the store address. Be careful here! The WooCommerce settings must contain the correct address, which must match the one displayed on the website. This includes the postal code — it’s important.
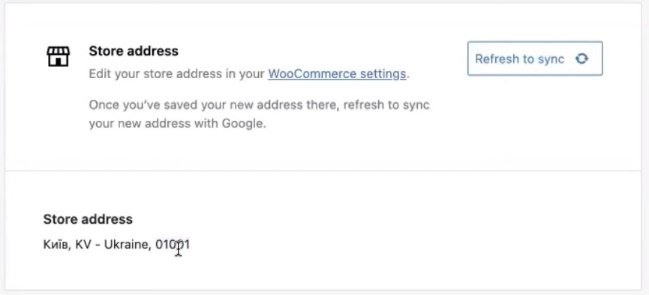
Why is this so critical? If Google finds discrepancies in the addresses when checking the store, this may be a reason for rejection. It’s better to spend a couple of minutes now and make sure that all the information matches and is accurate.
After filling in the address, check all the required boxes (without them, the system will not let you proceed) and click “Continue.”
Setting up a paid advertising campaign
Let’s move on to the “Product feed status” section. Here you will see that the product feed is ready to be uploaded, as well as the number of products — in my case, 27 items (this is a test site, so there aren’t many).

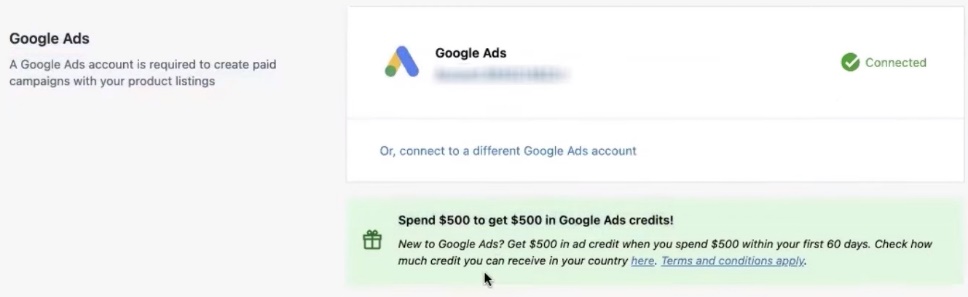
Next, you need to connect Google Ads. If there is already an advertising account associated with the email address you used to set up your accounts, the system will prompt you to select it. I don’t have one, so I click “Create account.” The account is created automatically. By the way, Google will immediately offer a promotion: spend $500 and get $500 credit — standard practice for new accounts.
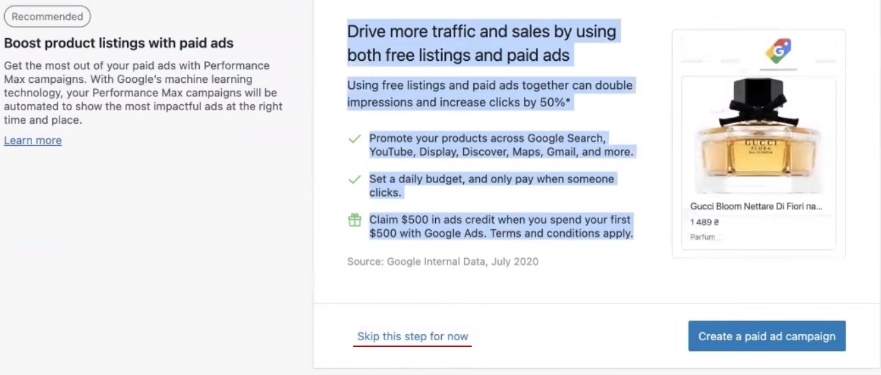
What to do next? The system suggests creating an advertising campaign right away, but I recommend skipping this step. Why? Until Merchant Center has been moderated and conversions have been set up, there is no point in launching advertising.
Click “Skip this step,” then “Maybe later.” When everything is ready—products checked, conversions set up—then create Performance Max. I will show this process separately so that you understand how to do everything correctly, without rushing.
Creating paid advertising campaigns in Google Listings & Ads
What do we see after completing the setup? First, the “Overview” block opens — the general control panel. Here, information about the number of products, their status, as well as various reports and dashboards are loaded.
Initially, only Free Listing — free advertisements — is activated. If you want to enable paid advertising, there are several ways to do so.
- Through the Google Listings & Ads plugin. Right in the plugin interface, click the “Add paid” button, and you can create a small advertising campaign without leaving the WordPress admin panel.
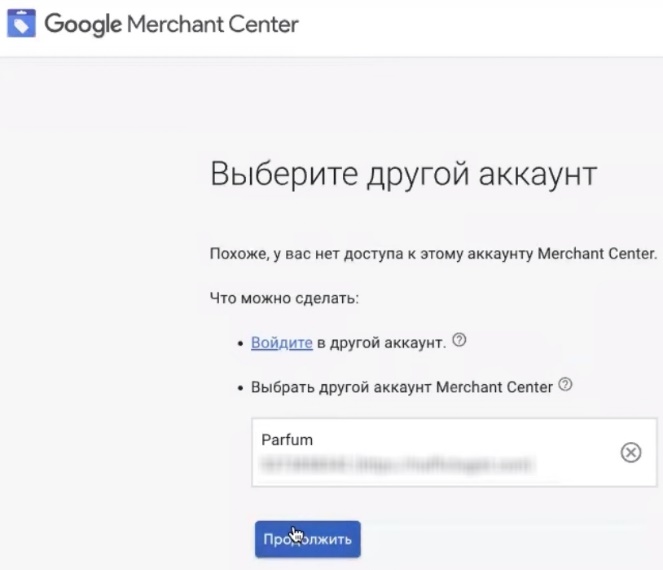
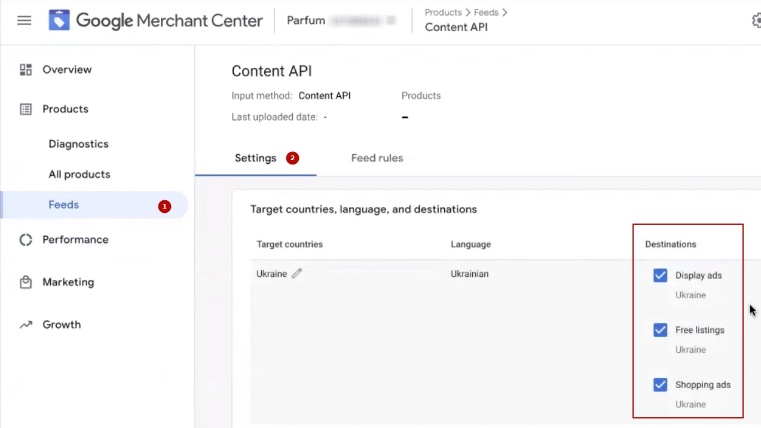
- Through Google Merchant Center. To do this, follow the link to Merchant Center and select the desired account (if you have several). Inside Merchant Center, open the “Products” → “Feeds” tab. You will see a feed called “Content API” — this is your WooCommerce product feed.
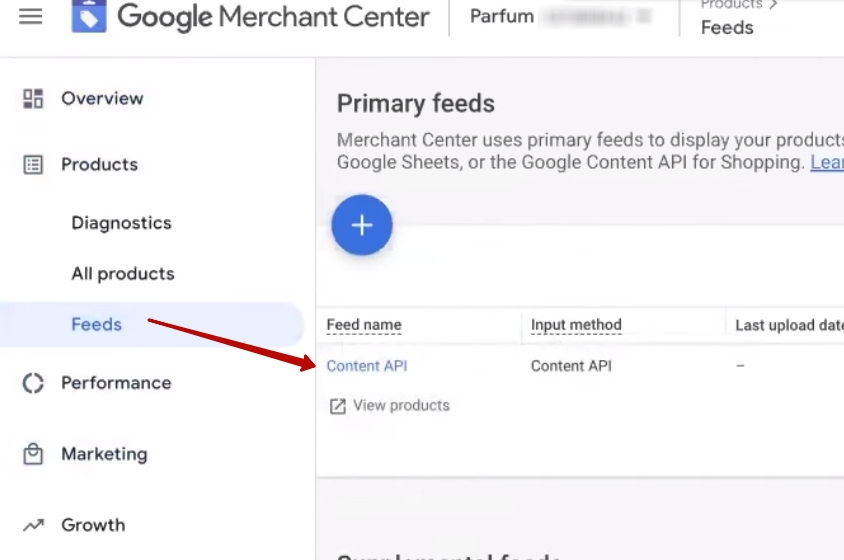
If you have the new Merchant Center Next interface, the path is slightly different: Tools → Settings → drop-down menu → Data sources. You will find your feed there.
Which programs are activated automatically? When you create a feed, three programs are activated immediately:

- Display ads — dynamic remarketing;
- Free listings — free advertisements;
- Shopping ads — commercial advertising.
Why is it important to understand this? You can first go through Merchant Center moderation only on free ads, and add paid advertising later—once you are sure that everything is working correctly.
How do I add a paid program manually? There are two options:
- Go to the “Feeds” → “Settings” section, click on the pencil icon, and add the desired program.
- Or click “Add campaign” directly in the plugin, follow a few steps, and paid advertising will be activated automatically.
Setting up a feed in Merchant Center
So, what do we have at this stage? A product feed has been created with basic settings — you can’t really change them, they are automatically pulled from WooCommerce. A Google Merchant Center has also been created, where a bunch of products have already been uploaded.
You will most likely see some errors right away—for example, that Google Ads is not connected. Don’t worry, we’ll come back to this issue a little later. Right now, we are at the stage of setting up Merchant Center.
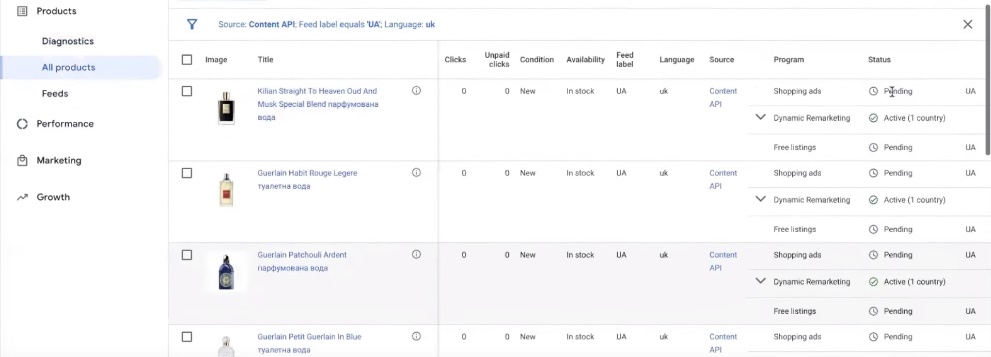
When the products start loading (in my case, there are 27 of them), they will all receive the status “Pending,” which means that Google has sent them for review. Moderation may or may not be successful. Remember the main thing: this process takes up to 3 days, so be patient.
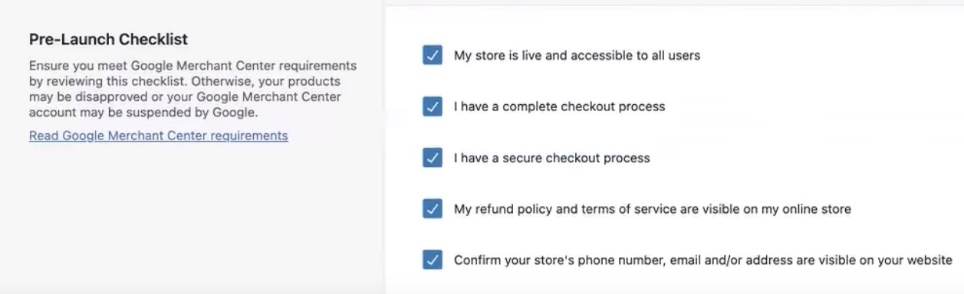
What should you do while your goods are being inspected? I recommend not sitting idly by, but going into the settings and checking a few important points:
- Shipping settings. Make sure that the correct delivery times and costs for your region are specified.
- Business information. Check the address, contact details, and company name—everything should match the information on the website.
- Tax settings. This is critically important if you are launching in the US — without the correct tax settings, you will not pass moderation.
Where can you find these sections? If you have the new Merchant Center Next interface, the panel with delivery settings and other parameters is located in the menu on the left. In the old version of Merchant Center, the location is slightly different, but the logic is the same.
Verification of specified delivery parameters
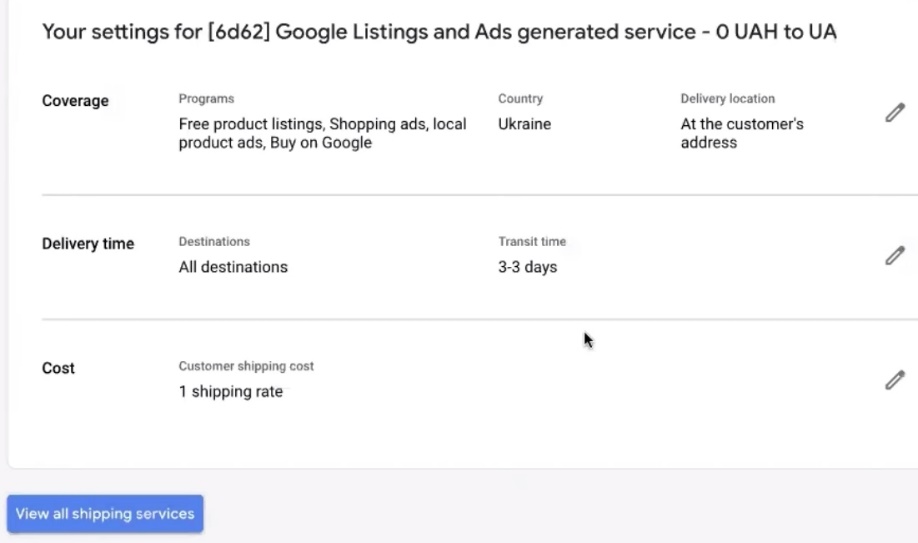
Go to Shipping settings and check that everything is correct. These shipping settings were created automatically when we filled in the parameters in the plugin. However, it is essential to double-check them and correct them if necessary.
What exactly are we checking:
- Order acceptance time (cut-off time). Specify the time until which you accept orders for same-day processing. For example, select Kyiv and set 8 p.m. Important: be sure to duplicate this information on your website in the “Delivery Policy” or “Delivery Terms” section. The data must match.
- Handling time. This is not the delivery time, but the period from receiving the order to transferring the goods to the delivery service. If you process orders around the clock and ship them on the same day, set 0-0. If you accept orders until a certain time and ship everything that comes in later the next day, enter 0-1. Also, select your working days: Monday-Friday, Monday-Saturday, or including Sunday, depending on your schedule.
- Transit time. Here we indicate how many days the delivery itself takes. For example, 1-3 days or 2-3 days — depending on your region and delivery service.
- Shipping cost. Go to this section and see what is specified there. Last time, I chose free shipping, which means that the cost should be zero. If you need a different calculation logic, for example, the cost depends on the order amount, select the appropriate parameter. To calculate by weight, you will need to add an additional attribute to the Google Merchant feed, otherwise the system will not be able to calculate the shipping cost.
The main rule: all information in Merchant Center must fully match what is written on the website in the delivery terms section. Any discrepancies may cause problems during moderation.
As for setting up returns, I recommend not doing that yet. First, go through moderation, make sure everything works, and then add a return policy. That’s a separate issue that can wait.
Tax parameters
The next section is taxes. It only makes sense to configure them in one case—if you are running ads in the United States. For other countries, you can skip this section.
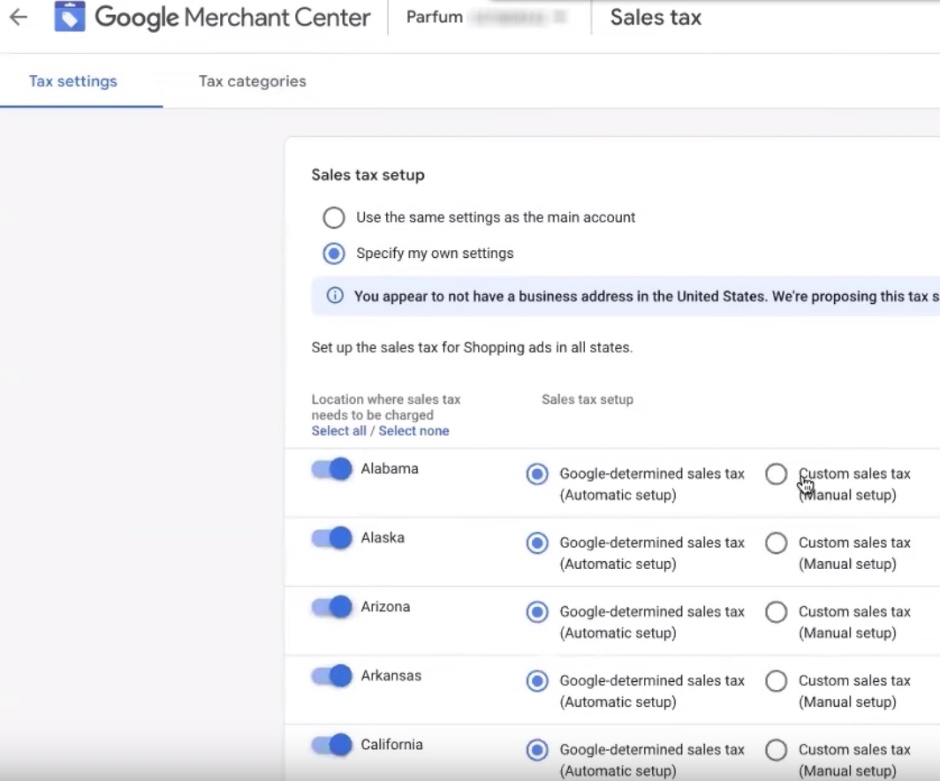
If you are working for the American market, there are several options:
- Use the universal settings offered by the system;
- Set your own parameters manually.
How do you do this? Select the United States, switch to advanced settings, select the states you need, and either enter the tax rates manually or allow the system to calculate them automatically. Choose the option that is more convenient for your situation.
If you do not work for the US and there are no taxes in your country, simply leave this section blank and move on.
Verification of business information block
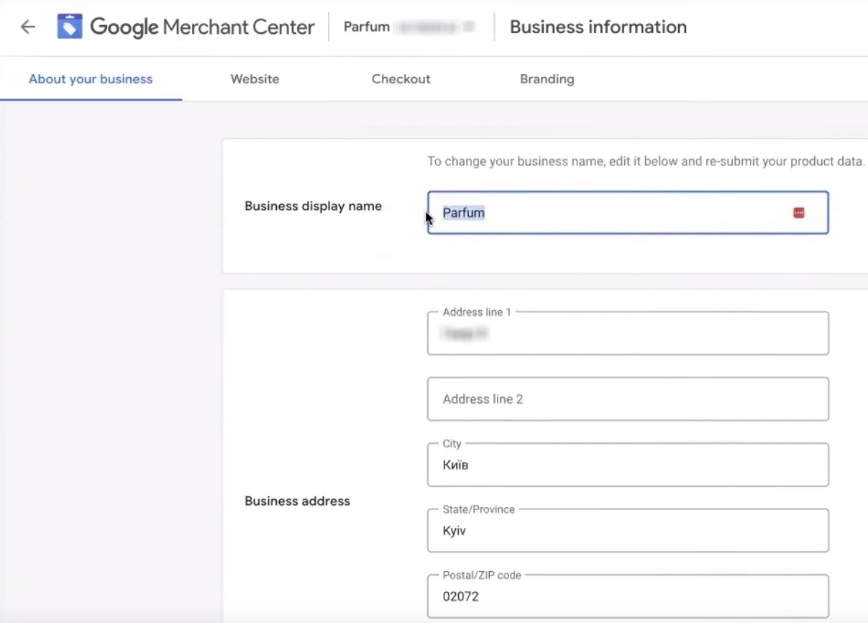
A mandatory item is the “Business information” section. Here you need to carefully double-check:
- Store name. It should match either the domain name of the website or the name that appears in the logo and on the website itself. There should be no discrepancies.
- Address. Make sure it matches exactly what is listed on the website. A small detail for Ukraine: Kyiv is a separate region, so there is no need to specify the Kyiv region. You have already entered this information in the previous step, but it is better to double-check it again.
- Phone number. Similarly, it must match the contact details on the website.
There are additional fields in this block. You can fill them in or leave them blank — it’s not critical, but it’s better to fill them in for completeness.
Other business information about the store
Let’s move on to the other tabs:
- Website. It should say that everything has been confirmed and verified. If you see green check marks, great, let’s move on.
- Checkout. This section does not need to be filled in.
- Branding. You can skip this too, there’s nothing critical here. If you want, you can add a logo later, but this will not affect the Google Merchant feed moderation process.
Merchant Center configuration results
What do we have at this stage? A fully configured Google Merchant Center with the following settings:
- Business information (name, address, contacts) filled in;
- Delivery terms are set up;
- Products from the catalog have been loaded;
- Three programs have been activated: dynamic remarketing, Free Listing, and paid ads.
If any of the programs did not start automatically, go to the “Growth” → “Program Management” section and activate the desired program manually.
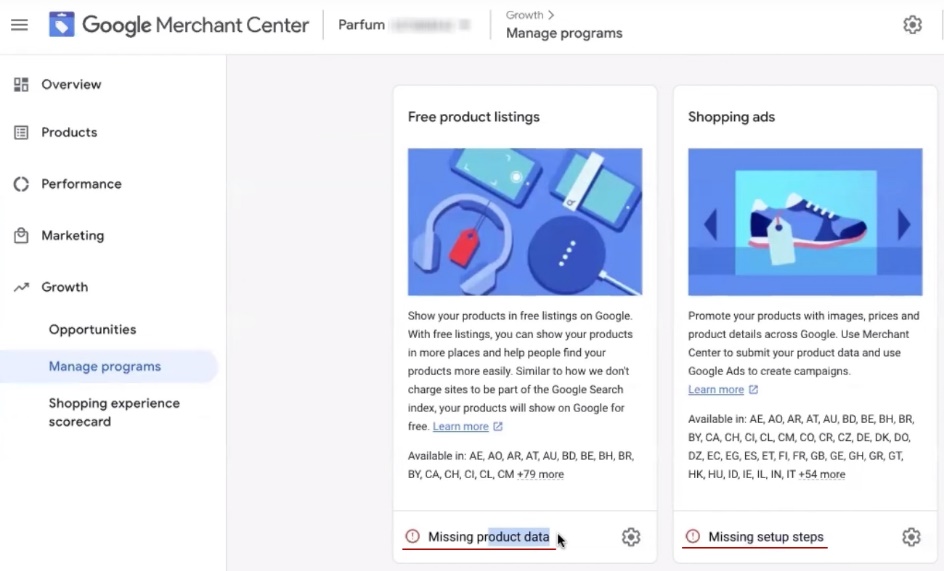
You may notice that some steps in the Shopping Ads section are marked as incomplete. For example, “Product data” — because the products are still undergoing moderation. Or “Setup steps” — because Merchant Center is not yet linked to Google Ads. Don’t worry about how to link these accounts together — we’ll cover that in the next steps.
We have now finished setting up Google Merchant Feed. Now we just have to wait for Google to fully verify the website and products. Once moderation is complete, you can start advertising.
Notice how easy it was—just a few clicks. No need to generate any feed links for WooCommerce, no need to manually update data.
But the main advantage is something else: with this integration format, any changes on the website are automatically reflected in Google Merchant Center within 15-30 minutes. You change the price, update the description, change the availability of the product — everything syncs automatically. This means that you will hardly ever encounter typical problems such as price or availability discrepancies between the website and the ad.
Announcement of the next video — creating analytics and Google Ads
Let’s move on to the next important step — setting up analytics to launch Performance Max and Google Shopping on WordPress (or, to be more precise, on WooCommerce).
Where shall we begin? Setting up analytics involves several key steps:
- Creating a Google Analytics 4 account. Why is it necessary? Firstly, to analyze the effectiveness of different sources of traffic to the website in the future. Secondly, to assess how user-friendly the website is and what interaction rate your customers show.
- Setting up conversions in Google Ads. This is a separate issue, and there is an important nuance here. At the time of writing (June 2024), for Performance Max or Google Shopping to work correctly on the automatic “Target return on investment” strategy, it is critical to set up the transfer of extended conversion data. What does this mean? The system must receive additional information about buyers — email addresses, phone numbers.
Sounds complicated? Actually, it’s not that difficult. Let’s go through it step by step. Some parts will take a little effort, but there’s nothing supernatural about it.
Here is one of the proven working mechanics — it works consistently, has a minimum of bugs and interruptions, and works on almost any website. If you have an alternative option for setting up Google Ads, you can use it. But I have tested this method in practice and can recommend it.


