If you own an online store built on Horoshop CMS, sooner or later you’ll wonder: how do I get listed on Google Shopping? The answer is simple—you need a product feed, a file that the system uses as a source of product information and displays to shoppers directly in search results.
The good news is that Khoroshop can generate this feed automatically. You don’t need to manually compile XML files or fiddle with spreadsheets. But there are some caveats: whether your products pass moderation in Google Merchant Center and actually start appearing in ads depends on whether the settings are configured correctly.
In this article, we’ll walk you through how to create a Google Shopping feed on Khoroshop—from activating the module to uploading it to Merchant Center. We’ll show you what to look out for to ensure your products aren’t rejected and to avoid wasting time fixing errors.
What do I need to prepare to set up a Google Shopping feed on Horoshop?
Before you log into the Khoroshop admin panel and enable feed generation, you should make sure your store is actually ready. Otherwise, you might end up creating a file only to have half the information fail moderation. Or worse—Google might suspend your entire account.
Pricing and access to the desired features
Setting up a Google Shopping feed on Horoshop isn’t available on all pricing plans. You’ll need at least the Standard plan. This feature simply isn’t available on lower-tier plans—check in advance so you aren’t caught off guard. If the feature isn’t available in the admin panel, you’ll need to choose a more expensive plan.
Google Accounts
To view the ads, you’ll need two accounts.
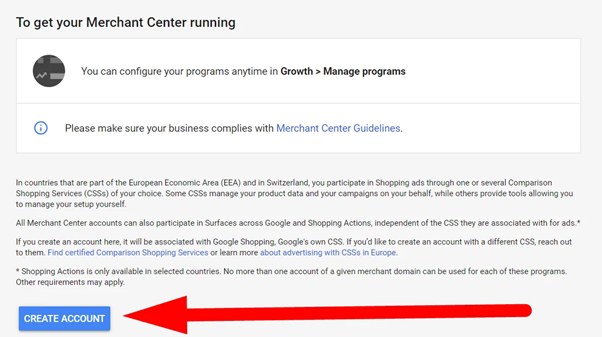
Google Merchant Center
Your feed will be uploaded here. If you don’t have an account yet, sign up at merchant.google.com.
Don’t forget to verify ownership of your online store and enter the correct URL. To do this, go to “Company Information” in your dashboard. There, you’ll need to enter the URL of your online store on Khoroshop:

Select “Upload HTML file” as the verification method and save the resulting file. Return to the admin panel’s home page and locate the “Files for external services” section:

Upload the file you downloaded earlier here. Once the upload is complete, verify ownership in the control panel.
Google Ads account
You’ll need it to launch ad campaigns. You’ll also need to link your account to Merchant Center. If both accounts are registered to the same email address, the link will be established automatically.
Requirements for an online store
Google has specific requirements for its advertisers. For example, to launch product ads:
- You must have at least one online payment method set up.
- Delivery to the specified address is required.
- The privacy policy and return policy pages are also required.
What information should a product card include?
Every card must include all required fields. If anything is missing, you’re guaranteed to run into problems. Here’s the minimum information required:
- Title (clear, without “filler” or all caps).
- Description — at least a few sentences. There is a separate field labeled “Description for marketplaces” — if you fill it out, that’s the one that will be processed.
- The price must be greater than 0. Otherwise, the items will not be shipped.
- Photo — at least one, without watermarks or text on the image.
- Availability — current status (in stock, out of stock, etc.).
Important! The information must match what the customer sees when they click the link. If the website lists a price of 1,200 UAH but the feed lists 1,100 UAH, Google will notice this and reject part of your product range.
Enable the Merchant Center feed in the Khoroshop admin panel
Now let’s move on to the practical steps. Open your online store’s admin panel and navigate to “Marketing” → “Marketplaces.” Here you’ll see a list of available feeds. Among them, find the version for Merchant Center.
Click the toggle to enable it. Then:
- Additional fields specific to sales campaigns (status, category, and others) will appear on the cards.
- Category management will become available—you’ll be able to link specific sections of the catalog to Google data.
- You will be able to generate a link to the XML file.
By the way, Horoshop includes a built-in feed generator, which is a huge plus. You don’t need to install third-party plugins or write scripts—everything works right out of the box. In fact, creating a feed for Merchant Center on the Horoshop CMS takes just a few clicks.
If your online store has two language versions (for example, Ukrainian and Russian), the platform also supports multilingual feeds. This means you can generate a separate file for each language and upload them as different data sources.
How do I select product categories to upload to the feed?
If the categories are set up incorrectly, Google will either exclude the products from the feed or automatically assign them to a category (often an inappropriate one). To select the correct categories for uploading in the CMS admin panel, go to Marketing → Marketplaces → Feed and click “Configure Categories.” The system will prompt you to map the sections of your catalog to Google’s list. To do this:
- Click “Sync Categories”—this will download the latest list from Google’s servers (they are updated automatically every Monday).
- Check the product categories you want to export from your online store.
- For each option you select, specify the corresponding one from the Google list.
Let’s say you have a section called “Shoes → Sneakers.” Find the most appropriate category in the Google structure—“Apparel & Accessories > Shoes > Athletic Shoes.” The more accurately you match them, the better Google will understand exactly what you’re selling.
Important! If a category is not activated, products from that category will not be included in the export, even if all their fields are filled out.
How do I import products from Horoshop into a Google Shopping feed?
It’s not enough to just set up categories—you also need to specify which specific items will be included in the feed file. In Khoroshop, you can do this in the product card settings.
Manual upload
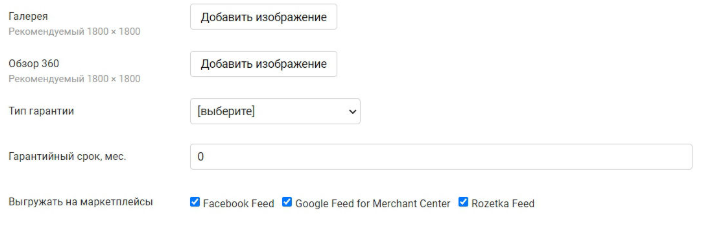
Open the product you need in the “Products” section. Next, go to “Description” and find “Basic Information.” In the field for uploading to marketplaces, select “Feed.” That’s it—the product is guaranteed to appear in the data feed during the next upload.
But if you have 500 items in your catalog, manually checking each one off is a task for the very patient.
Mass imports
This is where large-scale imports come in. Here’s how it works:
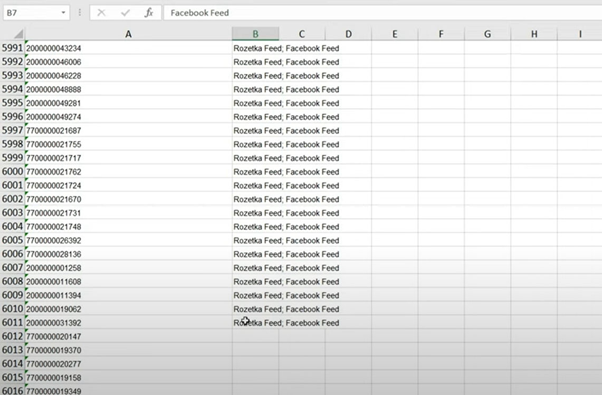
- Export the catalog from Khoroshop to Excel.
- Leave only two columns in the file: “SKU” and “Upload to marketplaces.”
- In the second column, enter “Google Feed” for each item you want to add.
- If you need to upload something to multiple feeds at once (for example, for Rozetka or Hotline), separate the names with semicolons.
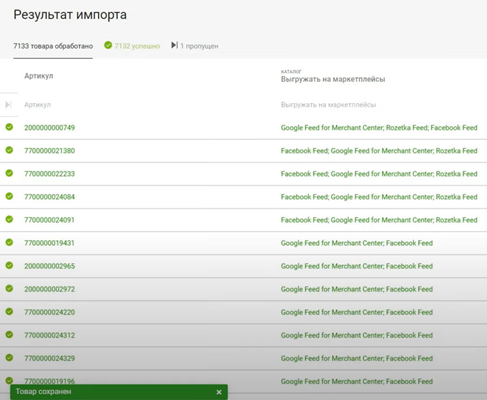
- Go back to the admin panel, navigate to “Catalog → Import,” and upload the edited file.
If everything is done correctly, the system will confirm that the import was successful. This method saves hours, especially when dealing with a large product range.
Which fields are required for products on Horoshop CMS?
Even if a product is marked for upload and its category is active, it won’t be published until the required fields are filled out. Required fields:
- Condition: used, new, refurbished. For most online stores, this means “new.”
- Brand — the name of the manufacturer. If you are selling something you have produced yourself, please provide your brand name.
- GTIN is an international code or barcode. Without it, you won’t be able to list products from well-known brands. For handmade items or products without a barcode, you can leave this field blank—but in that case, it’s best to fill in the MPN.
- MPN (Manufacturer Part Number) — the manufacturer’s part number. Enter this if there is no GTIN.
Tip! In Khoroshop, there is a separate field called “Description for Marketplaces” for product descriptions. If your main description is too long or contains HTML markup that might cause issues, enter an adapted version here. If the field is left blank, the platform will use the standard description.
Google also strictly monitors image quality. Photos must be taken against a white or light-colored background, without watermarks, text, or borders. The minimum size is 100×100 pixels (250×250 for clothing). Up to 8 photos can be uploaded per listing.
How do I create a feed for Google Merchant in my online store on Khoroshop?
In the online store’s admin panel, go back to the feed settings. There you’ll see a field labeled “Link.” You can enter your alias manually or click “Generate”—the system will create a 32-character random string.
The finished file will be available at a link like this: https://domen-vashego-sayta.com.ua/marketplace-integration/google-feed/alias?langId=2. You will use this link in Merchant Center as a source of information.
Once you have created the link, click the “Generate Feed” button. The system will process all products that meet the criteria and generate an XML file.
A few things to keep in mind:
- The feed in this CMS is updated automatically every day at 4:15 a.m. This means that if you add a new product in the evening, it will appear in the feed the following morning.
- When setting it up for the first time, it’s best to click “Generate Feed” manually so you don’t have to wait for the automatic update.
- If you are using a multilingual feed, a separate link with the corresponding langId parameter will be generated for each language version.
Upload a product feed to Google Merchant Center
The feed is ready and in your hands—all that’s left is to upload it where needed. This is the final step in connecting your store to the search giant’s advertising ecosystem.
Sign in to your Merchant Center account. In the top-right corner, click the settings icon and select “Data sources.” Next:
- Click “Add Source.”
- Select the option “Add from file.”
- Enter a name for the feed (for example, “Main — Ukrainian”).
- Paste the URL you received earlier.
- Set up an update schedule—daily is best, so that prices and availability are always up to date.
- Select the target country and language.
Once you save the file, Google will start the upload. The initial analysis may take up to 24 hours. Don’t panic if you don’t see the results right away—the system needs time to process the data.
Important! The URL must begin with https://. Make sure that Googlebot and AdsBot-Google are not blocked on your site; otherwise, the feed will not load on schedule.
If you have a multilingual feed, upload each language version as a separate source. After uploading, rename the feeds so you can tell which one corresponds to which language—replace “Product Source 1” and “Product Source 2” with descriptive names.
Primary and secondary feeds: what’s the difference?
There are two types of feeds in Merchant Center:
- Main. This is the primary data source. It contains all the necessary information: name, price, description, links, and photos. Everything generated by Khoroshop is part of the main feed. If the information in it is accurate and meets the requirements, no further action is needed.
- Supplementary. Used when you need to modify or add information to the main file without changing the file itself. For example, you might want to add a `custom_label` to categorize products into groups for advertising campaigns, or adjust the descriptions for specific items. The supplementary file references the main file via its ID and overwrites the fields.
When might this be useful? Let’s say you’re running a seasonal sale and want to label some of your offers with “sale” for a specific group of ads in Performance Max. Create an additional feed in the form of a table with two columns—id and custom_label_0—and link it to the main feed.
What types of ads can be run using the store data feed on Horoshop?
Now is the perfect time to launch your ads. The first thing you need to do is link Merchant Center to your Google Ads account. Go to Google Ads → “Linked accounts” → Merchant Center. Enter the ID and confirm the link.
After that, you’ll have several campaign types to choose from:
- Shopping (classic format). You create a campaign, set a budget and bids, and Google automatically determines what to show and for which search queries. The ads appear as mini-cards featuring a photo, price, and store name.
- Performance Max is a more advanced format that uses machine learning to display ads on Search, YouTube, Gmail, and the Display Network. A product feed is a required component for running Performance Max with product ads.
- Dynamic remarketing allows you to show users the exact products they previously viewed on your website. To do this, you’ll need an e-commerce module and, of course, a product feed.
- Free product listings is a separate program that allows you to display products in the “Shopping” tab of search results without paying for clicks. To enable this feature, activate the “Free Listings” section.
To be honest, for most Ukrainian online stores, Performance Max is the best way to get started. There’s no need for complicated setup—the product feed is generated automatically, and the system optimizes ad delivery on its own.
How do I update and delete products from the feed in Horoshop CMS?
With a feed, the “set it and forget it” approach doesn’t work. You need to keep it up to date. Prices change, products sell out, and new items are added.
For most stores, the standard automated data updates are sufficient. However, if you have a highly dynamic catalog—for example, if prices for dozens of items change daily—it makes sense to update the data manually.
One more thing: removing products. Simply unchecking the “Upload to marketplaces” box in the product card is no longer enough. Google has learned to automatically scan the site and may add the items back on its own. Recommended approach:
- Disable irrelevant categories in your ad campaigns.
- Create exclusion lists using additional files.
- Turn off automatic scanning if you don’t want Google to add products on its own.
On the Khoroshop side, make sure that hidden products (with the “Display: No” setting) and those with a zero price do not end up in the feed. The platform does not upload them by default, but it doesn’t hurt to be extra careful.


