
Hello, friends! Today we will discuss how to set up e-commerce on OpenCart — and we will do it as simply as possible. No unnecessary headaches or hours of fussing around. You already know my approach: set it up once — it works stably, without constant tweaks and rework.
To connect e-commerce via GA4, we will use a special plugin — you can find a link to it below this post. By the way, if you contact the developers, feel free to mention that you came from me. I would be happy to know that the material was useful.
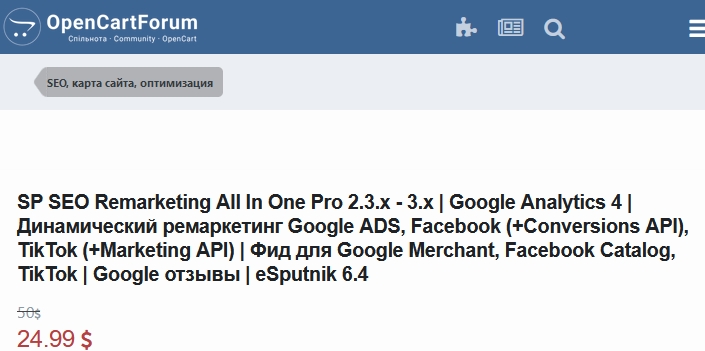
SP SEO Remarketing All In One Pro 2.3.x – 3.x Plugin
What is this OpenCart plugin? To be honest, it is a universal solution that covers virtually all analytics and advertising tasks on this CMS.
Here’s what you get with this plugin:
- Dynamic remarketing according to current Google requirements — not outdated templates, but exactly what the platform expects now;
- GA4 e-commerce with accurate data transmission — no glitches or missed transactions;
- Ability to upload product feed directly from the control panel;
- Integration with Google Tag Manager and event transmission via dataLayer.
In essence, this is the dream of any PPC specialist, not just a module.
A separate note about cost. The price may change by the time you read this, but I can say for sure that it is cheaper than hiring a programmer. Even if you have a developer who created your website, the plugin is still more cost-effective. Why? You won’t have to check every time whether the programmer has taken into account Google’s new requirements for event tracking, you won’t need to understand technical tasks, and you won’t need to monitor updates.
The plugin author keeps track of code relevance and adapts it to algorithm changes. You pay once and use it. No monthly subscriptions like on Shopify, where you have to overpay again and again.
By the way, this is a Ukrainian development — a nice bonus for those who support domestic developers.
What should you do first? Install the plugin on your website. We will skip this step—the module is already installed on the demo site.
Configuring the module for Google Analytics 4
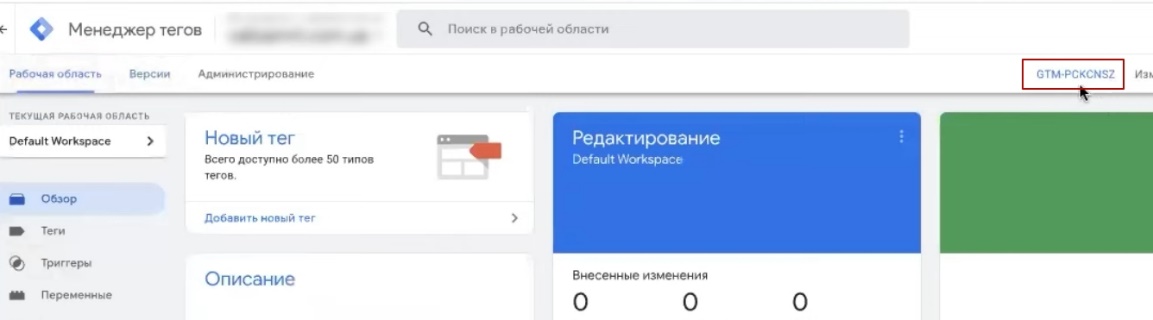
Let’s move on to the practical part. Go to your OpenCart admin panel — if you are a PPC specialist, use the login and password provided by the client.
Next, proceed step by step:
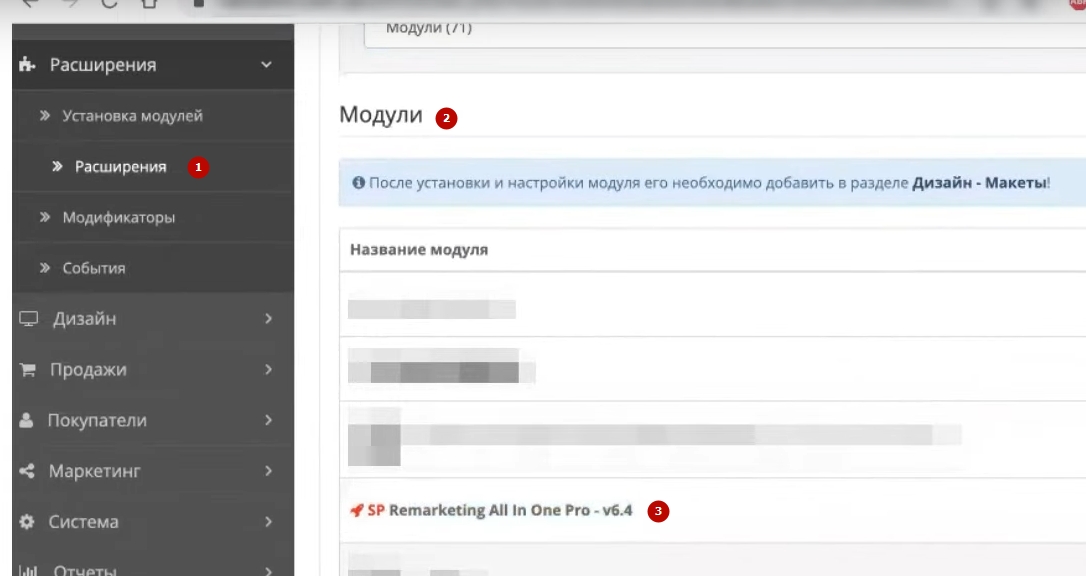
- Open the “Extension” section;
- In the filter, select “Modules”;
- Find our SP SEO Remarketing plugin in the list;
- Click on the pencil icon to edit.
I have already partially configured the module, but let’s go over everything from scratch.
What should you do first to connect Google Tag Manager and GA4 e-commerce? I recommend setting up all counters right away—this will help you avoid unnecessary questions and confusion later on.
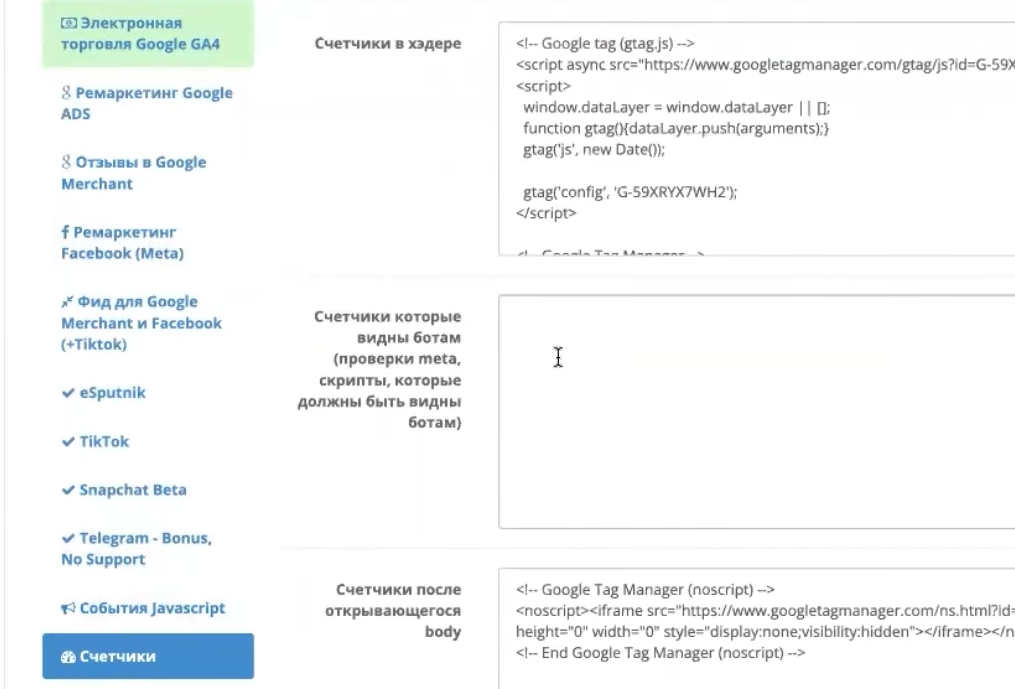
Go to the “Counters” tab and add:
- Google Analytics 4 code — paste it into the appropriate field;
- GTM code for the head section — place it in the header field;
- GTM code for the body section — add it to a separate field below.
There is no need to come up with anything complicated — just copy the codes from the relevant Google services and paste them into the specified fields. It is almost impossible to make a mistake here if you follow this sequence.
Where can I find the analytics code?
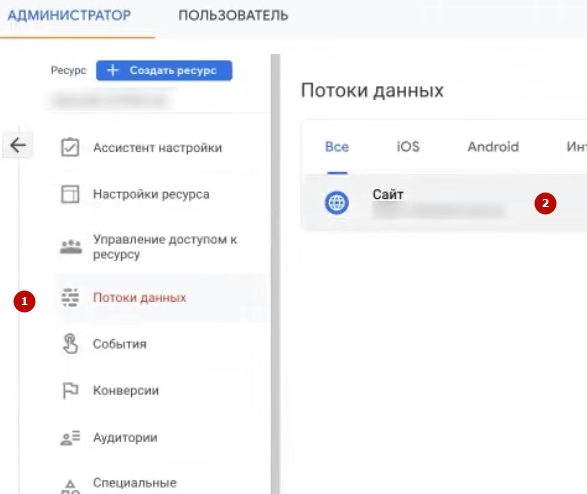
Now let’s figure out where to get the code for Google Analytics 4. Go to the analytics interface — to your administrator account.
The path is as follows:
- Open the “Administrator” section (gear icon at the bottom left);
- Find and click on “Data streams”;
- Select the desired stream — the one associated with your website;
- Click the “View tag instructions” button.
Here you will see the ready-made GA4 code for installation on the website. Copy it either by pressing Ctrl+C or by clicking on the special copy icon next to the code. Return to the plugin settings and paste it into the appropriate field using Ctrl+V.

Don’t save the settings yet — otherwise, it may kick you out of the module, and we still need to add GTM.
Установка кода Google Tag Manager
The next step is to connect Google Tag Manager. Why do you need it? In short, GTM gives you flexibility in managing tags without constantly interfering with the site code. But this is optional: if you don’t need Tag Manager, just skip this block and move on to the next section. For convenience, there will be timecodes under the video.
Next, I will show you how to check that all settings are working correctly — both through GTM and through DebugView in Analytics itself. The second option is suitable for those who don’t want to deal with Tag Manager.
So, if you need GTM:
- Create a Google Tag Manager container (or open an existing one);
- Click on the container ID — a window with two code snippets will appear;
- The first code is for the head section. Copy it and paste it into the “Header” field in the plugin settings.
- The second code is for the body section. Copy and paste it into the “Body” field.
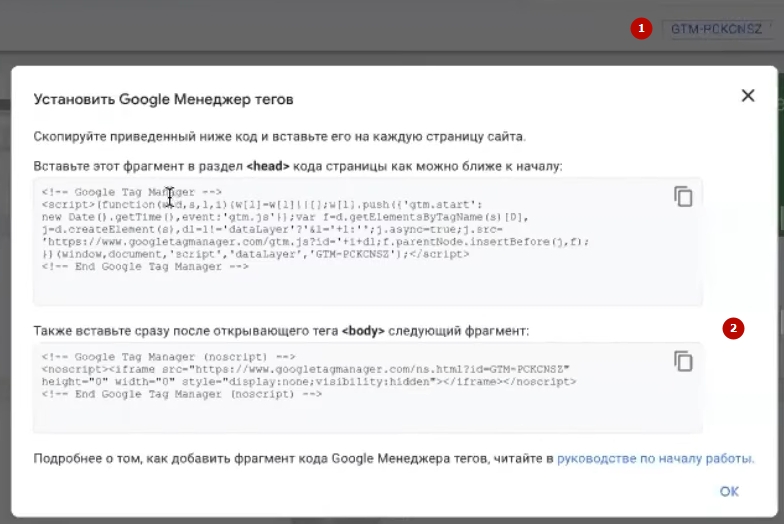
Please note: in the plugin interface, the fields are clearly labeled “Header” and “Body,” so it’s difficult to mix them up. Once you’ve inserted both codes, you’re done.
Additional point: where else do I need to insert the Google Analytics code?
There is one more important point. Copy the GA4 code — you can take it directly from the field where you already pasted it, or get it again from the Google Analytics interface.
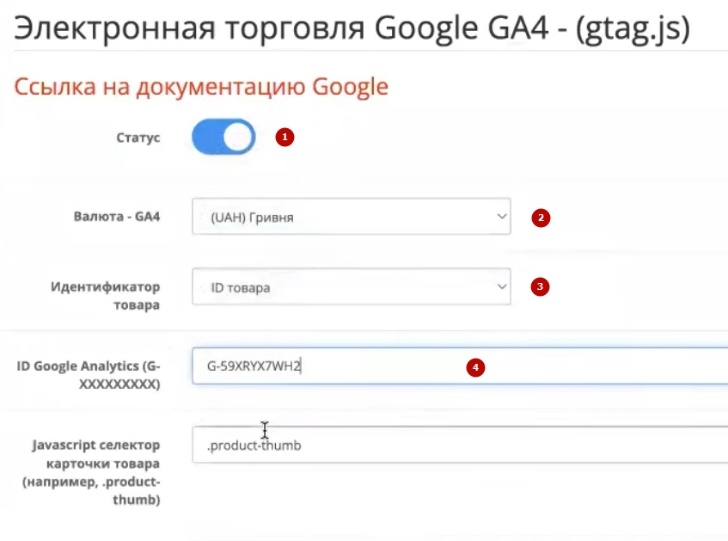
Now go to the “E-commerce” tab in the plugin settings. Here you need to do several things:
- Be sure to set the status switch to the “On” position. By default, it may be turned off, so check this point.
- Currency — select the desired currency (hryvnia, dollar, euro — depending on your store).
- Product ID — leave the default value “Product ID”; it is usually not necessary to change it.
- Tracking code — paste the same Google Analytics 4 code here.
This section also contains additional options, such as data transfer via dataLayer. However, the above settings are sufficient for basic e-commerce configuration.
After making all changes, click “Save.”
Checking code performance on a website using Google Analytics Debugger
The settings are done — now we need to make sure everything is working correctly. Open the website in your browser.

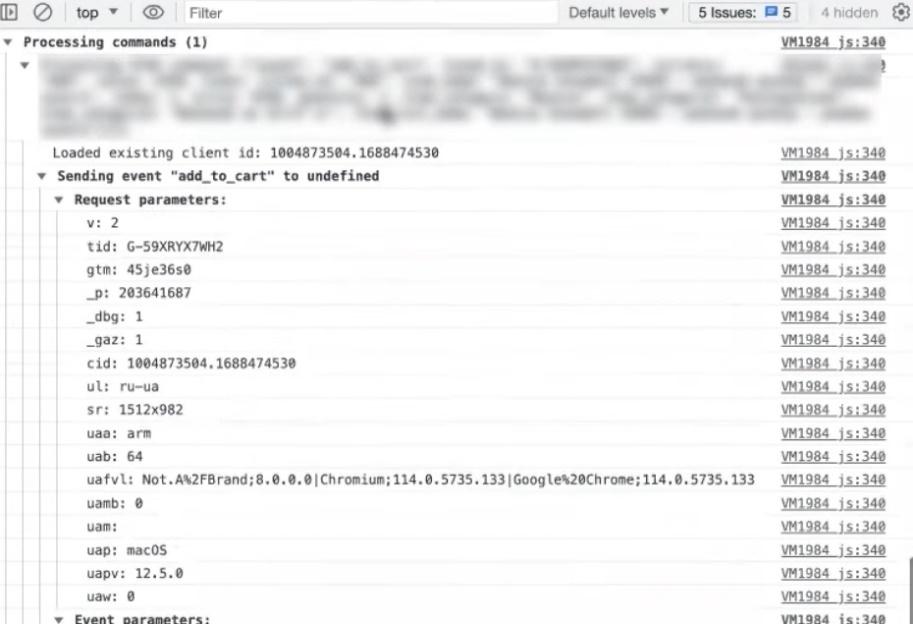
To check this, I recommend installing the Google Analytics Debugger extension for Chrome. I currently have it turned off—to activate it, simply click on the extension icon. When it is turned on, all analytics events will be displayed in the browser console.
Open the developer tools (F12) and go to the Console tab. We will use two methods of verification to understand exactly whether data is being transferred or not, and whether this combination is suitable for us.
Viewing results via Google Tag Manager
The second method is to check using the preview mode in GTM. To be honest, this isn’t my favorite method: if the site isn’t very fast to begin with, it will load even slower with Tag Manager preview enabled. But I’m showing it just in case — it might come in handy.
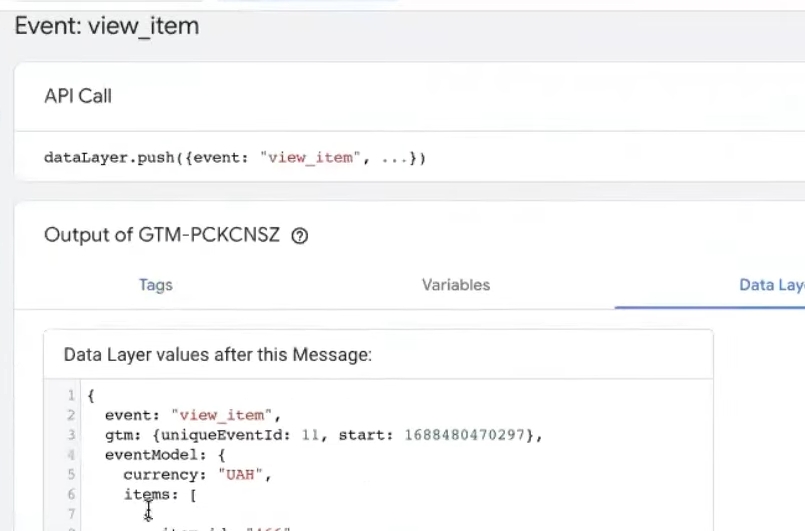
What do we do? Open any product card on the website. In GTM preview mode, look at the list of events on the left. If you see the view_item event, it means that e-commerce tracking is working. Product viewing data is being sent to analytics, and everything is set up correctly.
Checking data transfer in Google Analytics
Now let’s make sure that the data is actually being sent to Analytics. Open Google Analytics, close all pop-up windows, and go to the Admin section (the gear icon). Find DebugView — this is a tool for debugging events in real time.
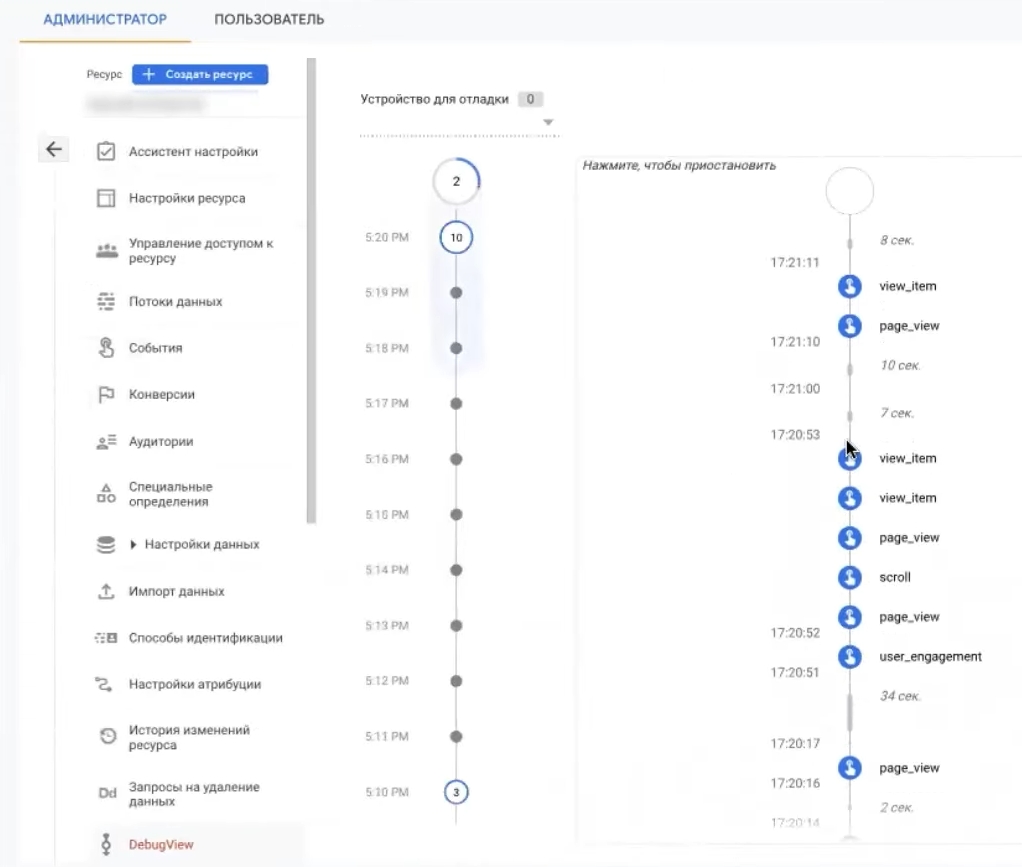
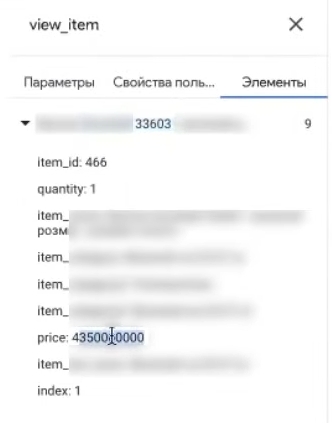
What should we see here? The view_item event, which was triggered when viewing the product card. If you reloaded the page several times, there will be several events — select the last one.
Click on the event and check the parameters. In my case, it was a snowboard suitcase with the following data:
- item_id — 33603;
- price — 4350,00;
- quantity — the quantity is specified.
Let’s go back to DebugView and check: the price is 4350.00, the ID is in place, and the quantity is being transferred. The price display format may look a little different, but the values themselves are being transferred correctly — that’s what matters.
The next step is to check the add to cart event. Return to the website and click the “Add to cart” button on any product. Now the add_to_cart event should appear in DebugView.
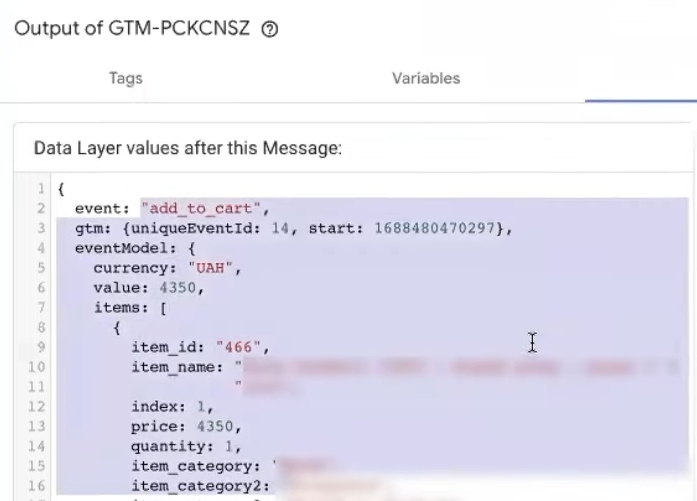
Please note: the plugin did all this automatically. No programmer sat down and wrote every event manually. You simply installed the module, made the basic settings, and e-commerce data transfer started working.
You can check the same thing using the Google Analytics Debugger extension in your browser console. There you will see the full picture: the add_to_cart event, the currency, item_id, and item_name parameters — the entire data set that is automatically sent to analytics without any additional action on your part.
Test order verification
The final and mandatory stage is a test order. Without it, it is impossible to verify that the entire chain of events is transmitted correctly.
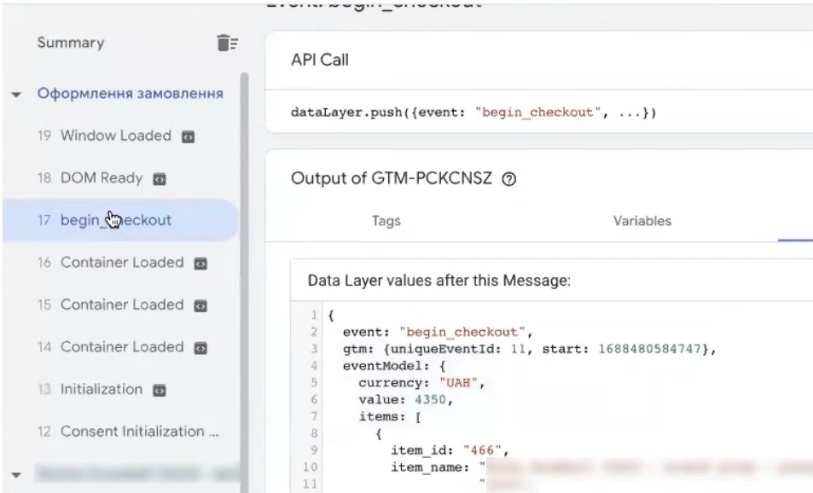
Find the shopping cart on the website (sometimes it may be hidden in an inconspicuous place). When you proceed to checkout in GTM, the begin_checkout event should appear — this is a signal that the purchase process has begun.
Fill out the order form with test data. To make things easier, choose pickup and cash payment — it’s simpler and faster. Click “Place order” and see what events have been recorded.
What we should see in Google Tag Manager preview mode:
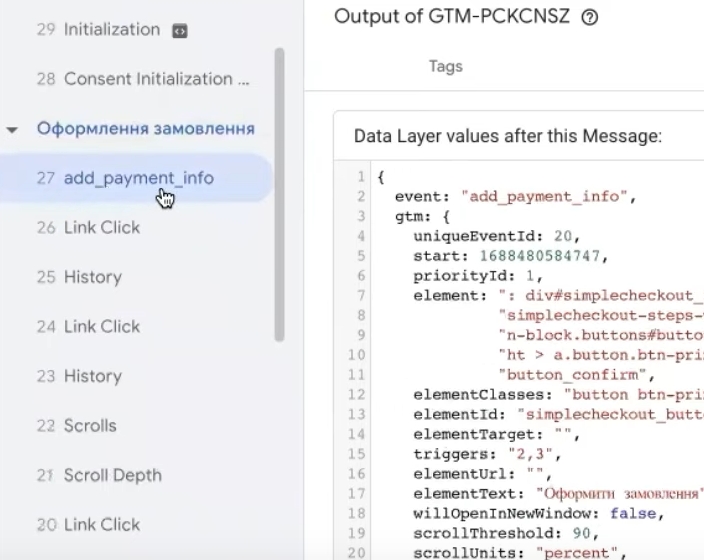
- add_payment_info — information about the payment method;
- begin_checkout — start of checkout;
- purchase — the purchase itself, the main event for tracking transactions.
All of this automatically goes to GA4 without any additional settings. Personally, I prefer to check it through GTM: everything is clear there, nothing will be lost when the page is updated, and you can calmly study each parameter.
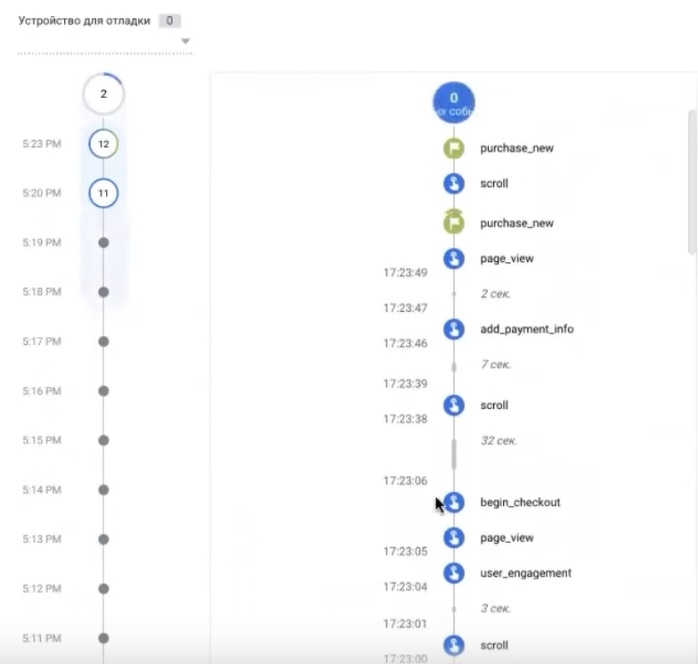
Go to DebugView analytics and check that the events have arrived. In my case, more than a dozen events have already accumulated there. Find add_payment_info, begin_checkout, and purchase with all the details: transaction_id, value, list of goods.
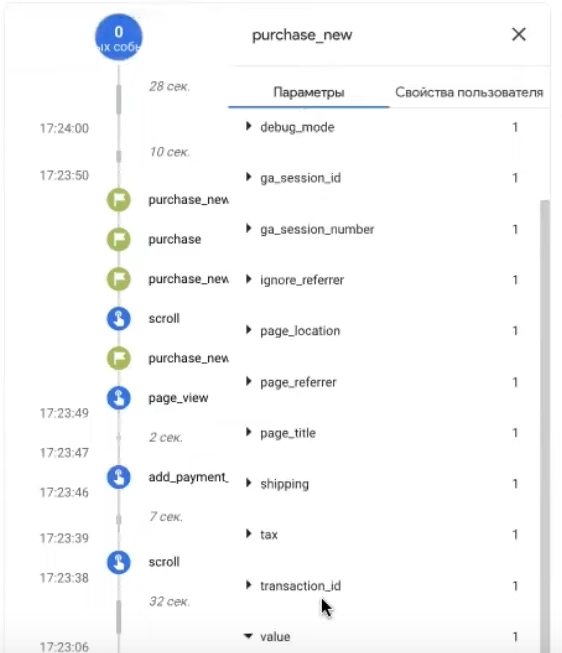
An interesting point: during testing, I discovered some strange purchase_new events that were being sent in parallel. They weren’t visible in GTM, but the Google Analytics Debugger extension showed them. What’s more, they were triggered several times in a row — clearly something unnecessary that had been installed earlier.
That’s why test orders are a must. Sometimes you find things you never even suspected. Such “surprises” can distort the data in monetization reports, so they need to be found and removed.
In my case, these extra events aren’t a big deal: the conversion will be set up for a standard purchase, not a purchase_new. But for clean analytics, it’s better to ask the developer to remove the duplicates.
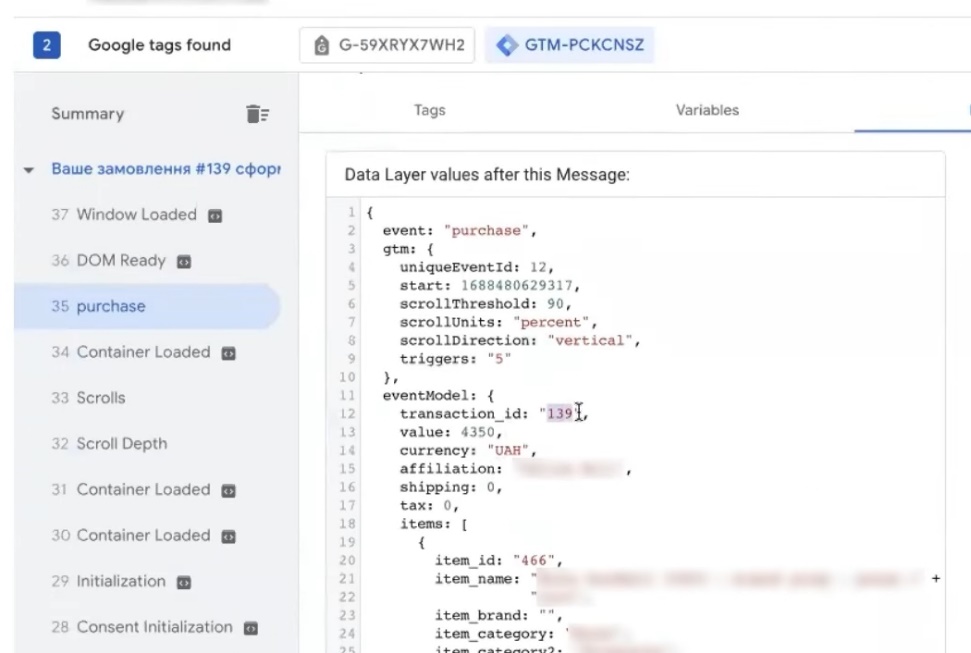
We check everything in the real-time report: begin_checkout is in place, purchase has the correct parameters — transaction_id matches, value corresponds to the order amount. Everything adds up.
Results
That’s it — GA4 e-commerce on OpenCart is set up and working. No hassle with codes, no complicated integrations. The plugin did all the work: events are transmitted, parameters are filled in, data is sent to analytics.
The only caveat with purchase_new is the legacy of previous site settings that are not related to the plugin. If you have a similar situation, simply find the source of the extra events and delete them.
And when it comes to SP SEO Remarketing, everything transferred perfectly. Now Google sees the full picture: product views, additions to the cart, the start of checkout, and completed purchases. This is exactly what you need for comprehensive online store analytics.