
In the previous video, we set up the Merchant Center and launched it for testing. What are we going to do now? We are going to make an interesting story. We will create and install the fourth analytics on your website. And we will also set up advanced conversion tracking for your PrestaShop platform. This is what Google Ads itself requires from us. Because we will create a Google Ads account separately.
Creating Google analytics
Yes. Where do we start? We’ll probably start by creating Google analytics. You need to go to analytics.google.com. Next, you need to create a new account for your website. I take the name of my site. I’m only removing the http links. Then you can check the box or not. Let’s move on.
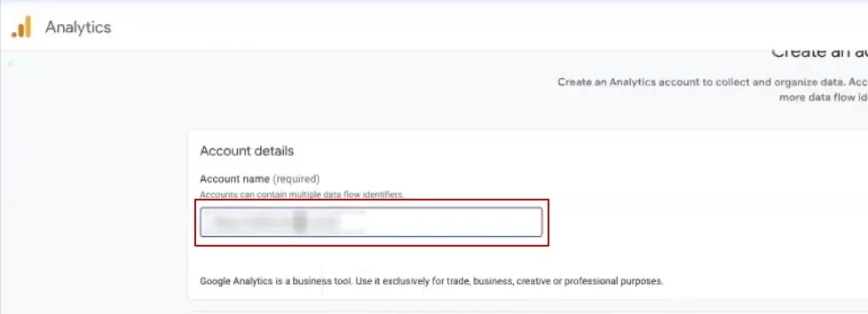
Yes, the name of the resource. I always recommend setting the name of the analytics. Choose our name, currency, country. We move on.
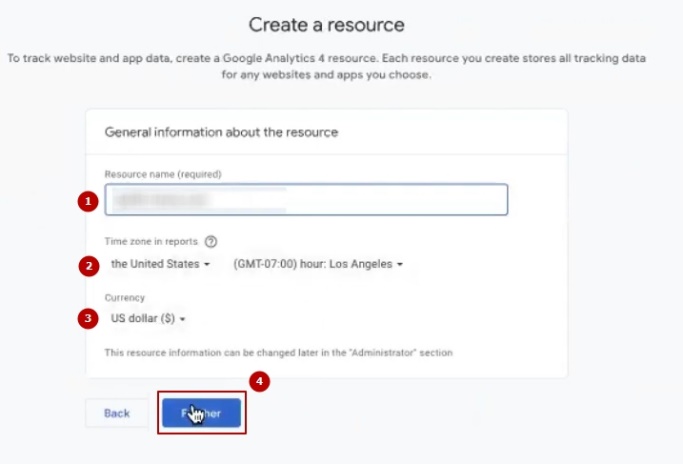
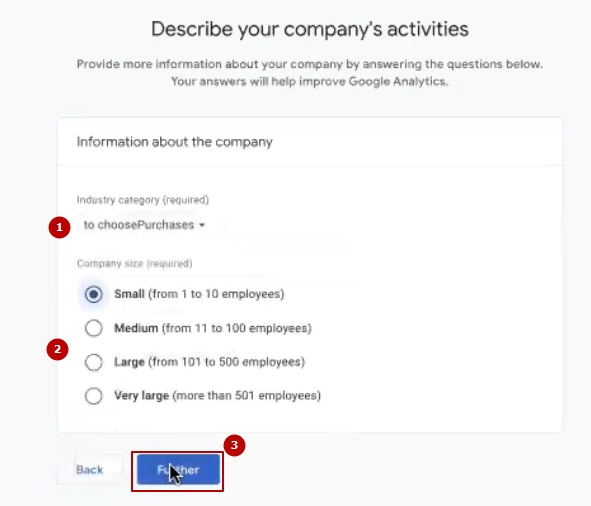
Here, look, you can put something here if you want, you can click nothing at all. It won’t be a problem.
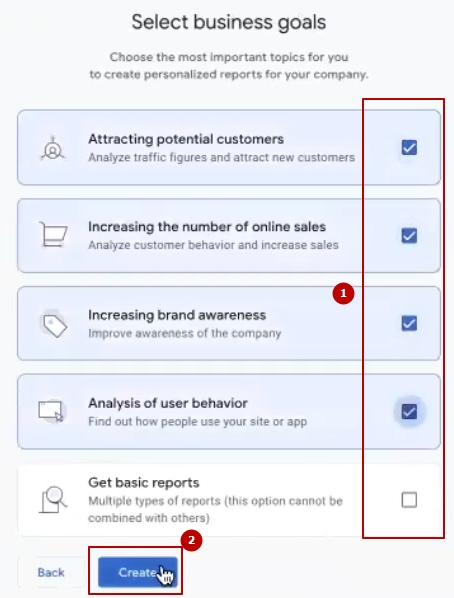
I want all, all, all, all the ticks. I’ll take it.
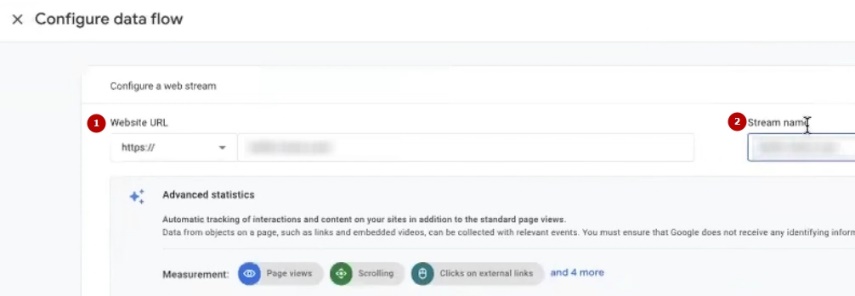
And what do we have? Next, click on “Web” and enter our website.
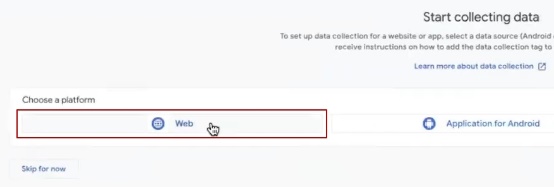
And be sure to enter the name of our resource that we will use.
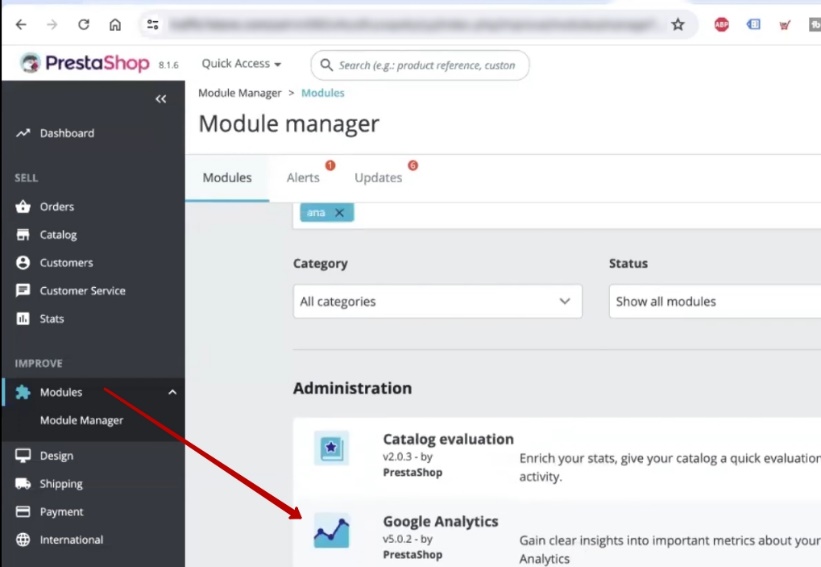
After that, Google will offer us to install this tag now. How will it prompt us? I reloaded the page to make it display correctly. What does it offer us? How will we install it? To do this, we return to our platform. Go to the “Modules” section. We are looking for our fourth analytics. You have it. We knock out analytics. Here we have Google and our analytics.
Click on “Configuration”. After that, it will offer us to create an account, but we don’t have to, since we have already created this account. Copy this identifier.

Return to our “Modules”. Change this identifier to the one we have.
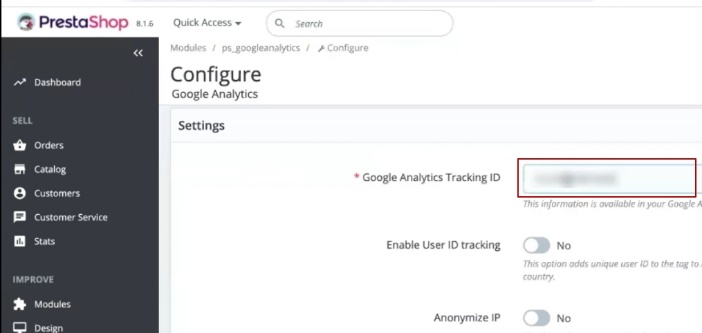
Then you can use it to enable User ID tracking, for example, or anonymize IP addresses. This depends on your specific situation.
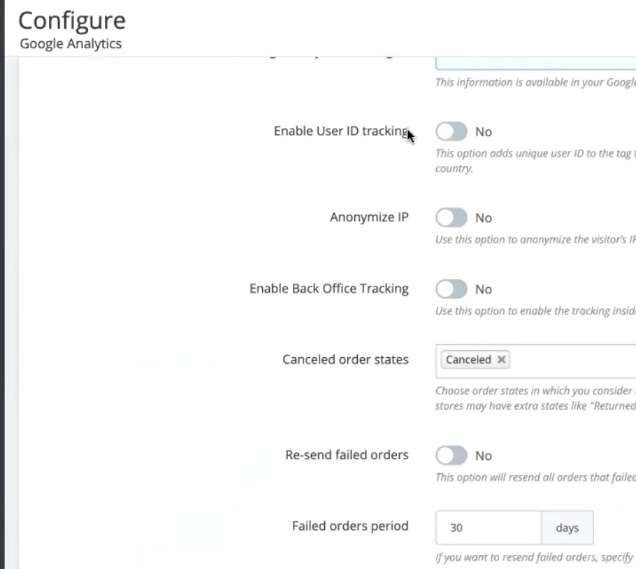
What do we do next? Be sure to click “Save”. And in fact, we can practically say that we have the analytics set up.
Checking if analytics is installed correctly
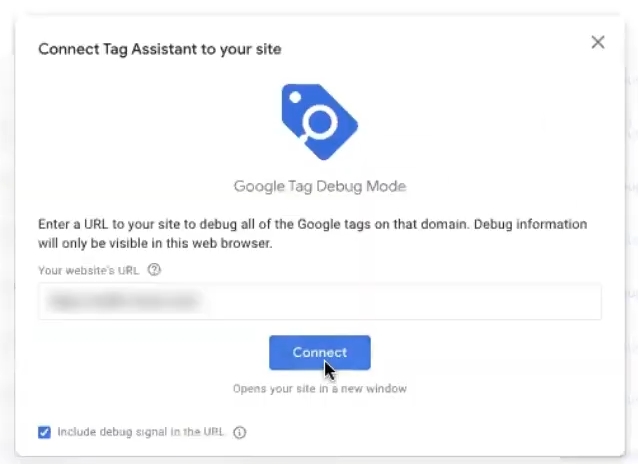
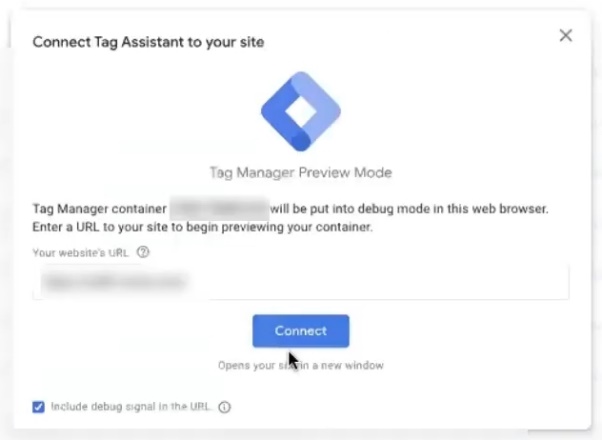
In order to check if it is installed on the site, we will use a plugin called Tag Assistant Companion. All you need to do is click on it. That is, we click Tag Assistant. Be sure to click “Connect” here, and then another window opens like this.
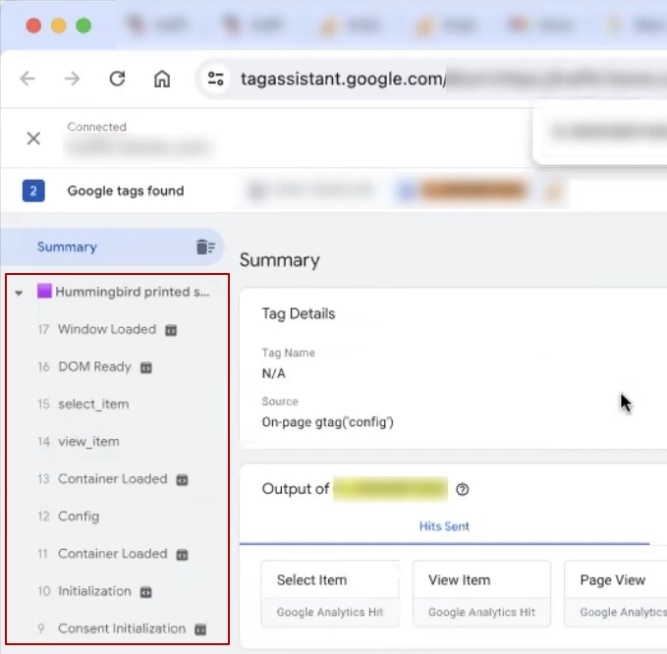
We can browse through the pages. But in this previous window, we will definitely find our new analytics code. Here, if we press F, it’s there. We have it locked. It is fixed. The module is working now. That is, we seem to have done everything with the fourth analytics. Right?
Setting up advanced conversion tracking
What’s left to do now? Now you need to set up advanced conversion tracking. What is advanced conversion tracking? We are going to Google, or rather Google Ads, to create his personalized conversion. One.
Second, we will definitely transfer email, phone, and other data to this conversion. I will tell you how it can be done. Why are we doing this? In order for Performance to have access to more data and, accordingly, its AI engine could learn from more rational and correct data.
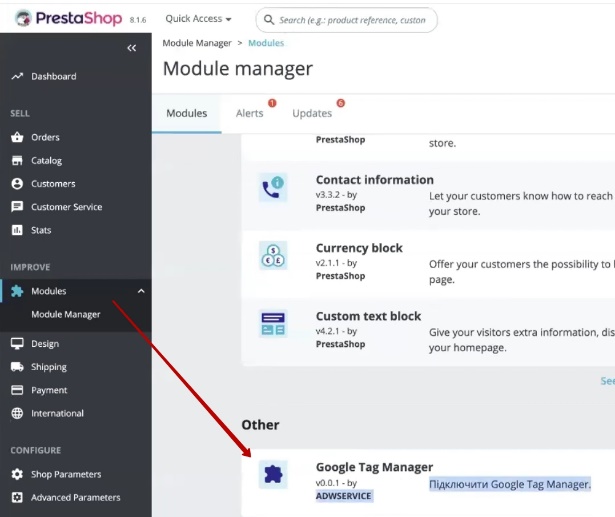
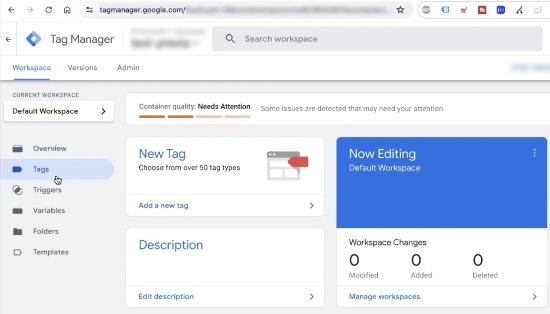
Installing the Google Tag Manager module
What will you need for this? We will need to install this module, which I call Google Tag Manager. Again, if you need it, you can write to me. I will tell you how to install it, or you can buy the module yourself here, or find some similar thing. I already have it integrated. And I already have it installed, as you can see. Here it is. Google Tag Manager is here.
Create a Google Tag Manager account
There’s nothing complicated about creating a Google Tag Manager account. You need to go and create this Tag Manager. It’s very easy, it’s pretty quick. As you can see, it’s completely empty. Now we will customize it.
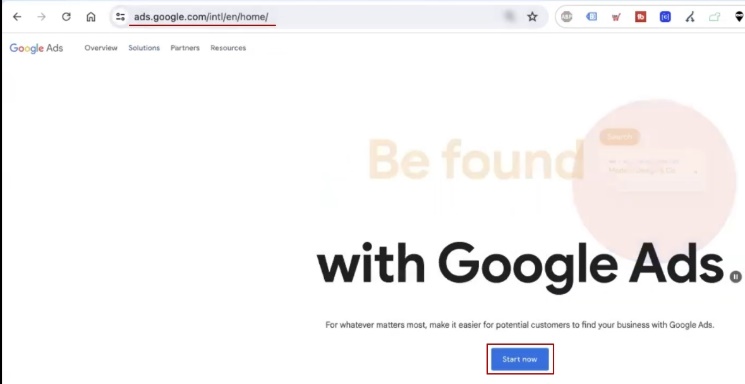
Setting up a Google Ads account
But before that, we need to set up a Google Ads account. How do we set up a Google Ads account? There are three ways to do this. The first one is that you go to your Google Ads account separately, directly. More precisely, on the Google Ads website. Let’s write Google Ads. The first option is to follow this link and create an account.
The second option is that you can ask me to create an advertising account. I can create one for you. And the third option is that we can create from the Merchant Center. Well, that is, one of the options.
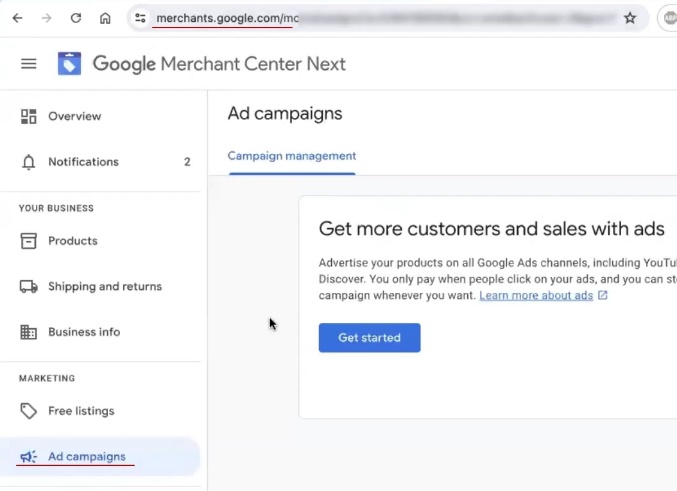
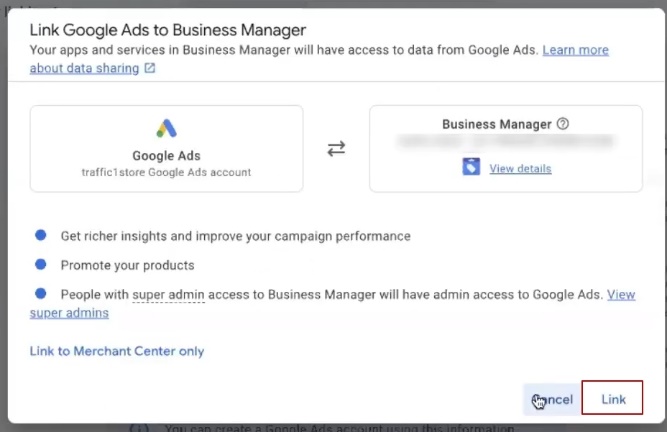
If we want to create from the Merchant Center, we go to our Merchant Center and click “Get started”. After we click “Get started”, we will be prompted to fill in certain settings right away. That is, to link with our Google Ads. We click “Link”.
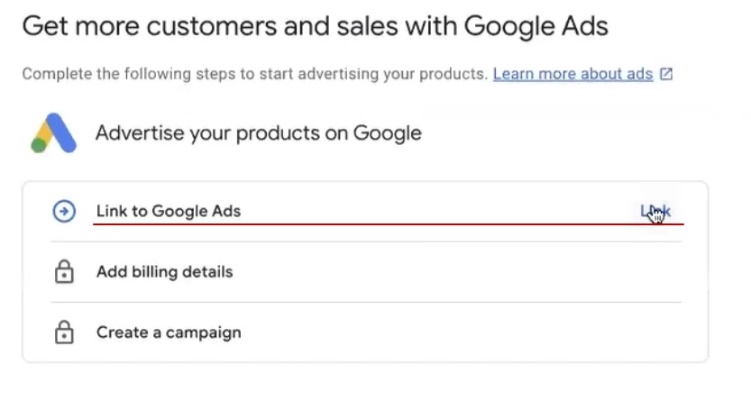
It offers us to create a new account or an account that we can potentially manage. It’s up to you to decide.
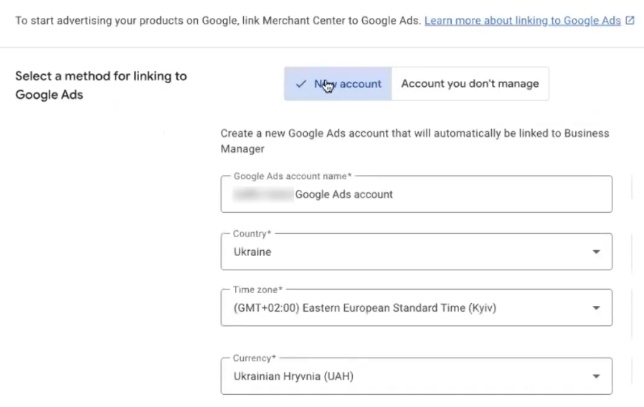
If we are talking about a new account, remember that it will immediately ask for payment information. Basically, the initial stage of creating an account will be to enter payment information. Go here, click here. Click on “Link”.
We will create a new account. Then it asks us to fill in all the payment details.
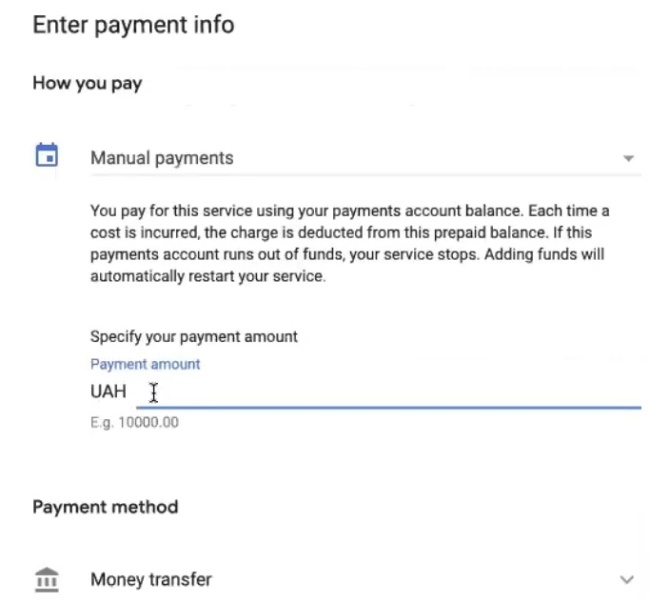
I’m going to skip this very quickly. We added Billing details. It offers me to download the invoice, because I entered it in a certain way. We go on. We have a part of it all. We have added the billing details. Close this window.
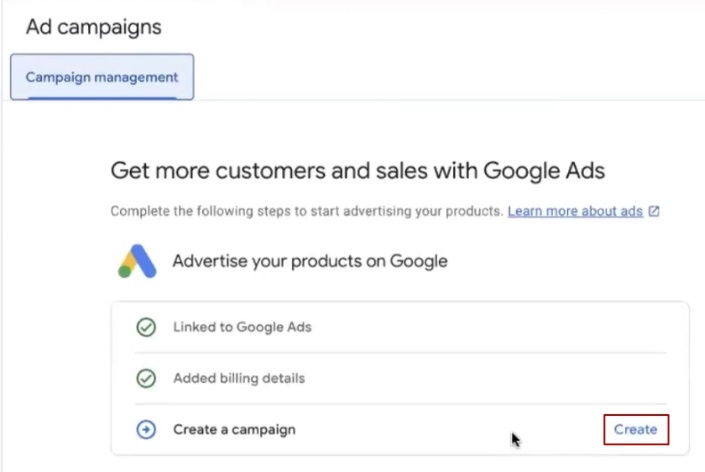
Create an advertising campaign
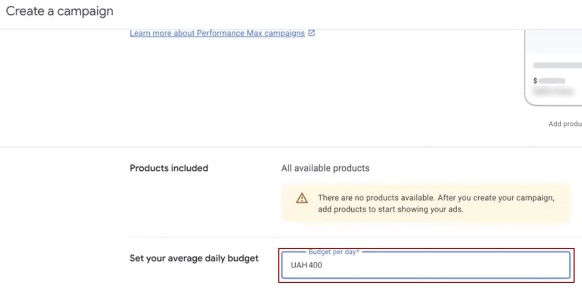
Next, we can create a campaign. We go to “Create a campaign”. What are we going to do here? This is my favorite option. We will create it very quickly. Why do I like the option of creating an advertising account and campaign through the Merchant Center? Because it’s super perfect, very easy, and very simple. Here you can set the budget that suits you right away. I’ll set the equivalent of about $10. Let’s move on. That’s it.
Now what do we need to do? We will need to go to our advertising account. How can we do this? We can go to the Google Ads billing tab and click Manage in Google Ads.
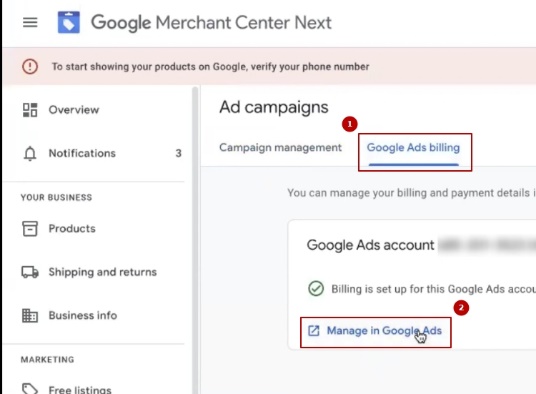
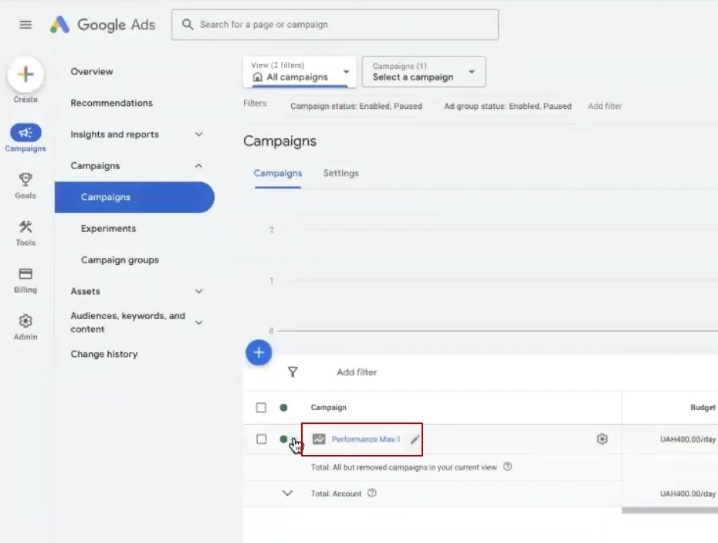
The Google Ads window opens. We have activated our account. Next. I go to my Google Ads account. I can already see my campaign, but we’re pausing it right now.
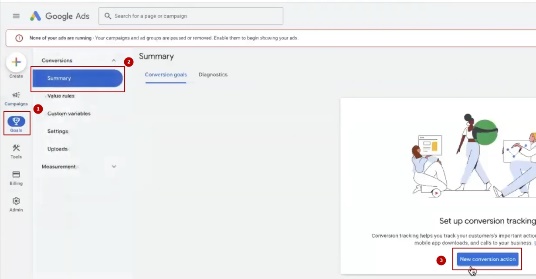
Setting up conversion in a campaign
We’re going to set up conversion now. Without this, you can’t turn off the performance at all, you can’t do anything with it. Go to our Summary goal settings. Select “New conversion action”.
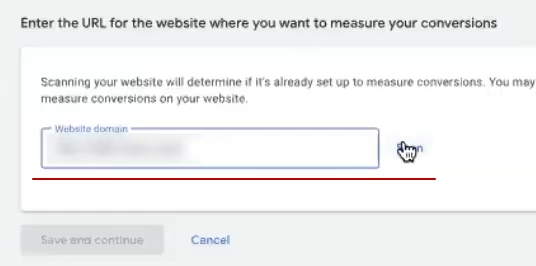
Choose a website.

Be sure to copy the name of our website here. Click “Scan”. Google Ads usually likes to add extra buttons for us.
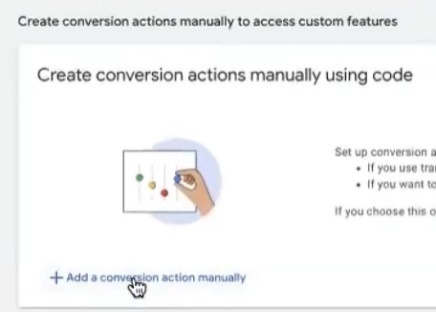
Go here. “Add manually”.
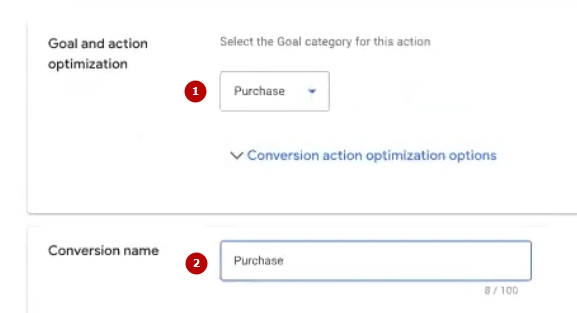
Choose the category “Purchase”. We name it accordingly. This is not a purchase from the fourth analytics.
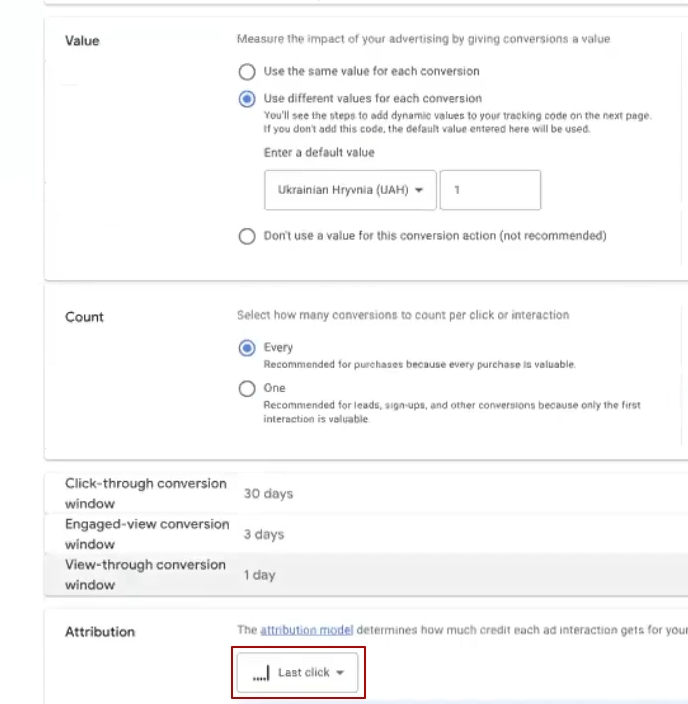
Here you set all the settings like I do. The only thing I personally prefer is “Last click”. But you can choose your own.
Click “Yes”. We agree with all this information. Click “Yes” again. Next. Go to our shopping cart. Scroll down to this section. And this is where the fun begins.

Creating tags one by one
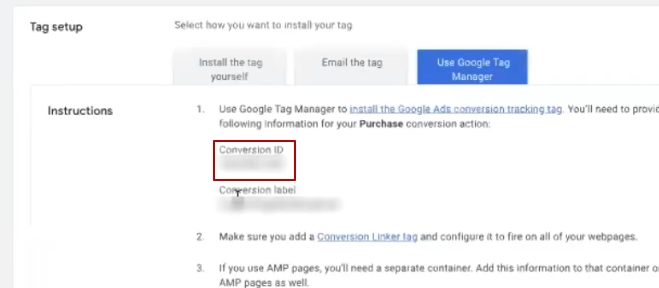
What do we need for this? First, we go to our Google Tag Manager. We will create all the tags one by one. Or, if you want to download this container ready-made, write to me in the comments, I will give you a ready-made container. What do we do? Take our Conversion ID and copy it.
Tag Configuration > Google Ads > Google Tag. Insert it here, add AW.

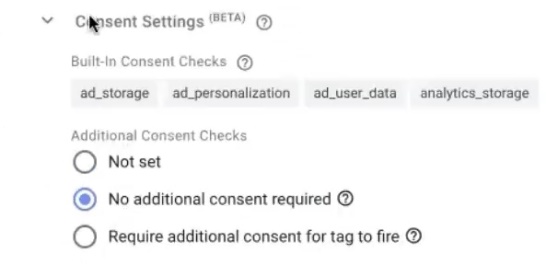
Be sure to select what works for you in Consent. This is mandatory.
And select the triggers. For me, for example, it’s either Initialization or, depending on the Consent settings, Consent Initialization. I choose just Initialization for now. Yes, Google Tag. We are saving it.

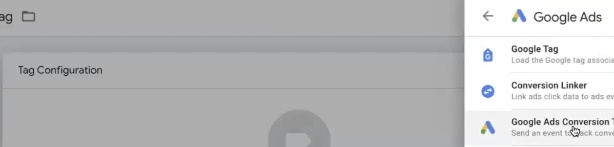
After that, we will tag the purchase itself. Again, we come back here and select Conversion Tracking.
Here, be sure to just click Create. Just save it. You don’t need to change anything else.
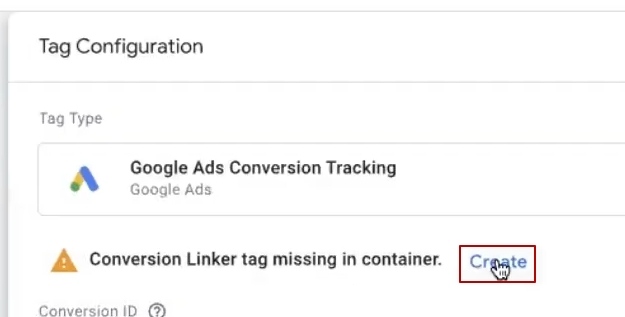
Paste our Conversion ID, which we copied in the previous step. Return to the label. We copy the label here and now we need to set all these parameters.

How are we going to set them? To do this, we will make a test order. Now I will show you how to do it.
Go to our Tag Manager. Click on “Preview”. Be sure to connect to our store here.
And I just make a test order from start to finish. Just like an ordinary user would do. I do everything. You can pay if you need to. I just have a payment method that’s made this way.
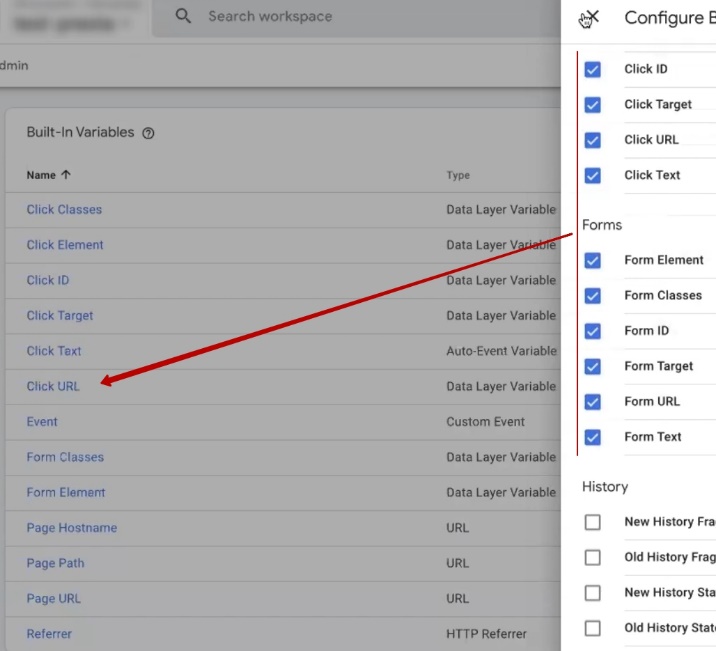
Okay, let’s go back here. I’m going to close this window now. And watch. Now we need to find in this whole story this, this line, which will be called purchase.
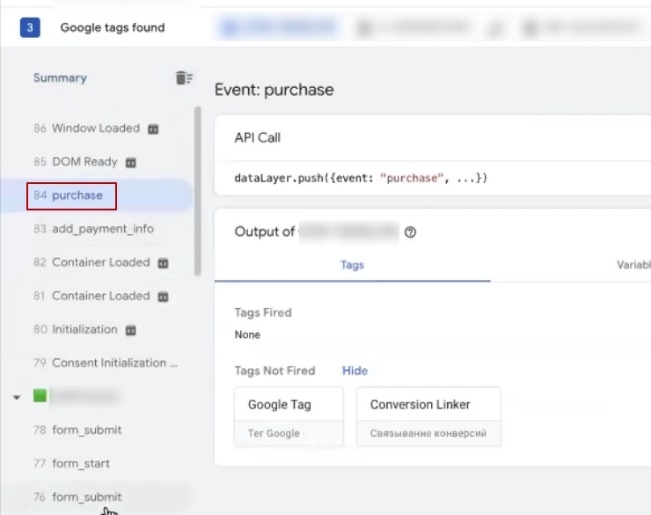
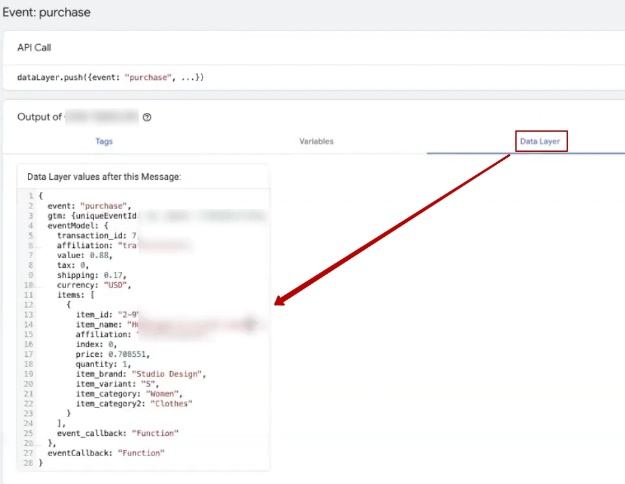
You should usually have it, here’s one. Then we move here to the Data Layer. And here we will dig into all this data, conditionally.
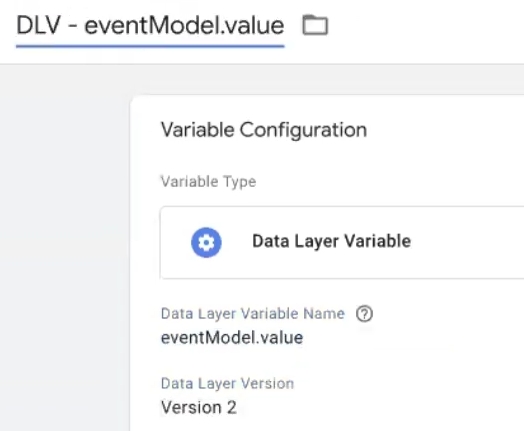
What are we going to do? We will set variables for this tag. Conversion value is our revenue.
We’re going to do Custom Data variable – our revenue.
You will simply either repeat after me, or if you want, you can download this container. No problem, I can share it with you.
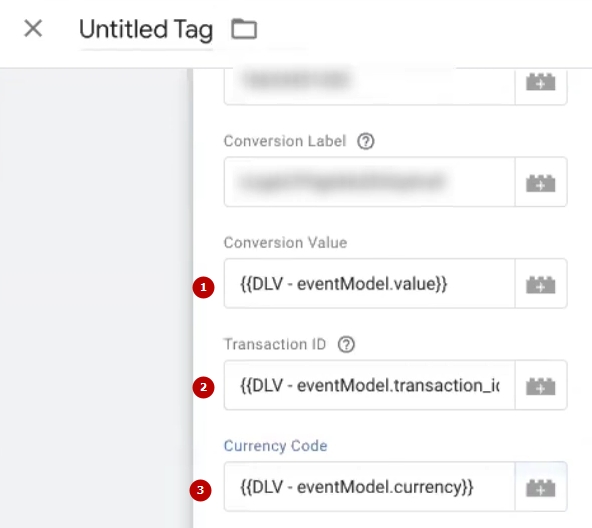
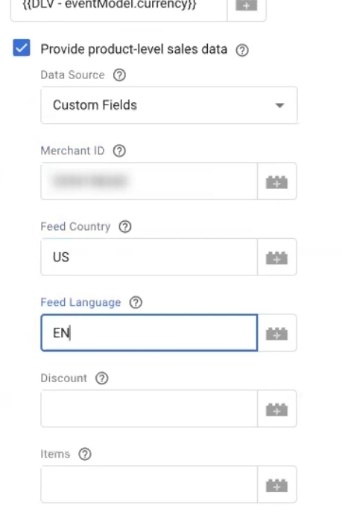
We will add the merchandise ID number with you. Country – US, English. Itеms. User-provided data we will create now. First, let’s complete this block.
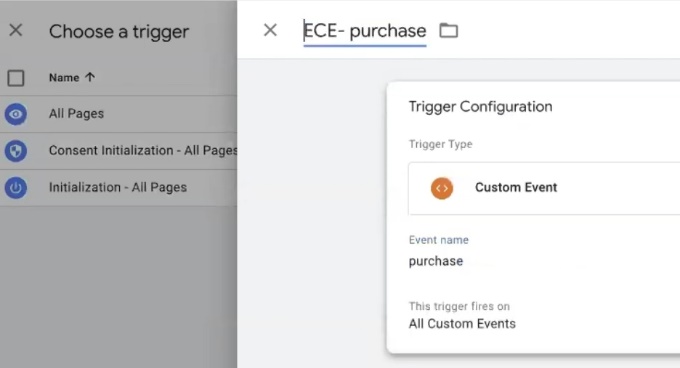
Don’t forget about the Consent. form. I don’t need Consent. Next, be sure to select a trigger. The trigger will be the Event purchase itself. Do you have it? Yes, I have it. I’m just keeping it. Because Google Tag Manager sometimes glitches. I’m reloading this page.
Next, you need to create User Data. In this block, this is what is mandatory, User provided data. We will be making a new variable with you.
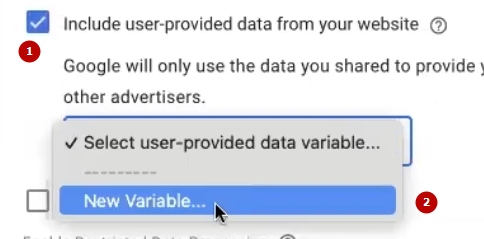
Be sure to select “Manual configuration”. Now we’re going to customize it for you.
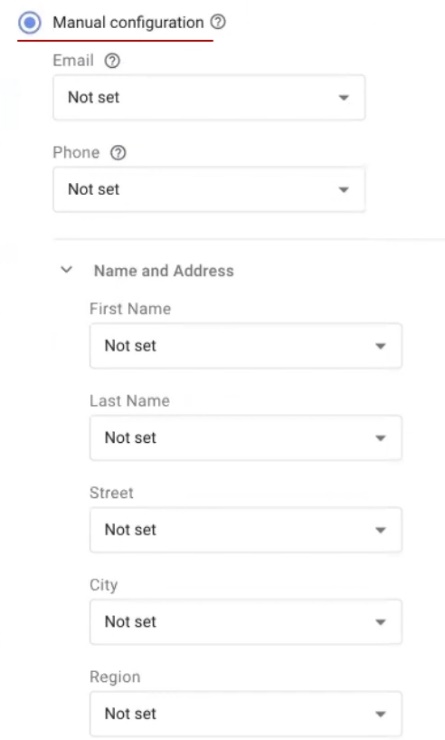
To do this, come back here and look for the stage where we can see the entire data set, such as “Delivery information” or, for example, our emails, or something like that. If you suddenly don’t see this information like I did, then you do the following. You can close this link. Click Preview again. And now we will almost place an order again. I add the product to the cart, go to the checkout and click “Proceed to checkout” again. And then what do we do?
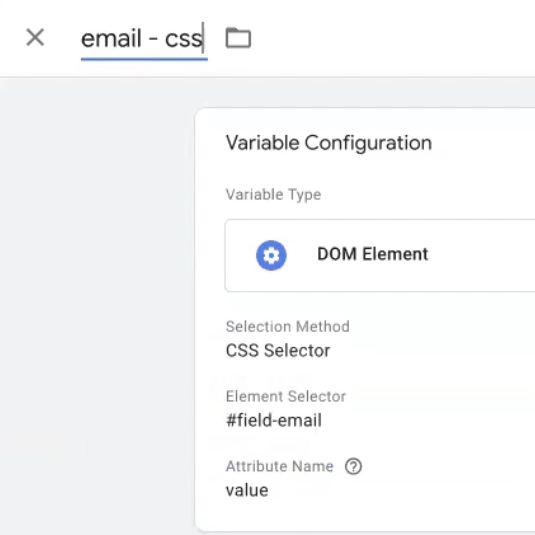
Since we can set almost all the information, we’ll start with that. I select “Email”. I click the right button. Click “View code”.
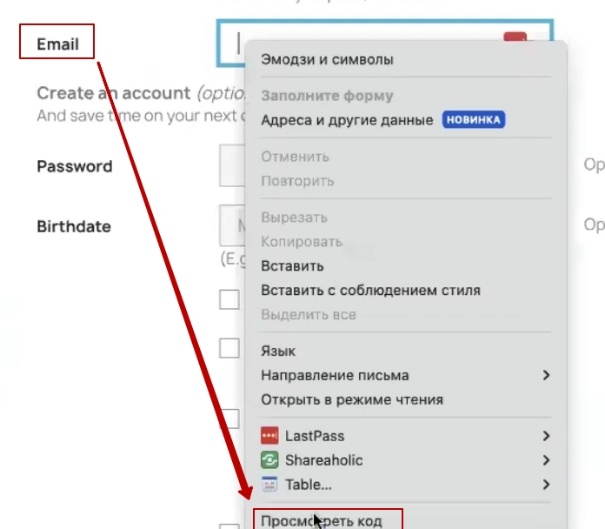
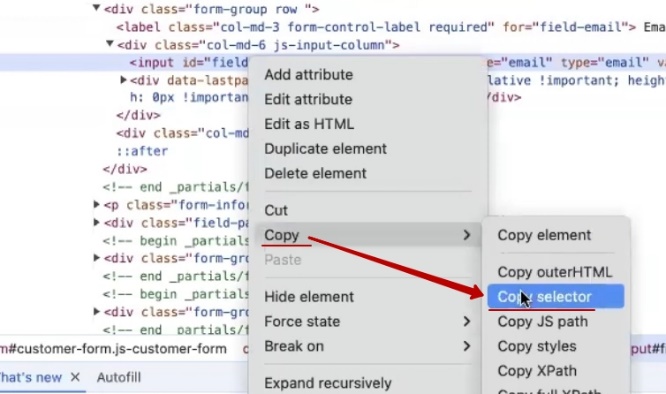
I choose “Copy” and select the “copy selector” here.
I’m going into the variables. I have a little glitch. Or in this “Email” window. And let’s go to “New variable…”.
I’ll put myself here for now. It’s the same with the phone. We do it with a phone if we have one.
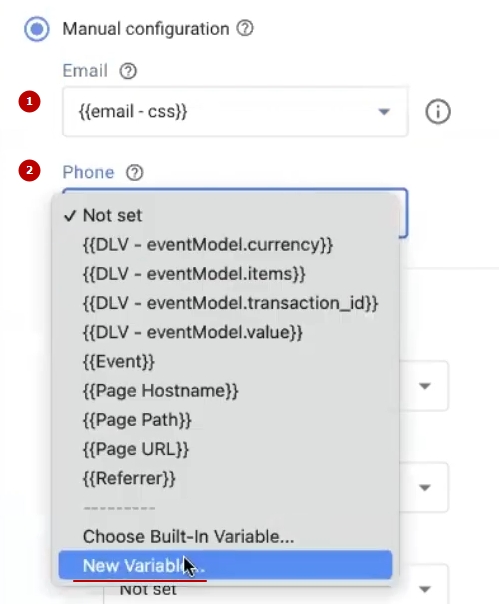
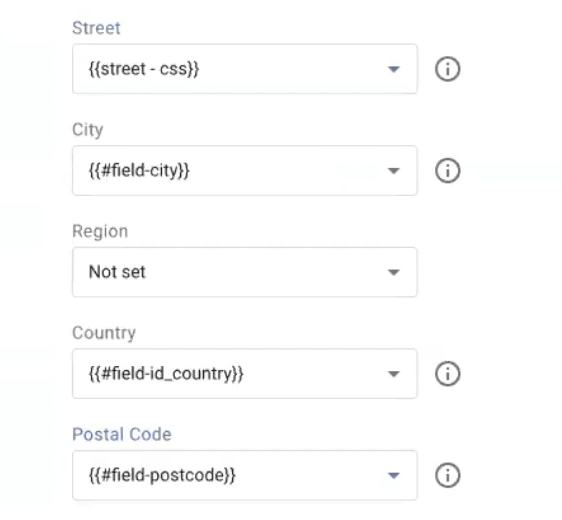
There is no phone here, but you can enter other data instead. For example, I don’t need anything here. “Continue”. First, VAT number, Address. And then we’re off and running. We can get the address here in the same way. “Copy selector.” Yes, we have a phone. We don’t have a phone. We take “Street” – “New variable…”. I think I’m going to pause the video here. I’m going to fill this out and then we’ll continue.
I filled in almost all the data. I’m saving it, “Save”. I’ll fill it up. Look, I’ve added it here. I’m showing you where to add it. We’re going to reload the page now. Before we do that, I’m going through the data blocks to make sure they’re being recorded. I always add this data block just in case. Let me show you why.
Checking the correctness of tag settings through a test order
And again, we go to “Preview”. We complete the test order from start to finish. We return to the debugger.
Now look, what do we need to do? We need to find on the previous page where exactly our data was recorded, if we see the CSS. You see, here’s the CSS. And here, for example, are all these things. To do this, go to the previous page and see where they were, where they were recorded. You see, I have a test where Yana gets here, here, here, here, here. And they are no longer in this block. Because they are not displayed in this block.

The only thing that is there is the email. The postalcode is not fully fixed here. We’re going to check it again. Everything is being recorded, form_start. Now I’m making another test order again. It’s just that I didn’t fill in those fields, so they weren’t recorded. And now we’re looking for the page where, at what stage, we had the largest amount of data recorded. Shipping_info doesn’t seem to be there. Yes, here you go. We had most of the data recorded on this “Order” page. That’s where we clicked form_submit.
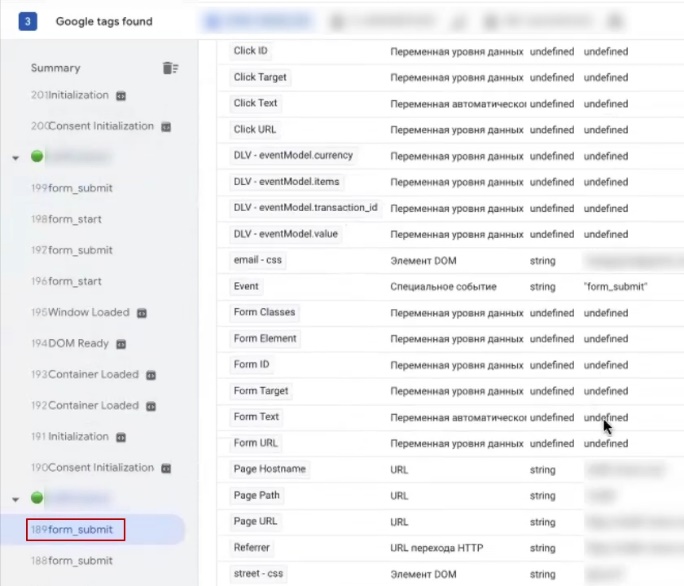
But form_submit is still repeated somewhere. So we need to try to figure out how to fix it correctly. Because User-Provided Data, which we made, is pretty well captured by itself. We’ve already realized how we need to customize this story. Let’s close it.
Setting up a separate User data sending
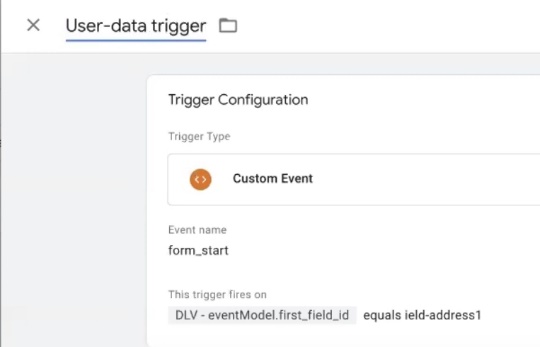
Now we’re going to send User data separately so that the system doesn’t scold us for not having it. Choose “User-provided Data”. Be sure to take our Conversion ID. Otherwise, it will not understand where to send all this data. We need to take our variable. Please don’t forget the Consent mod if you need it. And now we are going to choose a trigger. I take the Custom Event. My event is called “form_start”. Yes, and I need it to fire when I have a certain value of “first_field_id”. I make a new variable Data Layer, eventModel, first_field_id. I save it. And I need it to be “field-address1”. “User-data trigger” and save.
Saving. And now we make a full test order again to make sure that everything is working correctly. To do this, I am placing a full test order. And now we will see.
I see that it worked for us several times, the tag. So I’m going to add another variable to the Usеr data. I’ll show you now. So, we change “Once per event” to “Once per page”.

Let’s place a test order again. Now you will see that everything works. We place an order and watch. We take the summary. Here we have User-provided Data triggered once. What kind of feed do we have?
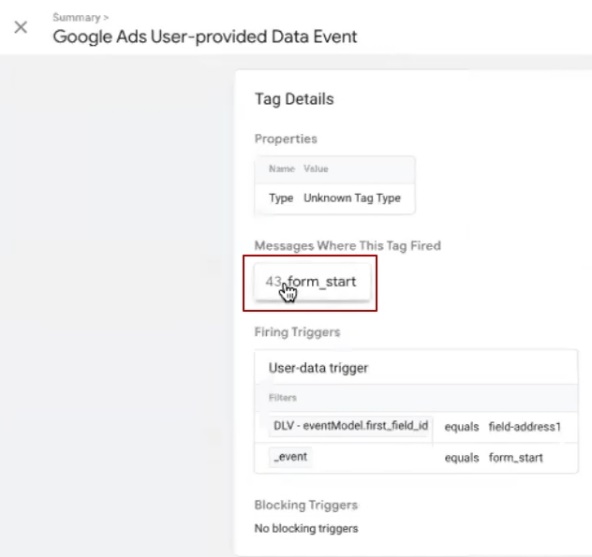
43 we are looking for. And now we need to see if we have it.
Analyzing the results of the created tag
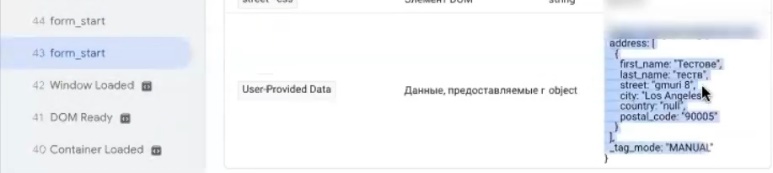
As you can see, this is almost the entire data set we needed. The only thing is that Country is not tracked. But I suggest that instead of leaving Country out, it won’t work. I suggest that you leave at least one of the options – try to leave only Email. You can also add a phone number and that will be enough. Because I take these variables in the way that Google itself offers me. I don’t see them through these variables.
If you need some kind of refinement of this whole story with a separate script, write to me and we can refine it separately with scripts that can also take Country. Because all you need is a country and an index for targeting. So we have almost everything ready, even if we look at Google’s Global Tag itself. Now let’s run through our purchase.
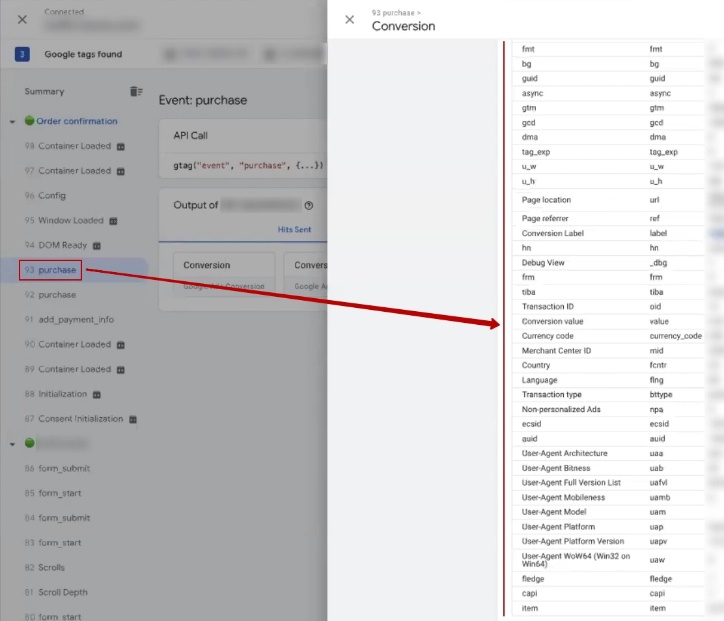
You see, we have this one, this purchase. It transmits the entire set of data that we need. This is our label. We have currency, we have income, we have Merchant ID. And so on and so forth. And, accordingly, somewhere here we should have User Data. Here is the User-provided Data.

Here we have all the hashed data transferred. Everything is fine. Google will understand this. Everything I do now, I must confirm the publication, because it won’t work without it. And that’s it. And now, now we can actually start creating advertising campaigns, as we need to do for Google, directly.


