
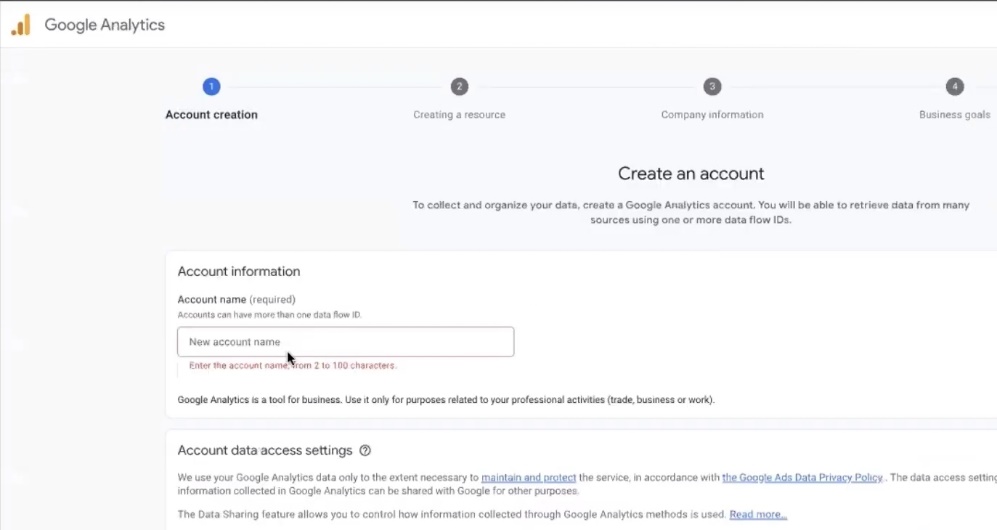
So, where do we start the entire process of setting up analytics and conversions? First things first — we create a Google Analytics 4 account. To do this, go to analytics.google.com and sign in with your Gmail account. Click the “Create account” button and give it a name.
I usually copy the website’s domain name and paste it as the account name. I highly recommend doing the same — naming accounts by domain. Why? When you have one site, it seems like a minor detail. But once you have two or three projects, running ads in different niches — confusion begins.
Typical story: you named the account “My store” or “Test,” and six months later you can’t find the right analytics. Searching by account ID won’t work either — the search in the analytics interface simply doesn’t work with it now. But by domain — you’ll find it in seconds.
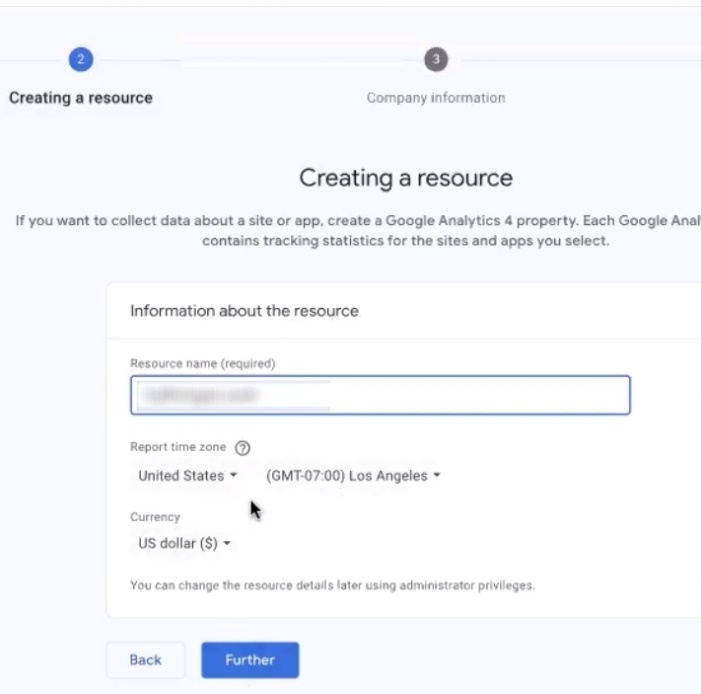
Next, everything is standard. Specify the country, time zone, and currency. Working with Ukraine — set Ukraine and hryvnia. Selling to Europe — select the appropriate country and euro. In my example, I’ll leave USA and dollar.
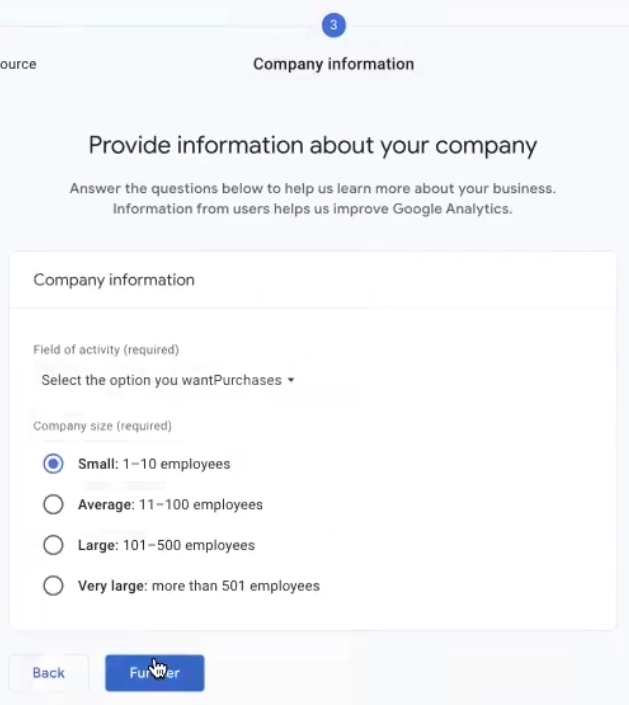
On the next step, the system will ask you to clarify information about your business. There are no strict rules here — fill it out as you see fit, choose the appropriate industry category.
After that, check all the suggested boxes and click “Create”. A user agreement will appear — ideally, you should read it to understand what you’re agreeing to. Accept the terms and move on.

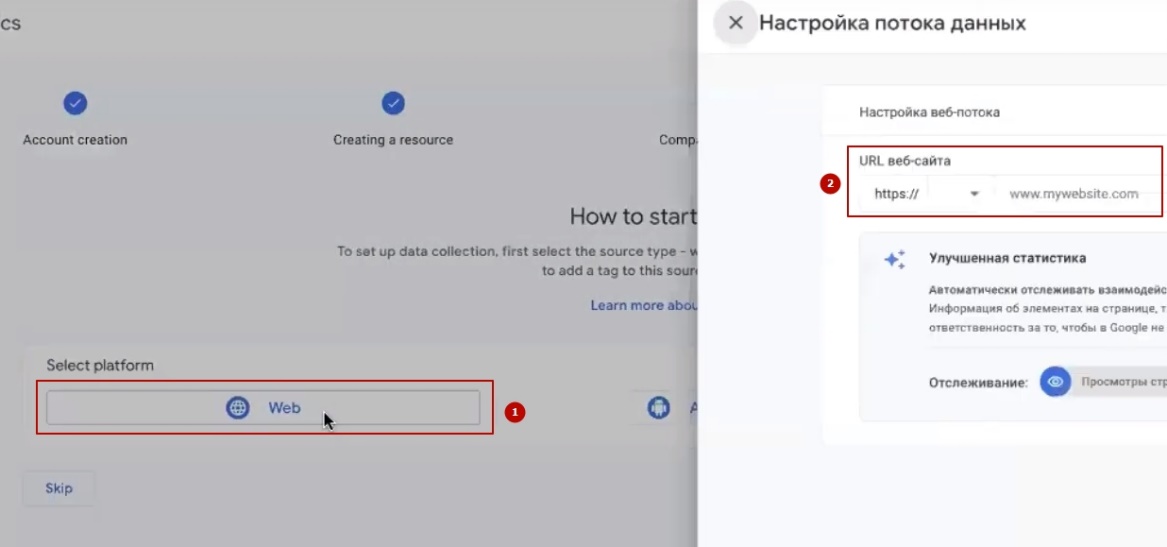
At the platform selection stage, click “Web”. Enter the website address — note that it must be on https. If your site is still running on http without a security certificate, you need to fix this first. For the data stream name, it’s convenient again to use the domain name. Make sure all checkboxes are active, and click “Create stream”.
Done — the account is created. The system will immediately offer to set up analytics in more detail, but we’ll get to that a bit later.
Installing the Google Tag Manager plugin on WordPress
Moving on. Since we’ll be setting up conversions in Google Analytics 4, including the purchase tag with dynamic data transfer, we’ll implement everything through Google Tag Manager. This is a separate tool from Google that acts as a “container” for all your tags and scripts.
Why do I suggest working specifically through it, rather than some other plugin? There are two main reasons:
- Budget-friendly yet fully functional solution. You get all the necessary functionality, which is more than enough for working with Performance Max and other campaigns in the long run. No paid subscriptions, no limitations on basic features.
- Flexibility. Google is constantly updating: things change almost every month, new requirements for data and event transmission are rolled out. If you’re tied to hardcoded scripts or a plugin without flexible settings, every such update is a headache. With Tag Manager, you go into the interface, adjust the needed tag or variable — and everything works. No edits to site code, no developer involvement.
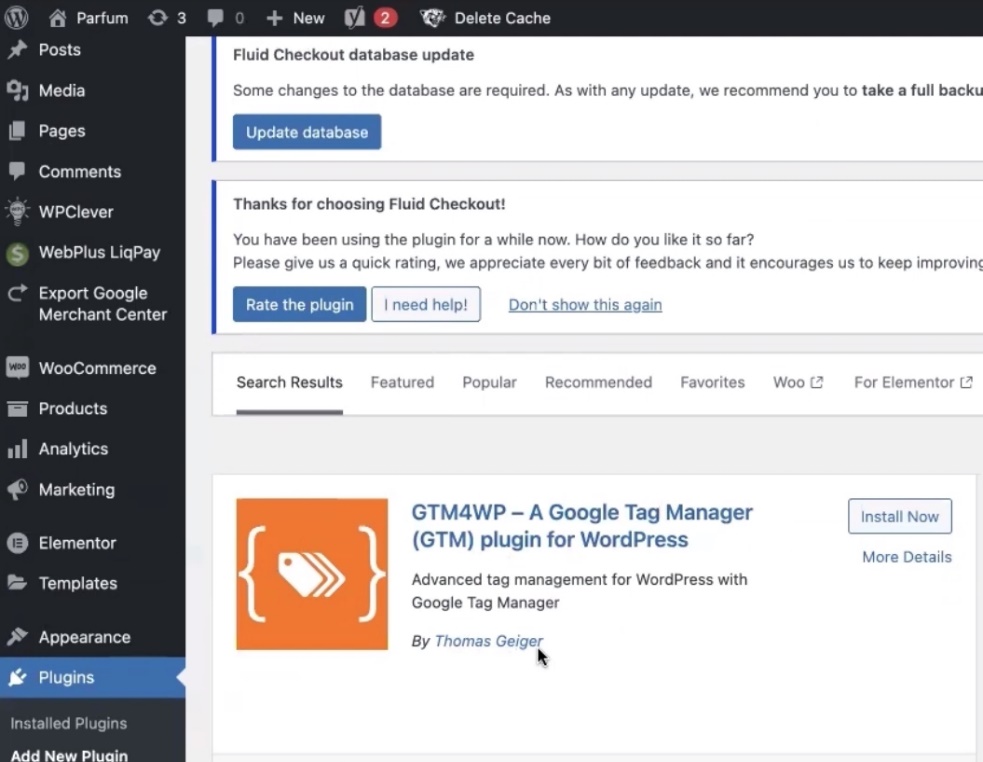
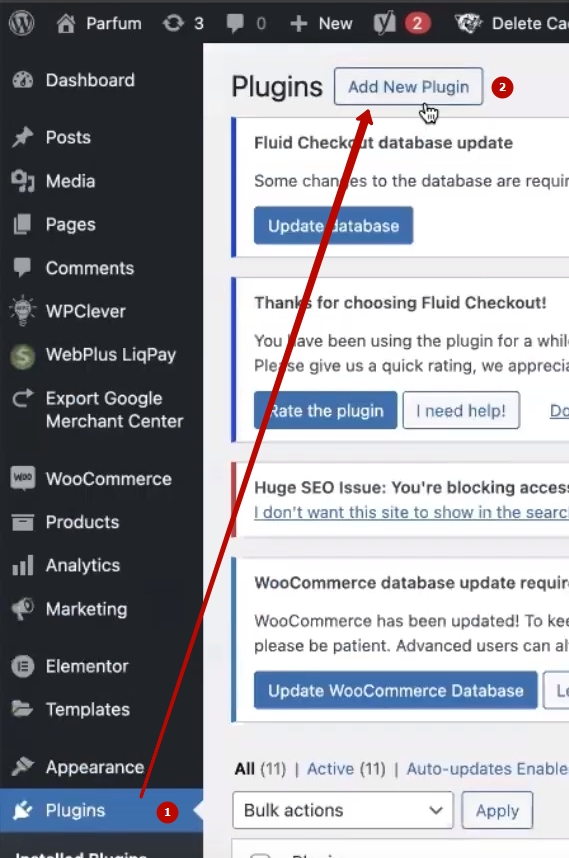
So, we need to install Google Tag Manager on WordPress WooCommerce. Go to the WordPress admin panel, navigate to the “Plugins” section and click “Add New Plugin”. In the search bar, enter gtm4wp — this is the short name of the plugin we need. The first result will be the GTM4WP — A Google Tag Manager (GTM) plugin for WordPress by author Thomas Geiger. Install it.
I want to emphasize: right now we’re doing a complete setup from scratch, to the maximum. Our goal is to pass all possible information about customer actions on the site to Google, and this plugin allows you to enable all necessary additional settings. After installation, be sure to click “Activate”. Done — the plugin is installed, find it in the plugins list.
Creating a Google Tag Manager account
Now click “Settings” (plugin settings) — and here’s where it gets interesting. The plugin will ask for the Tag Manager container ID, which means we need to create this container first. Don’t worry, this is quick.
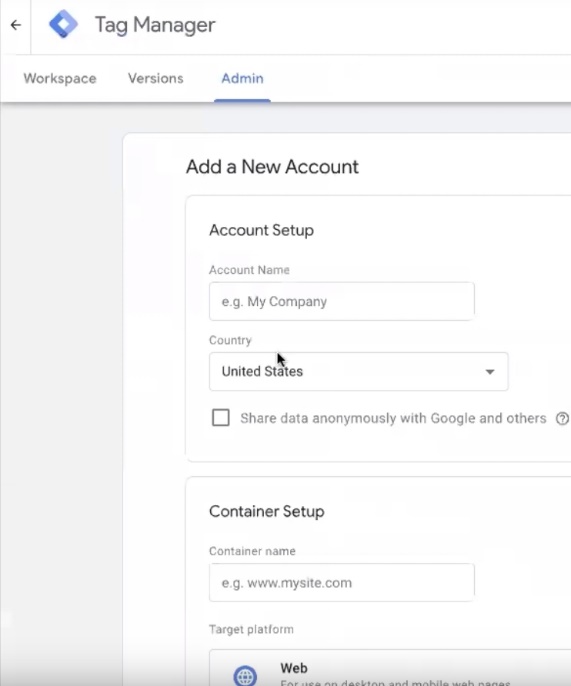
Go to tagmanager.google.com and click “Create account”. In the account name field, paste the website’s domain name — same logic as with analytics. When you have multiple accounts, you’ll always find the right one in a couple of seconds. Let’s say you have three online stores — and all accounts are labeled by domain. Convenient, clear, no confusion.

Next, select your country. In the container settings, I also prefer to use the domain name — it’s easier to navigate, especially if over time several containers appear in one account. Select the “Web” platform and click “Create”. The system will show terms of service — the language selection there is limited, but the essence is standard. You can’t proceed without agreeing to the terms, so accept and move on.
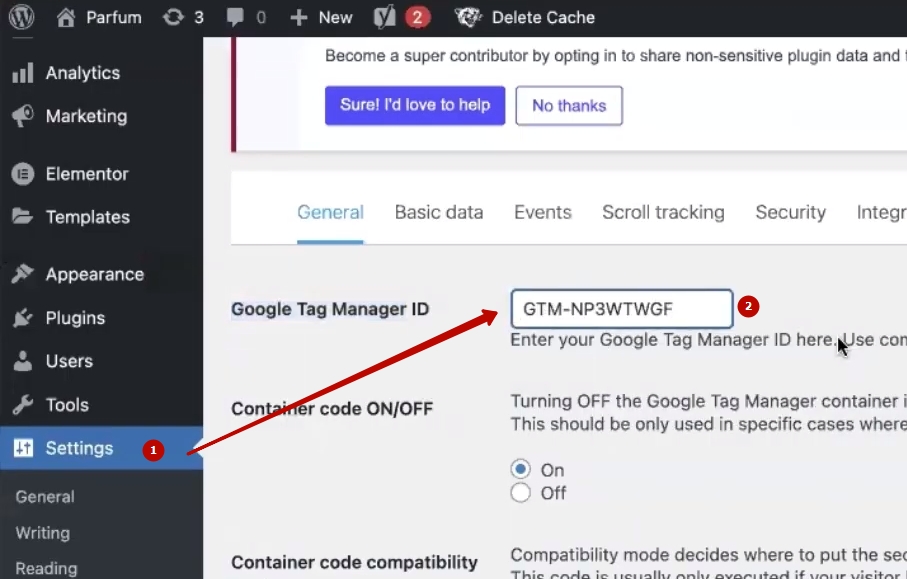
The Google Tag Manager account is created. What’s next? Copy the container ID — it looks like GTM-XXXXXXX (alphanumeric code at the top of the screen). Return to the WordPress WooCommerce admin panel, open the GTM4WP plugin settings and paste the copied ID into the appropriate field.
Configuring the GTM4WP plugin
Moving on to configuring the plugin itself. Open the “Integration” tab, find the “WooCommerce” block and check several fundamentally important boxes.
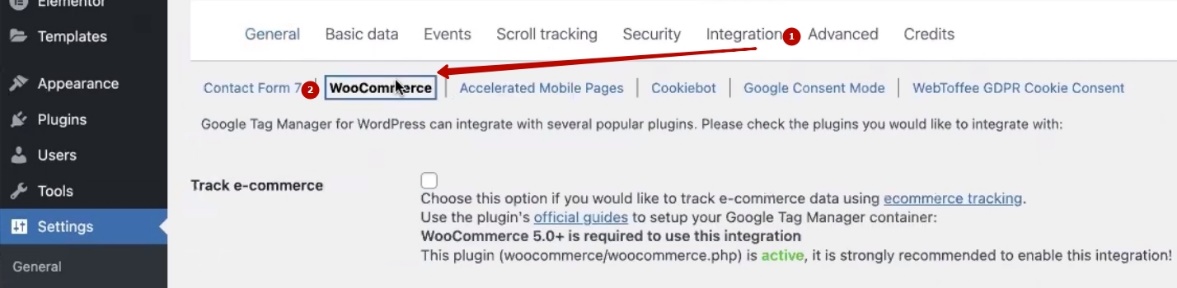
The first and main one — enable e-commerce tracking. This is essentially what we’re doing all this for.
The next parameter is “Products for impression”. The default value is 10, but I recommend setting at least 5. Why? WordPress templates vary: some themes transmit many events, others very few. Later I’ll show you in order how to nicely adjust everything for your specific case. If you don’t want to figure out each setting manually — I can share a ready-made Google Tag Manager container that you just need to import and substitute your data. Write in the comments if you need this option — I’ll know what to prepare.
But I’ll still describe the entire setup chain in full. This is important because sooner or later you’ll need to tweak or improve something, and you should understand what is responsible for what.
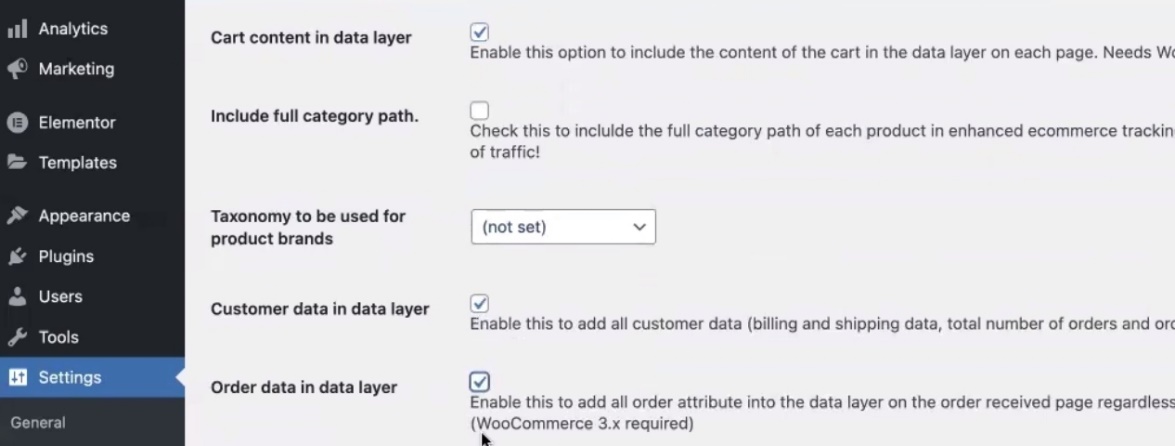
Moving on through the checkboxes. Enable “Cart content” — so that cart data is transmitted correctly. Leave taxonomy as automatic for now — let Google determine categories itself. Also check “Customer data” and “Order data”.
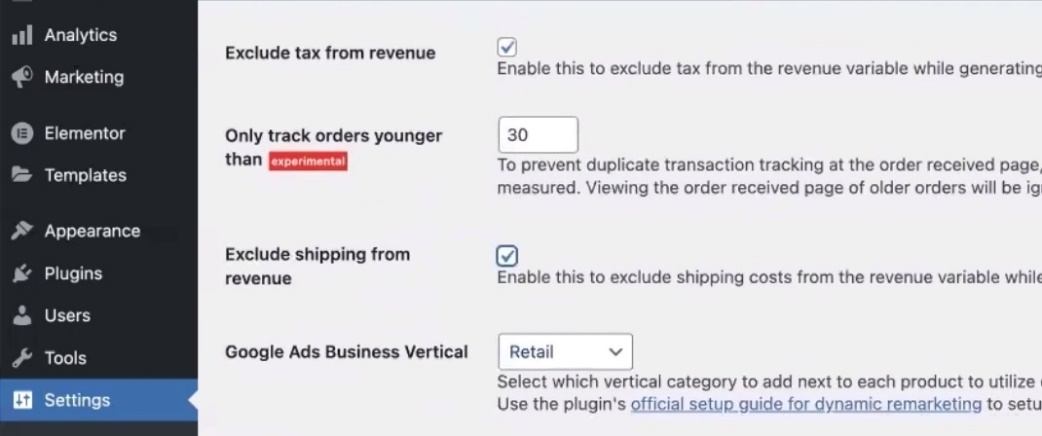
Now a moment about taxes and shipping. I always exclude taxes from revenue — I want to see real numbers and work with actual profitability, not inflated amounts. Same with shipping: if you need clean revenue without shipping and taxes — check the appropriate boxes. If you want to see “gross” revenue, that is, the full amount that comes to your account — don’t touch the checkboxes. Here everyone adjusts to their accounting model.
In the business type block, be sure to select “Retail”. There are options for education, airline tickets, different industries — but since we’re setting up an online store, our option is specifically “Retail”.
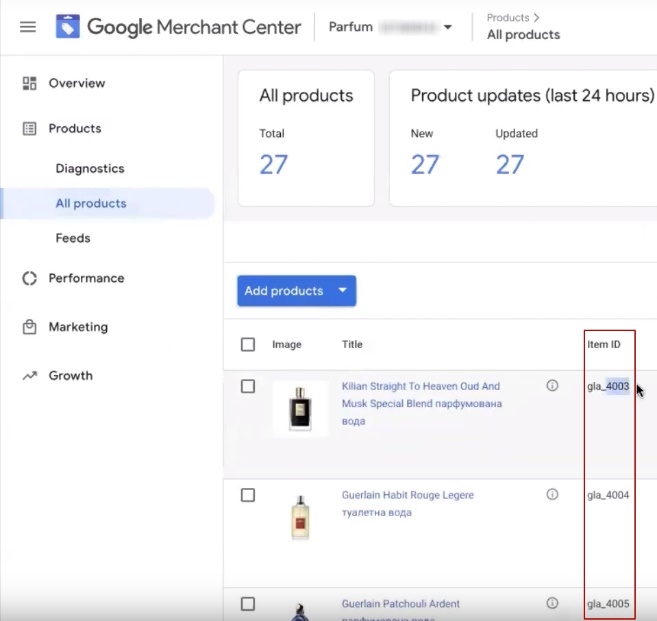
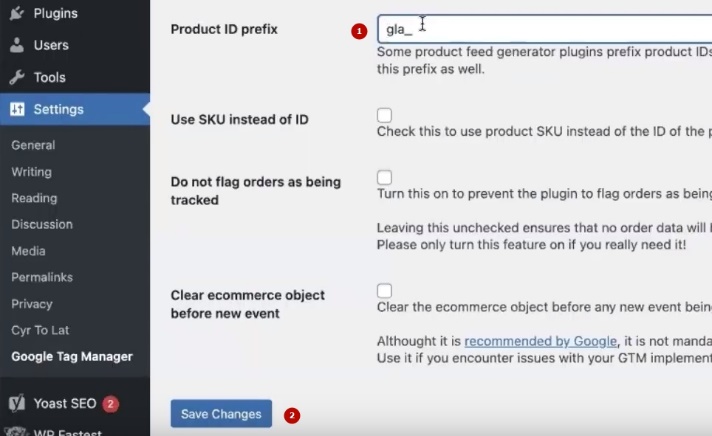
I’ll specifically stop at the “Product ID prefix” field. To understand whether you need to fill it in, go back to Google Merchant Center, open “Products” → “All products” and look at the product identifiers. If there’s some prefix before the numbers — for example, “gla_” — you need to copy it and paste it into this field in the plugin settings. Why this is needed, I’ll tell you a bit later when we get to conversion setup. Don’t check anything else here, click “Save”.
Just in case, double-check that the container block is in “ON” status — sometimes after saving settings it resets. Check the container code, click “Save changes”. After that, return to Google Tag Manager, click “Submit”, then “Publish” — so that all changes take effect.

Exporting and importing a ready-made Google Tag Manager container
And now the most interesting part begins. At this moment, our container is completely empty — it has no tags, no variables, no triggers. We’ll fix this, and quickly.

Return to the GTM4WP plugin (Thomas Geiger’s plugin), go to the “Integrations” tab, again open the “WooCommerce” section and find the link to “Official Guide”. Scroll down the page to the link for the ready-made container.
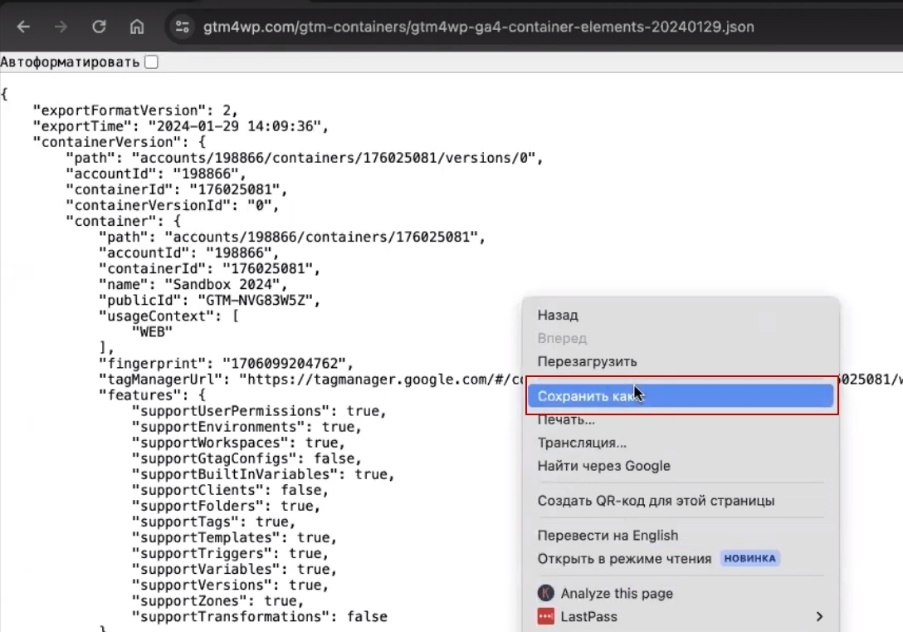
Right-click on it, select “Save as” and confirm saving. The file downloads in the needed format — no additional conversion required.
Now return to Google Tag Manager, go to the “Admin” section and click “Import Container”. Select the file you just downloaded.
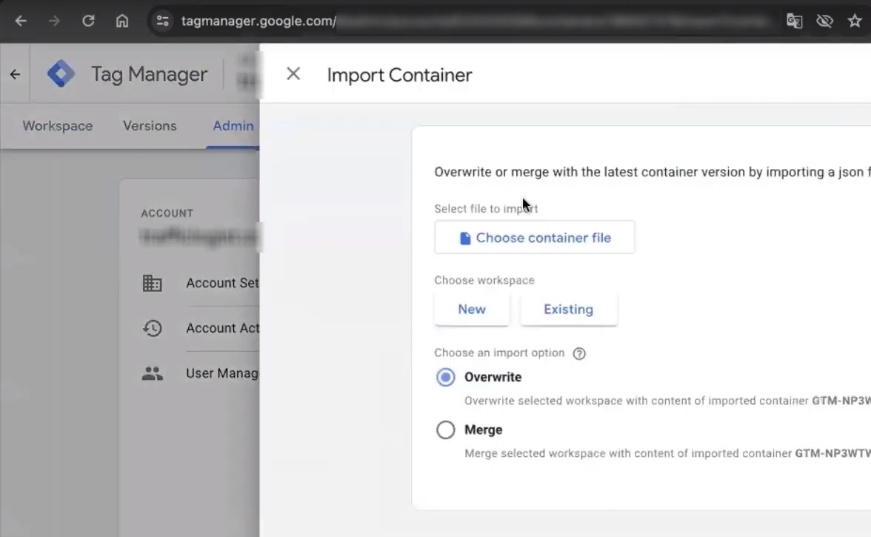
Next, the system will offer two options: import the container into a new workspace or an existing one. If, like in our case, the container is absolutely empty — choose “Existing”. On the next step, Tag Manager will ask whether to overwrite the content or merge. Since the container is clean — confidently select “Overwrite”.
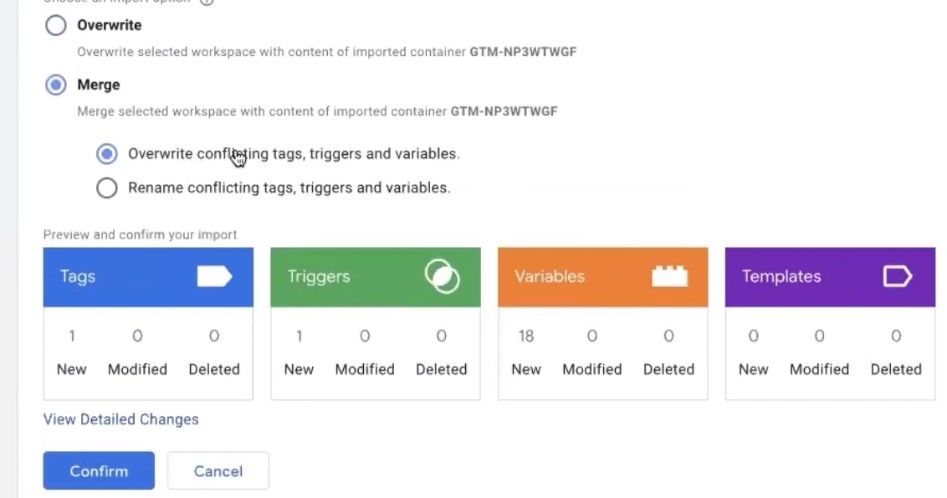
But if you’ve used Tag Manager before and it has some configured tags, then it’s better to choose “Merge”. This way you won’t lose existing settings. When merging, the system will also clarify — overwrite conflicting tags or rename. I choose “Overwrite conflicting tags”, confirm — and done.
After import, you’ll see that tags and a whole set of variables have already appeared in the container. This saves a decent chunk of time, because manually creating each variable is a long and monotonous task. Next, we’ll only need to fine-tune everything for your store.
Installing the fourth analytics Global Tag
Remember, earlier we created a Google Analytics 4 account? It’s time to connect it to our container. To do this, we need to install the so-called Global Tag — the basic tag without which analytics simply won’t receive data from the site.
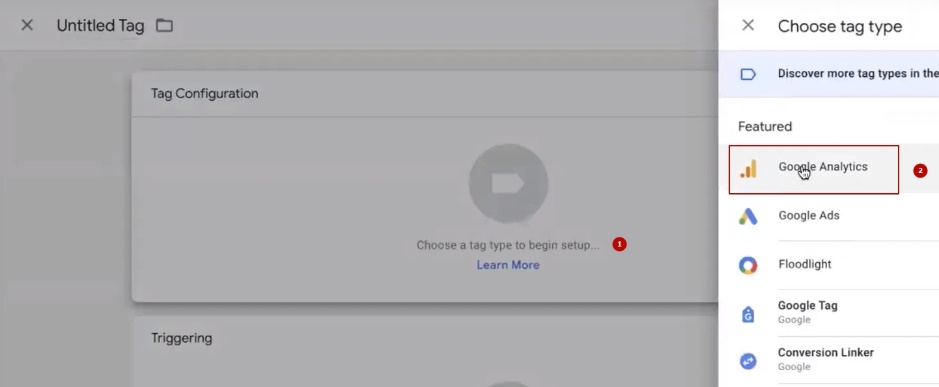
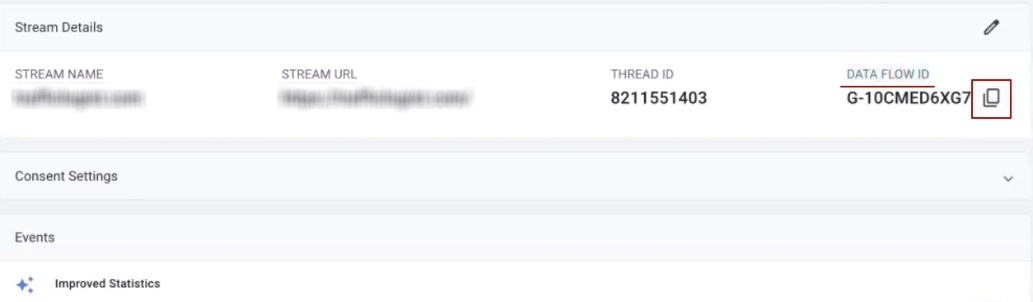
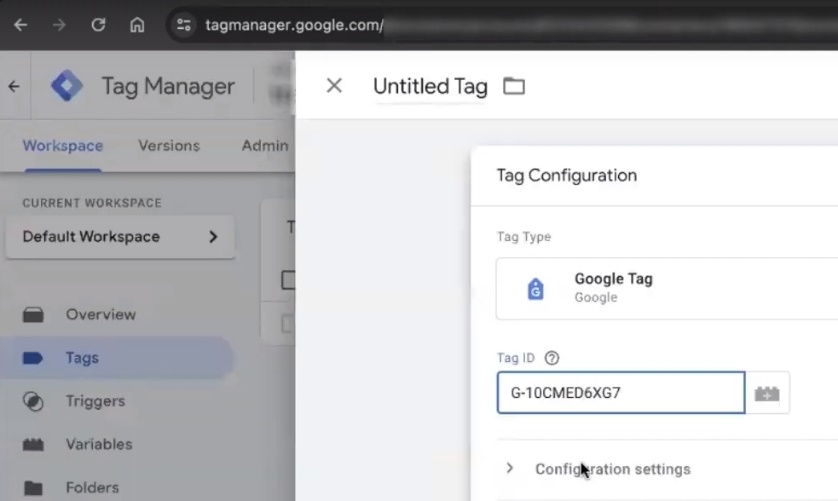
Go to Google Tag Manager and click “Create tag”. In the type list, select Google Analytics, then — Google Tag. Now we need the data stream ID. Return to our analytics, find the Data Streams section, open the needed stream and copy the Measurement ID — it starts with “G-” followed by a set of characters.
Paste the copied ID into the corresponding tag field.
Next, we need to assign a trigger. If you’re unsure which trigger to choose — check the official GTM4WP plugin documentation I mentioned earlier. They recommend using the “Initialization” trigger. I always pay attention to this: if something changes over time and my recommendations differ from current documentation, you always have the primary source to return to.
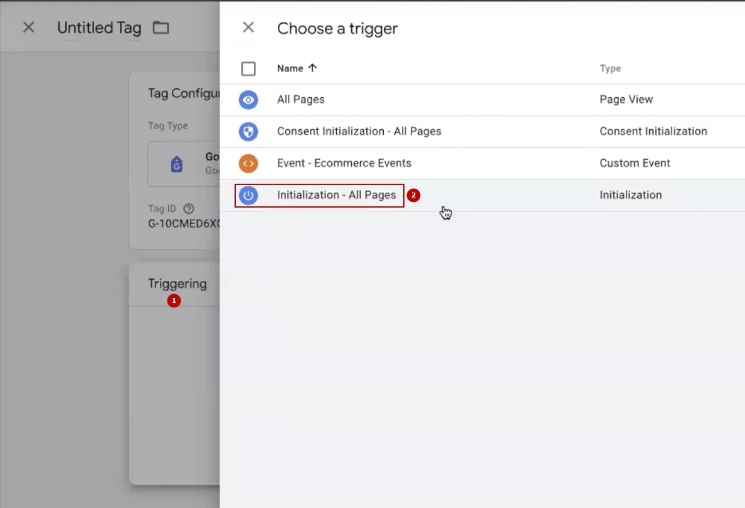
Name the tag — for example, “GA4-id” — and click “Save”.
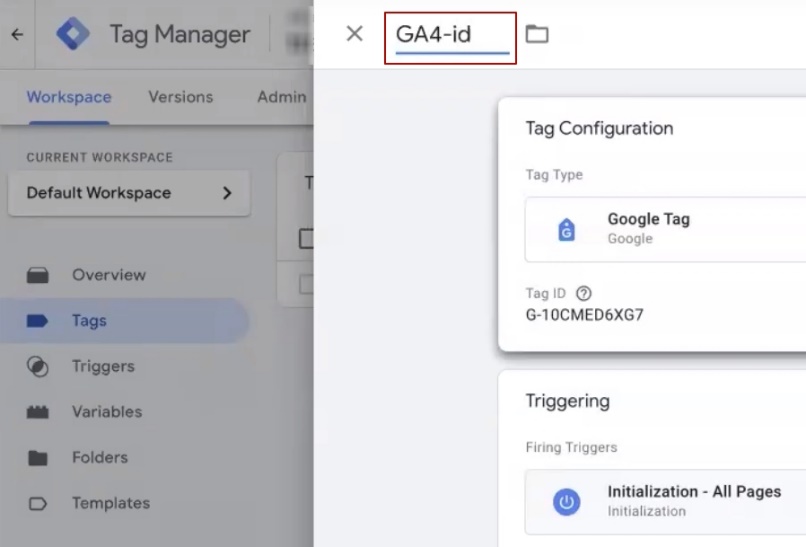
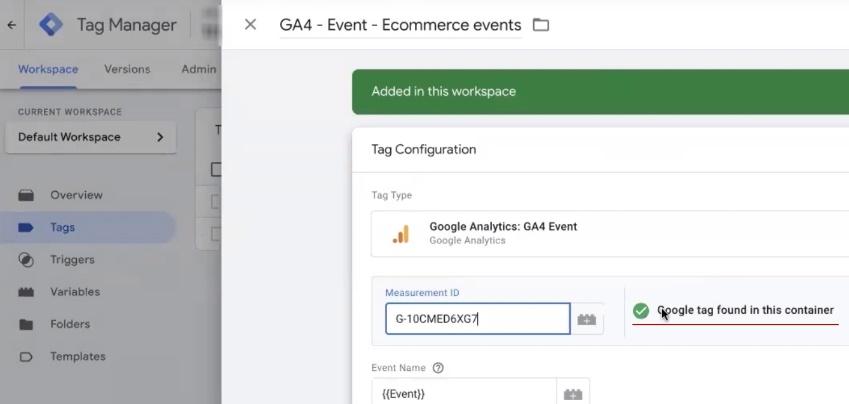
After saving, go into the just created tag once more. Here’s an important point: you need to remove the automatically inserted value and manually paste the Measurement ID from the fourth analytics. I prefer to do this before the “Google Tag found in container” message appears — this way you definitely won’t get confused. Save.
What have we achieved at this stage of setup?
Let’s record what we’ve already done and why it’s needed. At this moment, we have a working draft — a basic configuration for further setting up Google Analytics 4 for an online store. What does it give us?
- Foundation for tracking conversions and target actions on the site. When everything is finished, you’ll be able to see the full picture: which products are viewed most often, what gets added to cart, and what is ultimately purchased. This is a truly powerful report — I’ll show it later using Google’s demo account so you can appreciate the scale. Such analytics helps understand which positions in the catalog actually work and bring money, and which just take up space.
- The fourth analytics will show how visitors behave on the site — where they linger, where they leave, which pages cause difficulties. If you need to improve something in usability or store structure — this data will be invaluable.
- Even if you decide not to dive deeper into further settings, you can already use the purchase conversion from GA4 and import it into your Google Ads advertising account. We’ll set up a separate conversion for this a bit later. But that’s a slightly different story.
Reminder: if you don’t want to go through all the steps manually and prefer to get a ready-made container where you only need to substitute your IDs — write in the comments, I’ll share the file for import.
Placing a test order
Now moving on to verification. We need to make sure that all configured events fire correctly and data actually goes to analytics. To do this, let’s place a test order.

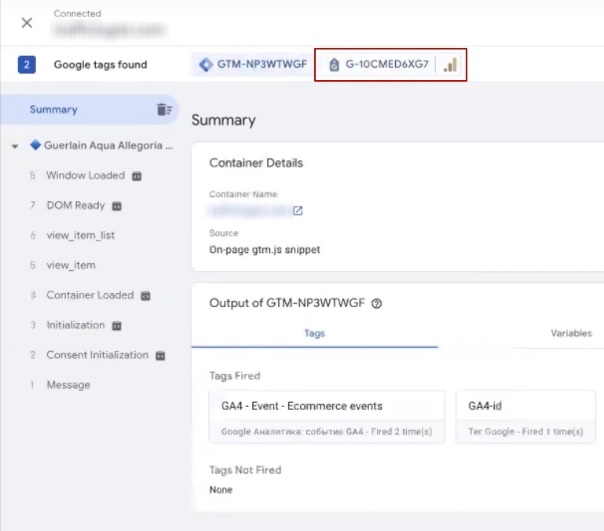
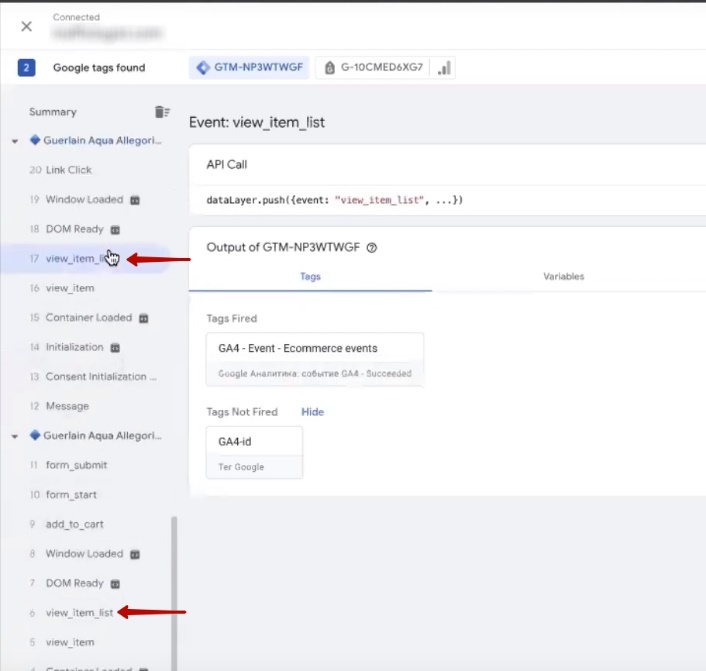
Open any product card on the site. Simultaneously go to Google Tag Manager and click the “Preview” button — this launches debug mode. Insert the site link and wait for loading.
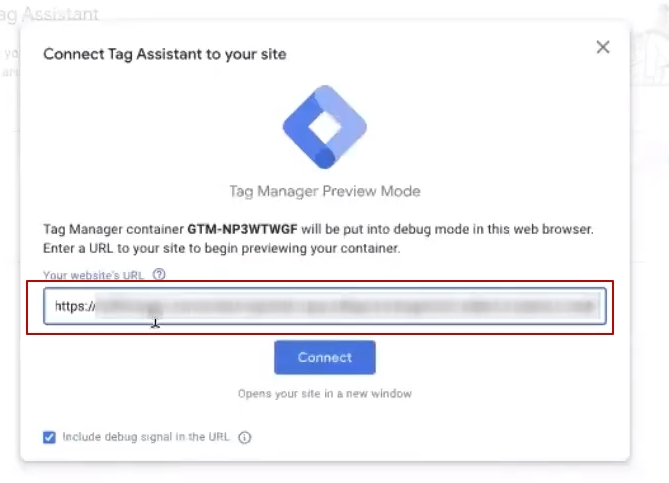
After launch, at least two windows will open. The first is the Tag Assistant debugger, where you can see in real time all firing tags and events. You’ll immediately notice that the fourth analytics is already installed through Google Tag Manager — the system will confirm this. The second window is the site itself with the note “Debug information for this page is viewable in the Tag Assistant window”.
It’s in the second window that we’ll go through the entire buyer journey: open the product card, add it to cart, proceed to checkout, fill in the data and complete the order. Just move through the steps as a regular buyer would. At the finish — the order confirmation page. It may look different: on some templates it displays full order information, on others — just “Thank you for your purchase”. This depends on your WordPress theme and doesn’t affect data transmission.

And now the most important part — return to the Tag Assistant debugger window. Scroll the events list to the very bottom and check what was recorded. What events are we looking for?
- view_item — signal that the visitor viewed a product card. For example, went to a page of specific sneakers or a phone case.
- view_item_list — viewing a listing, that is, a product list. This could be a category page (“Nike Sneakers”), a related products block on the card, a “Frequently bought together” collection — anything that represents a list of items.
- add_to_cart — adding a product to cart.
- view_cart — viewing cart contents.
- begin_checkout — starting order checkout.
- add_shipping_info — filling in shipping information.
- add_payment_info — selecting payment method.
- purchase — final event, purchase confirmation.
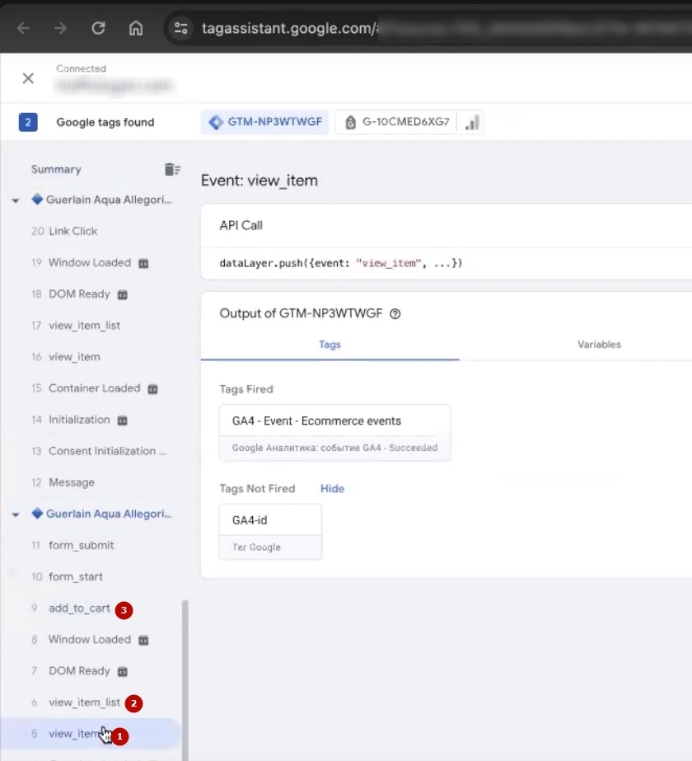
All these events should automatically “push” to our analytics if the previous steps were done correctly. If you don’t see some event — don’t panic, we’ll figure out how to fix this later.
Viewing test order results in analytics
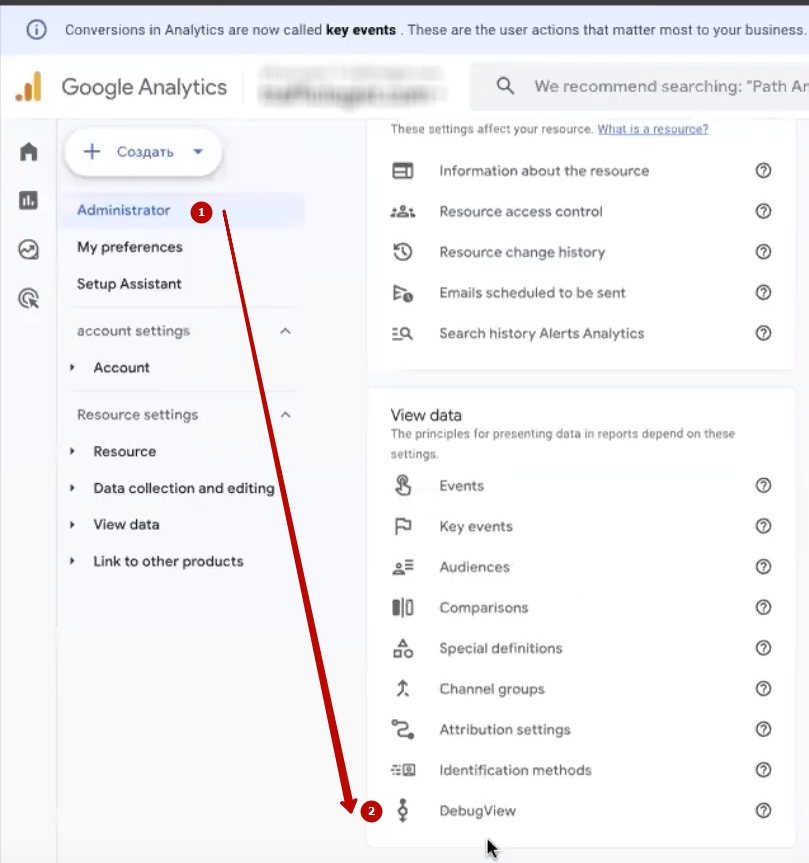
Test order placed — now we need to make sure all data reached Google Analytics 4. Close unnecessary tabs and go to the analytics interface. Click “Admin”, scroll down the page and find the tool called DebugView.
This is a built-in analytics debugger that shows events in real time. Sometimes data pulls up instantly, sometimes you need to wait a couple of minutes — this is normal. Once the information appears, scroll the events feed down and begin checking.
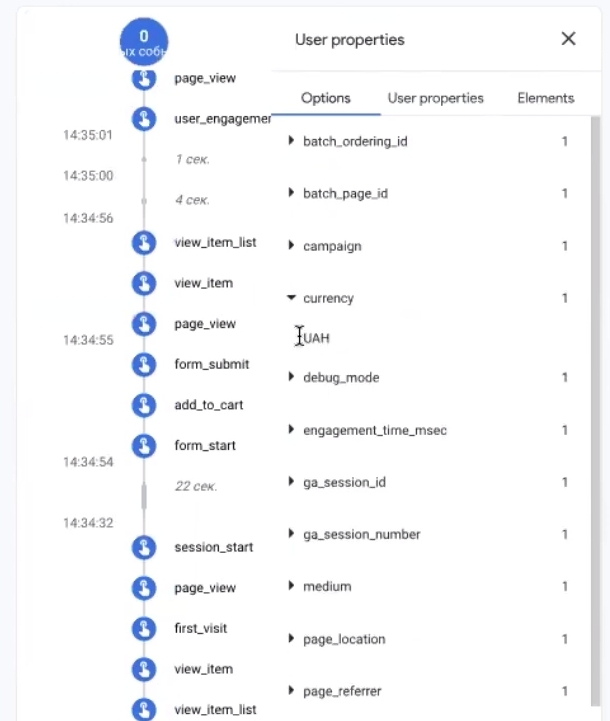
Open the view_item event. Inside, two key parameters must be transmitted: currency and value. The value should match the price that was indicated on the site. Let’s say the product cost 1250 UAH — then in analytics we should see 1250. Other parameters — product ID, quantity, name, category — are also transmitted, but the most critical are value and currency. The price in the “Items” block may display in an unusual format — don’t worry, the main thing is that everything is correct in the value parameter.
Moving to view_item_list. The logic is the same, only there will be more elements — since a listing contains several products. For example, if a “Related products” block with two items was displayed on the product card, you’ll see exactly two elements in the event.
Next — add_to_cart. There’s one important nuance here. The add to cart event should fire specifically when clicking the “Add to cart” button, not when viewing the cart page. These are different actions. Viewing cart is a separate event (view_cart). So if you added one product, but see two in add_to_cart — something is configured incorrectly. Check value and number of elements.
When you open the view_cart event, there will already be the total sum of all products in the cart. Let’s say you added two products at 2005 and 2005 — in value you’ll see 4010. Everything should add up arithmetically.
Same check for begin_checkout — make sure the number of items and sum match what was in the cart at the time of checkout. In our example — two items. Similarly check add_payment_info and add_shipping_info: currency, value, elements — everything in place.
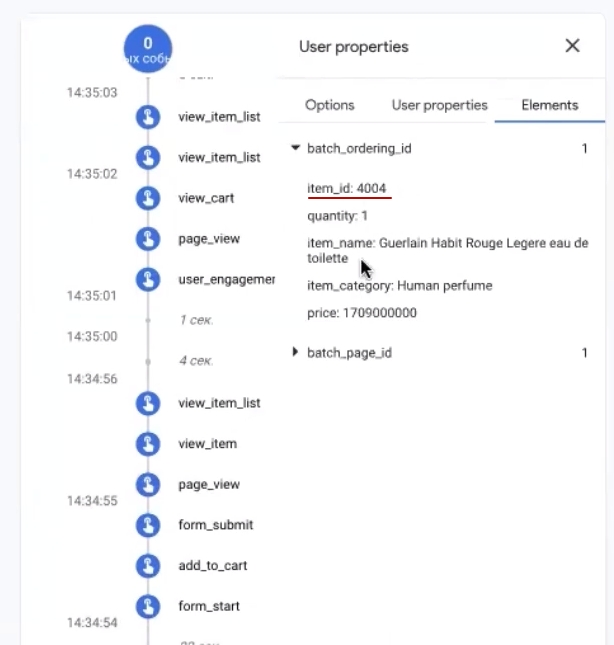
And finally — the purchase event. In DebugView it’s highlighted in green, because this is the main conversion we set everything up for. What must be inside? Currency, order sum (value), shipping data (shipping), and transaction ID — the transaction identifier. It usually matches the order number in WooCommerce. For example, in our case it’s 5304 — we look in the store admin and see an order with the same number. If the identifiers differ, figure out where the number comes from — sometimes plugins or custom settings replace the standard numbering. Open elements: first item — in place, second — also. Value matches the final sum of 2564. Everything matches, data is transmitted correctly.
Example of Google Analytics 4 report for an online store
So, conversion tracking setup is complete. What to do with this now and what reports become available? I’ll show using Google’s demo account example — this is test analytics with aggregated data that anyone can access and see how reports look “live”.
Go to the “Monetization” → “Ecommerce purchases” section. Here a complete picture by products opens: names, number of views, add to carts and purchases. Essentially, you see the entire funnel for each position in the catalog.
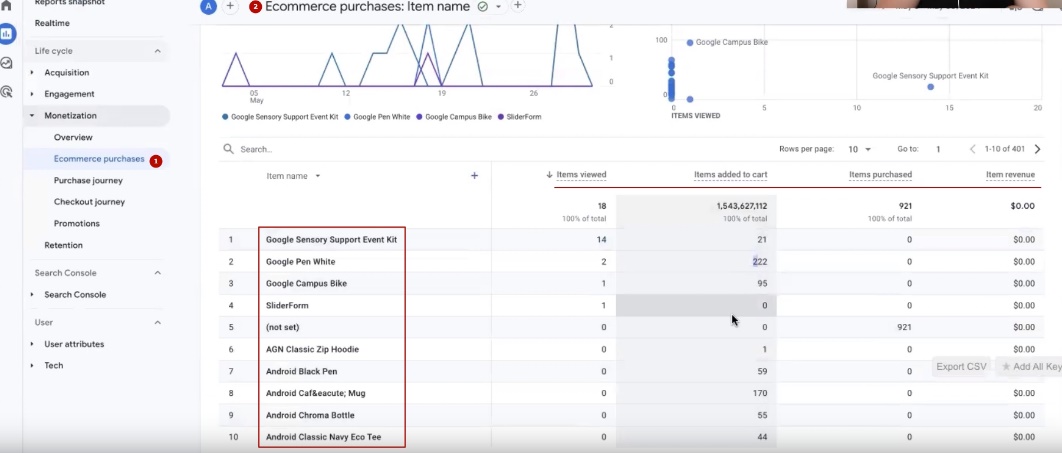
Here’s how this works in practice. Let’s say you have 200 products in your store. In the report you can see that the “Basic Black” t-shirt was viewed 3000 times (view_item), added to cart 400 times (add_to_cart), and purchased 85 times. While the “Runner Pro” sneakers were viewed 5000 times, but only purchased 20 times. Immediately it’s clear: something is wrong with the sneakers card — maybe the price is too high, maybe the photos aren’t selling, maybe shipping is expensive. Without this data you’d just be guessing, but with it — you make decisions based on numbers.
A separate column is revenue. For revenue to be calculated correctly, it’s critically important that the currency parameter is transmitted properly. This is what I emphasized when checking in DebugView — without currency, analytics won’t be able to correctly calculate revenue. Even Google itself has problems with revenue display in the demo account, so check this point twice in your setup.
This report is one of the most useful tools for an online store owner. Besides it, GA4 has many other slices: by categories, by traffic sources, by user behavior on the site. Each deserves separate analysis, but the main thing — the foundation for e-commerce data collection is already laid.
Why can events duplicate?
Returning to Google Tag Manager. The fourth analytics is set up — but there’s one nuance worth knowing in advance.
After everything starts working, you may notice that some events begin to duplicate. Most often this concerns view_item or view_item_list — the same action is recorded two, or even three times in a row. Why does this happen? The reason usually lies in the combination of your specific WordPress template and the set of plugins you use. For example, one theme may generate a product view event on page load, while an installed analytics plugin duplicates it on scroll. As a result, instead of one view_item, two appear in the report, and statistics start lying.
I recommend watching a separate video about how to avoid event duplication — I’ll leave the link in the description or it will appear in the hint for this video. If the picture in your DebugView differs from what I showed — don’t panic. Review that material, find the extra firings and remove them. The logic is simple: each event should be recorded exactly once per one user action.
In my example everything is clean — no duplicates, except for view_item_list. Leaving it as is for now, but if necessary this is easily fixed.
Fourth analytics is set up — great. Don’t forget to publish the container. Go to Google Tag Manager, click “Submit”, give the version a name — for example, “GA4” — and publish. From this moment, analytics will begin collecting all data about visitor actions on the site.
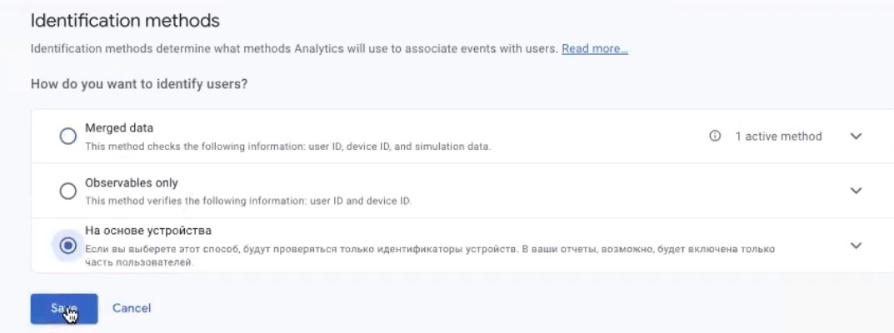
How to choose an identification method?
One more point worth adjusting in Google Analytics 4 settings. Go to analytics administration, find the “Reporting Identity” section, click “Show all” and select the last option — “Device-based”. Confirm the selection.
What does this change in practice? By default, GA4 tries to “stitch” users by several signals — Google Signals, User-ID, and device data. Sounds good in theory, but in practice this often leads to distortions in reports: numbers fluctuate, users duplicate or, conversely, collapse. The “Device-based” method gives a more stable and predictable picture, especially at the start, when you need data accuracy for decision-making.
If you want to understand this deeper — look into the Google Analytics demo account and see how different identification methods affect data display.
What’s next?
We’re finishing with Google Analytics 4 setup. But there’s still an important step ahead — we need to connect the fourth analytics with Google Ads. Without this connection, the advertising account won’t be able to use conversion data for campaign optimization. How exactly to do this, we’ll analyze at the next stage when we move to creating and setting up a Google Ads advertising account.
For now, moving on — we have other tools to set up that are necessary for a full advertising launch.


