One of the most progressive but unjustifiably rarely used services among all Google tools is Google Ads Editor. Even if you are professionally engaged in setting up and managing contextual campaigns on the platform itself, once you start using Ads Editor, you can discover many useful chips that simplify your work.
The service offers a set of effective intelligent tools that simplify the process of advertising optimization. This guide to working with Google Ads Editor is intended to help everyone to understand this system and learn more about the opportunities it provides.
What is Google Ads Editor?
Google Ads Editor is an application whose main task is to quickly and conveniently make large-scale adjustments to advertising campaigns. It has a simple user interface, navigation is intuitive even for inexperienced users.
Tip! Adding new ad groups and campaigns, testing and managing semantics – all this is possible through the editor, so you will hardly need to download the standard AdWords web-interface.
All account management is done locally. Adjustments are made on your computer and then uploaded to the AdWords office. Beforehand, it is necessary to create a kind of image of the advertising account on your PC by downloading all the information from the network. Any updates start to be applied to real campaigns only after the data is sent to the server.
Advantages of Google Ads Editor over the web interface
- Autonomy. With Google Ads Editor, you can work on your marketing campaigns without the need for a constant internet connection. You can quietly make changes while offline, and then with a click of a button upload updates to the server when a connection is available. This is especially convenient when traveling or with an unstable Internet connection.
- High speed of work. Editing campaigns here is much faster than in the web version of AdWords. There is no need to wait for pages to load and no need to switch between tabs. It is quite possible to create 60 campaigns in an hour in this tool.
- Ability to undo changes. Accidentally deleted your ad or made an incorrect edit? Until the changes are sent to the server, you can always undo them in a couple of clicks. This protects against errors and saves time.
- Mass editing of elements. As in the web interface, in a separate application you can apply bulk changes to several campaigns, their groups or ad sets. But here the process is more visual – you can see at a glance all the objects being edited and the adjustments being made. For example, it is possible to change headlines in 15 ads literally in 2-3 minutes.
- “Special rules”. Built-in validation prevents a campaign with critical flaws from being uploaded to the system. This helps you create campaigns that meet all Google’s requirements and pass moderation the first time.
Are there any disadvantages to the Google Ads editor?
- It does not support working with Perfomance Max product listings. As of today, this feature is available only in the web interface. However, given the program’s regular updates, it is likely that it will be added to the desktop editor in the future. In the meantime, you will have to use the online version when working with Perfomance Max campaigns.
- Less available statistics. The Google Ads editor is optimized primarily for quick and easy editing of campaigns, rather than in-depth data analysis. In the “Overview” tab you can get a general summary of key indicators, but for more detailed analytics it’s better to turn to the Google Ads web interface (ideally, link it to GA 4).
- You need to remember to regularly synchronize the latest changes. Unlike the online version, the editor does not update data in real time. It simply replaces the information with what was last uploaded. This means that if you or a colleague made edits to your account via the web interface, and then you download your version from the editor without updating the data, all online changes will be lost. To avoid this, develop the habit of always clicking the “Get recent changes” button before you start working in the editor and before you publish any changes. This way you will be sure that you are working with the most up-to-date version of your account and won’t accidentally delete important settings. This simple action will save a lot of time and nerves.
How do I set up Google Ads Editor for the first time?
Before proceeding to customizing the Google Ads Editor, you should install the application itself. You can find it by searching for it or downloading it from the “Advanced Campaigns” section of AdWords:
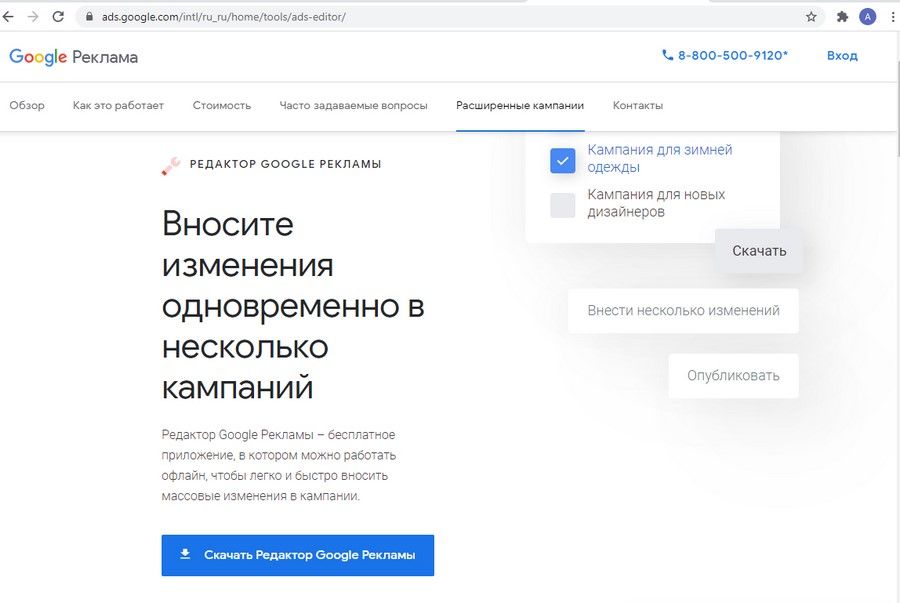
The download will start as soon as you click the corresponding button. During the download process, the system itself will determine which version of the software is required depending on the operating system on your computer.
Now you should install the program by running the downloaded file. The system will offer you a choice of two authorization methods – using the Google Chrome browser or the browser built into the application:
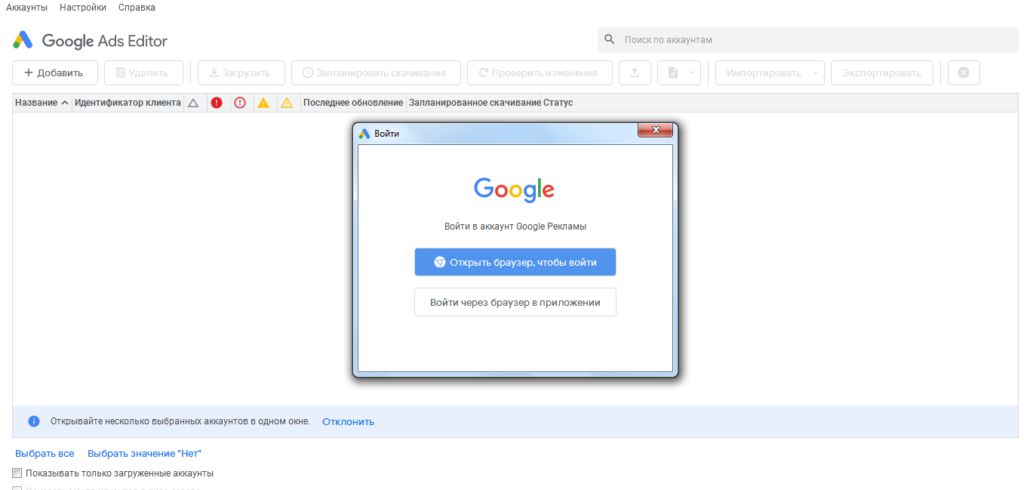
Enter your e-mail and password in the account login form that appears, then click on the “Next” button.
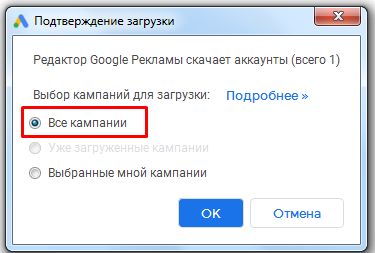
Determine which campaigns you want to upload: active and suspended campaigns or only those selected by the advertiser:
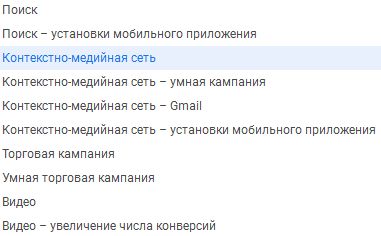
If you want to selectively upload campaigns of a certain type (for example, exclusively search or CMC), click on “Select campaigns by type”:
Confirm your action to signal the algorithm to start uploading. Wait until the copy process is complete.
How do I work with the Google AdWords editor interface?
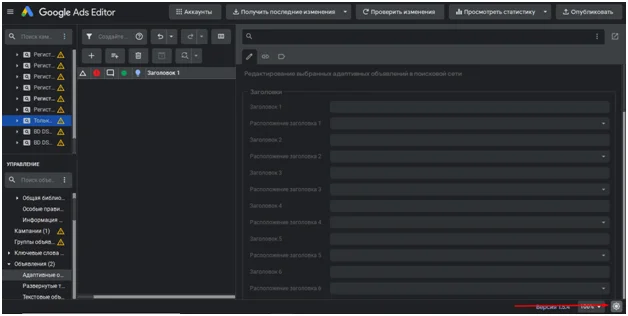
The interface of the application ready to work (the user is authorized and campaigns are loaded) looks like this:
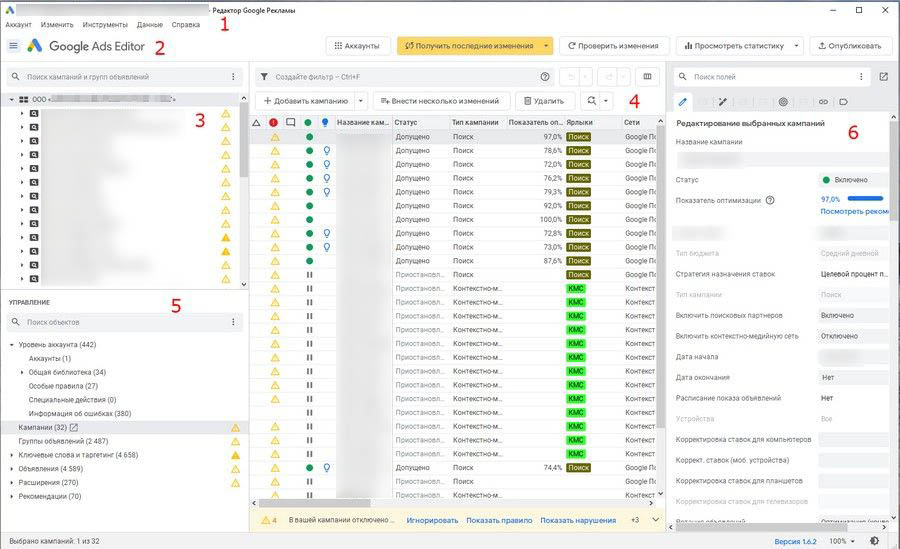
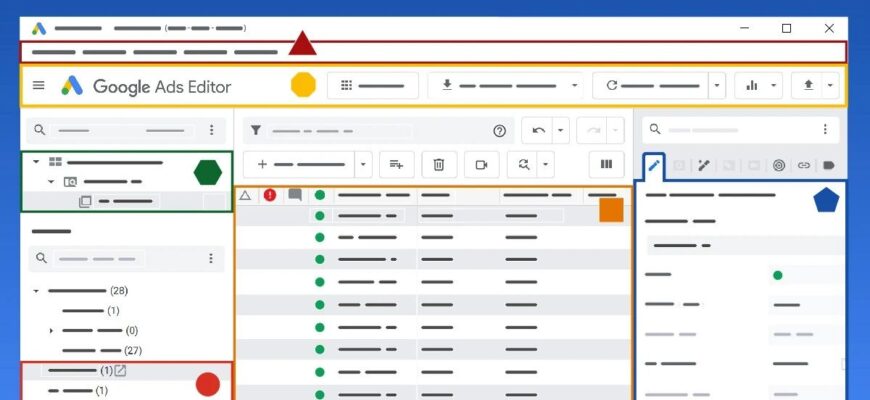
The image shows numbers opposite the important modules. To understand how to work with Google Ads Editor, let’s look at six key modules of the software workspace:
- Main Menu. Here you can find standard commands for interacting with files and program settings, just like in most other applications. In Windows, the main menu is located at the top of the working window, while in macOS it is at the very top of the screen. It is used to create a new account, import or export data.
- Toolbar. Contains frequently used functions for managing accounts and campaigns. For example, you can quickly connect your Google Ads profile, update your data, check and publish changes, or open summary statistics.
- Account Tree. Provides access to the hierarchical structure of your account – campaigns, groups, and individual ads. The tree can be used for faster and easier navigation.
- Workspace. This is the main part of the window where the data of the selected account, campaign or ad group is displayed in the form of a table. Which columns will be shown depends on the type of selected data in the dashboard. For an ad group you will see keyword and ad settings, and for a campaign you will see general settings like budget and geotargeting.
- Control Panel. Located below the accounts tree and allows you to choose what type of data you want to see in the workspace. For example, select a campaign and switch to the keywords section to manage minus words for that campaign only.
- Edit panel. It is displayed on the right side and allows you to change the parameters of the selected object. Values can be edited directly in the corresponding fields or entered from the keyboard. If you need more space on the screen, you can move this panel to a separate window.
The list of items displayed by default is quite large. For convenience, you can leave in it only those items that are used in your campaigns. You can do this in the following way:
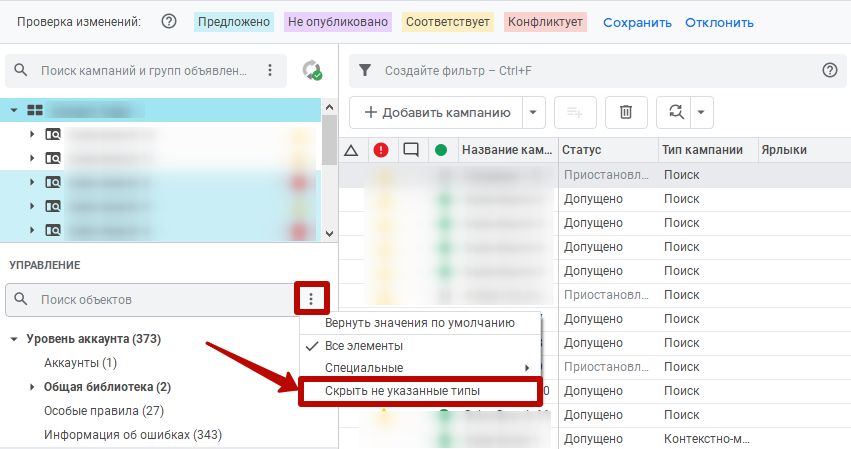
In the account tree, you can limit or organize the display of campaigns and ads by type or status:
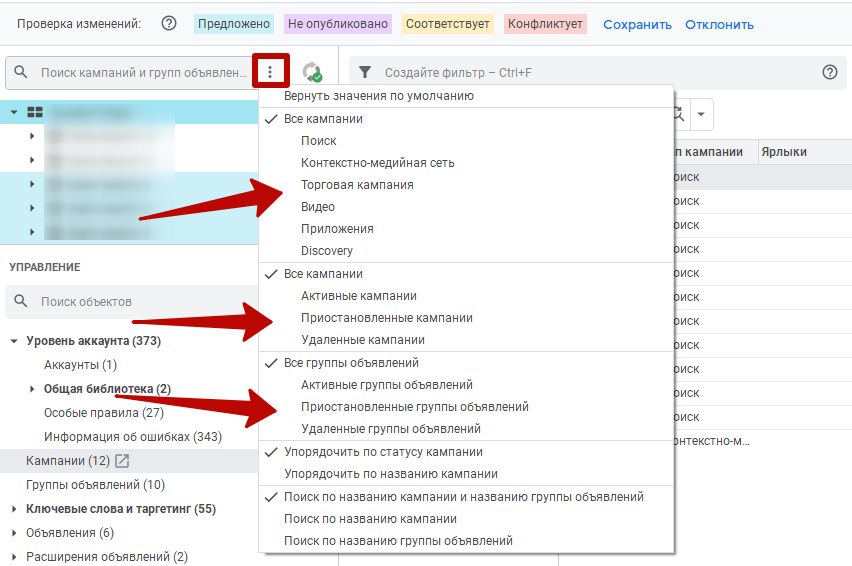
Depending on the advertiser’s objectives, you can customize the display of only certain data. Columns with unnecessary information can be hidden.
To exclude columns from the table, use the button:
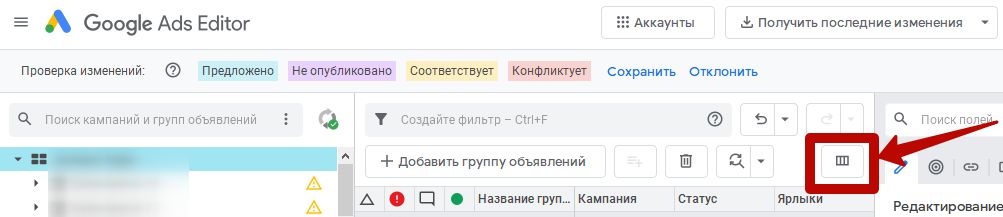
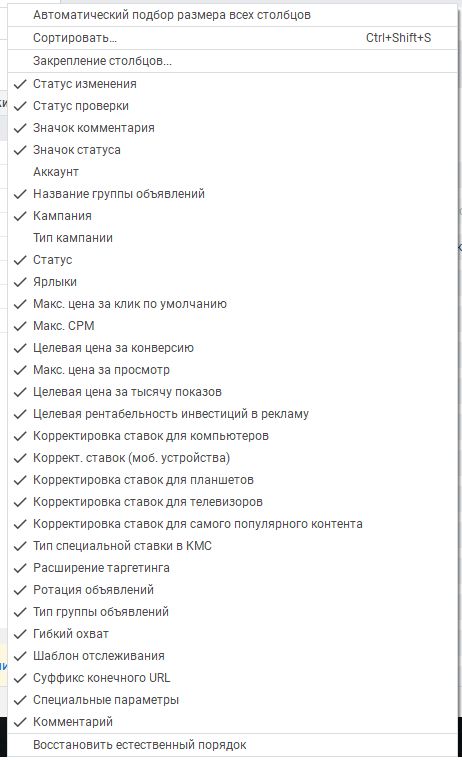
Fix those metrics that you need to see:
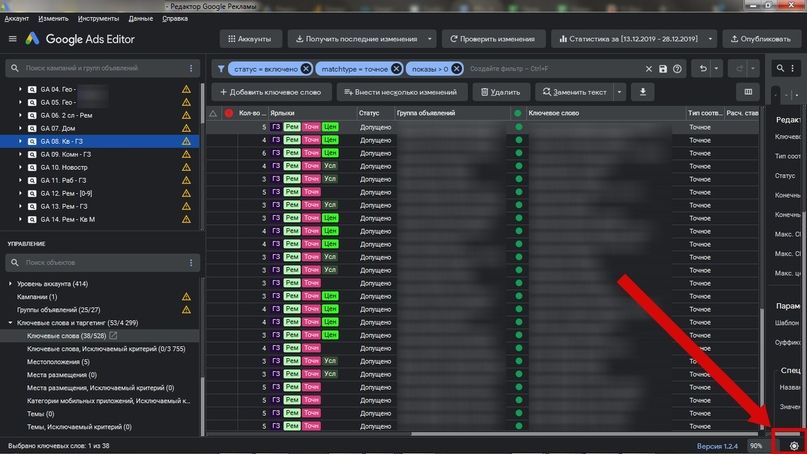
Two interface themes are implemented in the system: dark and standard light. You can switch between them quickly using the button located on the right side of the screen, in the lower corner:
Choosing a theme is a matter of taste. Some people find the darkened interface less stressful on their eyes.
Overview of useful features of Google AdWords Editor
In the following article you will learn about the most popular features of Google AdWords Editor, regularly used by PPC specialists when working with advertising campaigns.
Bulk editing of ads
In the application it is convenient to adjust budget, set rates and edit other settings of several campaigns or ad groups at once.
Using the account tree and holding down the Ctrl button on the keyboard, mark the campaigns where you plan to make changes.
In the edit box on the right, update the parameters for all marked items. These can be rate values, label URL parameters, or even text fragments of selected items. To replace the text, use the corresponding button in the control panel.
Next, we are interested in the “Replace” tab, where you can partially update the text by filling in the fields and clicking the button of the same name:
In this window you can also add common UTM tags. Locate the “Modify URL” tab and check the “Add text to all URLs” checkbox. In the box below, enter the link and apply the changes.
Importing data from another account
This function is useful if you need to copy data from one account to another. The relevance of the tool is also due to the fact that the standard transfer of information is not performed correctly every time. This problem is often solved by specialists using a table editor.
You need to find the item “Export entire account…” to write the information to a CSV format file:
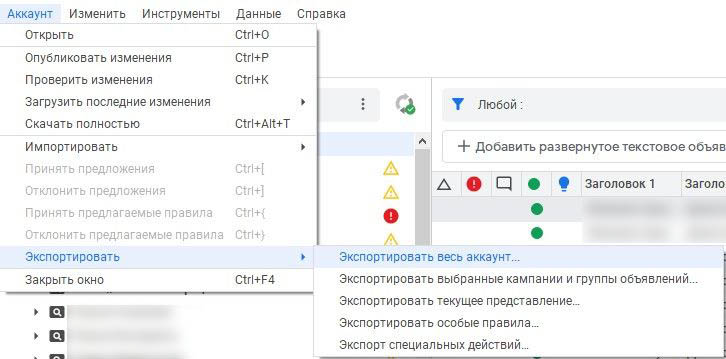
Specify the location where the data will be copied to and make the transfer. It may take quite a long time to export an account with a large number of items.
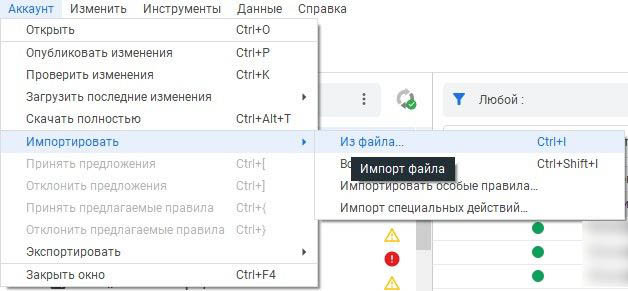
Authorize in the office where you plan to upload the saved information. You can use the import from file function built into the application, but this method sometimes works incorrectly. The errors arising in the process are difficult to identify, and the program itself often does not read its own files.
A similar problem occurs when external transfer tools are used, for example, the function of transferring campaigns from Yandex to Google.
A more reliable way is to make group changes, for which in the target account select the appropriate position in the campaign tree and click “Make multiple changes”. Open a file in MS Excel.
Copy the data, having previously selected the entire table, and transfer it to the table editor:
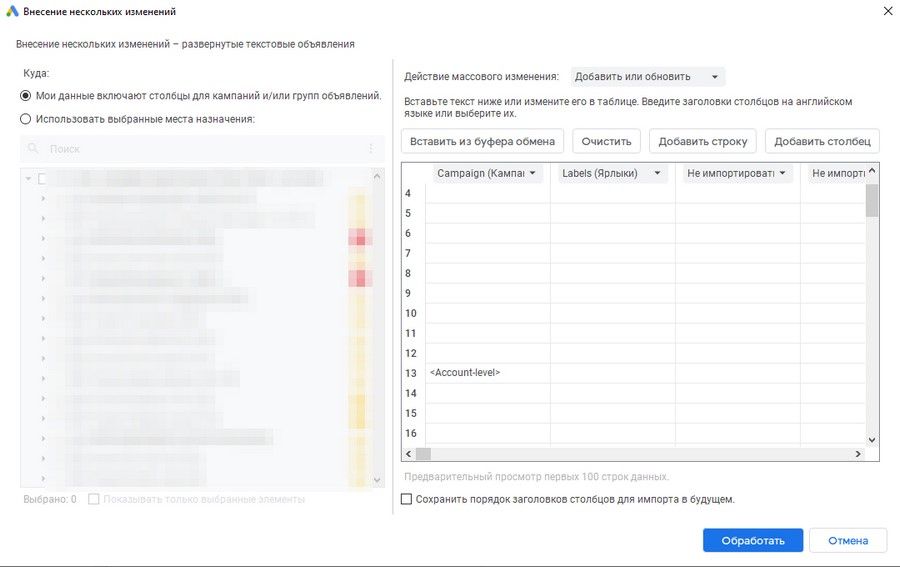
Click on the “Process” button and wait a bit until the system finishes importing the information. Most likely there will be no problems in the process, but even if there are errors, you can easily find and correct them.
Once the upload is complete, save the changes and you can start publishing.
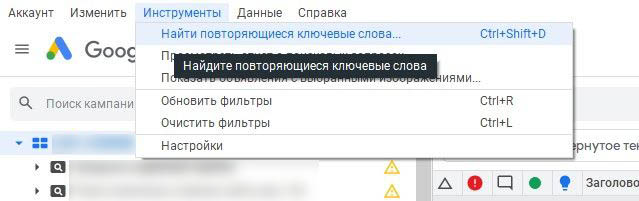
Search for duplicate key phrases
Sometimes it is necessary to create many campaigns at once, but due to the fact that a large amount of information is not easy to control, keyword phrases may be duplicated. This situation is often found in accounts where customization work was performed at different times by different people. To identify and remove repetitions, a convenient solution is implemented in the Google Ads editor.
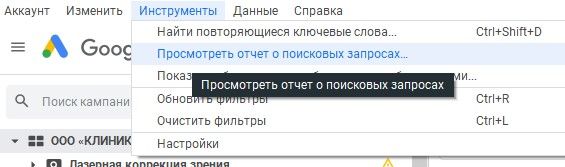
Using the main menu and the “Tools” item, go to the “Find repeated keywords” link:
Clicking on it will bring up a search form:
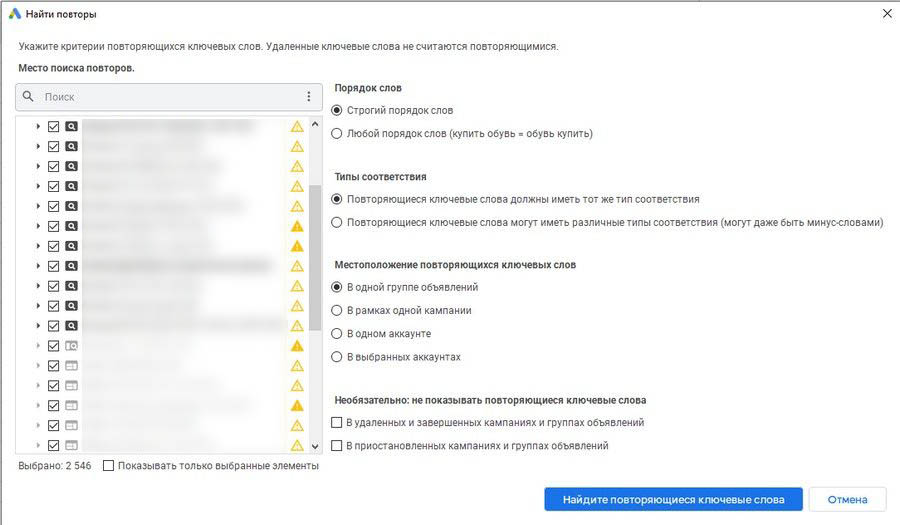
In the left module, mark the positions you plan to continue working with. On the right side you can customize the search:
- Word Order. If a keyword consists of several parts, you can limit the search to a strict word order or allow any combination of words.
- Match types. Of the three existing match types, which determine the order of inclusion of search queries in a keyword, you can search for duplicates only within one of them. Alternatively, you can search for duplicates in different match types, even taking minus words into account. This often helps to detect keyword phrase blocking by minus phrases.
- Location of takes. Set the level of duplicate search – it can be a group of ads, a campaign, an individual account or even several of them.
- Optionally, you can set the search to include deleted or stopped campaigns.
After defining all the parameters, run the search. You will see the result on the main working panel.
In the case when you, for example, tested keywords in a broad and phrase variant, but forgot to stop less effective of them, the system will definitely show this defect. You will be able to optimize the further work of the account by removing unnecessary key phrases.
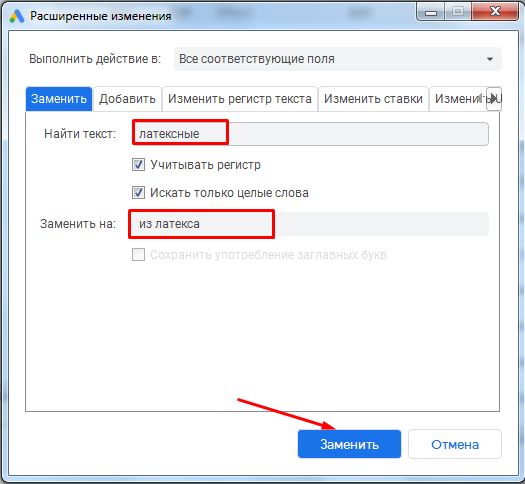
Using formula words
Words in the elements to be corrected can be edited using formula words. It takes time to compose them, so it is not very efficient to use the tool to replace a single phrase. But when simultaneously editing several text fragments at once, it is quite reasonable to use it.
The algorithm of actions looks like this:
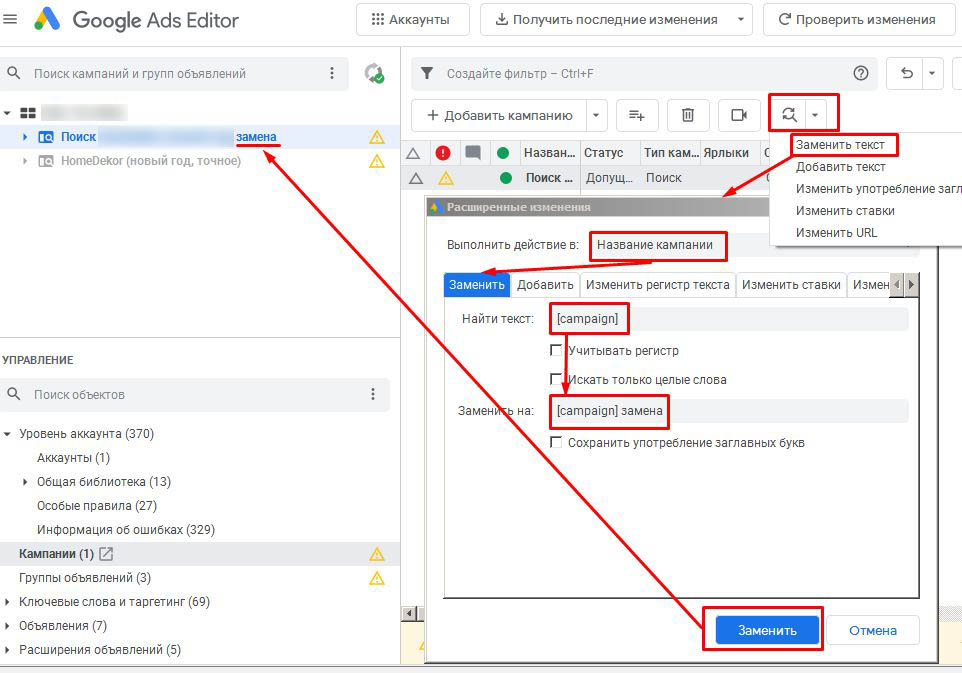
- Highlight all positions where you plan to make changes by pressing the Ctrl button on your keyboard.
- In the main panel, find the “Replace text” link and click it.
- In the form that opens, select “Campaign Name” in the “Perform Action” list.
- Fill the “Find text” field with the formula “[campaign]” and write “[campaign] replacement” in the “Replace with” field.
- All adjustments should be saved.
How do I view reports on search queries?
To evaluate the effectiveness of key phrases, you often need a list of search queries that visitors used to get to the site. You can generate such a list both in the web interface using a special report, and in the application using the corresponding tool. You will find it in the previously mentioned section “Tools”:
As in the previous options, mark all campaigns where changes are planned. Specify the collection period and in the right module check the parameters we want to analyze:
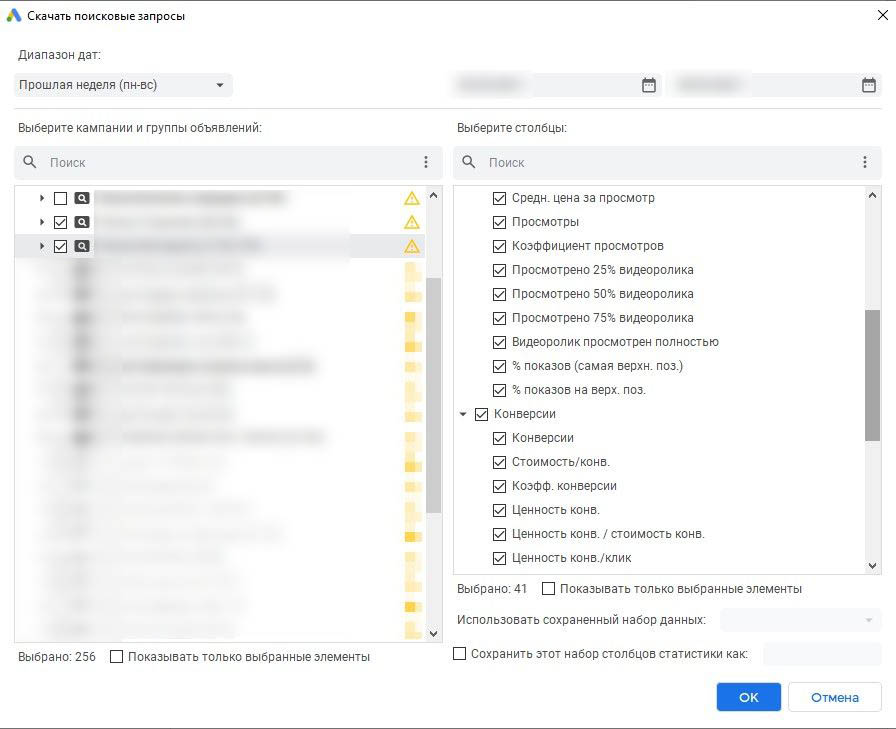
By default, all items are checked. In our example, we will not change anything and keep the list as it is. After a certain period of time after collecting the queries, their list will be displayed in the corresponding window.
The system will show each key, related values of the criteria selected at the previous step and statistical data characterizing its performance. The report contains information on both clickable queries and phrases that initiated only the display of the ad and did not result in clicking on it.
Analyzing the list of keywords, you will find among them irrelevant. They can be safely minus completely or partially. Some phrases will be flashed quite often and included in a “broad” keyword phrase, while remaining highly effective. It is effective to create separate ads for such keys, using them in the headlines and main text part.
The listed activities are performed manually or using the corresponding buttons of the interface. A similar mechanism works when including word combinations in the list of keywords. Understand the principle of its operation will not be difficult.
Using special rules
According to the results of the automatic check of ads by the Google Ads editor, the system may signal errors with a yellow triangle icon next to incorrect positions. The reasons for the problems may be as follows:
- The campaign does not contain any working ads.
- Audience lists could not be applied.
- Campaigns have three or fewer or no additional links.
- There are no clarifications.
- The text part of the ad is incomplete, etc.
You can reduce the number of problem points by creating your own rules for ads. To do this, go to the “Account Level” module, which can be found in the special rules in the control panel.
When adding a special rule, you need to enter the data in the form that opens.
For example, in case of exceeding the bid level for a keyword set at UAH 15, the algorithm should show a warning. To perform this task, you need to create a special rule.
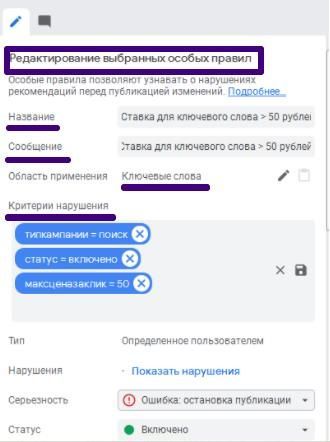
The following parameters should be specified:
- Name. It should be simple and easy to understand.
- Message. This warning will be seen by the user when the mouse cursor is over the yellow icon.
- Scope of application. Click the pencil button and in the form that opens, select the objects for which you want to apply the configurable rule.
- Violation criteria. A warning will appear if this limit is exceeded.
- Severity. You can set the degree of criticality of the events described by the created rule and choose how the algorithm will react to them: issue a warning, report an error, or automatically block shows.
Hotkeys
The editor provides an opportunity to make your work much easier by using hotkeys. Take a closer look at the actions that you have to perform especially often, and try to replace them with combinations of buttons on your keyboard, for example:
- To quickly copy a campaign or group of ads, select it and press Ctrl+C. Then go to the desired location and paste the copy via Ctrl+V. Quick and convenient!
- Use Ctrl+Shift+A to activate and Ctrl+Shift+P to pause selected campaigns. This is especially useful when you need to react quickly to changes.
- Ctrl+B instantly opens the rate setting window for the selected item and allows you to change rate assignment strategies in a couple of clicks.
- Ctrl+H moves the cursor to the search and replace field, through which you can easily find and edit text in a large number of objects simultaneously. And the combination Ctrl+Shift+H allows you to add text to selected items in bulk – for example, to add clarification to headings.
- Working with data import? Ctrl+I will quickly take you to file selection, and Ctrl+Shift+I will allow you to import settings directly from text.
Over time, such work will become a habit and will be automatic.
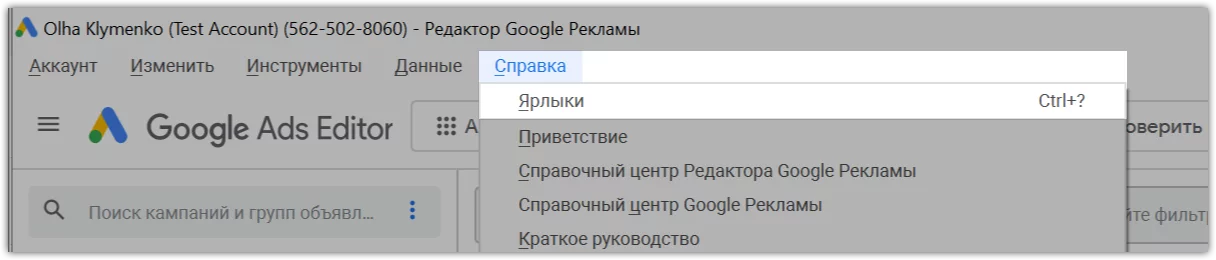
Of course, you don’t have to learn all the keyboard shortcuts by heart. To refresh your memory at any time or find a combination you rarely need, just go to the Help menu and select Shortcuts. There you will find a complete list of available keyboard shortcuts.
Dark interface
It will be especially appreciated by those who work at a computer in the evening or in low-light conditions. To switch to the dark theme, just click on the moon icon in the lower right corner of the editor window. If you want to go back to the usual light look, click on the sun icon there as well.