In this section, we move on to practice — we’ll be creating Performance Max campaigns. If you need regular Shopping campaigns, the principle is similar, but now we’ll focus specifically on PMax.
What do you need to launch Performance Max?
Before you start creating a campaign, make sure you’ve completed all the preparatory steps:
- Conversions are set up. We did this in the previous step — configured the “Purchase” tag.
- Dynamic remarketing is connected through Google Tag Manager. Important point: after setup, be sure to publish the GTM container. In practice, it often happens — everything is set up, everything is checked, but the container wasn’t published. As a result, nothing works, and the person sits there wondering what the problem is.
- Google Analytics is created and configured.
- Merchant Center is active, and products have passed moderation.
Regarding moderation — it usually takes up to three days. But we won’t wait, I’ll show you the entire process of creating ad campaigns right now so you understand the sequence of actions.
Launching Performance Max
I recommend not delaying and launching quickly so everything is ready when advertising starts. The easiest way to create a Performance Max campaign is to do it through Merchant Center. It doesn’t matter whether you’re working in Merchant Center Next or the classic version — the algorithm is the same.
Go to the “Marketing” → “Campaigns” section. Here you’ll see a block offering to create a Performance Max campaign to advertise your products. Click “Create campaign.”

The system will prompt you to fill in three fields:
- Feed label.
- Daily budget — set the minimum at start, then edit according to your needs.
- Campaign name — you can leave the default, or set your own. My advice: name the campaign based on the product group you’re advertising. For example, “Men’s Sneakers” or “Phone Accessories” — this makes it easier to navigate the account later when you have many campaigns.

After creation, return to your Google Ads account, refresh the page, and go to the “Campaigns” section. Your new ad campaign, linked to Merchant Center, will already appear there.
The main advantage of creating PMax through Merchant Center — you don’t need to worry about Assets (ads, images, texts, etc.) at the start. Of course, you can create a campaign directly from the Google Ads interface, but then the system will require you to fill in assets immediately.

And do you even need to add Assets? You don’t have to do it right now. It’s much more reasonable to wait a couple of weeks after launch, gather initial analytics, get conversions — and only then prepare quality assets based on real data.
A campaign without assets is the so-called “Feed only” format. It’s more than enough to get started with advertising. You begin advertising, get your first sales, and then refine the campaign as statistics accumulate.
Adjusting campaign settings: geography
After creating a campaign through Merchant Center, you need to adjust its settings. And the first thing to pay attention to is the geography of impressions.
The thing is, when creating Performance Max through Merchant Center, the campaign is automatically set to all countries worldwide. This means your ad could potentially show to anyone, anywhere. Of course, Performance Max is a smart campaign, and it can pull from the analytics data we set up earlier that your buyers are, say, in Ukraine. But it’s better not to rely entirely on this and immediately set the desired geography manually — specify the country or region from where you actually want to receive orders.

In the geography settings block, there’s another option that determines who exactly to show ads to — everyone in the selected location, or only those showing interest in it. This depends on your situation:
- If you’re launching nationwide — you can leave the default setting, this will be sufficient.
- If you’re advertising in a specific city or within a certain radius and don’t want people outside it to see your ads — switch to the stricter targeting option.
Specifying campaign languages
The next step is language settings. The logic here is simple: specify the languages your target audience speaks.
For Ukraine, for example, it’s quite normal to leave all languages or at least set three — Ukrainian, Russian, and English. And this isn’t some secret lifehack, but common practice. Why? Because many people relocate, travel, live abroad for some time, and have long been googling in other languages — Polish, Romanian, German, English. Limiting the campaign to one language, you’ll simply lose part of potential customers.

But if you’re launching ads in another country, the approach will be slightly different. Here you need to base it on your website’s language and the specific market’s characteristics. A few examples from practice:
- Website in German, launch in Germany — add only German language.
- Website in English, launch in the Netherlands — confidently add two languages: Dutch and English. The Netherlands is a country with high English proficiency, so this approach works well.
- Website in English, launch in France — but here the situation is reversed. The French prefer to buy in their own language, and conversion from an English-language website in France is usually quite low. Adding French language to targeting with an English website makes no sense — people will come, see an unfamiliar language, and leave.
General rule: languages in campaign settings should match the language your audience actually communicates and searches for products in.
“Automatically created assets” section settings
At the campaign start, I strongly recommend unchecking the boxes in the “Automatically created assets” section. Why? So that in the first two weeks of operation, your campaign remains a clean classic Shopping campaign without extra variability in search ads. This way you’ll get more transparent statistics and can objectively assess how the product feed itself performs.

When a couple of weeks pass and you want to give Performance Max more opportunities — you can turn this block back on. But be sure to exclude unnecessary URLs. What exactly to exclude? Blog pages, privacy policy, “About us” page, delivery and return terms — in general, everything that isn’t a product card or category. It’s done simply: copy the link to the unnecessary page, paste it into the exclusions field, and click Apply. Done.
How to properly set the budget?
The last thing that definitely needs to be adjusted after campaign creation is the budget and bidding strategy.
I’ll guide you on budgets with examples to make it clearer. The recommendations are quite universal — suitable for most WooCommerce online stores.

If going by the minimum threshold, starting budgets begin from 8 to 12–15 dollars per day. But here it’s important to consider your store’s average order value:
- Average order value above 150–170 dollars — the budget should be raised to 15–20 dollars per day. With expensive products, Google needs more room to find a paying audience.
- Average order value is not high (for example, products at 20–50 dollars) — better to start with smaller budgets, closer to 8–10 dollars. Why so? With a small budget, Google will spend funds more economically on A/B tests while searching for your target audience. Essentially, you’re giving the system the ability to “feel out” the market without draining the entire ad budget in a couple of days.
For example, for my test project, I start with a conditional 10 dollars per day — that’s approximately 300–400 UAH.
Want to start with a larger budget right away? No one forbids it. But a safer tactic is to enter with a small amount, wait for the first sales and conversions, and then gradually add budget as results come in. This way you control expenses and scale based on real data, not guesses.
Specifying the bidding strategy
Now let’s figure out the bidding strategy. In Performance Max, only two options are available: maximize conversions (with the ability to set a limit on cost per conversion) or maximize conversion value (with the ability to set target ROAS).
Which strategy is better to start with? I’ll be direct — this is largely a matter of taste and specific situation. There’s no universal recipe, because everything depends on the product type, average order value, target audience. Clothing can cost both 10 and 1000 dollars — and for each of these cases, the approach will be different. Male audiences buy differently than female. There are many nuances. But I’ll try to give guidelines that will help you start and get first results.
- If you have a zero account without any accumulated analytics, here’s what to rely on:
- Average order value up to 70–100 dollars — you can confidently start with the “Maximize conversions” strategy. At launch, start without limits, let the campaign gather data, and then set the target cost per conversion. The logic is simple: if there are “easy” conversions in your niche — the maximize conversions strategy will collect them like cream from milk. This is the fastest way to get first sales.
- Average order value above 100 dollars — here I’d recommend looking at the “Maximize conversion value” strategy. You can start without limits or immediately set target profitability (ROAS).
Why do I prefer the value strategy? My personal preference is to start specifically with conversion value. This strategy is more dynamic and flexible. It’s capable of finding customers where maximize conversions simply doesn’t reach.
I’ll explain with an example. Imagine a graph of your audience. The maximize conversions strategy works in a narrow range — it looks for people who fit within the set cost per conversion. As a result, there may be few orders, and the system is constrained. The value strategy acts broader: it accounts for different order values, different purchase scenarios, picks analogous products. Roughly speaking, it “sees” more opportunities for sales.
What to do if you chose maximize conversions but there are no sales? If in the first one to two weeks on the maximize conversions strategy you don’t get sales — this is a signal to switch to profitability. Often, changing the strategy to conversion value with a set ROAS becomes that very life preserver for the campaign.
What Target ROAS value to set?
The target profitability value depends on what result you want to get from the advertising account. What gross ROAS is acceptable for you — 1000%, 500%, 200%? Base it on this number, but under no circumstances set it “as is” in the campaign settings.
Why can’t you set the desired ROAS right away? This is one of the most common mistakes of online stores just starting with advertising. Let’s say you want to get 700% profitability. Logical to set 700% in the settings, right? In practice, the result will be sad — the campaign will either stop showing entirely, or will spin barely, gathering a couple of clicks per day. Google simply won’t be able to find enough audience that fits such strict constraints, especially when the account has no history and accumulated analytics.
My advice: start with reduced values and gradually increase profitability as the campaign gains momentum.
What values to set at start? Guidelines depend on the market. For Ukraine, a low starting profitability would be 400–500%. For Europe and the USA, the values will be completely different, as there’s a different economy, different average order values, and competitive environment.
How to properly perceive Target ROAS? Don’t think of target profitability as a value that Google will literally ensure for you. Consider Target ROAS more as a reach limiter — both useful and not so useful. Google doesn’t think in categories of “I’ll only show ads to those typing the word buy.” The system works differently.
Today, the buyer doesn’t move through the classic sales funnel from top to bottom. Google itself describes the customer journey as an infinity sign — a person can make a purchase from any stage. Moreover, sometimes conversion from the upper stage of the funnel is cheaper than from the lower one, where there’s the toughest competition and competitors actively undercut prices.
Don’t want to bother with selecting profitability? Then launch the strategy without any limits at all. Look at the intermediate results for the first one to two weeks, evaluate what conversions come in, and only then set a specific value. Both bidding strategies without limits at start can catch all kinds of conversions — and this is normal for the initial stage.
Personally, I prefer to start immediately with specific profitability values, but this is already a more advanced level of setup, when there’s a clear goal and understanding of product economics. For a basic Performance Max launch, it’s enough to start with low ROAS values and gradually increase them, tracking sales dynamics.
These were the basic Performance Max campaign settings. Moving to the next step.
Selecting products for launch in Performance Max
After setting up the strategy and budget, don’t forget to check which specific products will be advertised. To do this, go into the campaign, navigate to the “Asset groups” section, and open listings. Make sure there are no extra signals in the campaign and that it’s operating in Feed only mode.

Why do this? It happens like this: you planned to advertise only one category — for example, winter jackets — but the campaign pulled in the entire catalog, including accessories and t-shirts that you don’t need to promote right now. So be sure to select specific products you want to launch in ads. You can filter by category, product type, brand — whatever is convenient. This is the final touch in setting up Performance Max from start to finish.
Creating a Shopping ad campaign
Performance Max isn’t for everyone. If you want to manually manage bids, see exactly what traffic is coming, and clean it if necessary — create a regular Shopping ad campaign.
In this case, it’s better to turn off Performance Max, because when simultaneously launched on the same assortment, PMax “eats up” impressions, clicks, and all other traffic from the regular Shopping campaign. It will just hang like dead weight. So choose one or the other.

How to create a regular Shopping campaign? Click “New campaign,” select the Sales goal, click “Continue.”

Next, select the “Shopping” type and specify the correct Merchant Center. Remember — if you have two accounts under one email, it’s important not to mix them up.

Select the standard Shopping campaign and click “Continue.” Name it as convenient — for example, “Manual” or “All items.”

The easiest way to start is to choose the “Maximize clicks” strategy. Personally, I’m closer to manual cost per click, but I understand that many find it difficult to properly assess what bid to set. So “Maximize clicks” is a quite working option. But I strongly recommend setting a maximum cost per click limit so the system doesn’t start generating clicks at 60–70 UAH if traffic in your niche is expensive.

How to determine the maximum cost per click? Take a couple of keywords describing your product type, go to Google Ads “Keyword Planner” and look at the maximum bid value. Add 10–20 cents on top of this number — and you get a guideline for the limit.
All niches are different: for some, a click costs 10–15 cents, while for others — 2, 3, or even 6 dollars. So don’t set the number at random, but check the real cost in the planner.

Set the budget according to your capabilities — whether 10 or 1000 dollars. The main thing is to monitor traffic quality and filter it regularly. If you don’t do this, site conversion in a regular Shopping campaign will quickly drop to zero.
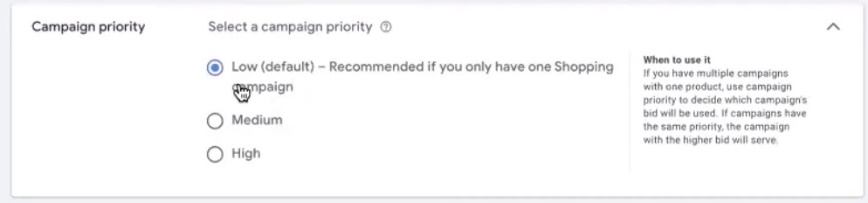
A few words about campaign priority setting — this parameter only matters when you’re running several regular Shopping campaigns in parallel. If you have one Shopping or Shopping plus Performance Max — priority doesn’t play a role.
I’d turn off Search partners. The quality of this traffic raises doubts, especially if you’re working on brand reputation and want ads to show in verified places. Google has had scandals more than once regarding platforms where advertisers’ ads appeared.

Geography — set up on the same principle as in Performance Max.

After creating the campaign, be sure to select products for advertising. You can filter by product type, Google product category, brand, ID, condition, custom labels — whatever is convenient for you.

Who is a regular Shopping campaign suitable for? This is the ideal option if you want to manually control cost per click, clean search queries, systematically gather analytics on target traffic, and only then, based on this data, launch Performance Max.
How to determine the maximum cost per click?
I’ll show in practice how to check the guideline for limiting maximum cost per click in a Shopping campaign.

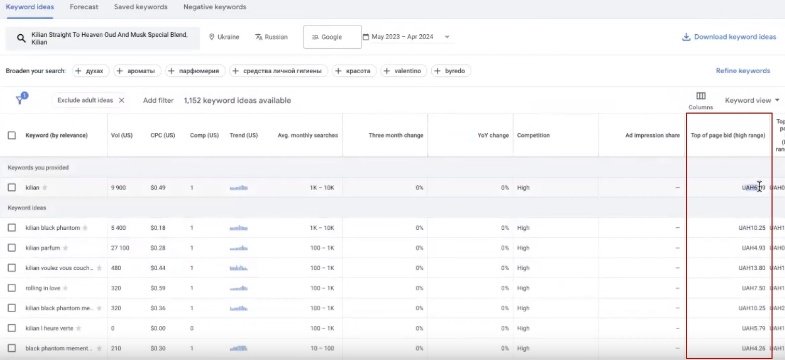
Go to the “Keyword Planner” section in Google Ads and select “Discover new keywords.” Enter several queries related to your product. For example, if you sell drones — write “buy drone,” “phantom drone,” “quadcopter.” If you sell ceramic tableware — “buy ceramic plates,” “handmade dinnerware set.” The logic is simple: take the product or category name and add commercial prefixes.

Specify the needed geography and language, run the search. We’re interested in the High range column — this is the upper bid for top positions in search results. Let’s say you see that the average cost per click for your queries is 10 UAH. Add 10–15 cents on top (or equivalent in hryvnia) and set this value as the limit. In our example, it will be about 20 UAH.

For some, this number will be 5 UAH, for others — 50. It depends entirely on your product assortment and competition level in the niche.
There’s another method that isn’t available in Performance Max but works great in a regular Shopping campaign. After 72 hours from start, go to product groups and add the “Benchmark max CPC” column. An actual average bid will appear there that your competitors pay for the same search queries. Based on this data, you can adjust your bid — raise or lower it, depending on results.

Why filter traffic in a Shopping campaign?
In a regular Shopping ad campaign, traffic filtering is a must-have. Don’t confuse it with Performance Max, which can independently analyze what stage of purchase a person is at and adapt to their behavior.
A regular Shopping campaign can’t do this — it shows ads for queries without deep analytics of user intent. Forget to clean irrelevant queries — you’ll get a bunch of junk traffic, low conversion, and a drained budget.
Summary
That’s it — we’ve gone through the full cycle of ad setup. As a result, we have both Performance Max and a regular Shopping ad campaign ready to launch. Just need to unpause, and you can start.
Let’s summarize what we’ve done in the framework of this comprehensive guide:
- Set up Google Analytics 4.
- Connected and configured Merchant Center.
- Created the “Purchase” tag for Google Ads with enhanced data transmission.
- Set up dynamic remarketing.
- Created and configured a Performance Max campaign.
- Set up a regular Shopping ad campaign.
This set of tools is enough to start selling in almost any country in the world where Google Shopping is available. Launch, gather first analytics, and scale based on real data.


