Hi everyone, my name is Jana and I am a Google logistician. I’m in the business of delivering targeted business audience with the right parameters. And I help scale online business sales across the globe.
Shortly what will be covered in the video
In today’s video, I’ll be showing step-by-step from start to finish what you need to do in order to set up shopping campaigns or Performance Max on a platform like OpenCart.
OpenCart is a fairly popular platform for running both Google shopping and SEO promotion. That is, it is really pumped up in this regard and it is quite convenient for long-term projects and tests. So, what do we need to do in order to customize this Google shopping on OpenCart? For this we need to configure some important services in Google itself, because it is not so universal after all. What do we need to do? Set up Merchant Center – this is a separate service where we will upload information about our products, where Google will check them separately for compliance with its policies – service and other stories of some kind.
Next, we need to set up goals – this is what our smart strategies in Google shopping or Performance Max-i will be optimized against. At a minimum, you’ll see the performance of your ads. And the next thing is to set up the Google Ads service, the advertising cabinet, from where we will run these advertising campaigns.
Setting up the Merchant Center
We will start with perhaps the longest step. In most cases, it can be the most difficult for someone – it is setting up the Merchant Center. Why is this the longest step or the most difficult? Because, first of all, you have to make that Merchant Center, fill in all the information about your business and plus fill in the information about your products and wait at least 72 hours for Google to check all your products or your store for compliance with its rules. Some advertisers may have problems with Merchant Center moderation. Indeed, Google is going to be pretty picky about most stores in 2024-2025. It’s only getting more and more complicated every year, sometimes to the point of absurdity. But that’s not what we’re talking about today. So, if suddenly you got on some Merchant Center ban, if you have any problems with passing moderation, write to me. I will leave my contacts either in the first comment or in the description of the video. You and I can work this out separately so we don’t have to stretch this video out for too long.
Creating a Merchant Center Cabinet
What do I need to upload goods to Merchant Center? The first thing is to create a Merchant Center account. What do you need to do? The first thing you need to do is log in to some sort of Gmail profile. It is important, I would recommend you to create some or take that Gmail, under which you can enter all your services Google Ads, analytics and Merchant Center. Whichever one is comfortable, convenient for you or you can create a new one. I will not stop at this stage. I have a Gmail profile already created.
Next, we go to the merchants.google.com link. It may look completely different to you. It’s no big deal. I’m just getting an error page like this because I already have a bunch of Merchant Centers. I’m going to be creating a new Merchant Center account now. It’s not hard to do here.
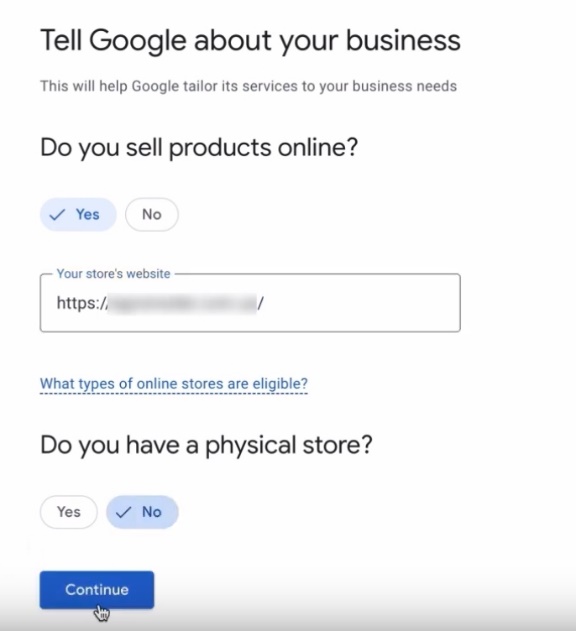
If we are asked if we sell online – “yes”. Do we – we need to enter our, directly, website here. Next, do we have a physical store? Yes/no, I don’t have one. I choose “next” to continue. Next, it tells us what we can, the rules.
We go on, “continue” and next we fill in the basic information. The first is necessarily the name of your store. It is desirable to make it so that it is very easy to find on your site in the same duplicated way. That is, if your logo or brand name is somehow different, you can enter the domain name, as in this case did, and nothing critical will not be.
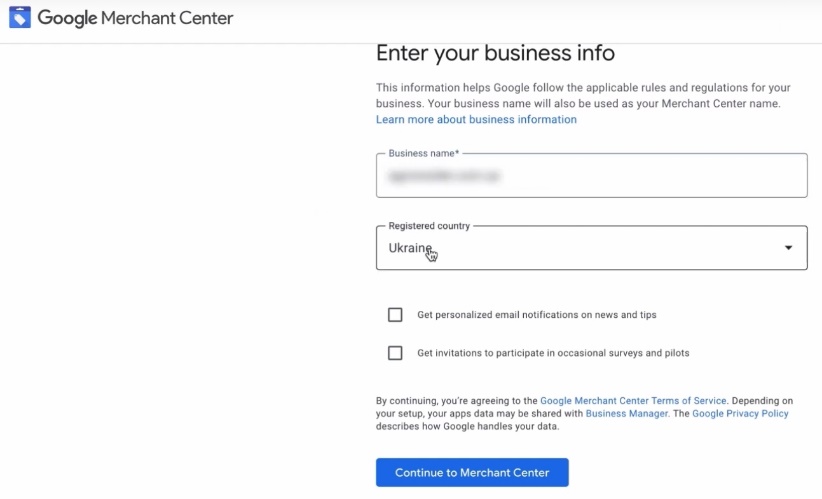
Next. Select the country in which you will launch. I had Ukraine automatically pulled up. You choose from the lists you need. The only nuance that I want to point out is that it is better to create this Merchant Center for your store in the country in which you want to launch, so that all IPs, all addresses and so on, all data about your computer, by location coincide with the country in which you will sell. Such a kind of a kind of a lifehack in the ease of going through moderation. Yeah, I want to get emails, too. There’s certainly nothing worse for you, confidential in this format. Better agree, something interesting will be sent to you.
What to complete in Merchant Center Next?
So, I have a Google Merchant Center Next profile created right now. What do I need to do? What’s very convenient about this Merchant Center Next is that it shows us at a glance what we need to fill in here. So we will go through all of these items one by one. The only difference I have is that if you suddenly start advertising for the United States of America, you will have one more item about taxes. I can show you later where these taxes can be found or just included in this functionality.
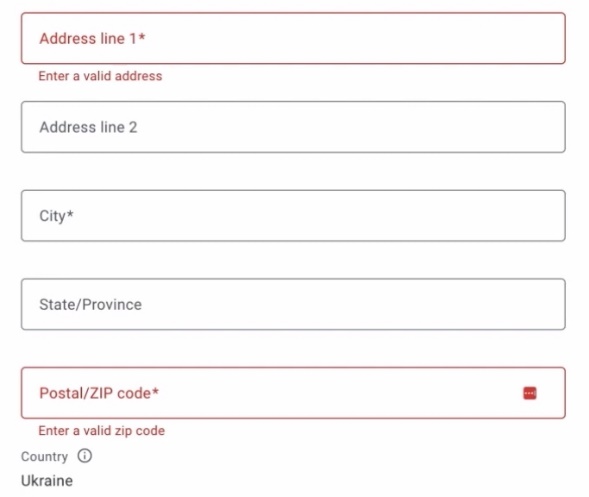
Specifying a business address
We need to add a business address. You won’t have anything complicated here. You need to fill out the entire address with the ZIP code you are in. Why is it super important to fill out this all data? Because it all has to match up with what you have on your website. You have a contact section and it is desirable that it all matches what you have on your site. Because the system will check it and the manual moderator will also check it. Nothing complicated, you can handle it here.
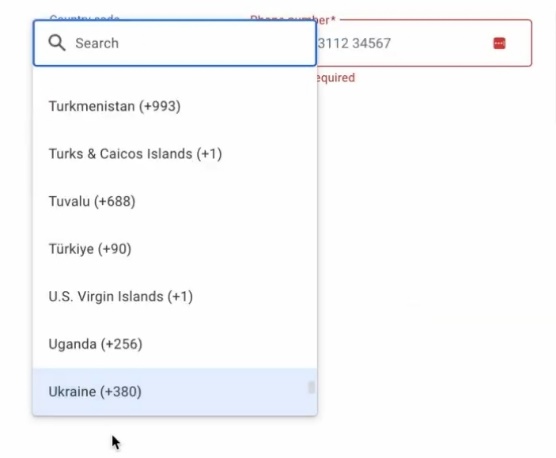
Providing a phone number
Verifying your phone number isn’t super difficult either. You need to select your country code, enter your phone number and confirm. You will be prompted to either text or call in which they will dictate the code, which you simply confirm.
Confirming the rights to the site
Next. The functionality is more about confirming that this Merchant Center belongs to a particular site. What does this affect? It is important that there is only one active Merchant Center. Active, meaning that you will be using, that will be approved. And we tell Google that this Merchant Center is ours and it belongs to our site because of the fact that we’re going to validate it in a certain way. How does that validation happen? Confirmation happens in a number of ways.
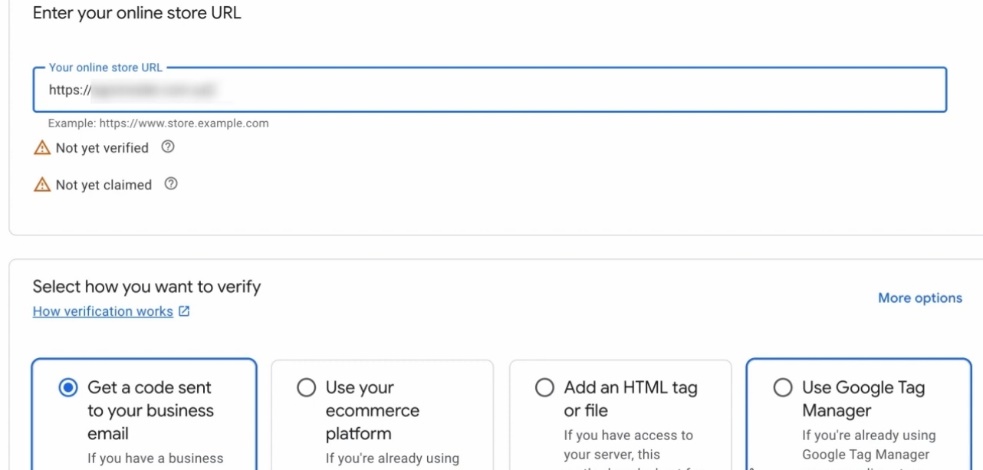
Look at this, it offers us what? We can use some kind of automatic integration, but there’s no OpenCart here. We need to either add HTML code or, for example, upload some HTML file to our FTP for this whole story. Or we can use Google Tag Manager to confirm that this Merchant Center belongs to us.
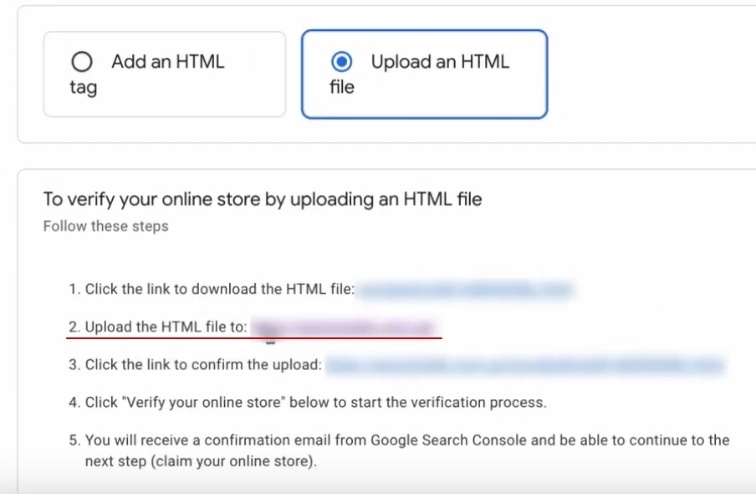
How will we confirm the rights to the site with you? The best way for you all is to upload a file to your FTP. How does it download? You need to follow this link, you will be prompted to download a file. This file you need to download on FTP, where it will be convenient for you. And after that you just need to follow this link.
Confirming site rights via Google Tag Manager
You can still use the Google Tag Manager format for confirmation. The only thing is that we don’t have it in this format right now, so you’re going to have to play with it a little bit if you want to. I’m going to show you a video of how a confirmation can happen through Google Tag Manager so that you understand the submission format. I’m going to log into Google Tag Manager. Will definitely be logging into my new email now. I’ll be creating a new Google Tag Manager account now. It is not very difficult. We will also use this service to customize the same targets on OpenCart. You choose the country that suits you.
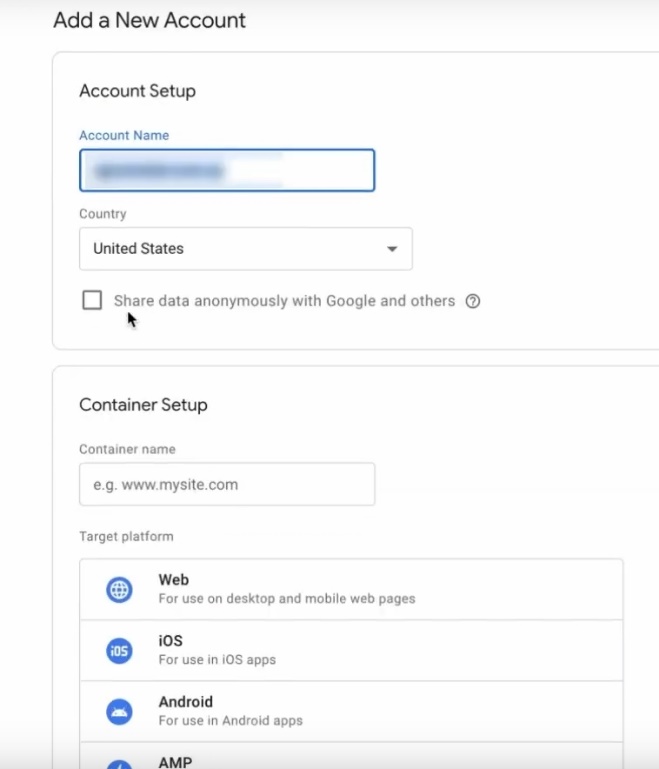
For example, I’ve already started Ukraine, but it’s not a fundamental difference. There is no correlation here at all if you choose the States or some other country. It doesn’t matter at all. So, here we have Google Tag Manager under this email.
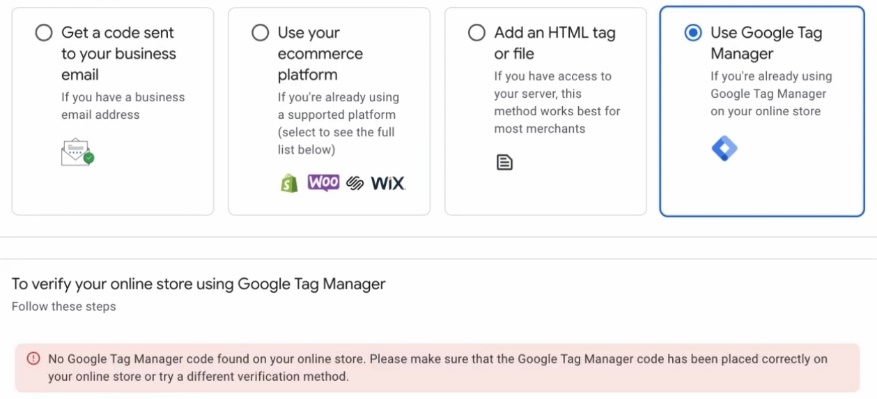
Potentially we can now click check our site and it tells us that you see the Tag Manager is not present on our site. So we need to put this GTM on the site.
How are we going to do it? Even setting up all the other goals will be done as follows, through a module like this. I’m going to leave a link to it and I’m going to add a promo code for a discount on it, on the purchase. It’s a very cool module. It solves a lot of issues on OpenCart from the point of view of communication with Google services. It’s called something like this.
I click “Adjust.” And then what do we need to do? We go to the block called “Scripts”.

This one here. We’re going to need to install this Google Tag Manager. Click on this block here. Copy the first script first.
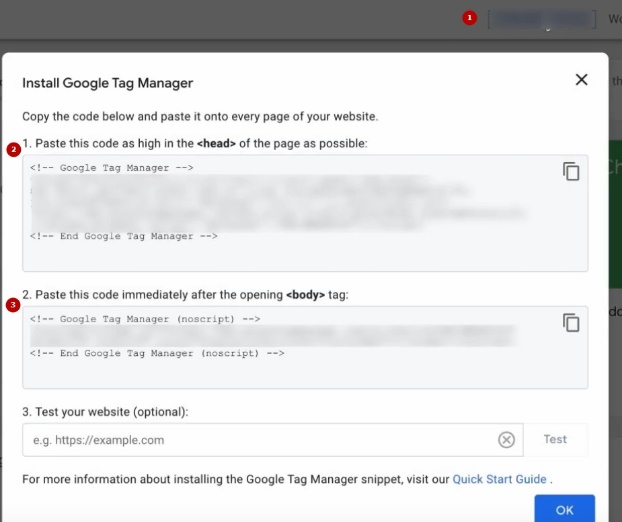
Here we go here. Find the head tag block. Insert it. And we also need a body block. Here’s the second code. I press copy. Paste. Be sure to save this entire history.

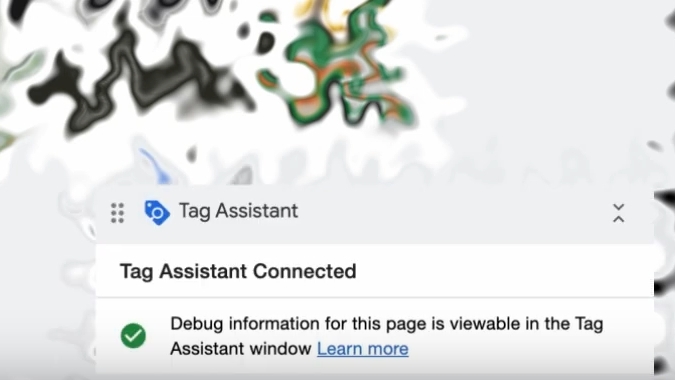
You can also double-check again if you really have this Google Tag Manager on your site. It is checked in the following way. You click preview in Google Tag Manager. You get a window like this.
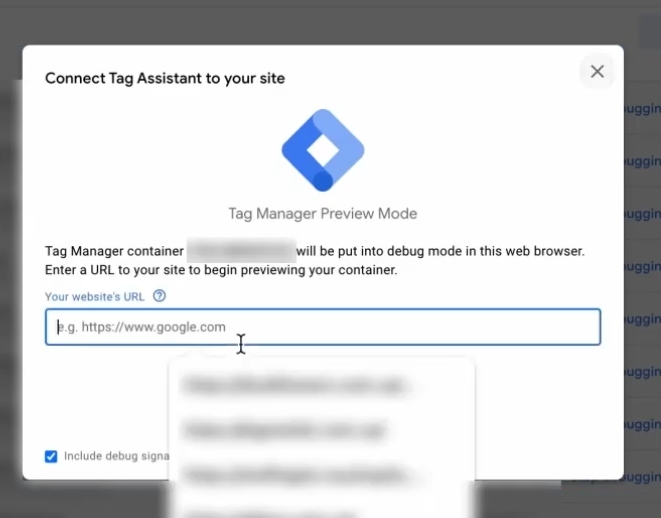
You insert your domain here, click the next button, and then we see a window like this. It should say “Debug information for this page is viewable”, i.e. it is viewable. This means that we have GTM published on the site.
What do we do next? Go back to our Merchant Center, click “verify.” Then all we have to do is either click “Claimed” again, this one. You see, we’ve got the “verified” checkboxes right away. Click “Continue”.
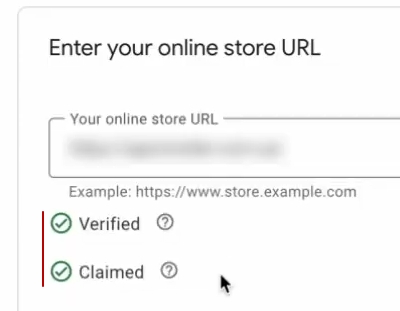
In this case, my online store is confirmed, Google already sees that this Merchant Center owns a certain site and there are no other active Merchant Centers. This is quite fundamental, important for Google.
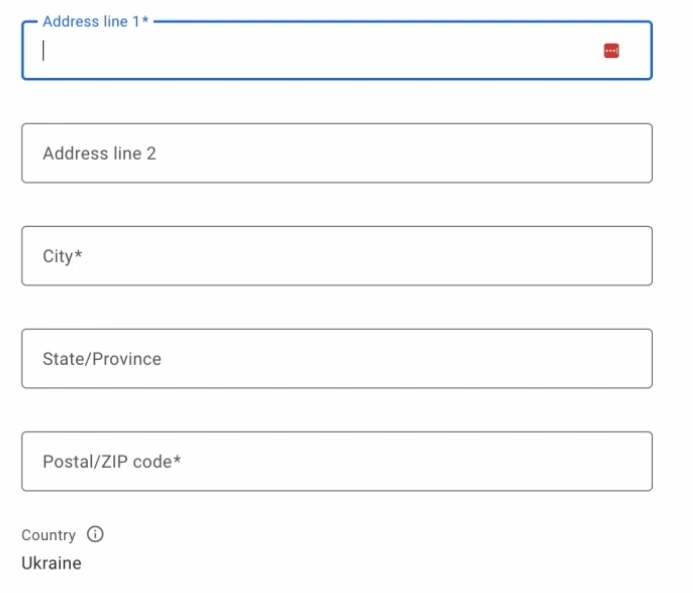
Specifying a business address
Next, what do we do? We enter our business address. To do that, I go to our website, look at that address, enter it here.
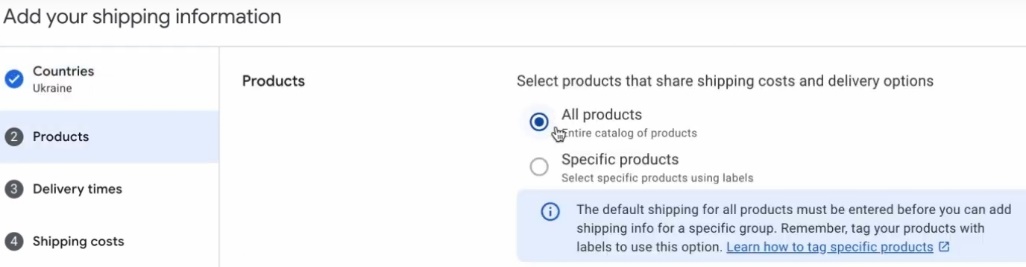
Specifying shipping information
Next we need to add shipping information for our products. In this case for OpenCart the most acceptable option for us is to set some standard cost for all products. If you use direct integration with some services, it may be better to do it through them. But in this case we will set one universal shipping cost for this whole country. That won’t be a problem. Select “All Products.”
Select the order processing time. In our case it is until 8 pm. Be sure to choose the correct time, time zone. Be sure to specify the correct order processing time. This is the time in which you are processing this order. In this case, it’s order 0-1. Then the delivery, we go somewhere about three days. We should thank Novaya Post for doing it right.
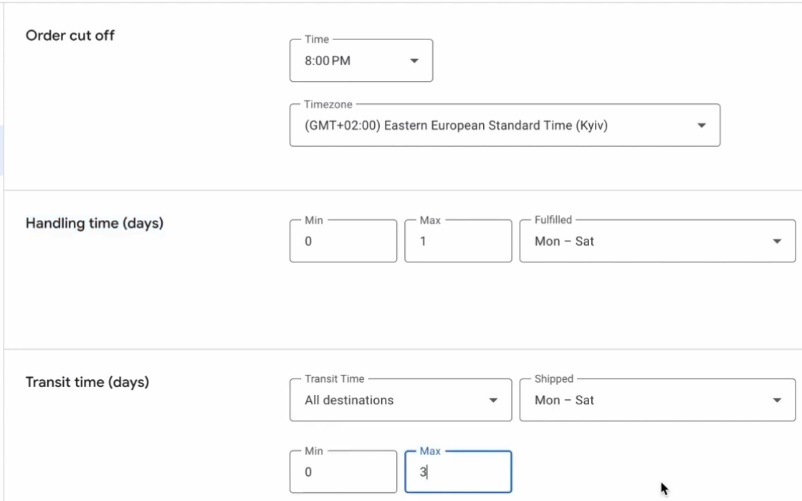
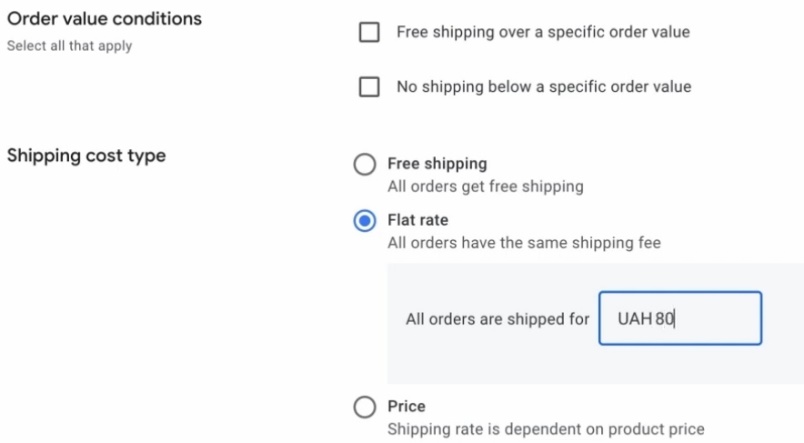
And thus we still need to get the cost of this shipping correctly. If it’s listed here on the website, that would be very nice. Payments… Payment methods. See, we don’t have anything here. Yes, it’s paid for, Nova Post, daily. We are about to introduce some basic cost of delivery. It is desirable that it be adequate. We’ll choose “Flat rate”, set 80 UAH Flat rate. “Save.” Okay, we’ve got the delivery up and running. Next.
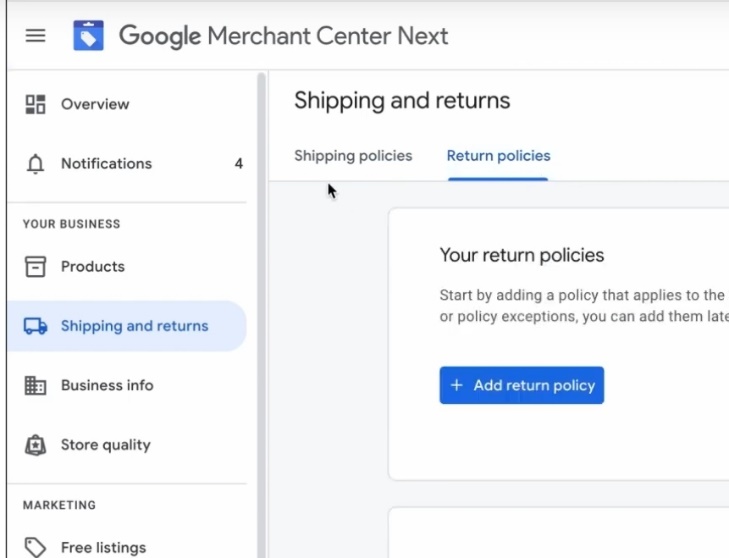
Specifying a return policy
We need to specify our return policy. To do that we click “Add”, but the return policy is not super necessary to set. Yes, terms of use. We have a no return policy here on this site. It would be desirable to add one, so I’m kensel this for now.
Adding items to Merchant Center
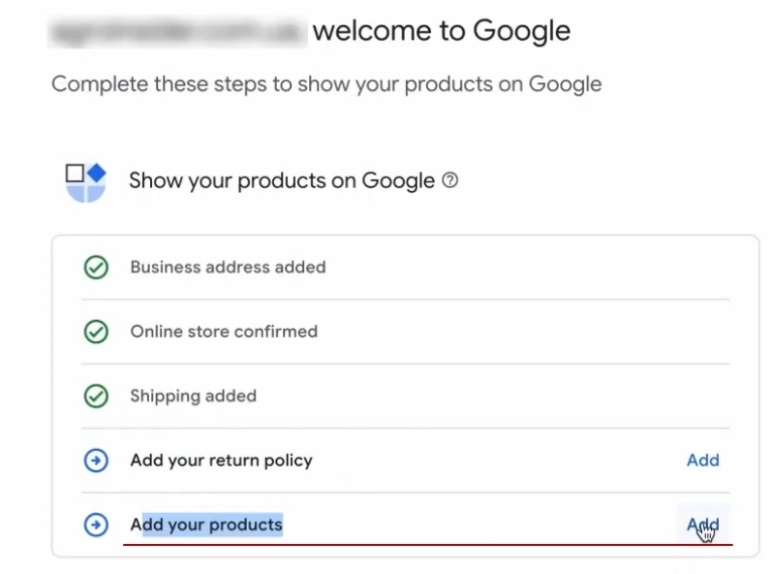
Next we have to do what? Add our products so that the initial checkout of our store can begin. Without this, we can’t move forward. We will not be able to launch Google shopping, we will not be able to do anything in fact. What do we need to do for that? Let’s go back to our module. This is the one that was on OpenCart, we find a block like this, which is called Feed for Google Merchant.
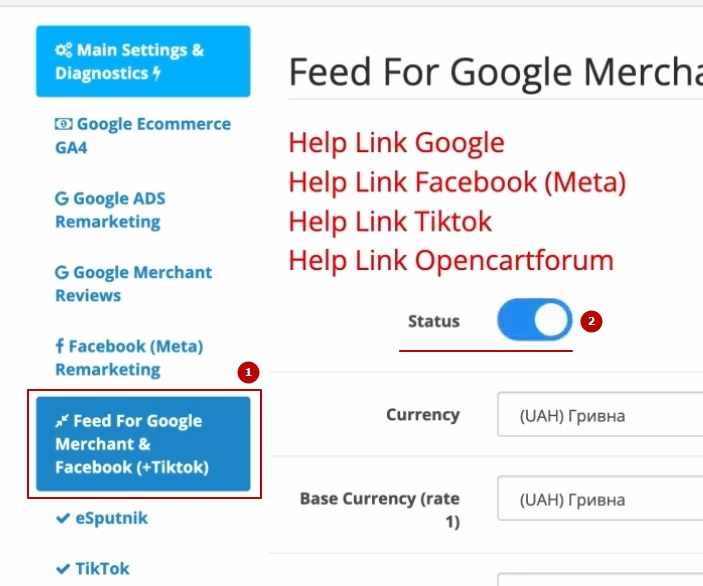
It’s here for Facebook and even TickTock has it. What do we need to do? Properly set the settings for it. That is, the first status is “enabled”, we enable it. Be sure to choose the correct currency, Product identifier product identifier from where to take, or from the model, or from product id.
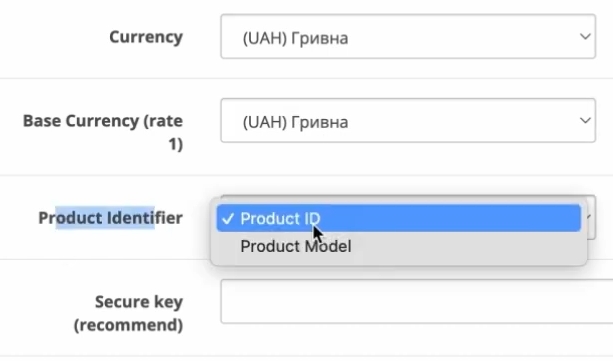
Then you can even set the security key. We immediately have links that can be generated accordingly for this Merchant Center. We’ll take the first link.
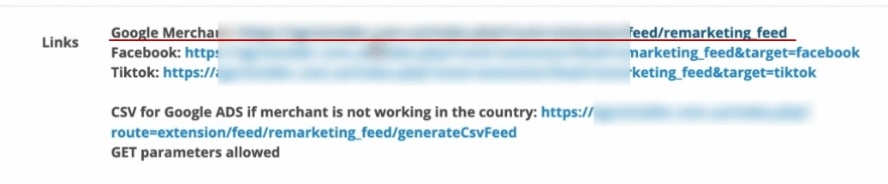
Then we can fill in these blocks of information, if we have them. Since I have agro-products here, I don’t really need to set GTIN or MPN here. I don’t have any product highlites.
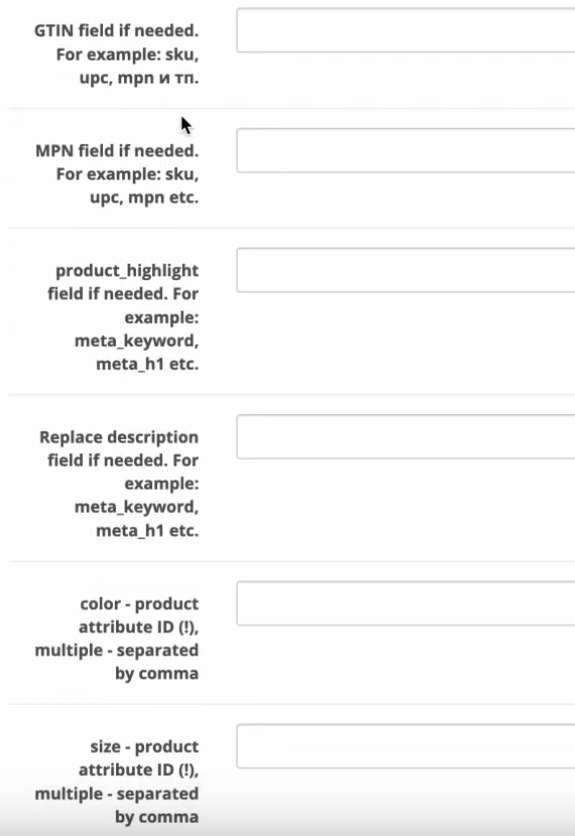
This is where you can play around with it all and set it. Ideally, of course, you should set it all, but if you suddenly don’t have it and want to do something differently, you can do it later. Next. Other. Additional SQL we do not need. We don’t need minimum, maximum price. The status we’re taking here is the “Out of Stock (force)” status. We don’t need to add all of these items? There are a lot of different nuances that you can add in this format. You can even put a UTM tag. In this case, I don’t need much of any of that. I make sure to follow this link. Once there, I see these kind of XML feeds. I don’t have a lot of products on this site, so there are very few of them here.
The next thing I do is take this link. You can definitely click “Save” here so that our feed is activated. Go to Merchant Center. Go to the “Add Products” block.
Choose “Add from file”. Insert a link to the file. First, I recommend that you put in the monthly update.
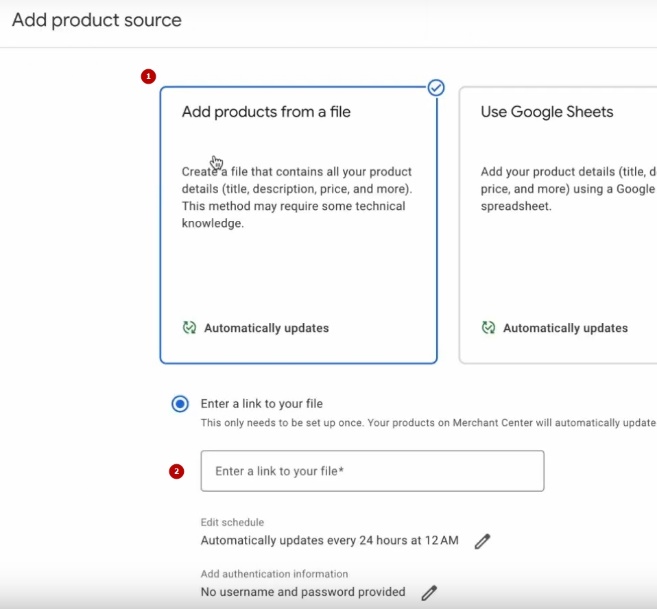
First you go through this whole history check, your goal would be to pass the check in 72 hours. If everything is okay, then you can set yourself an update schedule, either every 24 hours or weekly, depending on when you make changes to your products.
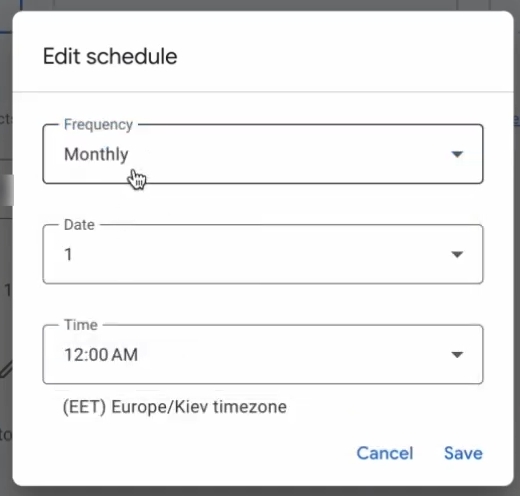
At first I suggest that you make it monthly, so that you can pass the check, so that you don’t change the information about your products very intensively. That will be even better. Let’s save.
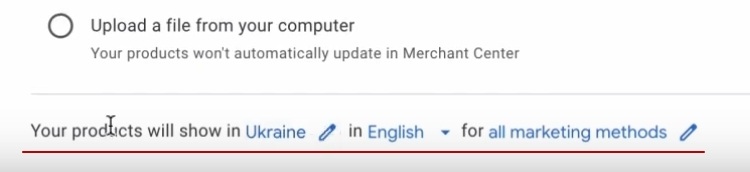
Next here is this very hidden block. You choose the country where you are selling. Be sure to choose the correct language for this feed. In this case I have Russian. I choose Russian. See, I still have Free listings in my marketing methods.
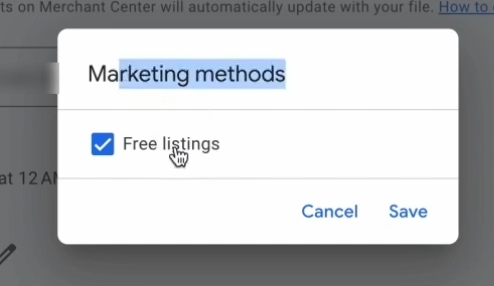
These are free listings. When we get to the creation of the advertising cabinet, more paid ads will be automatically added here. That is, we add, click “Continue” necessarily.
Connecting additional features and specifying additional information
And it’s already prompting us to fill in certain details. Oh, it didn’t even suggest it, it automatically created it. That’s it. Next, we wait for all this information to start loading into this Merchant Center. It will not take very long to load. This Merchant Center Next is a little glitchy sometimes. In 15-30 minutes you should already have information about products in the “Products” section.
Next, it would be important for us to go straight to Add-ons and add a few more items. Obligatorily Advanced data source management.

Be sure to enable dynamic remarketing right away. Make sure you turn it on right away.

Next. Promotions. Google API. Yes, this is where we’ve finalized for now, this will be enough for now for us to do what? Filled out the basic information about our store. We’ve filled in the shipping information. You can, of course, add more return policy for moderation. It doesn’t affect it yet.
You can fill it in, you can leave it out. If it’s critical for your Merchant Center of the country, Google will suggest it to you. So far, it’s not critical. Delivery we have filled, business information we have basic filled so far. We have the site confirmed and the products are now filled in.
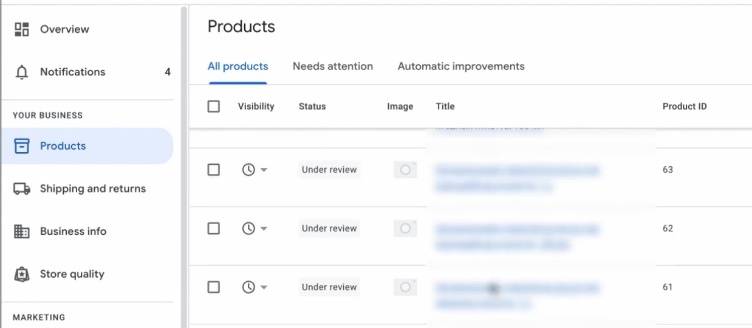
Control the process of displaying goods
You can see that I already have product information showing up. They are now in the “Under review” status, which means that they will still be checked.
If you want to see a general picture of how the dynamics of adding products or something like that is going, you can click on this “View history”. There’s a nice chart like this coming up. I will show it later, as soon as it is uploaded, in order for you to see how many products have passed moderation, have not passed moderation, in the general card. On this link we can always find some global problems of our Merchant Center account.
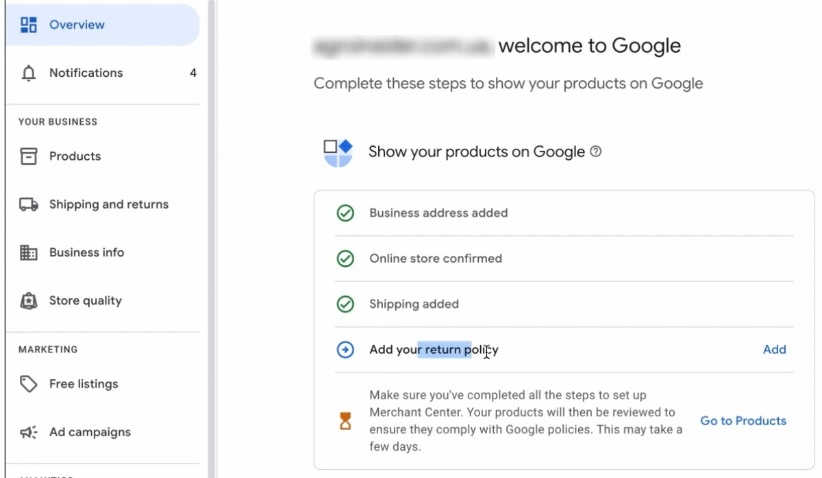
That is to say, we are done with Merchant Center for now. We’re still being told to add a return policy. You can add it, as I said, add it, don’t add it. It’s critical that we pass the primary inspection. If you have problems with it, please contact me. We will find an option to help you with passing moderation, because it’s a separate story. If your store is not properly finalized or some pages are missing, as in this case – there is no return policy on the client’s site, so there is nothing I can do about it here.
Conclusions
This is the basic what is so far enough for us to create a Merchant Center, fill in the settings, fill in the information about the product. Confirmed, of course, the rights to the site and now we are waiting for the upruv. In parallel, you can already set up goals, set up an advertising cabinet, which we will look at in the next parts of this video.