
Goals in Google Analytics is one of the most powerful tools with which you can set up tracking of any criterion: from the number of visitors interested in a video on any page of a web resource, to the number of those who placed a product in the cart.
Information! One of the most important skills of an internet marketer is the ability to work with goals in Google Analytics. Tracking them gives access to information about which of the advertising channels used is more profitable, allows you to form audience segments and detect flaws in the design of a web page.
The service’s toolkit is so extensive that it seems intimidating for those who are just starting to work with it. In this article, we will try to dispel all fears and banish insecurity by telling you how to add goals to Google Analytics and what to do to make their use as productive as possible.
What types of goals can you set up in Google Analytics?
- Target page – under this criterion, the system records each entry to a specified page, for example, the one that appears in front of the visitor after he or she has successfully placed an order;
- Session duration – for this task you can configure the minimum required time spent on the site before performing a target action, which will be counted by the system;
- Number of pages viewed per session – this allows you to assess whether users go to additional pages or are satisfied with the one they came to. This is very important for information portals, blogs and so on;
- Event – you can track any interaction of a visitor with elements of the web resource interface. For example, it is often necessary to record clicks on a certain button or copying of an email address;
- Smart Targets is a special tool that works using machine learning algorithms. Its launch requires a large amount of accumulated information – at least five hundred clicks on Google Ads over the past month. Analyzing all the traffic, the system determines the characteristics of such sessions that are most likely to lead to conversions. Based on the resulting data, goals are generated.
Microconversions and macroconversions
All the above goals can be divided into macroconversions and microconversions. The most important for business, of course, are macro conversions. These include making a purchase, placing an order, requesting a callback. They usually foreshadow a profit.
However, micro conversions are also very important. They can contribute to future revenue. In GA, you can track:
- adding an item to the cart;
- registering on the site;
- online chat questions;
- publishing testimonials;
- subscribing to the mailing list;
- visiting a page with contact information.
Setting up goals in Google Analytics for each view is limited to twenty items. If you need to track more target actions, you can duplicate the current view by copying the data and adding 20 new items.
How do I create goals in Google Analytics?
To familiarize yourself with the aspects that are important when creating goals in Google Analytics, let’s take a look at what they are and how to work with each one:
Target Page
At the first step, we collect a list of landings and sections of the online platform, where it is required to lead the user to make the desired action. Detail the tasks according to the peculiarities of the web resource. For example, it is important for the owner of a service-related business to know how many visitors went to “Contacts” after visiting the services section.
Let’s try to understand how to set goals in Google Analytics, using this example.
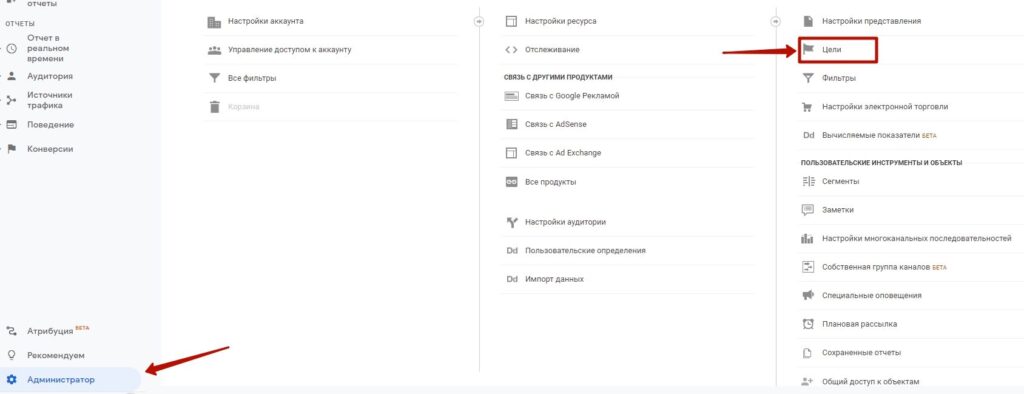
Click on the “Goals” link, having previously gone to the “Administrator” section:
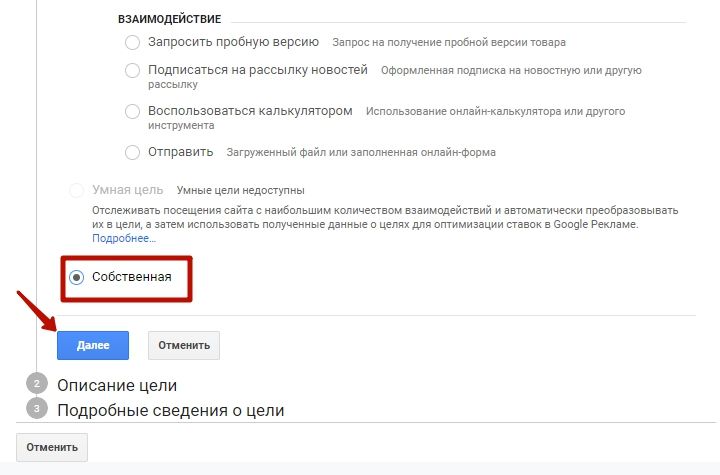
Click on “+Goal”, go to the bottom of the page, ignoring the list of built-in templates that appears, select “Own” and click “Next”:
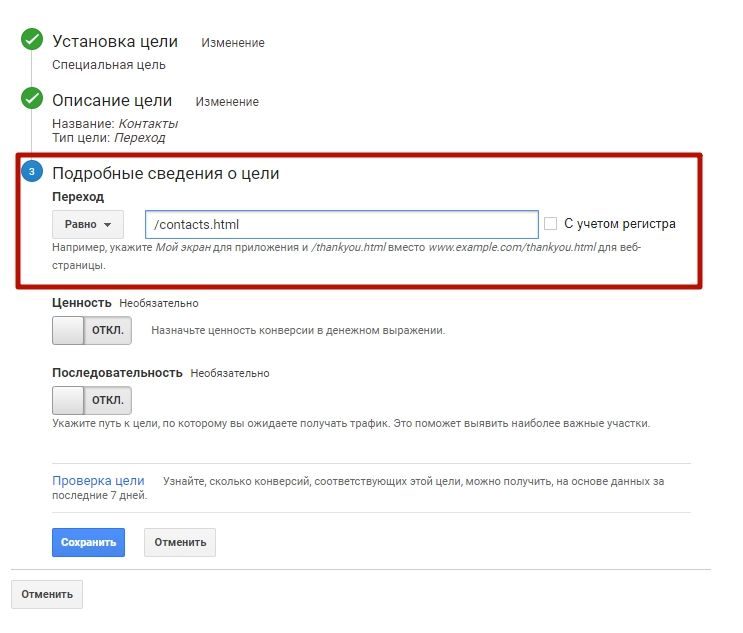
Come up with a preferably meaningful title and specify it. After that, the target list is set up. Click on “Target Page”, then click on “Continue”. In the “Transition” field, specify the part of the web resource where the visitor needs to go (in our case, it’s “Contacts”):
Find the “Sequence” module, designed to create a chain of pages that the visitor will open on the way to the “Contacts” page, if necessary, enter their addresses and save.
Session duration
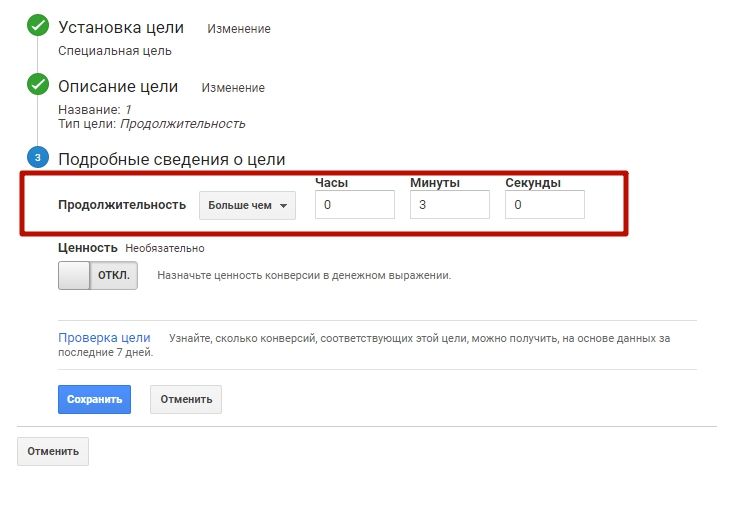
To create a “Visit Duration” goal, go through the entire process described in the example just discussed, up to the step of defining the goal type. In the module of the same name, specify “Duration” and click on “Target Details”, set the desired duration and save your changes:
Number of pages per session
Setting the “Number of pages or screens per session” goal does not require any special knowledge and skills. We go through the previous example again, but select “Pages/Screens per session” as the type and specify a name. Then enter the required number and save.
All settings can be duplicated several times, specifying a new number of pages/screens in each copy.
Event Tracking
The “Events” goal, unlike the previous one, is quite complicated to set up and requires some experience, especially if you decide to monitor a large number of events. Let’s consider such customization on the example of form filling tracking.
Create an event in the system by following all the steps of the tasks described earlier and selecting the appropriate type. Do not forget to enter information in the “Action” and “Category” fields, specifying what we are tracking and what user actions we want to record. In our example, you should specify “form” in the “Category” field and “action” in the “Action” item – “send”:
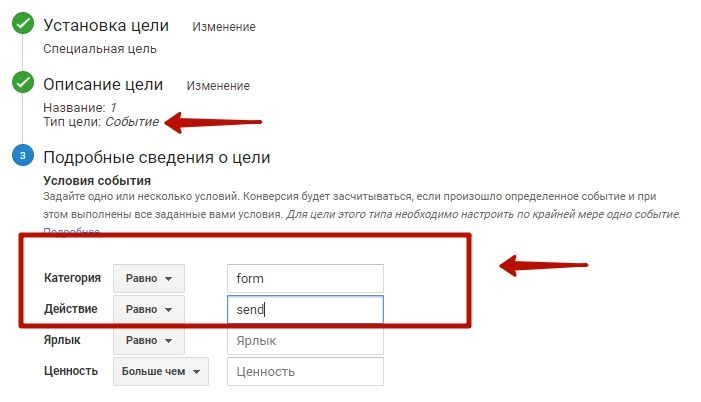
“Label” and “Value” do not need to be filled in. Save the changes.
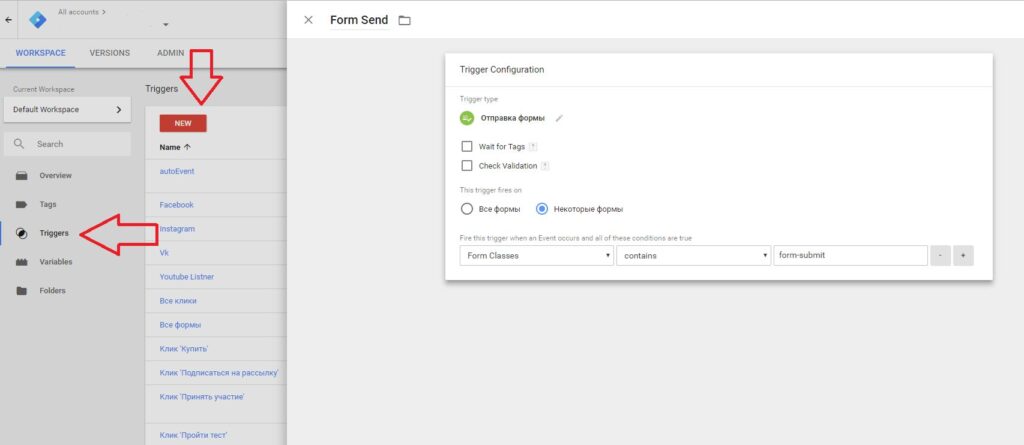
To make the information about achieving the set goal visible in GA, you need to upload it there. One way is to use Google Tag Manager.
To send information via GTM, select the parameters of the required element and use them to record the required action (for example, class or ID of the required form). Form a trigger with the type “Send form”. Execution condition associated with the element contained in the form:
Form tag with Universal Analytics type and “Event” tracking type. Set a settings variable that includes your Google Analytics ID:
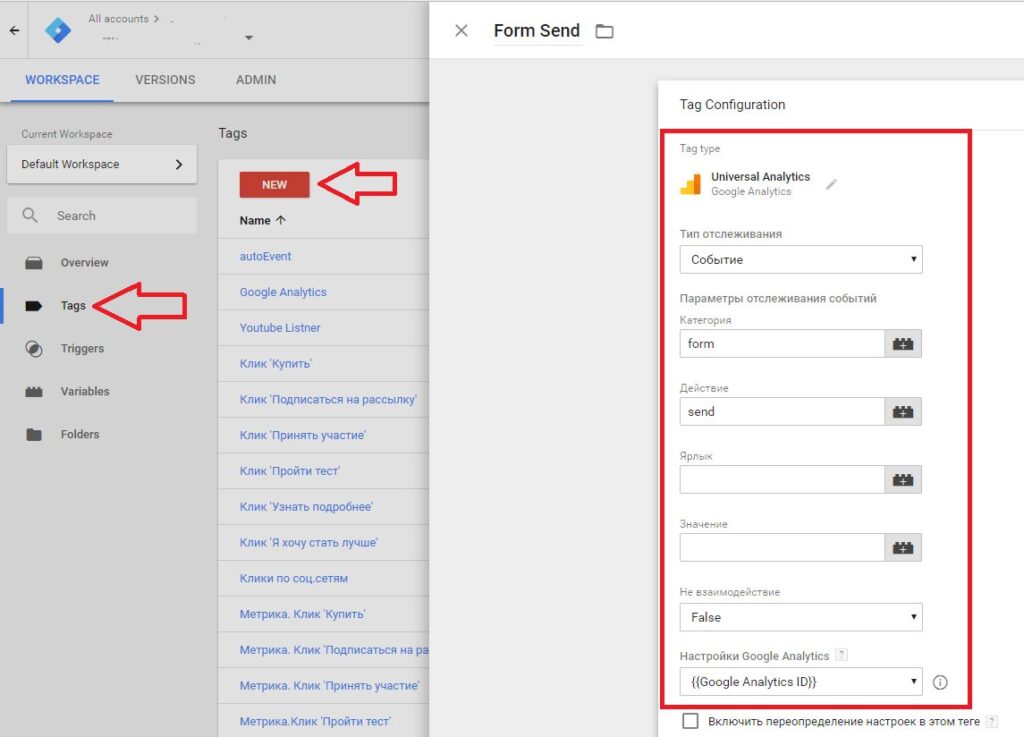
Next, you will need to select the trigger we generated earlier.
How to check if the targets have been added?
To verify that goals have been added to Google Analytics, use the “Verify goal” button. If everything is done correctly, you’ll see information about how many times the goal was reached in the past week (assuming the analytics system has been running for the entire time specified):

In addition, it is important to know how to monitor the set goals in real time. Try to perform one of the target actions yourself and check whether this conversion is included in the report. To do this, go to the “Real-time mode” module and select “Conversions” there. If the information about the test conversion is present, everything is fine – the system works correctly. Otherwise, open the settings and try to find the error.
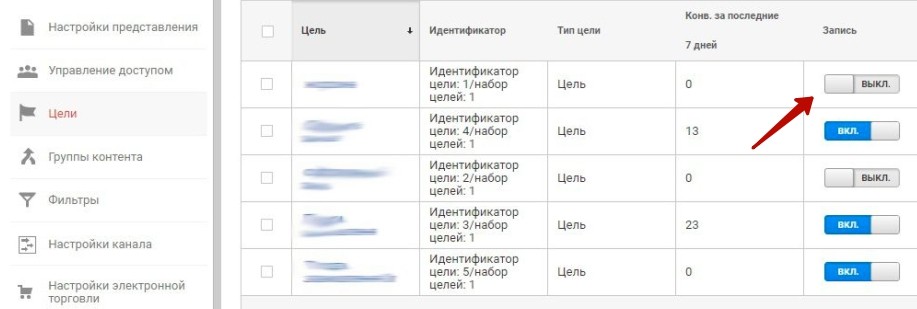
Can I delete a previously created goal?
There is no option to delete a previously added goal in Google Analytics. However, you can disable data retention by moving the corresponding switch to the inactive position:
Tip: If twenty targets have already been created in the current view, the system will not allow you to create a twenty-first target if necessary. However, you can change the settings of an existing goal.
How to set up goals in Google Analytics: practical tips
The following tips will help you set up your Google Analytics goals correctly and maximize the return on your marketing investment:
When setting up goals, consider the sales funnel
For example, the first goal records the user’s familiarization with the product card, the second – placing one or more items in the cart, the next – entering data into the order form, and the last – sending the completed form.
If we are talking about a site where no sales are made, the funnel can look like this: the first goal is considered achieved after clicking on the button that opens the target form, the second is responsible for entering information into the first block, the next – for the second, and then until the form is sent.
Combining different goals allows you to flexibly work with dynamic remarketing settings, targeting ads, for example, to users who have placed a product in the shopping cart but have not completed the transaction for some reason.
Use goals to target your remarketing audiences
The Google Analytics toolkit helps when building remarketing lists. The first step is to start collecting a “basic” list, including all visitors to the web resource.
You can segment the audience and collect a detailed portrait of a potential buyer by combining different types of target actions. These can be users who watched a video or visitors who spent a long time studying the text content of your site, etc. You can also collect information about visitors who left without buying, to find out at what point in the sales funnel they are more likely to want to close the tab with the site in the browser.
Analyze the results to refine the site
For example, based on data from analytics you can refine the linking of internal pages of the web resource. Such links have a positive effect on improving the site’s position in search engines. Collected information about internal visitor transitions allows you to analyze the user’s interaction with the site.
Targets allow you to track the effectiveness of offline advertising
For example, your beauty salon is holding a promotional event near the subway. A promoter hands out leaflets to people coming from work. And there is a pole near the neighboring station. The purpose is to receive applications on the site, an appointment with a beautician.
But how do you know which source worked better? Put one landing page on the flyer and another on the billboard. And then create goals in Google Analytics for visits to these URLs. This way you can optimize your ad campaign costs.
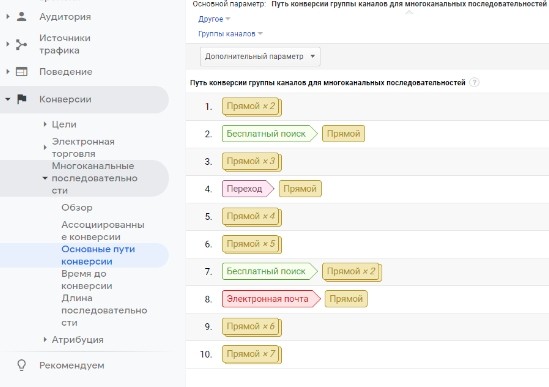
Take into account multi-channel sequences
The “Main Conversion Paths” section in Google Analytics will allow you to understand the path a user has traveled before fulfilling a goal. In many topics, a single visit to the site is not enough for a customer to place an order. The first visit may come from a social network (cold traffic), followed by a targeted Google search and contextual advertising. And in the end – a direct visit to the site and a request.
Attribution allows you to track all these chains of events until the goal is met:
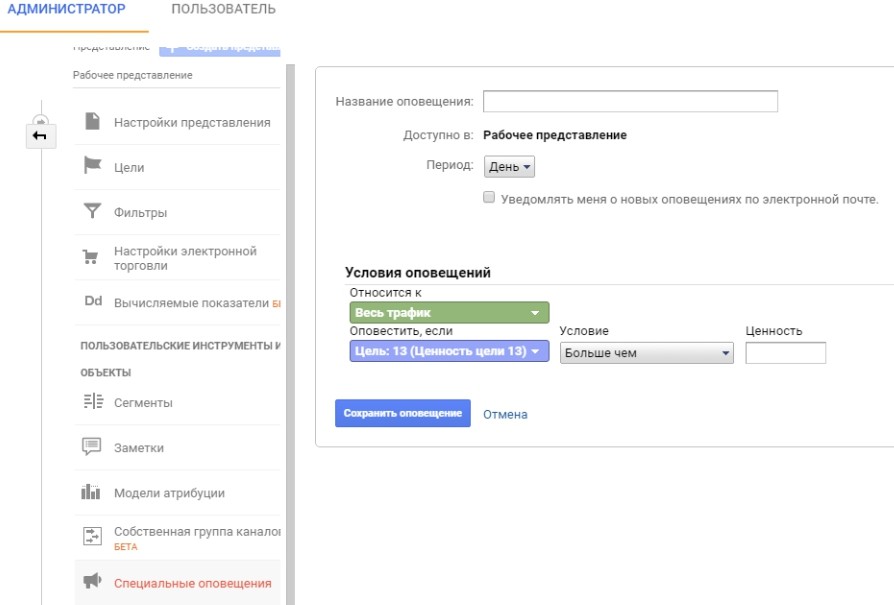
Customize notification
The system can send a notification to the advertiser whenever the conversion rate for any goal decreases, so that he can respond in a timely and efficient manner.
Open the administration panel in your personal Google Analytics account and go to the “Special Alerts” section, and then set the necessary conditions:
How do I import set goals into Google Ads?
To import goals into your Google Ads personal account, you need to link it to your Analytics account. Find the corresponding item in the “Administrator” submenu:
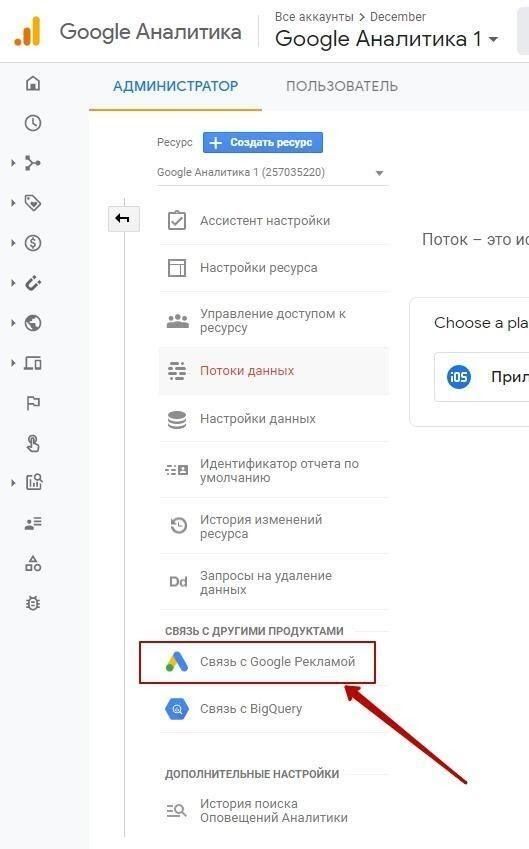
Important: The data can be imported only if you have administrative rights in Google Ads and the ability to edit the account on the same Google mail account.
Continue the process in your Google Ads personal cabinet and go to the “Tools and settings” module. There, click on “Conversions” in the “Tracking” section, then click on “+”:
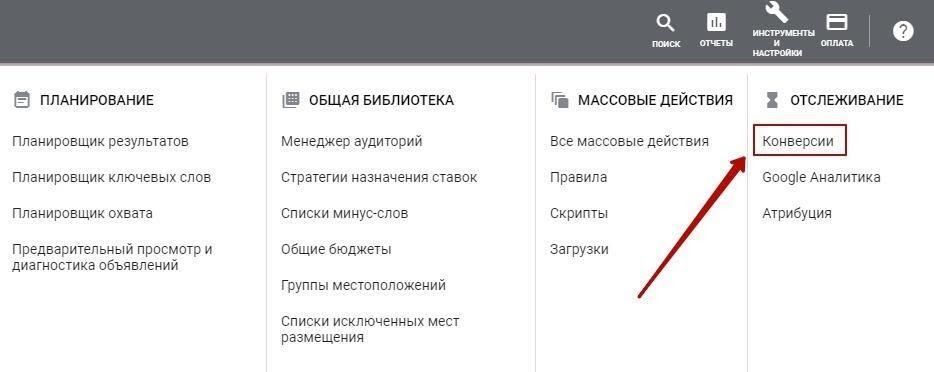
In the window that appears, look for the “Import” link:

Put the cursor against Google Analytics and click on “Continue”:
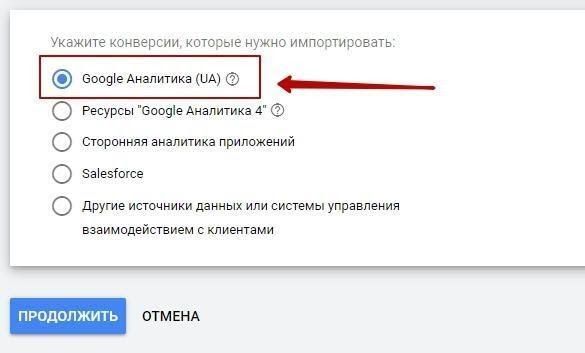
Mark the goals and transactions to be transferred to the advertising service and click on “Import and Continue”. This is the final step of import customization.
Conversion tracking is one of the fundamental points of internet marketing. When you analyze data from a combination of goals with different types of goals, you may come up with ideas to improve your web resource or advertising campaigns.
Why might goals not work?
There are several reasons why goals in Google Analytics refuse to work. Here are the main ones:
- An error in composing the regular expression. Try to correct the entry. There are special online services for this purpose that allow you to check the correctness of RegExp compilation.
- Incorrect URL of the target. Try to copy the URL of the target page and paste it into the search box on the “Pages” tab. If the system does not find it, the address is incorrect.
- There is no tracking code on the page. This code should be added to all pages of the site for the analytics system to work correctly. However, there are situations when the code does not work on a particular page. For example, different templates are used on different URLs. If you add code – the goals will be fixed.
- Inappropriate tracking type. By default, Analytics uses the “Starting with” type. However, in different cases it may be more appropriate to change the tracking type to “Equal to” or use a regular expression.
- The target is a downloadable page. For example, you have placed a PDF file on your website. Google Analytics can’t track such goals because the tracking code is not embedded in the document.
How are the goals in Google Analytics 4 different?
Google Analytics 4 has significantly changed the logic of tracking user actions compared to the previous version. Instead of the usual goals, conversions are now used. This approach provides more options when analyzing the performance of a web resource or application.
Previously, you could create up to twenty goals per view in Universal Analytics. Now there is no limit to the number of conversions. This allows you to track all of the interactions between users and your website that are really valuable to your business without having to create additional views or change the current settings.
Any important action of a user on the resource pages can be counted as a conversion. And there is no need to create separate goals for this, as before. At the same time, conversions can be built in the form of chains. That is, you can combine events and create a new conversion based on them. Alternatively, if a user first subscribes to a newsletter and then places an order, this action can be treated as a separate conversion.
What types of target actions can GA4 track?
Some basic events, depending on the GA4 counter settings, will be captured automatically once it is installed on a website. However, for in-depth analysis of visitor behavior, Google Analytics 4 can be configured to track additional types of events:
- Visits to specific pages. For example, if you have an online store, it makes sense to track visits to the “Thank you for your order” page after making a purchase. This will help you more accurately measure the number of transactions.
- Depth of browsing. Especially relevant for content projects, blogs, online publications. Tracking the number of pages viewed per session will give an understanding of how interested visitors are in the materials posted on the Internet resource. If people on average view 5-10 articles – this is a good indicator of engagement.
- Duration of time spent on the site. Analyzing the time spent by the user on the pages allows you to draw conclusions about the quality of content and ease of navigation. For example, for a delivery service site, long sessions can be a warning sign – it may be difficult for people to find the information they need. But for a training portal, a high rate of time on the site is a big plus.
- Clicks on page elements (banners, buttons, links). You will learn which sections of the site are popular, and which suffer from low clickability. Based on this data, it will be possible to optimize the design and location of key elements.
- Views of certain content blocks. For example, you have embedded a video player on your site and want to know what percentage of visitors watch videos to the end. Or you have set up a “This product is bought with this product” block and it is important for you to track whether users pay attention to it.
- Web Form Submission. Filling out a form, submitting an application, signing up for a newsletter – these are all important for many online businesses. GA4 tracks form completion in detail, step-by-step, which helps identify trouble spots and improve performance.
- Action Sequence. In GA4 you can create events that are triggered only when a chain of conditions is met. Let’s say you consider a target visitor to be someone who went to the main page, clicked on the promotion banner and put a product in the cart. In this case, these actions should be performed strictly in the specified order to account for conversion.
In the fourth Google Analytics, they added the “Enhanced Measurement” option. It opens access to additional reports – on files, clicks on external links, video interaction and page scrolling. You can enable advanced tracking in the GA4 data flow settings.
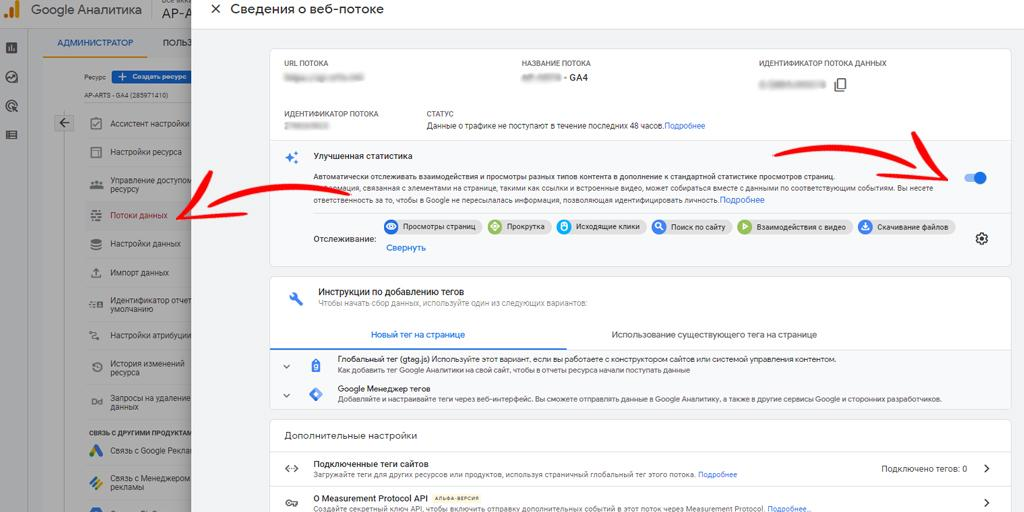
To do this, go to the “Administrator” section (it is located at the bottom of the left menu on the main screen), select the desired object and go to “Data Streams” – “Web”. There, find the already created data stream that you wish to expand, click on it and activate the “Enhanced Statistics” slider in the pop-up window.
How to add conversion goals in Google Analytics 4?
To start tracking important actions of users in Google Analytics 4, you need to connect and set up conversion goals. It’s quite easy to do this – any event that is already tracked in your GA4 account can be assigned as a conversion in just a couple of clicks.
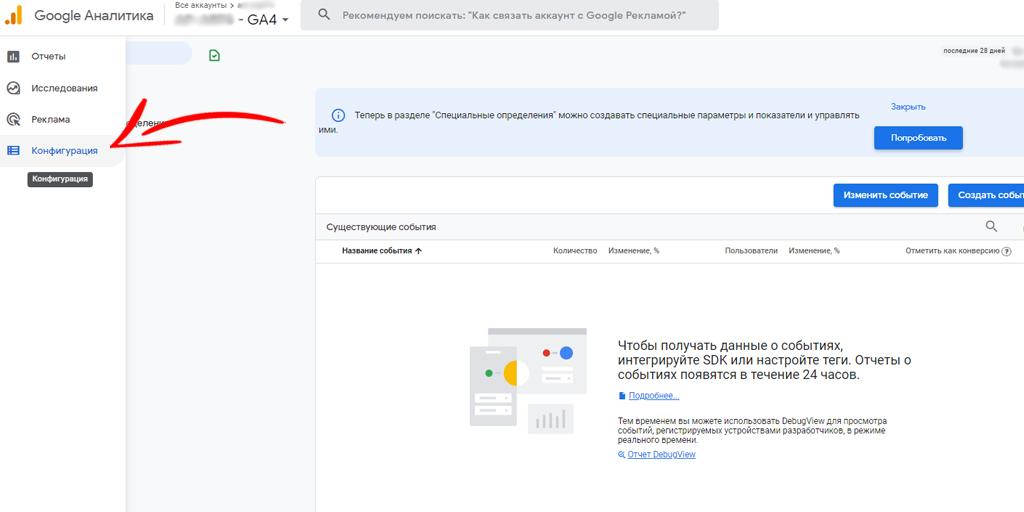
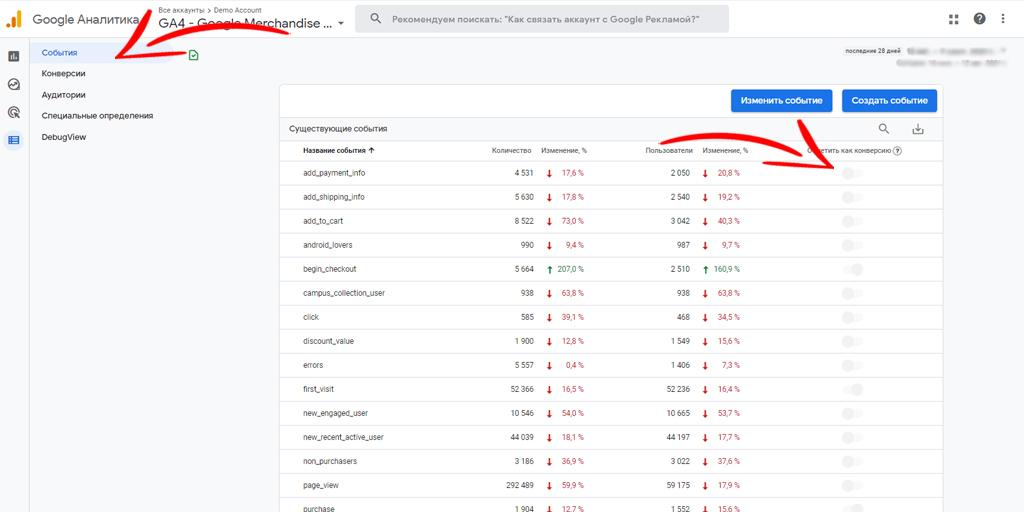
To get started, open the “Configuration” item in the vertical menu on the left side of the GA4 interface page and find the “Events” tab there. A list of actions that are already being recorded will open in front of you.
Opposite each event there is a switch with the caption “Mark as conversion”. Enable it for important events that you want to take into account when tracking.
Now go to the Conversions tab in the GA4 menu. This displays all events labeled as conversions and their key metrics – number of conversions, their value, etc.
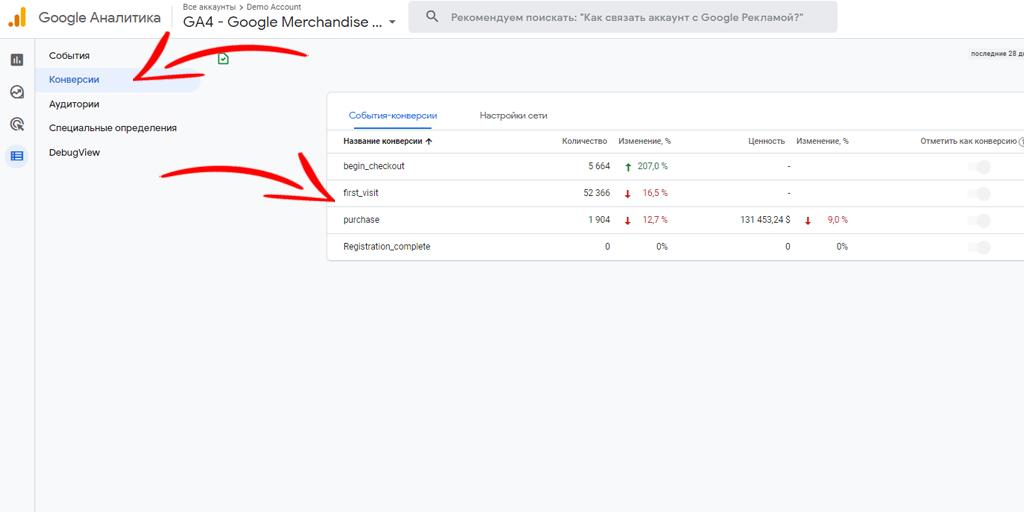
By analyzing this data, you can evaluate the effectiveness of your website or web application and find points of growth.
But GA4 allows you not only to treat existing events as conversions, but also to create new ones specifically for tracking. To do this, click the “Create a conversion event” button in the “Conversions” section:
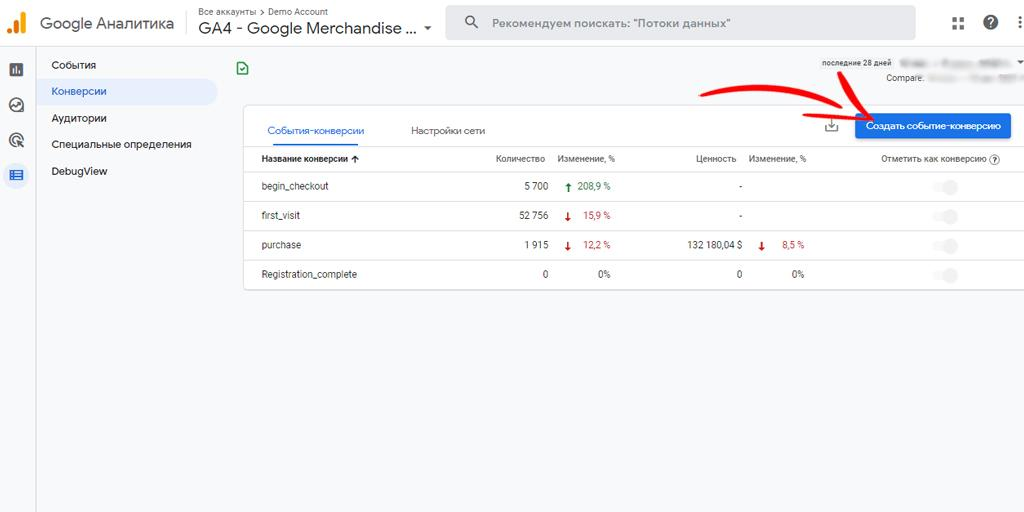
Specify a name for the goal, for example, “Registration in your personal account” or “Sending a request for demo access”. Choose concise and understandable names to make it easier for you to work with reports in the future.
After saving the conversion, you need to configure the corresponding event. Go to Configuration > Events and click Create Event:
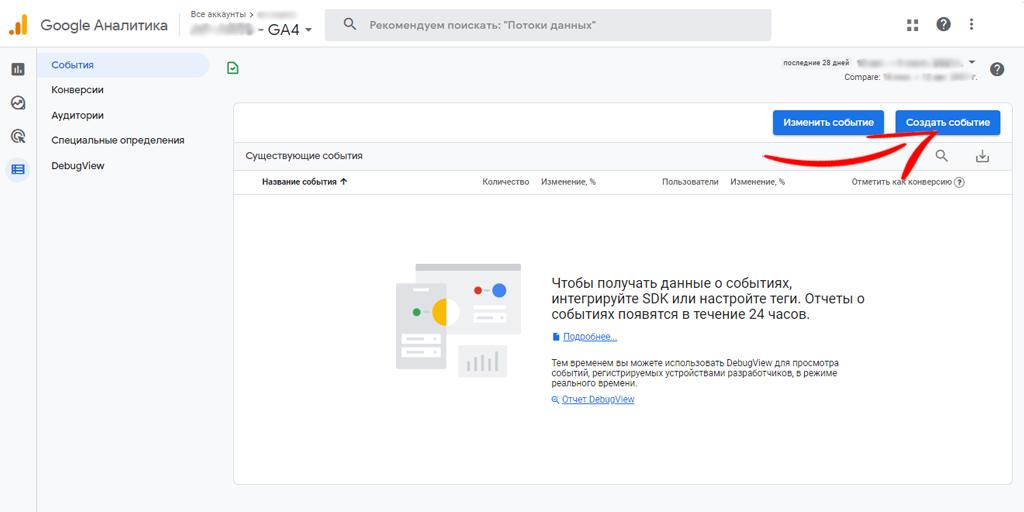
Specify the same name that you set for the conversion. Define the conditions under which the event is recorded.
Let’s assume that successful registration in the personal account on the site implies filling out a form and going to the user’s welcome page. To track such conversion, add a condition on the “page_location” parameter. For example, if you set the URL of the “Thank you” page here, GA4 will start automatically counting visits to this page as a targeted action:
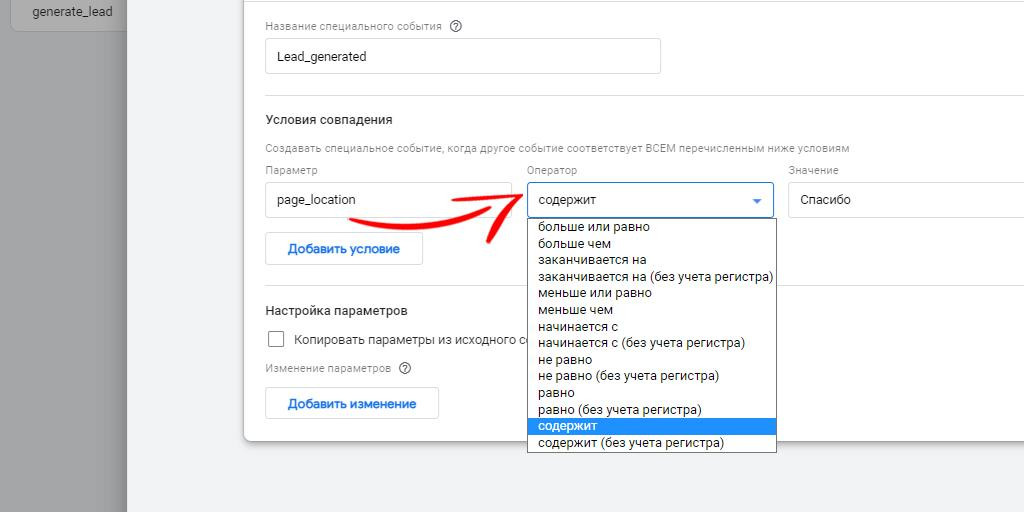
Similarly, you can set conversion events for file downloads, adding items to cart, clicking a button, and any other targeted actions. By combining different conditions by events, parameters and values, you can collect detailed statistics on visitor behavior at all stages of the sales funnel.
Don’t forget to look in the “Reports” > “Conversions” section when you finish customization to check how the selected settings are working. Keep an eye on the dynamics of the indicators – both in general and by individual traffic sources, devices, and countries.


