One of the best ways to get more customers to your website is to use Google Shopping for online stores on Shopify. Shopping ads were introduced by the world’s largest search engine several years ago.
Over the years, this advertising tool has significantly increased the profitability of online stores and proved to be highly effective. In this article, we will provide step-by-step instructions on how to set up Google Shopping on Shopify, as well as talk about all the benefits of such integration.
Benefits of connecting Google Shopping to Shopify
Google Shopping for Shopify is an additional advertising channel that allows you to significantly increase sales. In addition, the tool provides the following benefits:
- Target visitors. Regardless of how well set up your ad campaign is in AdWords and other systems, product ads can help you get an additional flow of interested leads for your online store. Traffic from Google Shopping is targeted, since the queries that the user enters in the search box contain the name of the product, which significantly increases the likelihood of making a purchase after going to the advertiser’s website.
- Great traffic potential. Product ads appear at the very top of search results. In one of their studies, the search engine found that most online stores report a doubling of click-through rate (CTR) after connecting to Google Shopping.
- High ROI. In most topics, advertising on Google shopping is cheaper, because the user immediately sees the image of the product and the price right in the ad. Because the CTR is high here. And the higher the click-through rate, the cheaper each click is.
- Easy to set up. Compared to standard contextual advertising, for Google Shopping on Shopify, you will not need to select keywords and come up with ad texts. Shopify provides dedicated apps to connect to Google Shopping to help you quickly create a feed and place product ads. At the same time, product information is updated automatically without the participation of the advertiser.
Requirements for a store to run Shopify Product Ads
To connect an online store powered by Shopify to Google Shopping, it must meet certain requirements set by Google. Let’s take a look at them below.
- Having a Merchant Center account. This is a free service that allows you to create and manage a product feed, as well as transfer information about all products added to your online store to Google Shopping.
- Compliance with Google’s Product Advertising Policies. For example, photos must be of high quality. In addition, products that violate copyright or intellectual property rights, contain inappropriate content, or pose a threat to the health and safety of customers are prohibited from sale.
- Having a valid SSL certificate. To protect the confidential information of customers (bank card data), the online store must have a valid SSL certificate. This is a digital certificate that encrypts the information sent between the client and the server to ensure security. To obtain a certificate, you can contact the hosting support service.
- Unique IDs. Each item must be assigned a unique identifier. This is necessary to correctly display the description and price of the goods, as well as to prevent duplicates.
How to set up Google Shopping on Shopify?
In order to connect Google Shopping to Shopify, you will need to create and link an account in the Merchant Center in the store’s admin panel. You can either do it manually or use one of the apps that make it easy to set up Google Shopping for Shopify (like Adnabu).
Step 1. Create or login to your Merchant Center account
Enter your store. Click on Applications in the toolbar. Enter AdNabu in the search bar. Add this app to your store. Verify your Shopify account and use your Gmail account to register with GMC.
Next, you need to add the name of the business and addresses of operating branches. Then fill in your email settings, checkout options, and other information requested by the system.
Step 2: Add tax information
It depends on your location. With the Adnabu app, this data is automatically copied from the Shopify store to the Merchant Center.
You can also complete everything manually in your Merchant Center account by going to Payments – Manage Settings – Tax Information. Next, edit or update the information.
Step 3. Describe the terms of delivery
Now you need to fill in the terms of delivery. The AdNabu app can copy the shipping cost from the store without the need for manual filling.
Don’t forget that the shipping cost to GMC and the website must be identical. If the price is different, the feed may be rejected.
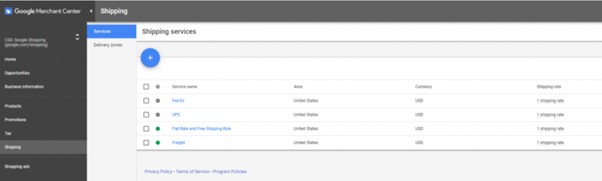
Delivery conditions can also be specified manually. To do this, go to the “Tools” section, find “Shipping and Returns” and click “Delivery Services”. Check the countries and currencies to which the goods can be shipped.
Step 4. Verification
Before you start AC, you need to check and verify your site. The AdNabu app or any other will help you do this automatically.
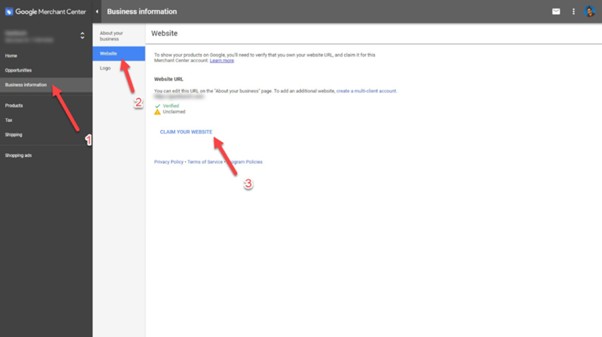
To manually check your site, sign in to your Merchant Center account and go to Settings and then Business Information. Enter the URL of the online store and click “Check and confirm”.
Step 5. Link your Google Ads and Merchant Center accounts
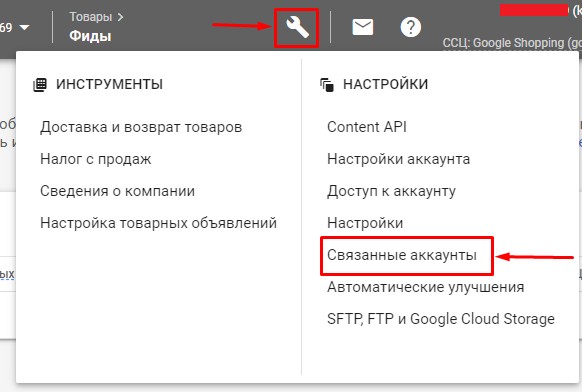
To do this, you need to go to the “Settings” section in the Merchant Center and select “Linked Accounts”. Then click “Google Ads” to pair.
You will then need to enter the Google Ads Client ID (Customer ID) of the account you wish to link. After you have entered the ID, click “Save”.
Step 6. Adding Products
The last step is to upload products from the online store to Shopify using the feed. This can be done with apps that automatically generate a data feed. For example, this feature is available in the same AdNabu extension that we discussed above.
If you prefer to download the feed manually, then you need to do the following:
- Click on “Products” in the left pane.
- Select “Feeds”.
- Click on Primary feed
- Enter the name of the feed and select the language and country that matches your target audience.
- Determine how you want to upload your products: using a file or using the API.
- Upload the feed file or provide the URL for the API.
- Click on “Fetch Now” to download your items.
Creating a Google Shopping Campaign for Shopify
Creating a Google Shopping campaign for Shopify involves several steps:
- Log in to your AdWords account and go to the Campaigns tab.
- To create a new campaign, click on the “+” button.
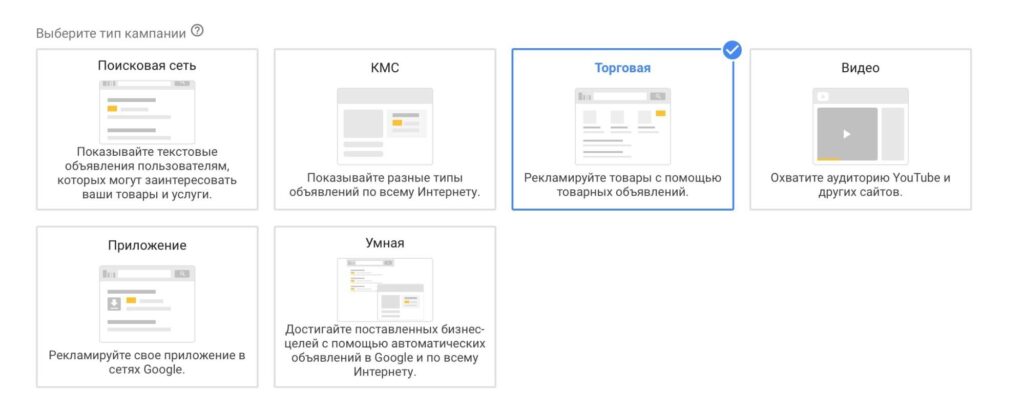
- Set the campaign type to Shopping and click Next.
- Enter the name of the campaign. Subsequently, using the name, you will be able to track the main metrics in AdWords analytics. The name can be changed later.
- Select a Merchant Center account that has a Shopify feed added to it. Remember that it cannot be changed after the creation of the AC.
- Specify the countries to which products can be delivered. Ads may be shown to customers located in these geolocations. Please note that the countries for a particular ad campaign cannot be changed after the impressions have started.
- Determine the list of products for which ads will be shown. This is necessary if you wish to limit the list of advertised products or categories. You can change the settings after creating a campaign.
- Enter the type of rate you want to use. Decide which target action of the user you will pay for Google (click, order, fill out a form, etc.).
- Set a budget. You can choose between the daily budget and the total budget for the entire period of the ad.
- Configure the locations, networks, and devices on which ads will be displayed. By default, ads will appear on Gmail, YouTube, Display Network assets, and Discover. From devices available to choose from PCs, laptops and smartphones. Use these options to limit impressions to non-targeted audience segments.
- After completing all the steps, you must click Save and Continue. At the next stage, the system will prompt you to create a new ad group and decide on a bid per click.


