
Many online store owners sooner or later think about changing their e-commerce platform. Switching to another CMS is not an easy process. It requires a balanced approach and careful preparation.
Next, we’ll take a closer look at the main things you should pay attention to before migrating your online store from BigCommerce to Shopify: how to import the product catalog and orders, how to prepare both sites for migration, and much more.
Following these simple instructions will make your transition from BigCommerce to Shopify as painless as possible, while minimizing the potential risks for your business.
Why is it better to move from the BigCommerce platform to Shopify?
Typically, among the reasons that make people move from BigCommerce to Shopify, business representatives name the following:
The ability to personalize the design
Shopify provides access to the source code of the theme and a convenient editor in the admin panel for making any changes to the design. You can change the page structure, add your own HTML code or CSS style sheets, install additional widgets and blocks.
In BigCommerce, these options are very limited – templates are closed for editing and allow you to make only minimal changes. Any significant design changes will have to be ordered from the developer.
SEO optimization
Shopify was originally created as an SEO-focused platform. It allows you to customize CNC URLs, image alt tags, meta tags, structured data in product cards, and more.
BigCommerce has more limited functionality and often requires programmer intervention in the source code for better search engine optimization. Switching to Shopify will greatly facilitate the work of the site optimizer.
Integration with payment systems
Shopify allows you to connect a huge number of payment gateways and systems, including various local solutions that are popular in your country. For BigCommerce, the choice of payment providers is much more limited.
Therefore, when entering new markets, Shopify will provide a much better choice for integrating local popular payment systems, which will significantly affect the final conversion.
Better support
Shopify’s technical support is considered one of the best e-commerce CMS on the market. Consultants respond promptly, provide useful instructions and advice.
BigCommerce support is great too, but user reviews for Shopify are a lot more complimentary. The company also releases many educational materials and webinars for platform clients.
A wide range of applications in the marketplace
The Shopify App Store has a huge variety of apps and store extensions available, from messenger integrations to marketing automation and management accounting.
The choice of add-ons for BigCommerce is much more modest. Therefore, switching to Shopify opens up more opportunities for automating business processes.
Instructions for migrating from BigCommerce to Shopify via app
Once you have decided on the decision to switch to Shopify, the next important step is to directly migrate data from one platform to another. For the smoothest and fastest transfer of information, we recommend using our instructions for migrating from BigCommerce to Shopify:
Install the Matrixify app from the Shopify App Store
To do this, go to the Applications section of your Shopify store’s admin panel. Navigate to the directory of available applications. Enter the name “Matrixify” in the search and find the desired application.
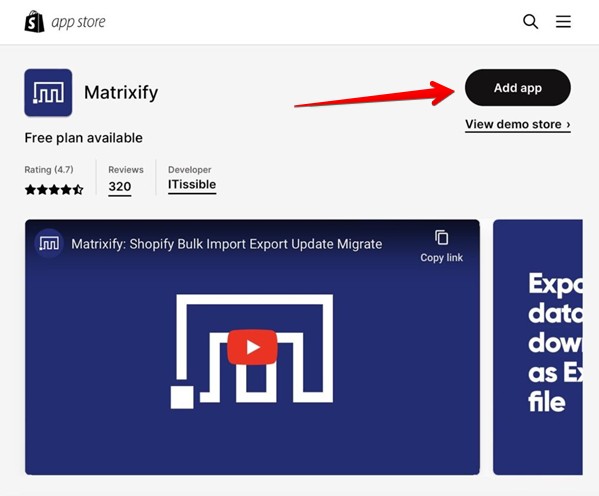
Once you’ve landed on the Matrixify page, click the Add App button to begin the installation process. Give consent to connect the application to your store. After that, Matrixify will appear in the admin panel. Also, a new item with the name of this extension will be added to the menu.
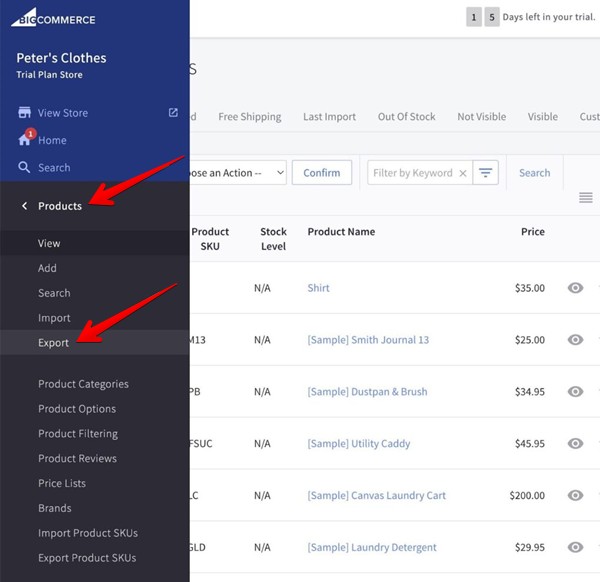
Export data from Bigcommerce
In order to prepare your current BigCommerce store data for further migration to Shopify, you need to upload it in CSV format. This will make it easy to import information to the new platform.
Before exporting your data, we recommend that you back up your BigCommerce store. This will allow you to return to the original state if there are any errors or problems during the migration process.
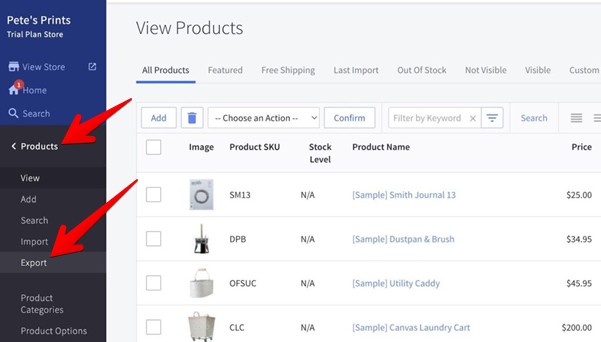
To export, go to the “Products” section in the control panel. Find the “Export” block and start the upload by clicking on the appropriate button:
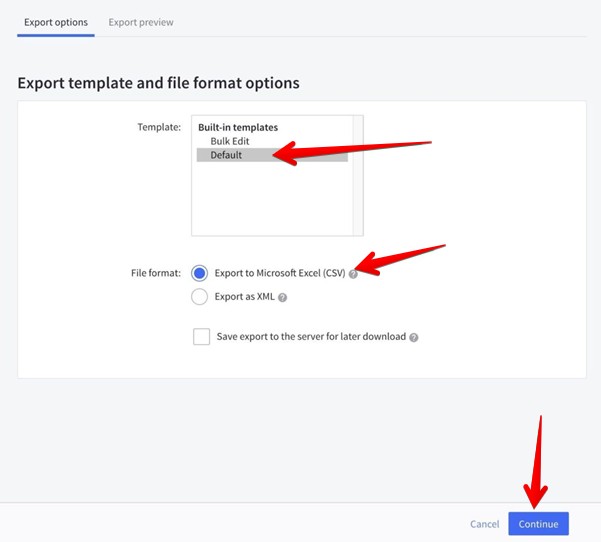
In the window that opens, select the default export template and CSV format (because XML is not suitable for loading using the Matrixify extension):
After processing the request, you will be able to download a CSV file – a table with all the data. This file can then be used in the Matrixify application to import information.
What to consider when exporting?
- Always use the CSV format. It is the most versatile and is supported by all e-commerce platforms (although Matrixify does support XLS).
- Most likely, the field names in the exported table will not match those required for uploading to Shopify. This point is best checked manually. Life hack – use an import template that can be downloaded from Shopify.
- Column order is usually not important. The main thing is that the table contains all the necessary fields. But the order of the columns can be left the same as in the source file. This is not critical when importing.
- Split data into different tables. Upload orders to a separate file, products, categories, etc. to another. This will simplify the import and prevent you from making mistakes.
- Verify the uploaded information carefully. Before importing, make sure that the CSV contains all the necessary information, especially product and order data.
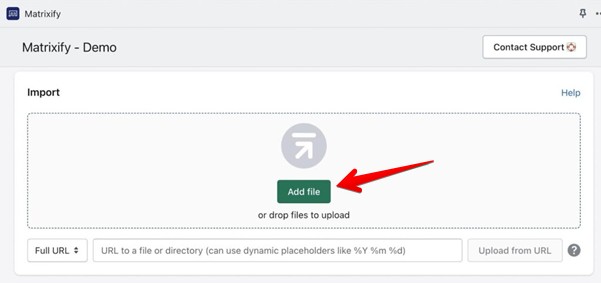
Upload CSV file to Shopify
To import data, go to the Matrixify interface through apps in your Shopify dashboard. Click the “Add File” button in the “Import” section. Select the desired CSV file on your computer and upload it (or simply drag and drop to the desired window):
The application will show a summary of the imported data – the number of fields in the table and the parameters loaded. If Matrixify encounters an error, it will display an appropriate message so that you can fix the file before importing.
After checking, press the button and start the process. For large files, the import may take some time:
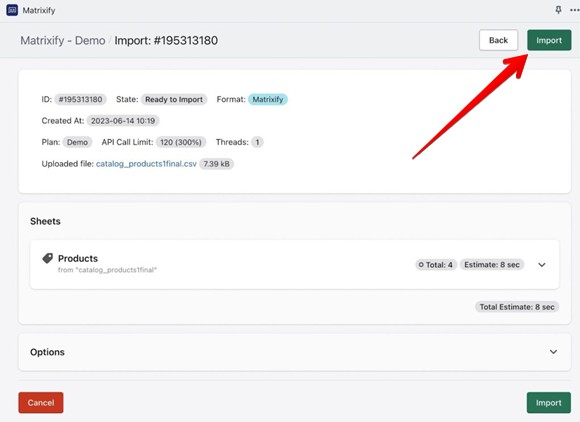
When completed, Matrixify will display a report with the results of the import and indicate any errors (if any) encountered. If a small number of errors have been generated in the process, this is not a problem, because Shopify may not support some of the data from the old site.
BigCommerce to Shopify manual migration guide
While using dedicated migration apps makes migrating from BigCommerce to Shopify a lot easier, sometimes you need to manually migrate or edit your data on the new CMS.
Next, we present a step-by-step guide to migrating from BigCommerce to Shopify. Although this method is more time consuming, it allows you not to miss anything important and carefully check the transferred data.
Upload product and category files from BigCommerce
In order to prepare product and category data for manual migration, you must first upload it from the current store. To do this, go to the “Products” section in the BigCommerce admin panel and click “Export”. Select the “CSV” format and specify the date range so that all existing items are uploaded:
After processing the request, download the resulting file. It will contain the product name, description, price, SKU, stock, images.
Similarly, upload the categories of the store – go to the “Product Categories” section and use the export. As a result, you will have two files. To check the completeness of the information and edit them if necessary, use Microsoft Excell or any other spreadsheet editor.
Use a template to import from Shopify
Download the template provided by Shopify for data import. It contains all required columns with correct headers. The example contains columns with product name, categories, tags, options and features:

Next, open the upload you downloaded from your BigCommerce account. Most likely, the names of the columns there will be different. In order for the file to be imported correctly, you need to either rename the columns in the original CSV, or copy the data into the appropriate fields of the Shopify template. The main thing is that the column names match.
Upload data in the Shopify admin panel
To import prepared information about products and categories, go to the “Products” section in the Shopify admin panel. Click on the “Import” button and select “Upload File”.
Select a pre-prepared CSV document and click Continue. The system will open part of the table for preview. At this point, make sure everything looks right, go back and edit the original fields if necessary.
Start the import by clicking on “Import Products”. Wait for the process to complete. After that, the platform will display a list of commodity items:
Popular Questions
- If your online store is small and you have basic e-commerce CMS skills, you can do the move yourself. However, with a large amount of content, complex logistics, and the use of additional applications, it is better to contact a technical specialist. This will avoid errors and downtime.
- It all depends on the size of the site. If there are no more than 100 product positions, the migration can take up to an hour. At the same time, it is important to take into account that the process can be significantly delayed due to the need to copy the design of the old online store.
- In addition to the standard export to an Excel document, it is highly desirable to download the SQL database from the server in order to be able to restore all the functionality of the engine at the right time.
- To keep your site’s position in search engines, be sure to save the old page URLs. If the functionality of the new engine does not allow this, then you need to redirect from the old URLs to the new ones.


